


In many computer vision applications, the processing power at your disposal is low. In such cases, we have to use simple, yet effective techniques.
In this post, we will cover one such technique for estimating the background of a scene when the camera is static and there are some moving objects in the scene. This scenario is not uncommon. For example, many traffic and surveillance cameras are rigidly fixed.
Temporal Median Filtering
To understand the idea we are going to describe in this post, let us consider a simpler problem in 1D.
Suppose we are estimating a quantity (say the temperature of the room) every 10 milliseconds.
Let’s say, the temperature of the room is 70 degrees Fahrenheit.
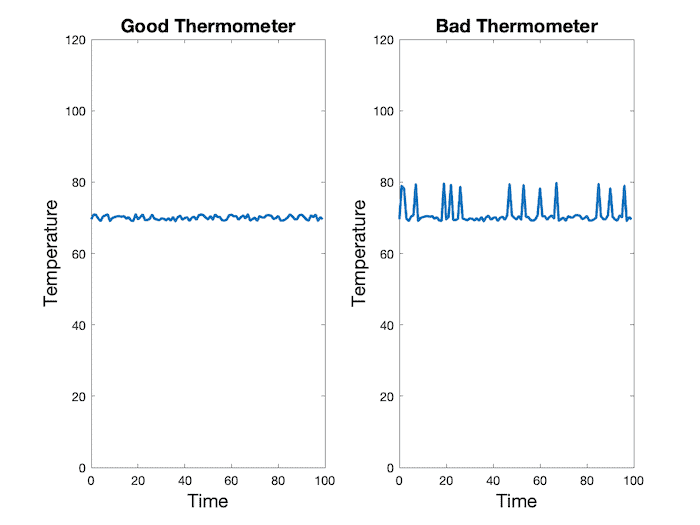
In the above figure, we have shown measurements from two thermometers — a good thermometer and a bad thermometer.
The good thermometer shown on the left reports 70 degrees with some level of Gaussian noise. To get a more accurate estimate of temperature, we can simply average the values over a few seconds. Since the noise is Gaussian with positive and negative values, the average will cancel out the noise. Indeed, the average value in this specific case is 70.01.
The bad thermometer, on the other hand, behaves like the good thermometer most of the time but occasionally, the numbers are completely wrong.
In fact, if we take an average of the numbers reported by the bad thermometer we get 71.07 degrees. This is clearly an overestimate.
Can we still get a good estimate of temperature?
The answer is YES. When the data contains outliers, the median is a more robust estimate of the value we are trying to estimate.
The median is the mid-value of the data when it is sorted in ascending or descending order.
The median of the curve shown above is 70.05 degrees which is a much better estimate than 71.07 degrees.
The only downside is that the median is more expensive to calculate compared to the mean/average.


Using the Median for Background Estimation
Now, let’s return to the problem of estimating the background when the camera is static.
We can assume most of the time, every pixel sees the same piece of the background because the camera is not moving. Occasionally, a car or other moving object comes in the front and obscure the background.
For a video sequence, we can randomly sample a few frames (say 25 frames).
In other words, for every pixel, we now have 25 estimates of the background. As long as a pixel is not covered by a car or other moving object more than 50% of the time, the median of the pixel over these 25 frames will give a good estimate of the background at that pixel.
We can repeat this for every pixel and recover the entire background.
Background Estimation Code (C++ / Python)
Now, let’s look at the actual code.

Python code
import numpy as np
import cv2
from skimage import data, filters

# Open Video
cap = cv2.VideoCapture('video.mp4')

# Randomly select 25 frames
frameIds = cap.get(cv2.CAP_PROP_FRAME_COUNT) * np.random.uniform(size=25)

# Store selected frames in an array
frames = []
for fid in frameIds:
    cap.set(cv2.CAP_PROP_POS_FRAMES, fid)
    ret, frame = cap.read()
    frames.append(frame)

# Calculate the median along the time axis
medianFrame = np.median(frames, axis=0).astype(dtype=np.uint8)

# Display median frame
cv2.imshow('frame', medianFrame)
cv2.waitKey(0)
C++ code
#include <opencv2/opencv.hpp>
#include <iostream>
#include <random>

using namespace std;
using namespace cv;
We will create a couple of functions to calculate the median frame.
int computeMedian(vector<int> elements)
{
  nth_element(elements.begin(), elements.begin()+elements.size()/2, elements.end());

  //sort(elements.begin(),elements.end());
  return elements[elements.size()/2];
}

cv::Mat compute_median(std::vector<cv::Mat> vec)
{
  // Note: Expects the image to be CV_8UC3
  cv::Mat medianImg(vec[0].rows, vec[0].cols, CV_8UC3, cv::Scalar(0, 0, 0));

  for(int row=0; row<vec[0].rows; row++)
  {
    for(int col=0; col<vec[0].cols; col++)
    {
      std::vector<int> elements_B;
      std::vector<int> elements_G;
      std::vector<int> elements_R;

      for(int imgNumber=0; imgNumber<vec.size(); imgNumber++)
      {
        int B = vec[imgNumber].at<cv::Vec3b>(row, col)[0];
        int G = vec[imgNumber].at<cv::Vec3b>(row, col)[1];
        int R = vec[imgNumber].at<cv::Vec3b>(row, col)[2];

        elements_B.push_back(B);
        elements_G.push_back(G);
        elements_R.push_back(R);
      }

      medianImg.at<cv::Vec3b>(row, col)[0]= computeMedian(elements_B);
      medianImg.at<cv::Vec3b>(row, col)[1]= computeMedian(elements_G);
      medianImg.at<cv::Vec3b>(row, col)[2]= computeMedian(elements_R);
    }
  }
  return medianImg;
}
int main(int argc, char const *argv[])
{
  std::string video_file;
  // Read video file
  if(argc > 1)
  {
    video_file = argv[1];
  } else
  {
    video_file = "video.mp4";
  }

  VideoCapture cap(video_file);
  if(!cap.isOpened())
    cerr << "Error opening video file\n";

  // Randomly select 25 frames
  default_random_engine generator;
  uniform_int_distribution<int>distribution(0,
  cap.get(CAP_PROP_FRAME_COUNT));

  vector<Mat> frames;
  Mat frame;

  for(int i=0; i<25; i++)
  {
    int fid = distribution(generator);
    cap.set(CAP_PROP_POS_FRAMES, fid);
    Mat frame;
    cap >> frame;
    if(frame.empty())
      continue;
    frames.push_back(frame);
  }
  // Calculate the median along the time axis
  Mat medianFrame = compute_median(frames);

  // Display median frame
  imshow("frame", medianFrame);
  waitKey(0);
}
As you can see, we randomly select 25 frames and calculate the median of every pixel over the 25 frames. This median frame is a good estimate of the background as long as every pixel sees the background at least 50% of the time.
The result is shown below
Frame differencing (C++ / Python)
The obvious next question is if we can create a mask for every frame which shows parts of the image that are in motion.
This is accomplished in the following steps
- Convert the median frame to grayscale.
- Loop over all frames in the video. Extract the current frame and convert it to grayscale.
- Calcualte the absolute difference between the current frame and the median frame.
- Threshold the above image to remove noise and binarize the output.
Let’s check out the code.
Python code
# Reset frame number to 0
cap.set(cv2.CAP_PROP_POS_FRAMES, 0)

# Convert background to grayscale
grayMedianFrame = cv2.cvtColor(medianFrame, cv2.COLOR_BGR2GRAY)

# Loop over all frames
ret = True
while(ret):

  # Read frame
  ret, frame = cap.read()
  # Convert current frame to grayscale
  frame = cv2.cvtColor(frame, cv2.COLOR_BGR2GRAY)
  # Calculate absolute difference of current frame and
  # the median frame
  dframe = cv2.absdiff(frame, grayMedianFrame)
  # Treshold to binarize
  th, dframe = cv2.threshold(dframe, 30, 255, cv2.THRESH_BINARY)
  # Display image
  cv2.imshow('frame', dframe)
  cv2.waitKey(20)

# Release video object
cap.release()

# Destroy all windows
cv2.destroyAllWindows()
C++ code
//  Reset frame number to 0
cap.set(CAP_PROP_POS_FRAMES, 0);

// Convert background to grayscale
Mat grayMedianFrame;
cvtColor(medianFrame, grayMedianFrame, COLOR_BGR2GRAY);

// Loop over all frames
while(1)
{
  // Read frame
  cap >> frame;

  if (frame.empty())
    break;

  // Convert current frame to grayscale
  cvtColor(frame, frame, COLOR_BGR2GRAY);

  // Calculate absolute difference of current frame and the median frame
  Mat dframe;
  absdiff(frame, grayMedianFrame, dframe);

  // Threshold to binarize
  threshold(dframe, dframe, 30, 255, THRESH_BINARY);

  // Display Image
  imshow("frame", dframe);
  waitKey(20);
}

  cap.release();
  return 0;
}
Results
The video below shows the output of background estimation and frame differencing.


100K+ Learners
Join Free OpenCV Bootcamp3 Hours of Learning