


Come, see for yourself, how Cropping an Image using OpenCV works. First, why do we need to crop? Cropping is done to remove all unwanted objects or areas from an image. Or even to highlight a particular feature of an image.
There is no specific function for cropping using OpenCV, NumPy array slicing is what does the job. Every image that is read in, gets stored in a 2D array (for each color channel). Simply specify the height and width (in pixels) of the area to be cropped. And it’s done!
The following code snippets show how to crop an image using both, Python and C++. Further in the post, you will get to learn about these in detail.
Python
# Import packages
import cv2
import numpy as np

img = cv2.imread('test.jpg')
print(img.shape) # Print image shape
cv2.imshow("original", img)

# Cropping an image
cropped_image = img[80:280, 150:330]

# Display cropped image
cv2.imshow("cropped", cropped_image)

# Save the cropped image
cv2.imwrite("Cropped Image.jpg", cropped_image)

cv2.waitKey(0)
cv2.destroyAllWindows()
C++
// Include Libraries
#include<opencv2/opencv.hpp>
#include<iostream>

// Namespace nullifies the use of cv::function();
using namespace std;
using namespace cv;

int main()
{
 // Read image
 Mat img = imread("test.jpg");
 cout << "Width : " << img.size().width << endl;
 cout << "Height: " << img.size().height << endl;
 cout<<"Channels: :"<< img.channels() << endl;
 // Crop image
 Mat cropped_image = img(Range(80,280), Range(150,330));

 //display image
 imshow(" Original Image", img);
 imshow("Cropped Image", cropped_image);

 //Save the cropped Image
 imwrite("Cropped Image.jpg", cropped_image);

 // 0 means loop infinitely
 waitKey(0);
 destroyAllWindows();
 return 0;
}


Python
# Importing the cv2 library
import cv2

C++
#include<opencv2/opencv.hpp>
#include<iostream>

// Namespace nullifies the use of cv::function();
using namespace std;
using namespace cv;
The above code imports the OpenCV library in Python and C++ respectively.
Cropping Using OpenCV

Python:
img=cv2.imread('test.png')

# Prints Dimensions of the image
print(img.shape)

# Display the image
cv2.imshow("original", img)
cv2.waitKey(0)
cv2.destroyAllWindows()
C++
Mat img = imread("test.jpg");

//Print the height and width of the image
cout << "Width : " << img.size().width << endl;
cout << "Height: " << img.size().height << endl;
cout << "Channels: " << img.channels() << endl;

// Display image
imshow("Image", img);
waitKey(0);
destroyAllWindows();
The above code reads and displays an image and its dimensions. The dimensions include not just the width and height of the 2-D matrix, but the number of channels as well (for example, an RGB image has 3 channels – Red, Green and Blue).
Let’s try to crop the part of the image that contains the flower.
Python
cropped_image = img[80:280, 150:330] # Slicing to crop the image

# Display the cropped image
cv2.imshow("cropped", cropped_image)
cv2.waitKey(0)
cv2.destroyAllWindows()
C++
Mat crop = img(Range(80,280),Range(150,330)); // Slicing to crop the image

// Display the cropped image
imshow("Cropped Image", crop);

waitKey(0);
destroyAllWindows();
return 0;

In Python, you crop the image using the same method as NumPy array slicing. To slice an array, you need to specify the start and end index of the first as well as the second dimension.
- The first dimension is always the number of rows or the height of the image.
- The second dimension is the number of columns or the width of the image.
It goes with the convention that the first dimension of a 2D array represents the rows of the array (where each row represents the y-coordinate of the image). How to slice a NumPy array? Check out the syntax in this example:
cropped = img[start_row:end_row, start_col:end_col]
In C++, we use the Range() function to crop the image.
- Like Python, it also applies slicing.
- Here too, the image is read in as a 2D matrix, following the same convention described above.
The following is the C++ syntax to crop an image:
img(Range(start_row, end_row), Range(start_col, end_col))
Dividing an Image Into Small Patches Using Cropping
One practical application of cropping in OpenCV can be to divide an image into smaller patches. Use loops to crop out a fragment from the image. Start by getting the height and width of the required patch from the shape of the image.
Python
img =  cv2.imread("test_cropped.jpg")
image_copy = img.copy()
imgheight=img.shape[0]
imgwidth=img.shape[1]
C++
Mat img = imread("test_cropped.jpg");
Mat image_copy = img.clone();
int imgheight = img.rows;
int imgwidth = img.cols;
Load the height and width to specify the range till which the smaller patches need to be cropped out. For this, use the range() function in Python. Now, crop using two for loops:
- one for the width range
- other for the height range
We are using patches with a height and width of 76 pixels and 104 pixels respectively. The stride (number of pixels we move through the image) for the inner and outer loops is equal to the width and height of the patches that we are considering.
Python
M = 76
N = 104
x1 = 0
y1 = 0

for y in range(0, imgheight, M):
    for x in range(0, imgwidth, N):
        if (imgheight - y) < M or (imgwidth - x) < N:
            break

        y1 = y + M
        x1 = x + N

        # check whether the patch width or height exceeds the image width or height
        if x1 >= imgwidth and y1 >= imgheight:
            x1 = imgwidth - 1
            y1 = imgheight - 1
            #Crop into patches of size MxN
            tiles = image_copy[y:y+M, x:x+N]
            #Save each patch into file directory
            cv2.imwrite('saved_patches/'+'tile'+str(x)+'_'+str(y)+'.jpg', tiles)
            cv2.rectangle(img, (x, y), (x1, y1), (0, 255, 0), 1)
        elif y1 >= imgheight: # when patch height exceeds the image height
            y1 = imgheight - 1
            #Crop into patches of size MxN
            tiles = image_copy[y:y+M, x:x+N]
            #Save each patch into file directory
            cv2.imwrite('saved_patches/'+'tile'+str(x)+'_'+str(y)+'.jpg', tiles)
            cv2.rectangle(img, (x, y), (x1, y1), (0, 255, 0), 1)
        elif x1 >= imgwidth: # when patch width exceeds the image width
            x1 = imgwidth - 1
            #Crop into patches of size MxN
            tiles = image_copy[y:y+M, x:x+N]
            #Save each patch into file directory
            cv2.imwrite('saved_patches/'+'tile'+str(x)+'_'+str(y)+'.jpg', tiles)
            cv2.rectangle(img, (x, y), (x1, y1), (0, 255, 0), 1)
        else:
            #Crop into patches of size MxN
            tiles = image_copy[y:y+M, x:x+N]
            #Save each patch into file directory
            cv2.imwrite('saved_patches/'+'tile'+str(x)+'_'+str(y)+'.jpg', tiles)
            cv2.rectangle(img, (x, y), (x1, y1), (0, 255, 0), 1)
C++
    int M = 76;
    int N = 104;

    int x1 = 0;
    int y1 = 0;
    for (int y = 0; y<imgheight; y=y+M)
    {
        for (int x = 0; x<imgwidth; x=x+N)
        {
            if ((imgheight - y) < M || (imgwidth - x) < N)
            {
                break;
            }
            y1 = y + M;
            x1 = x + N;
            string a = to_string(x);
            string b = to_string(y);

            if (x1 >= imgwidth && y1 >= imgheight)
            {
                x = imgwidth - 1;
                y = imgheight - 1;
                x1 = imgwidth - 1;
                y1 = imgheight - 1;

                // crop the patches of size MxN
                Mat tiles = image_copy(Range(y, imgheight), Range(x, imgwidth));
                //save each patches into file directory
                imwrite("saved_patches/tile" + a + '_' + b + ".jpg", tiles);
                rectangle(img, Point(x,y), Point(x1,y1), Scalar(0,255,0), 1);
            }
            else if (y1 >= imgheight)
            {
                y = imgheight - 1;
                y1 = imgheight - 1;

                // crop the patches of size MxN
                Mat tiles = image_copy(Range(y, imgheight), Range(x, x+N));
                //save each patches into file directory
                imwrite("saved_patches/tile" + a + '_' + b + ".jpg", tiles);
                rectangle(img, Point(x,y), Point(x1,y1), Scalar(0,255,0), 1);
            }
            else if (x1 >= imgwidth)
            {
                x = imgwidth - 1;
                x1 = imgwidth - 1;

                // crop the patches of size MxN
                Mat tiles = image_copy(Range(y, y+M), Range(x, imgwidth));
                //save each patches into file directory
                imwrite("saved_patches/tile" + a + '_' + b + ".jpg", tiles);
                rectangle(img, Point(x,y), Point(x1,y1), Scalar(0,255,0), 1);
            }
            else
            {
                // crop the patches of size MxN
                Mat tiles = image_copy(Range(y, y+M), Range(x, x+N));
                //save each patches into file directory
                imwrite("saved_patches/tile" + a + '_' + b + ".jpg", tiles);
                rectangle(img, Point(x,y), Point(x1,y1), Scalar(0,255,0), 1);
            }
        }
    }
Next, display the image patches, using the imshow() function. Save it to the file directory, using the imwrite() function.
Python
#Save full image into file directory
cv2.imshow("Patched Image",img)
cv2.imwrite("patched.jpg",img)

cv2.waitKey()
cv2.destroyAllWindows()
C++
    imshow("Patched Image", img);
    imwrite("patched.jpg",img);
    waitKey();
    destroyAllWindows();
The below GIF demonstrates the process of executing the code for dividing the image into patches:
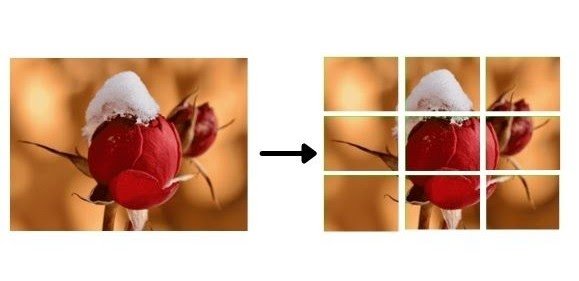
The final image with the rectangular patches overlayed on it will look something like this:
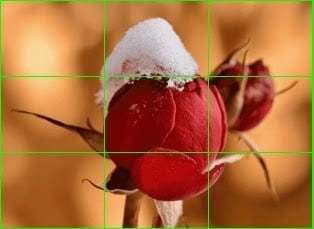
The following image shows the separate image patches that are saved to the disk.
Some Interesting Applications using Cropping
- You can use cropping to extract a region of interest from an image and discard the other parts you do not need to use.
- You can extract patches from an image to train a patch-based neural network.
Interesting Streamlit Web Application
Crop Application using Streamlit:
- Use the app to upload any image from your file directory that needs to be cropped.
- Then crop the image by specifying its dimensions.
You can try out the Streamlit web app here.
Summary
In this blog, we discussed the basic syntax of cropping images in C++ and Python. The cropping operation is carried out using slicing, i.e., we specify the height and width or the region to be cropped as dimensions of the image matrix. The resultant image can therefore be saved in a new matrix or by updating the existing matrix. This matrix can then be displayed as an image using the OpenCV imshow() function or can be written as a file to disk using the OpenCV imwrite() function. We also discussed how to divide an image into smaller patches and some applications around it.
You can find all the codes discussed above at this link → Colab Notebook.
100K+ Learners
Join Free OpenCV Bootcamp3 Hours of Learning