


Annotating images and videos serves more than one purpose, and OpenCV makes the process straightforward and easy. See how you can use it:
- Adding information to your demos
- Drawing bounding boxes around objects in case of object detection
- Highlighting pixels with different colors for image segmentation
Once you learn to annotate images, annotating video frames will seem just as easy. That’s because each frame in a video is represented as an image. We will demonstrate here how to annotate images with geometric shapes and text.
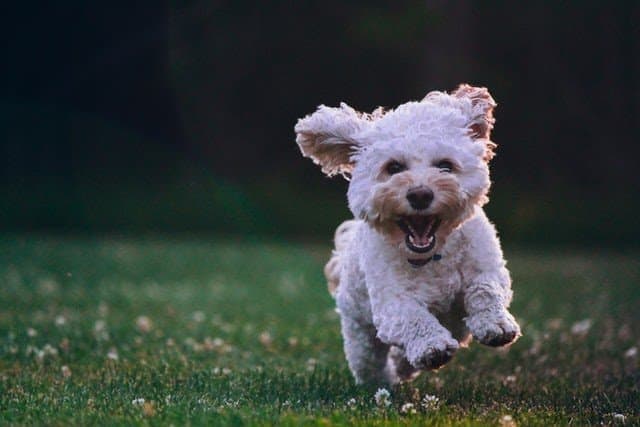
This is the image we will be using in all the example here.
- Annotate an Image With a Color Line
- Draw a Circle Over an Image
- Overlay an Image With a Filled Circle
- Annotate Images with Rectangles
- Draw Ellipses on Images
- Overlay Images With Outlined and Filled Up Half-Ellipses
- Annotate Images With Text Using Different Font Faces and Styles
First, take a quick look at this code to annotate an image. Each line in the code will be discussed in detail so that you understand it fully.
Python:
# Import dependencies
import cv2
# Read Images
img = cv2.imread('sample.jpg')
# Display Image
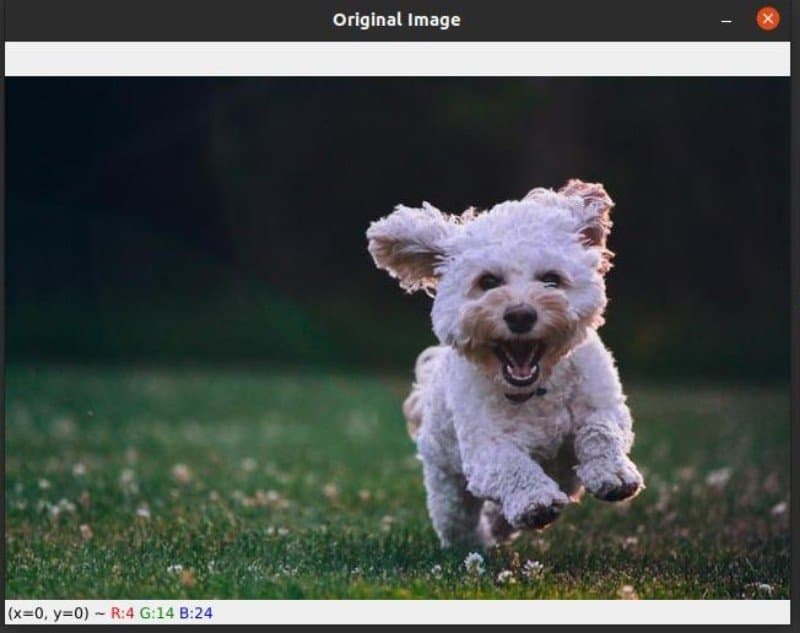
cv2.imshow('Original Image',img)
cv2.waitKey(0)
# Print error message if image is null
if img is None:
print('Could not read image')
# Draw line on image
imageLine = img.copy()
Draw the image from point A to B
pointA = (200,80)
pointB = (450,80)
cv2.line(imageLine, pointA, pointB, (255, 255, 0), thickness=3, lineType=cv2.LINE_AA)
cv2.imshow('Image Line', imageLine)
cv2.waitKey(0)
C++:
// Import dependencies
#include <opencv2/opencv.hpp>
#include <iostream>
// Using namespaces to nullify use of c::function(); syntax and std::function(); syntax
using namespace std;
using namespace cv;
int main()
{
    // Read Images
    Mat img = imread("sample.jpg");
    // Display Image
    imshow("Original Image", img);
    waitKey();
    // Print Error message if image is null
    if (img.empty())
        {
            cout << "Could not read image" << endl;
        }
    // Draw line on image
    Mat imageLine = img.clone();
    Point pointA(200,80);
    Point pointB(450,80);
    line(imageLine, pointA, pointB, Scalar(255, 255, 0), 3, 8, 0);
    imshow("Lined Image", imageLine);
    waitKey();
}


Start by importing OpenCV, as shown below.
Note: For C++, you normally use cv::function(). Because we chose to use cv namespace (using namespace cv), you can access the OpenCV functions directly. No need to prepend cv:: to the function name.
Python:
# Import dependencies
import cv2

C++:
// Import dependencies
#include <opencv2/opencv.hpp>
#include <iostream>
// Using namespaces to nullify use of c::function(); syntax and std::function(); syntax
using namespace std;
using namespace cv;
In the code below, we use imread() to read in the image and imshow() to display it. The C++ code requires some additional steps. We create the main function and define a matrix for the image, prior to using the imread() function to read the image.
To display the image, use the imshow() function.
Python:
# Read the image
img = cv2.imread('sample.jpg')
#Display the input image
cv2.imshow('Original Image',img)
cv2.waitKey(0)
C++:
int main()
{
   // Read Image
   Mat img = imread("sample.jpg");
   // Display the Image
   imshow("Original Image", img);
   waitKey();
   // Print Error message if image is null
   if (img.empty())
       {
           cout << "Could not read image" << endl;
       }
Next, we describe how to annotate images, using the various drawing functions in OpenCV. Each function comes with several optional arguments. To know them in detail, please refer to the OpenCV documentation pages.
Draw a Line
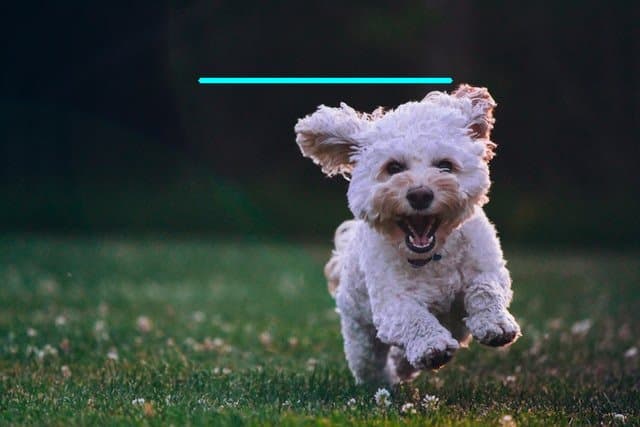
In this first example, let’s annotate the image with a color line, using the line() function in OpenCV. Before calling the line() function, create a copy of the original image by using:
- the
copy()function in Python - the
clone()function in C++
A copy will ensure that any changes you make to the image will not affect the original image. In C++, you first create a matrix for the copy of the original image.
Here’s the syntax for the line() function:
line(image, start_point, end_point, color, thickness)
- The first argument is the image.
- The next two arguments are the starting point and ending point for the line.
Draw a line from point A(x1, y1) to point B(x2, y2), where A and B represent any two points in the image. Look at the top left corner of the image, you’ll find there the origin of the xy coordinate system.
- The x-axis represents the horizontal direction or the columns of the image.
- The y-axis represents the vertical direction or the rows of the image.
As shown in the code below:
- Specify the start and end points, to draw a line that is 250-pixels long, horizontally on the image.
- Specify its color to be a mixture of blue and green, and its thickness is specified as 3.
To study other optional arguments, do visit the OpenCV documentation page here.
Python:
#Make copy of the image
imageLine = img.copy()
# Draw the image from point A to B
pointA = (200,80)
pointB = (450,80)
cv2.line(imageLine, pointA, pointB, (255, 255, 0), thickness=3))
cv2.imshow('Image Line', imageLine)
cv2.waitKey(0)
C++:
// Make copy of the image
   Mat imageLine = img.clone();
   // Draw the image from point A to B
   Point pointA(200,80);
   Point pointB(450,80);
   line(imageLine, PointA, PointB, Scalar(255, 255, 0), 3, 8, 0);
   imshow("Lined Image", line_image);
   waitKey();
Check out the results in the image below.
Draw a Circle
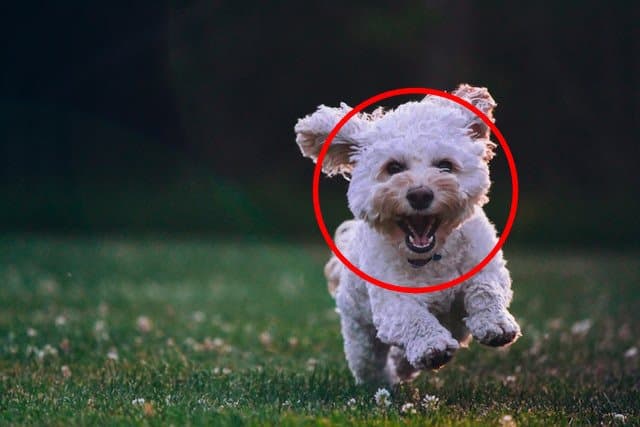
Next, let’s annotate the image with a circle, using the circle() function in OpenCV. Have a look at its syntax:
circle(image, center_coordinates, radius, color, thickness)
- As with all drawing functions in OpenCV, the first argument is the image.
- The next two arguments define the coordinates for the center of the circle and its radius.
- The last two arguments specify the color and thickness of the line.
In this example, you annotate the image, with a red circle around the dog’s face. Then use the imshow() function to display the annotated image.
Python:
# Make a copy of image
imageCircle = img.copy()
# define the center of circle
circle_center = (415,190)
# define the radius of the circle
radius =100
#  Draw a circle using the circle() Function
cv2.circle(imageCircle, circle_center, radius, (0, 0, 255), thickness=3, lineType=cv2.LINE_AA)
# Display the result
cv2.imshow("Image Circle",imageCircle)
cv2.waitKey(0)
C++:
// Make a copy of image
   Mat circle_image = img.clone();
   // define the center of circle
   Point circle_center(415,190);
   // define the radius of circle
   int radius = 100;
   // Draw a circle using the circle() Function
   circle(circle_image, circle_center, radius, Scalar(0, 0, 255), 3, 8, 0);
   // Display the result
   imshow("Circle on Image", circle_image);
   waitKey();
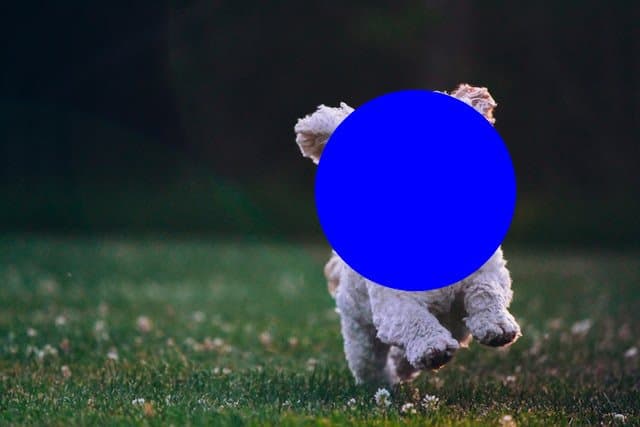
Draw a Filled Circle
You just finished annotating the image with a red circle. What if you want to fill this circle now with a solid color? That’s easy. Just change the thickness argument to -1, as shown in the code below.
Python:
# make a copy of the original image
imageFilledCircle = img.copy()
# define center of the circle
circle_center = (415,190)
# define the radius of the circle
radius =100
# draw the filled circle on input image
cv2.circle(imageFilledCircle, circle_center, radius, (255, 0, 0), thickness=-1, lineType=cv2.LINE_AA)
# display the output image
cv2.imshow('Image with Filled Circle',imageFilledCircle)
cv2.waitKey(0)
C++:
// make a copy of the original image
   Mat Filled_circle_image = img.clone();
   // define the center of circle
   Point circle_center(415,190);
   // define the radius of the circle
   int radius = 100;
   //Draw a Filled Circle using the circle() Function
   circle(Filled_circle_image, circle_center, radius, Scalar(255, 0, 0), -1, 8, 0);
   // display the output image
   imshow("Circle on Image", circle_image);
   waitKey();
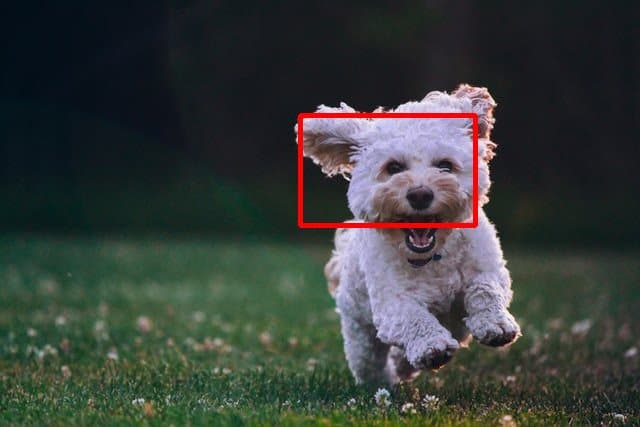
Draw a Rectangle
Now, you’ll draw a rectangle on the image, using the rectangle() function in OpenCV. Check out its syntax:
rectangle(image, start_point, end_point, color, thickness)
In the rectangle() function, you provide the starting point (top left) and ending point (bottom right) for the corners of the rectangle.
Go through this example code now and annotate the image, with a red rectangle, on the face of the puppy.
Python:
# make a copy of the original image
imageRectangle = img.copy()
# define the starting and end points of the rectangle
start_point =(300,115)
end_point =(475,225)
# draw the rectangle
cv2.rectangle(imageRectangle, start_point, end_point, (0, 0, 255), thickness= 3, lineType=cv2.LINE_8)
# display the output
cv2.imshow('imageRectangle', imageRectangle)
cv2.waitKey(0)
C++:
// make a copy of the original image
   Mat rect_image = image.clone();
   // Define the starting and end points for the rectangle
   Point start_point(300,115);
   Point end_point(475,225);
   // Draw a rectangle using the rectangle() function
   rectangle(rect_image, start_point, end_point, Scalar(0,0,255), 3, 8, 0);
   imshow("Rectangle on Image", rect_image);
   waitKey();
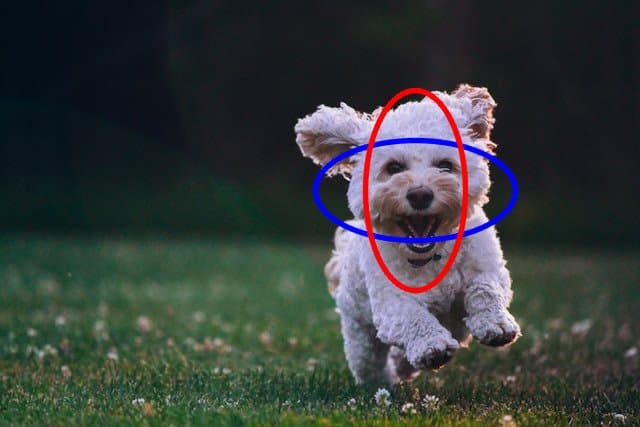
Draw an Ellipse
You can also draw an ellipse on the image, using the ellipse() function in OpenCV. The syntax for the ellipse() function is quite similar to that for the circle. Except, instead of a radius, you need to specify the:
- major and minor axis lengths of the ellipse
- rotation angle
- starting and ending angle of the ellipse
- These angles let us draw just a portion of the arc
ellipse(image, centerCoordinates, axesLength, angle, startAngle, endAngle, color, thickness)
In the example code below, you annotate the image with:
- horizontal blue ellipse
- vertical red ellipse
As you can see again, the drawing functions in OpenCV are so similar and therefore so easy to master. Also, they provide optional arguments such that you can freely define the location and orientation of many basic geometric shapes.
Python:
# make a copy of the original image
imageEllipse = img.copy()
# define the center point of ellipse
ellipse_center = (415,190)
# define the major and minor axes of the ellipse
axis1 = (100,50)
axis2 = (125,50)
# draw the ellipse
#Horizontal
cv2.ellipse(imageEllipse, center, axis1, 0, 0, 360, (255, 0, 0), thickness=3)
#Vertical
cv2.ellipse(imageEllipse, center, axis2, 90, 0, 360, (0, 0, 255), thickness=3)
# display the output
cv2.imshow('ellipse Image',imageEllipse)
cv2.waitKey(0)
C++:
// make a copy of the original image
   Mat imageEllipse = img.clone();
   // define the center point of ellipse
   Point ellipse_center(415,190);
   // define the major and minor axes of the ellipse
   Point axis1(100, 50);
   Point axis2(125, 50);
   // Draw an ellipse using the ellipse() function
   //Horizontal
   ellipse(imageEllipse, ellipse_center, axis1, 0, 0, 360, Scalar(255, 0, 0), 3, 8, 0);
   // Vertical
   ellipse(imageEllipse, ellipse_center, axis2, 90, 0, 360, Scalar(0, 0, 255), 3, 8, 0);
   // display the output
   imshow("Ellipses on Image", imageEllipse);
   waitKey();
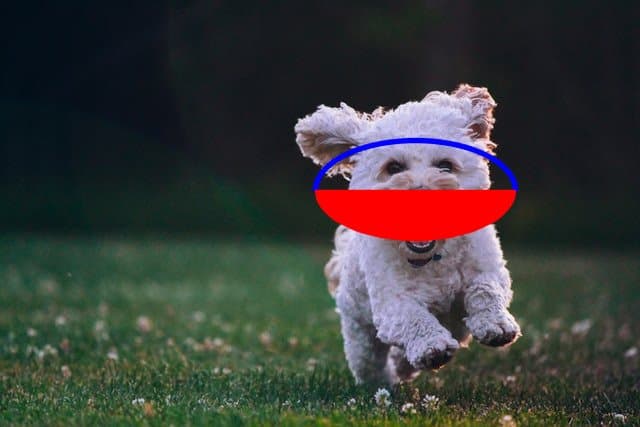
Draw a Half-Ellipse
In this example, we modify the previous code to:
- Draw just half of the blue ellipse
- Change the vertical red ellipse to a horizontal red ellipse, which is half-filled
To do this, make the following changes:
- Set the
endAnglefor the blue ellipse as 180 deg - Change the orientation of the red ellipse from 90 to 0
- Specify the start and end angles for the red ellipse, as 0 and 180 respectively
- Specify the thickness of the red ellipse to be a negative number
Python:
# make a copy of the original image
halfEllipse = img.copy()
# define the center of half ellipse
ellipse_center = (415,190)
# define the axis point
axis1 = (100,50)
# draw the Incomplete/Open ellipse, just a outline
cv2.ellipse(halfEllipse, ellipse_center, axis1, 0, 180, 360, (255, 0, 0), thickness=3)
# if you want to draw a Filled ellipse, use this line of code
cv2.ellipse(halfEllipse, ellipse_center, axis1, 0, 0, 180, (0, 0, 255), thickness=-2)
# display the output
cv2.imshow('halfEllipse',halfEllipse)
cv2.waitKey(0)
C++:
//make a copy of the original image
   Mat halfEllipse = image.clone();
   // define the center of half ellipse
   Point ellipse_center(415,190);
   //define the axis point
   Point axis1(100, 50);
   // draw the Half Ellipse, just the outline
   ellipse(halfEllipse, ellipse_center, axis1, 0, 180, 360, Scalar(255, 0, 0), 3, 8, 0);
   // if you want to draw a Filled ellipse, use this line of code
   ellipse(halfEllipse, ellipse_center, axis1, 0, 0, 180, Scalar(0, 0, 255), -2, 8, 0);
   // display the output
   imshow("Half-Ellipses on Image", halfEllipse);
   waitKey();
Check out the results below:
Adding Text
Finally, let’s try annotating images with text. To do this, use the putText() function in OpenCV. Have a look at its syntax, followed by the arguments:
putText(image, text, org, font, fontScale, color)
- As usual, the first argument is the input image.
- The next argument is the actual text string that we want to annotate the image with.
- The third argument specifies the starting location for the top left corner of the text string.
- The next two arguments specify the font style and scale.
- OpenCV supports several font-face styles from the Hershey font collection, and an italic font as well. Check out this list:
FONT_HERSHEY_SIMPLEX = 0,FONT_HERSHEY_PLAIN = 1,FONT_HERSHEY_DUPLEX = 2,FONT_HERSHEY_COMPLEX = 3,FONT_HERSHEY_TRIPLEX = 4,FONT_HERSHEY_COMPLEX_SMALL = 5,FONT_HERSHEY_SCRIPT_SIMPLEX = 6,FONT_HERSHEY_SCRIPT_COMPLEX = 7,FONT_ITALIC = 16
- OpenCV supports several font-face styles from the Hershey font collection, and an italic font as well. Check out this list:
- The font scale is a floating-point value, used to scale the base size of the font up or down. Depending on the resolution of your image, select an appropriate font scale.
- The last required argument is the color, which is specified as a BGR triplet.
Have a look at this code to understand how these arguments are implemented to display a text string on the image.
Python:
# make a copy of the original image
imageText = img.copy()
#let's write the text you want to put on the image
text = 'I am a Happy dog!'
#org: Where you want to put the text
org = (50,350)
# write the text on the input image
cv2.putText(imageText, text, org, fontFace = cv2.FONT_HERSHEY_COMPLEX, fontScale = 1.5, color = (250,225,100))))
# display the output image with text over it
cv2.imshow("Image Text",imageText)
cv2.waitKey(0)
cv2.destroyAllWindows()
C++:
// make a copy of the original image
   Mat imageText = img.clone();
   // Write text using putText() function
   putText(imageText, "I am a Happy dog!", Point(50,350), FONT_HERSHEY_COMPLEX, 1.5, Scalar(250,225,100));
   imshow("Text on Image", imageText);
   waitKey(0);
The final results are here!

Web Application using Streamlit
We have created a simple web application that you can explore here that allows you to annotate images using OpenCV.
Summary
Annotating images with geometric shapes and text is a powerful way to communicate. It helps amplify information on images. Images are almost always annotated to overlay results after images have been processed by various computer vision algorithms (for example, bounding boxes are drawn around objects detected by an object-detection model).
You have seen here how easy it is to annotate images with geometric shapes and text. Even the drawing functions have similar input arguments. Just the way you specify the location and size of the annotations may slightly differ.
You also learned to fill shapes with the desired color. Draw ellipses and arcs of specific orientation and length.
Finally, you saw how to annotate images with text.
You can find all the codes discussed in this post at this link → Image Annotation using OpenCV Colab Notebook.
100K+ Learners
Join Free OpenCV Bootcamp3 Hours of Learning