


The mouse pointer is a key component in a Graphical User Interface (GUI). Without it, you can’t really think of interacting with a GUI. So, let’s dive in and get introduced to the built-in functions for the mouse and trackbar in OpenCV. We will demonstrate how to use the mouse to annotate images, and also how to use a trackbar to control the size of an image.
This post is a part of the series Getting Started with OpenCV which consists of the following posts:
We will be using the image below to demonstrate the use of the mouse pointer and trackbar capabilities in OpenCV.

Annotating Images Using the Mouse
OpenCV provides a mouse event-detection feature to detect various mouse operations like left-click and right-click. In this first example, we will show you how to use the mouse to render a rectangle, on an image displayed in a named window.
Here’s the code for it:.
Python:
# Import packages
import cv2

# Lists to store the bounding box coordinates
top_left_corner=[]
bottom_right_corner=[]

# function which will be called on mouse input
def drawRectangle(action, x, y, flags, *userdata):
  # Referencing global variables
  global top_left_corner, bottom_right_corner
  # Mark the top left corner when left mouse button is pressed
  if action == cv2.EVENT_LBUTTONDOWN:
    top_left_corner = [(x,y)]
    # When left mouse button is released, mark bottom right corner
  elif action == cv2.EVENT_LBUTTONUP:
    bottom_right_corner = [(x,y)]
    # Draw the rectangle
    cv2.rectangle(image, top_left_corner[0], bottom_right_corner[0], (0,255,0),2, 8)
    cv2.imshow("Window",image)

# Read Images
image = cv2.imread("../Input/sample.jpg")
# Make a temporary image, will be useful to clear the drawing
temp = image.copy()
# Create a named window
cv2.namedWindow("Window")
# highgui function called when mouse events occur
cv2.setMouseCallback("Window", drawRectangle)

k=0
# Close the window when key q is pressed
while k!=113:
  # Display the image
  cv2.imshow("Window", image)
  k = cv2.waitKey(0)
  # If c is pressed, clear the window, using the dummy image
  if (k == 99):
    image= temp.copy()
    cv2.imshow("Window", image)

cv2.destroyAllWindows()
C++:
// Import packages
#include <opencv2/opencv.hpp>
#include <vector>
#include <iostream>

//Using namespace to nullify use of cv::function(); syntax
using namespace cv;
using namespace std;

// Points to store the bounding box coordinates
Point top_left_corner, bottom_right_corner;
// image image
Mat image;

// function which will be called on mouse input
void drawRectangle(int action, int x, int y, int flags, void *userdata)
{
  // Mark the top left corner when left mouse button is pressed
  if( action == EVENT_LBUTTONDOWN )
  {
    top_left_corner = Point(x,y);
  }
  // When left mouse button is released, mark bottom right corner
  else if( action == EVENT_LBUTTONUP)
  {
    bottom_right_corner = Point(x,y);
    // Draw rectangle
    rectangle(image, top_left_corner, bottom_right_corner, Scalar(0,255,0), 2, 8 );
    // Display image
    imshow("Window", image);
  }

}

// Main function
int main()
{
  image = imread("../../Input/sample.jpg");
  // Make a temporary image, which will be used to clear the image
  Mat temp = image.clone();
  // Create a named window
  namedWindow("Window");
  // highgui function called when mouse events occur
  setMouseCallback("Window", drawRectangle);

  int k=0;
  // loop until q character is pressed
  while(k!=113)
  {
    imshow("Window", image );
    k= waitKey(0);
    // If c is pressed, clear the window, using the dummy image
    if(k == 99)
    {
     temp.copyTo(image);
    }
  }
  destroyAllWindows();
  return 0;
}


Start by importing the necessary packages.
Python:
# Import packages
import cv2

C++:
// Import packages
#include <opencv2/opencv.hpp>
#include <vector>
#include <iostream>

// Using namespace to nullify use of cv::function(); syntax
using namespace cv;
using namespace std;
Next, initialize two lists to store points that will be used to draw a rectangle. In C++, we also initialize a matrix to store image data (not required in Python).
Python:
# Lists to store the points
top_left_corner=[]
bottom_right_corner=[]
C++:
// Points to store the center of the circle and a point on the circumference
Point top_left_corner, bottom_right_corner;
// image
Mat image;
Begin by defining a special ‘Callback’ function that will draw a rectangle on the image displayed in the named window. Called only when certain user interface events are detected, this type of functions came to be known as the ‘Callback’ functions. Here, this particular function is associated with mouse events, so we define it as a MouseCallback function. You can however name the function whatever you like. In this case, we have named it drawRectangle(). This works because we are going to register this function name to be associated with mouse events. You need not specify any input arguments to the function, these will be populated automatically when the user interacts with the mouse.
Let’s understand how to associate this function with specific mouse events. As shown below, we create the logic to draw a rectangle, based on certain mouse events. The available list of events is documented here. Whenever the user interacts with the mouse, while it is over the image being displayed: The mouse event type and event flags are recorded, along with the mouse x and y coordinates. These are then passed to the function for processing. *userdata is an optional argument that can provide further inputs to the callback function (we will not require it in this example though). When actions LEFTBUTTONDOWN and LEFTBUTTONUP are triggered, we store the coordinates in the respective variables and use them to draw the rectangle.
If you are not familiar with annotating images, please refer to this post.
Python:
def drawRectangle(action, x, y, flags, *userdata):
  # Referencing global variables
  global top_left_corner, bottom_right_corner
  # Mark the top left corner, when left mouse button is pressed
  if action == cv2.EVENT_LBUTTONDOWN:
    top_left_corner = [(x,y)]
    # When left mouse button is released, mark bottom right corner
  elif action == cv2.EVENT_LBUTTONUP:
    bottom_right_corner = [(x,y)]
    # Draw the rectangle
    cv2.rectangle(image, top_left_corner[0], bottom_right_corner[0], (0,255,0),2,8)
    cv2.imshow("Window",image)
C++:
void drawRectangle(int action, int x, int y, int flags, void *userdata)
{
  // Mark the top left corner when left mouse button is pressed
  if( action == EVENT_LBUTTONDOWN )
  {
    top_left_corner = Point(x,y);
  }
  // When left mouse button is released, mark bottom right corner
  else if( action == EVENT_LBUTTONUP)
  {
    bottom_right_corner = Point(x,y);
    rectangle(image, top_left_corner, bottom_right_corner, Scalar(0,255,0), 2, 8 );
    imshow("Window", image);
  }
}
After defining this mouse callback function, we proceed to perform the following:
- Read the sample image from disk, using
imread() - Save a copy of the image, using
copy()orclone()for C++ - Create a named window
Call setMouseCallback() to register the mouse callback function that we defined above, and (drawRectangle()) for mouse events that occur in the named window.
The general syntax for the setMouseCallback() function is shown below, and also documented here.
Python:
cv2.setMouseCallback(winname, onMouse, userdata)
C++:
void cv::setMouseCallback(const String & winname, MouseCallback onMouse, void * userdata = 0);
Arguments
winname: Name of the windowonMouse: Callback function for mouse eventsuserdata: Optional argument passed to the callback
Python:
# Read Images
image = cv2.imread("../Input/sample.jpg")
# Make a temporary image, will be useful to clear the drawing
temp = image.copy()
# Create a named window.
cv2.namedWindow("Window")
# highgui function called when mouse events occur
cv2.setMouseCallback("Window", drawRectangle)
C++:
  image = imread("../Input/sample.jpg");
  // Make a temp image, which will be used to clear the image
  Mat temp = image.clone();
  // Create a named window
  namedWindow("Window");
  // highgui function called when mouse events occur
  setMouseCallback("Window", drawRectangle);
In the final step, we need to create a display loop that allows the user to interact with the named window. Therefore, in the code below, we:
- Create a while loop that continuously displays the image, until the user presses the ‘
q’ key (ASCII code: 113) to quit the application script. - Provide the functionality within the loop for the user to clear all previous annotations. The user can reset the image in the named window to the copy that was made when we read in the original image. This is simply accomplished by checking for a keyboard entry of ‘
c’ (ASCII code: 99). - When the user exits the loop, we destroy the window, using
destroyAllWindows().
If you are not familiar with the use of the waitKey() function, take a look at the first post in the ‘Getting Started’ series here.
Python:
k=0
while k!=113:
  cv2.imshow("Window", image)
  k = cv2.waitKey(0)
  if (k == 99):
    image= temp.copy()
    cv2.imshow("Window", image)
cv2.destroyAllWindows()
C++:
  int k = 0;
  while(k!=113)
  {
    imshow("Window", image );
    k= waitKey(0);
    if(k == 99)
    {
      temp.copyTo(image);
    }
  }
  destroyAllWindows();
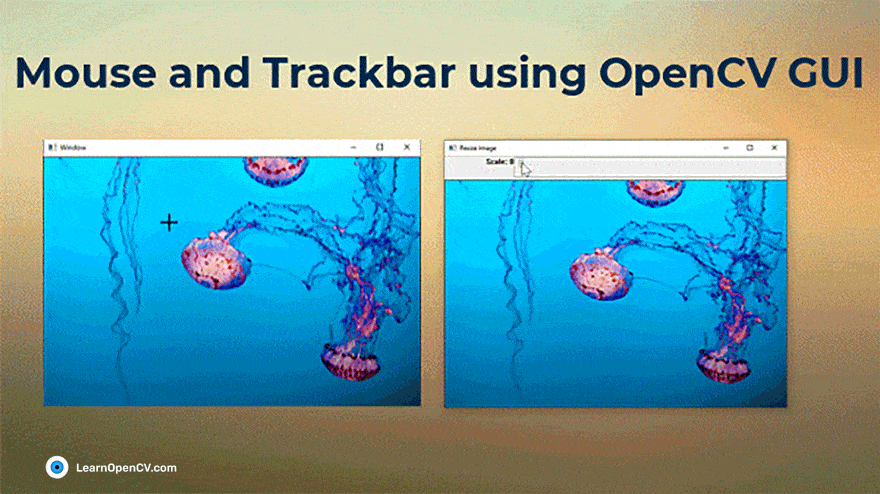
When executed, this code lets the user draw one or more rectangles on the image, as shown below. Keep in mind that drawing a rectangle on the image was just a simple demonstration of the use of the mouse pointer. The real power comes from knowing that you can detect the user’s interaction with the image, and provide any functionality that you may need in your applications.

Resizing an Image Using the Trackbar
Now, we will demonstrate the use of the trackbar to resize an image. Have a look at this code:
Python:
# Import dependancies
import cv2

maxScaleUp = 100
scaleFactor = 1
windowName = "Resize Image"
trackbarValue = "Scale"

# read the image
image = cv2.imread("../Input/sample.jpg")

# Create a window to display results and  set the flag to Autosize
cv2.namedWindow(windowName, cv2.WINDOW_AUTOSIZE)

# Callback functions
def scaleImage(*args):
    # Get the scale factor from the trackbar
    scaleFactor = 1+ args[0]/100.0
    # Resize the image
    scaledImage = cv2.resize(image, None, fx=scaleFactor, fy = scaleFactor, interpolation = cv2.INTER_LINEAR)
    cv2.imshow(windowName, scaledImage)

# Create trackbar and associate a callback function
cv2.createTrackbar(trackbarValue, windowName, scaleFactor, maxScaleUp, scaleImage)

# Display the image
cv2.imshow(windowName, image)
c = cv2.waitKey(0)
cv2.destroyAllWindows()
C++:
// Import Packages
#include <opencv2/opencv.hpp>
#include <iostream>
#include <string>

// Using namespace to nullify use of cv::function(); syntax
using namespace std;
using namespace cv;

int maxScaleUp = 100;
int scaleFactor = 1;

string windowName = "Resize Image";
string trackbarValue = "Scale";

// Callback functions
void scaleImage(int, void*)
{
 // Read the image
 Mat image = imread("../../Input/sample.jpg");

    // Get the Scale factor from the trackbar
    double scaleFactorDouble = 1 + scaleFactor/100.0;

 // Set the factor to 1 if becomes 0
    if (scaleFactorDouble == 0)
 {
        scaleFactorDouble = 1;
    }

    Mat scaledImage;
    // Resize the image
    resize(image, scaledImage, Size(), scaleFactorDouble, scaleFactorDouble, INTER_LINEAR);
    // Display the image
    imshow(windowName, scaledImage);
}

int main()
{
// load an image
Mat image = imread("../../Input/sample.jpg");

// Create a window to display results and set the flag to Autosize
namedWindow(windowName, WINDOW_AUTOSIZE);

// Create Trackbars and associate a callback function
createTrackbar(trackbarValue, windowName, &scaleFactor, maxScaleUp, scaleImage);
scaleImage(25,0);

// Display image
imshow(windowName, image);
waitKey(0);
destroyAllWindows();
return 0;
}
You have already learned to resize images in OpenCV, to review the details again, please take a look at this post. Here, our focus will be on how to use the trackbar function in OpenCV to create a custom callback function. This example is much like the mouse pointer example described above, so we will mainly point out the details associated with the trackbar.
Start by importing the packages, as shown below.
Python:
# Import dependencies
import cv2
C++:
// Import Packages
#include <opencv2/opencv.hpp>
#include <iostream>
#include <string>

// Using namespace to nullify use of cv::function(); syntax

using namespace std;
using namespace cv;
Next, we initialize some variables and strings. We will require these to create the trackbar and implement our callback function.
scaleFactorwill be used in the callback function that we are going to define for scaling the image.maxScaleUpis the maximum value that the trackbar position will record. It’s best to have 100 as the maximum value for we can then use the trackbar position to directly scale something as a percentage.
Python:
maxScaleUp = 100
scaleFactor = 1
windowName = "Resize Image"
trackbarValue = "Scale"
C++:
int maxScaleUp = 100;
int scaleFactor = 1;

string windowName = "Resize Image";
string trackbarValue = "Scale";
Now, let’s read a sample image, using imread(), and also create a named window. In the namedWindow() function, we pass the WINDOW_AUTOSIZE flag. This is important because it lets us resize the image.
Python:
# load an image
image = cv2.imread("../Input/sample.jpg")

# Create a window to display results
cv2.namedWindow(windowName, cv2.WINDOW_AUTOSIZE)
C++:
// load an image
Mat image = imread("../Input/sample.jpg");

// Create a window to display results and set the flag to Autosize
namedWindow(windowName, WINDOW_AUTOSIZE);
We are now ready to talk about the callback function, it will be called when the user interacts with the trackbar. Defining a trackbar callback function is very similar to defining a mouse callback function. Simply conform to the TrackbarCallback function signature, then associate that callback function with the trackbar.
- Define the callback function, with the function signature, as shown below for Python and C++.
- As before, name the function whatever you like. In this case, we have named it
scaleImage(). - In the Python code, retrieve the trackbar position from
args[0], on a scale of 0 to 100. - Compute a
scaleFactor, based on the trackbar position and input thatscaleFactorto theresize()function to resize the image. - In the Python code, you need not specify any data type for the image. But in C++, you have to initialize it as a
Mat.
Here’s the code for it:
Python:
def scaleImage(*args):

    # Get the scale factor from the trackbar
    scaleFactor = 1+ args[0]/100.0

    # Resize the image
    scaledImage = cv2.resize(image, None, fx=scaleFactor, fy =    scaleFactor, interpolation = cv2.INTER_LINEAR)
    cv2.imshow(windowName, scaledImage)
C++:
void scaleImage(int, void*)
{
 Mat image = imread("../Input/sample.jpg");

    // Get the Scale factor from the trackbar
    double scaleFactorDouble = 1 + scaleFactor/100.0;

    Mat scaledImage;

    // Resize the image
    resize(image, scaledImage, Size(), scaleFactorDouble, scaleFactorDouble, INTER_LINEAR);
    imshow(windowName, scaledImage);
}
To create a trackbar that uses our callback function, we need to call the createTrackbar() function, as documented here. Check out its syntax in the code below.
Python:
cv2.createTrackbar( trackbarName, windowName, value, count, onChange)
C++:
int cv::createTrackbar (const String & trackbarname, const String & winname, int * value, int count, TrackbarCallback onChange = 0, void * userdata = 0)
Arguments
trackbarname: Name of the created trackbar.winname: Name of the parent window of the created trackbar.value: Default position of the slider. This is optional.count: Till what value the slider will go.onChange: Callback function.userdata: User data that is passed to the callback function. It can be used to handle trackbar events, without using global variables.
See it implemented in the code below:
Python:
cv2.createTrackbar(trackbarValue, windowName, scaleFactor, maxScaleUp, scaleImage)
C++:
createTrackbar(trackbarValue, windowName, &scaleFactor, maxScaleUp, scaleImage);
scaleImage(25,0);
Finally, we simply call imshow() to display the image in the named window. Followed by waitKey(0), with an argument of zero, which displays the window indefinitely.
Python:
cv2.imshow(windowName, image)
cv2.waitKey(0)
cv2.destroyAllWindows()
C++:
imshow(windowName, image);
waitKey(0);
destroyAllWindows();
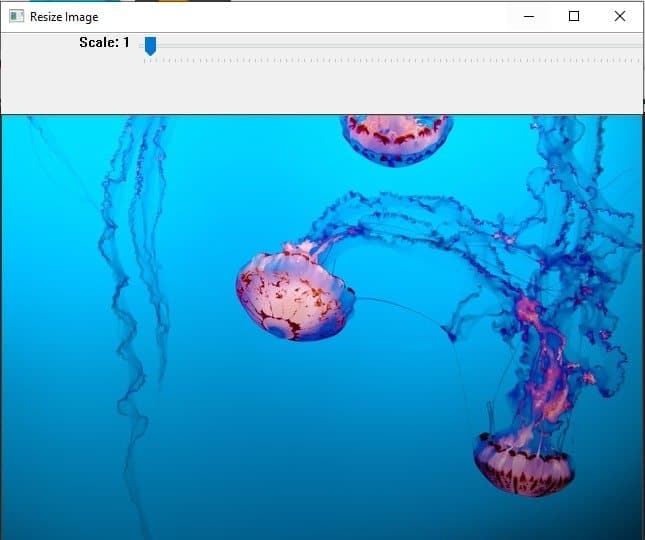
This is what the named window looks like, with the trackbar implemented.
Summary
You not only learned to create callback functions that can be associated with mouse events initiated by the user. But also to register them using setMouseCallback() and createTrackbar(). With these basic components, you can create many interesting applications. Why not try using the trackbar to change the intensity of the displayed image!
100K+ Learners
Join Free OpenCV Bootcamp3 Hours of Learning