PyTorch Tutorial For Beginners: All the Basics

The world is evolving and so is the technology serving it. It’s crucial for everyone to keep up with the rapid changes in technology. One of the domains witnessing the fastest and largest evolution is Artificial Intelligence.
We are training our machines to learn and the results are getting better and better. There are Generative Networks (GANs) which can generate new images, Deep Learning models for translating signed language into text, and much more! In this swift-moving domain, PyTorch has originated as an alternative for building these models.
Taking into account all the pros of knowing PyTorch, we have come up with a series of posts on Deep Learning with PyTorch – a Pytorch tutorial for beginners. In this introductory lesson, we are going to cover the following topics.
What is PyTorch?
PyTorch is a Python-based library which facilitates building Deep Learning models and using them in various applications. But this is more than just another Deep Learning library. It’s a scientific computing package (as the official PyTorch documents state).
It’s a Python-based scientific computing package targeted at two sets of audiences:
Deep Learning with PyTorch: A 60 Minute Blitz
1. A replacement for NumPy to use the power of GPUs
2. A deep learning research platform that provides maximum flexibility and speed
PyTorch uses Tensor as its core data structure, similar to a Numpy array. You may wonder about this specific choice of data structure. The answer lies in the fact that with appropriate software and hardware available, tensors provide acceleration of various mathematical operations. These operations when carried out in large numbers for Deep Learning make a huge difference in speed.
PyTorch, similar to Python, focuses on ease of use and makes it possible for even users with very basic programming knowledge to use Deep Learning in their projects. This also makes it the perfect “first deep learning library to learn“, if you don’t know one already.
Why Should I Learn PyTorch? – Pytorch Tutorial for Beginners
In the previous section, we mentioned PyTorch is the perfect choice for the first deep learning library you should learn. In this section, we will elaborate on why it is so.
There is no shortage of Deep Learning libraries: Keras, Tensorflow, Caffe, Theano (RIP) and many more. What makes PyTorch different?
An ideal deep learning library should be easy to learn and use, flexible enough to be used in various applications, efficient so that we can deal with huge real-life datasets and accurate enough to provide correct results even in the presence of uncertainty in input data.
PyTorch performs really well on all these metrics mentioned above. The “pythonic” coding style makes it simple to learn and use. GPU acceleration, support for distributed computing and automatic gradient calculation helps perform backward pass automatically starting from a forward expression.
Of course, because of Python, it faces a risk of slow runtime but the high-performance C++ API (libtorch) removes that overhead. This makes the transition from R&D to Production very smooth. One more reason to use PyTorch!
Let’s look at some interesting results you could attain using an application of PyTorch.


To get you hooked even more to PyTorch, here is an extensive list of really cool projects that involve PyTorch.
Overview of the PyTorch Library
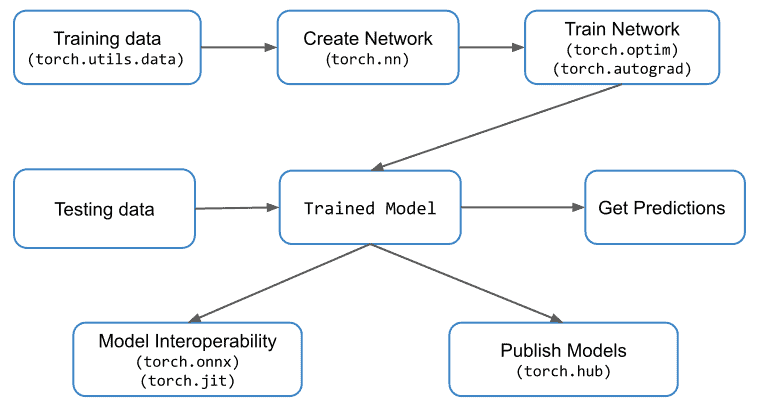
Now that we are aware of PyTorch and what makes it unique, let’s look at the basic pipeline of a PyTorch project. The figure below describes a typical workflow and the important modules associated with each step.

The important PyTorch modules that we will discuss here briefly are: torch.nn, torch.optim, torch.utils and torch.autograd.
1. Data Loading and Handling
The very first step in any deep learning project deals with data loading and handling. PyTorch provides utilities for the same via torch.utils.data.
The two important classes in this module are Dataset and DataLoader.
- Dataset is built on top of Tensor data type and is used primarily for custom datasets.
- DataLoader is used when you have a large dataset and you want to load data from a Dataset in background so that it’s ready and waiting for the training loop.
We can also use torch.nn.DataParallel and torch.distributed if we have access to multiple machines or GPUs.
2. Building Neural Network
The torch.nn module is used for creating Neural Networks. It provides all the common neural network layers such as fully connected layers, convolutional layers, activation and loss functions etc.
Once the network architecture is created and data is ready to be fed to the network, we need techniques to update the weights and biases so that the network starts to learn. These utilities are provided in torch.optim module. Similarly, for automatic differentiation, which is required during backward pass, we use the torch.autograd module.
3. Model Inference & Compatibility
After the model has been trained, it can be used to predict output for test cases or even new datasets. This process is referred to as model inference.
PyTorch also provides TorchScript which can be used to run models independently from a Python runtime. This can be thought of as a Virtual Machine with instructions mainly specific to Tensors.
You can also convert model trained using PyTorch into formats like ONNX, which allow you to use these models in other DL frameworks such as MXNet, CNTK, Caffe2. You can also convert onnx models to Tensorflow.
Introduction to Tensors
So far in this post, we have discussed why you should learn PyTorch. Now it’s time to start the very same journey. We will kick this off with Tensors – the core data structure used in PyTorch.
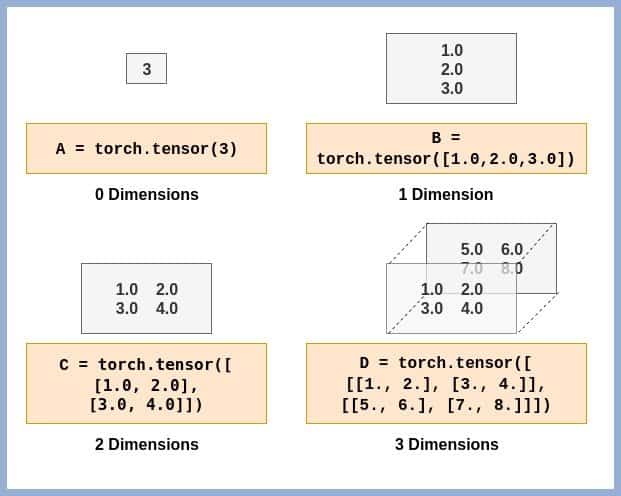
Tensor is simply a fancy name given to matrices. If you are familiar with NumPy arrays, understanding and using PyTorch Tensors will be very easy. A scalar value is represented by a 0-dimensional Tensor. Similarly, a column/row matrix is represented using a 1-D Tensor and so on. Some examples of Tensors with different dimensions are shown for you to visualize and understand.

Before we start with the introduction to Tensors, let’s install PyTorch 1.1.0 by running the command given below.
conda install -c pytorch pytorch-cpu
That’s it, you now have PyTorch ready for use! Now let’s get started. We suggest you use Google Colab and follow along. Chose a GPU runtime type from the Menu.
Construct your first Tensor
Let’s see how we can create a PyTorch Tensor. First, we will import PyTorch.
import torch

# Create a Tensor with just ones in a column
a = torch.ones(5)

# Print the tensor we created
print(a)

# tensor([1., 1., 1., 1., 1.])

# Create a Tensor with just zeros in a column
b = torch.zeros(5)
print(b)

# tensor([0., 0., 0., 0., 0.])
We can similarly create Tensor with custom values as shown below.
c = torch.tensor([1.0, 2.0, 3.0, 4.0, 5.0])
print(c)

# tensor([1., 2., 3., 4., 5.])
In all the above cases, we have created vectors or Tensors of a single dimension. Now, let’s create some tensors of higher dimensions.
d = torch.zeros(3,2)
print(d)

# tensor([[0., 0.],
#        [0., 0.],
#        [0., 0.]])

e = torch.ones(3,2)
print(e)

# tensor([[1., 1.],
#        [1., 1.],
#        [1., 1.]])

f = torch.tensor([[1.0, 2.0],[3.0, 4.0]])
print(f)

# tensor([[1., 2.],
#        [3., 4.]])

# 3D Tensor
g = torch.tensor([[[1., 2.], [3., 4.]], [[5., 6.], [7., 8.]]])
print(g)

# tensor([[[1., 2.],
#         [3., 4.]],
#
#        [[5., 6.],
#         [7., 8.]]])
We can also find out the shape of a Tensor using .shape method.
print(f.shape)
# torch.Size([2, 2])

print(e.shape)
# torch.Size([3, 2])

print(g.shape)
# torch.Size([2, 2, 2])
Access an element in Tensor
Now that we have created some tensors, let’s see how we can access an element in a Tensor. First let’s see how to do this for 1D Tensor aka vector.
# Get element at index 2
print(c[2])

# tensor(3.)
What about 2D or 3D Tensor? Recall what we mentioned about dimension of a tensor in last section. To access one particular element in a tensor, we will need to specify indices equal to the dimension of the tensor. That’s why for tensor c we only had to specify one index.
# All indices starting from 0

# Get element at row 1, column 0
print(f[1,0])
# We can also use the following
print(f[1][0])

# tensor(3.)

# Similarly for 3D Tensor
print(g[1,0,0])
print(g[1][0][0])

# tensor(5.)
But what if you wanted to access one entire row in a 2D Tensor? We can use the same syntax as we would use in NumPy Arrays.
# All elements
print(f[:])

# All elements from index 1 to 2 (inclusive)
print(c[1:3])

# All elements till index 4 (exclusive)
print(c[:4])

# First row
print(f[0,:])

# Second column
print(f[:,1])
Specify data type of elements
Whenever we create a tensor, PyTorch decides the data type of the elements of the tensor such that the data type can cover all the tensor elements. We can override this by specifying the data type while creating the tensor.
int_tensor = torch.tensor([[1,2,3],[4,5,6]])
print(int_tensor.dtype)

# torch.int64

# What if we changed any one element to floating point number?
int_tensor = torch.tensor([[1,2,3],[4.,5,6]])
print(int_tensor.dtype)

# torch.float32

print(int_tensor)

# tensor([[1., 2., 3.],
#        [4., 5., 6.]])


# This can be overridden as follows
int_tensor = torch.tensor([[1,2,3],[4.,5,6]], dtype=torch.int32)
print(int_tensor.dtype)

# torch.int32
print(int_tensor)

# tensor([[1, 2, 3],
#        [4, 5, 6]], dtype=torch.int32)
Tensor to/from NumPy Array
We have mentioned several times that PyTorch Tensors and NumPy arrays are pretty similar. This raises the question if it’s possible to convert one data structure into another. Let’s see how we can do this.
# Import NumPy
import numpy as np

# Tensor to Array
f_numpy = f.numpy()
print(f_numpy)

# array([[1., 2.],
#       [3., 4.]], dtype=float32)

# Array to Tensor
h = np.array([[8,7,6,5],[4,3,2,1]])
h_tensor = torch.from_numpy(h)
print(h_tensor)

# tensor([[8, 7, 6, 5],
#        [4, 3, 2, 1]])
Arithmetic Operations on Tensors
Now it’s time for the next step. Let’s see how we can perform arithmetic operations on PyTorch tensors.
# Create tensor
tensor1 = torch.tensor([[1,2,3],[4,5,6]])
tensor2 = torch.tensor([[-1,2,-3],[4,-5,6]])

# Addition
print(tensor1+tensor2)
# We can also use
print(torch.add(tensor1,tensor2))

# tensor([[ 0,  4,  0],
#        [ 8,  0, 12]])

# Subtraction
print(tensor1-tensor2)
# We can also use
print(torch.sub(tensor1,tensor2))

# tensor([[ 2,  0,  6],
#        [ 0, 10,  0]])

# Multiplication
# Tensor with Scalar
print(tensor1 * 2)
# tensor([[ 2,  4,  6],
#        [ 8, 10, 12]])

# Tensor with another tensor
# Elementwise Multiplication
print(tensor1 * tensor2)
# tensor([[ -1,   4,  -9],
#        [ 16, -25,  36]])

# Matrix multiplication
tensor3 = torch.tensor([[1,2],[3,4],[5,6]])
print(torch.mm(tensor1,tensor3))
# tensor([[22, 28],
#        [49, 64]])

# Division
# Tensor with scalar
print(tensor1/2)
# tensor([[0, 1, 1],
#        [2, 2, 3]])

# Tensor with another tensor
# Elementwise division
print(tensor1/tensor2)
# tensor([[-1,  1, -1],
#        [ 1, -1,  1]])
CPU v/s GPU Tensor
PyTorch has different implementations of Tensor for CPU and GPU. Every tensor can be converted to GPU in order to perform massively parallel, fast computations. All operations that will be performed on the tensor will be carried out using GPU-specific routines that come with PyTorch.
If you don’t have access to a GPU, you can perform these examples on Google Colab. Select GPU as Runtime.
Let’s first see how to create a tensor for GPU.
# Create a tensor for CPU
# This will occupy CPU RAM
tensor_cpu = torch.tensor([[1.0, 2.0], [3.0, 4.0], [5.0, 6.0]], device='cpu')

# Create a tensor for GPU
# This will occupy GPU RAM
tensor_gpu = torch.tensor([[1.0, 2.0], [3.0, 4.0], [5.0, 6.0]], device='cuda')
If you are using Google Colab, focus on the RAM consumption meter in the top right corner and you will see the GPU RAM consumption increase as soon as you create tensor_gpu.
Just like tensor creation, the operations performed for CPU and GPU tensors are also different and consume RAM corresponding to the device specified.
# This uses CPU RAM
tensor_cpu = tensor_cpu * 5

# This uses GPU RAM
# Focus on GPU RAM Consumption
tensor_gpu = tensor_gpu * 5
The key point to note here is that no information flows to CPU in the GPU tensor operations (except if we print or access the tensor).
We can move the GPU tensor to CPU and vice versa as shown below.
# Move GPU tensor to CPU
tensor_gpu_cpu = tensor_gpu.to(device='cpu')

# Move CPU tensor to GPU
tensor_cpu_gpu = tensor_cpu.to(device='cuda')
That’s all folks!
A quick recap, in this post we discussed PyTorch, its uniqueness and why should you learn it. We also discussed PyTorch workflow and PyTorch Tensor data type in some depth.
Important articles in our Pytorch for beginners tutorial series:
Image Classification using Pre-trained models
Semantic Segmentation using torchvision
References
- Deep Learning with PyTorch by Eli Stevens, Luca Antiga – Manning Publication
- PyTorch tutorial


100K+ Learners
Join Free OpenCV Bootcamp3 Hours of Learning