This is a multipart post on image recognition and object detection.
In this part, we will briefly explain image recognition using traditional computer vision techniques. I refer to techniques that are not Deep Learning based as traditional computer vision techniques because they are being quickly replaced by Deep Learning based techniques. That said, traditional computer vision approaches still power many applications. Many of these algorithms are also available in computer vision libraries like OpenCV and work very well out of the box.
This series will follow the following rough outline.
- Image recognition using traditional Computer Vision techniques : Part 1
- Histogram of Oriented Gradients : Part 2
- Example code for image recognition : Part 3
- Training a better eye detector: Part 4a
- Object detection using traditional Computer Vision techniques : Part 4b
- How to train and test your own OpenCV object detector : Part 5
- Image recognition using Deep Learning : Part 6
- Object detection using Deep Learning : Part 7
A Brief History of Image Recognition and Object Detection
Our story begins in 2001; the year an efficient algorithm for face detection was invented by Paul Viola and Michael Jones. Their demo that showed faces being detected in real time on a webcam feed was the most stunning demonstration of computer vision and its potential at the time. Soon, it was implemented in OpenCV and face detection became synonymous with Viola and Jones algorithm.
Every few years a new idea comes along that forces people to pause and take note. In object detection, that idea came in 2005 with a paper by Navneet Dalal and Bill Triggs. Their feature descriptor, Histograms of Oriented Gradients (HOG), significantly outperformed existing algorithms in pedestrian detection.
Every decade or so a new idea comes along that is so effective and powerful that you abandon everything that came before it and wholeheartedly embrace it. Deep Learning is that idea of this decade. Deep Learning algorithms had been around for a long time, but they became mainstream in computer vision with its resounding success at the ImageNet Large Scale Visual Recognition Challenge (ILSVRC) of 2012. In that competition, an algorithm based on Deep Learning by Alex Krizhevsky, Ilya Sutskever, and Geoffrey Hinton shook the computer vision world with an astounding 85% accuracy — 11% better than the algorithm that won the second place! In ILSVRC 2012, this was the only Deep Learning based entry. In 2013, all winning entries were based on Deep Learning and in 2015 multiple Convolutional Neural Network (CNN) based algorithms surpassed the human recognition rate of 95%.
With such huge success in image recognition, Deep Learning based object detection was inevitable. Techniques like Faster R-CNN produce jaw-dropping results over multiple object classes. We will learn about these in later posts, but for now keep in mind that if you have not looked at Deep Learning based image recognition and object detection algorithms for your applications, you may be missing out on a huge opportunity to get better results.
With that overview, we are ready to return to the main goal of this post — understand image recognition using traditional computer vision techniques.
Image Recognition ( a.k.a Image Classification )
An image recognition algorithm ( a.k.a an image classifier ) takes an image ( or a patch of an image ) as input and outputs what the image contains. In other words, the output is a class label ( e.g. “cat”, “dog”, “table” etc. ). How does an image recognition algorithm know the contents of an image ? Well, you have to train the algorithm to learn the differences between different classes. If you want to find cats in images, you need to train an image recognition algorithm with thousands of images of cats and thousands of images of backgrounds that do not contain cats. Needless to say, this algorithm can only understand objects / classes it has learned.
To simplify things, in this post we will focus only on two-class (binary) classifiers. You may think that this is a very limiting assumption, but keep in mind that many popular object detectors ( e.g. face detector and pedestrian detector ) have a binary classifier under the hood. E.g. inside a face detector is an image classifier that says whether a patch of an image is a face or background.
Anatomy of an Image Classifier
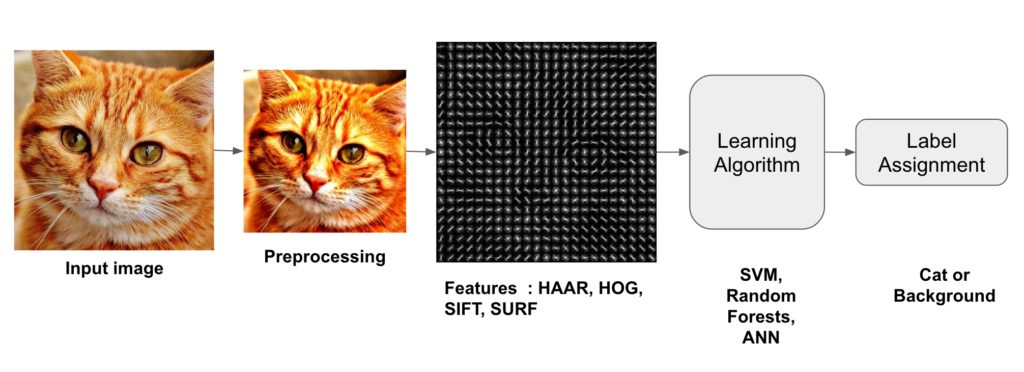
The following diagram illustrates the steps involved in a traditional image classifier.
Interestingly, many traditional computer vision image classification algorithms follow this pipeline, while Deep Learning based algorithms bypass the feature extraction step completely. Let us look at these steps in more details.
Step 1 : Preprocessing
Often an input image is pre-processed to normalize contrast and brightness effects. A very common preprocessing step is to subtract the mean of image intensities and divide by the standard deviation. Sometimes, gamma correction produces slightly better results. While dealing with color images, a color space transformation ( e.g. RGB to LAB color space ) may help get better results.
Notice that I am not prescribing what pre-processing steps are good. The reason is that nobody knows in advance which of these preprocessing steps will produce good results. You try a few different ones and some might give slightly better results. Here is a paragraph from Dalal and Triggs
“We evaluated several input pixel representations including grayscale, RGB and LAB colour spaces optionally with power law (gamma) equalization. These normalizations have only a modest effect on performance, perhaps because the subsequent descriptor normalization achieves similar results. We do use colour information when available. RGB and LAB colour spaces give comparable results, but restricting to grayscale reduces performance by 1.5% at 10−4 FPPW. Square root gamma compression of each colour channel improves performance at low FPPW (by 1% at 10−4 FPPW) but log compression is too strong and worsens it by 2% at 10−4 FPPW.”
As you can see, they did not know in advance what pre-processing to use. They made reasonable guesses and used trial and error.
As part of pre-processing, an input image or patch of an image is also cropped and resized to a fixed size. This is essential because the next step, feature extraction, is performed on a fixed sized image.
Step 2 : Feature Extraction
The input image has too much extra information that is not necessary for classification. Therefore, the first step in image classification is to simplify the image by extracting the important information contained in the image and leaving out the rest. For example, if you want to find shirt and coat buttons in images, you will notice a significant variation in RGB pixel values. However, by running an edge detector on an image we can simplify the image. You can still easily discern the circular shape of the buttons in these edge images and so we can conclude that edge detection retains the essential information while throwing away non-essential information. The step is called feature extraction. In traditional computer vision approaches designing these features are crucial to the performance of the algorithm. Turns out we can do much better than simple edge detection and find features that are much more reliable. In our example of shirt and coat buttons, a good feature detector will not only capture the circular shape of the buttons but also information about how buttons are different from other circular objects like car tires.
Some well-known features used in computer vision are Haar-like features introduced by Viola and Jones, Histogram of Oriented Gradients ( HOG ), Scale-Invariant Feature Transform ( SIFT ), Speeded Up Robust Feature ( SURF ) etc.
As a concrete example, let us look at feature extraction using Histogram of Oriented Gradients ( HOG ).
Histogram of Oriented Gradients ( HOG )
A feature extraction algorithm converts an image of fixed size to a feature vector of fixed size. In the case of pedestrian detection, the HOG feature descriptor is calculated for a 64×128 patch of an image and it returns a vector of size 3780. Notice that the original dimension of this image patch was 64 x 128 x 3 = 24,576 which is reduced to 3780 by the HOG descriptor.
HOG is based on the idea that local object appearance can be effectively described by the distribution ( histogram ) of edge directions ( oriented gradients ). The steps for calculating the HOG descriptor for a 64×128 image are listed below.
- Gradient calculation : Calculate the x and the y gradient images,
and
, from the original image. This can be done by filtering the original image with the following kernels.
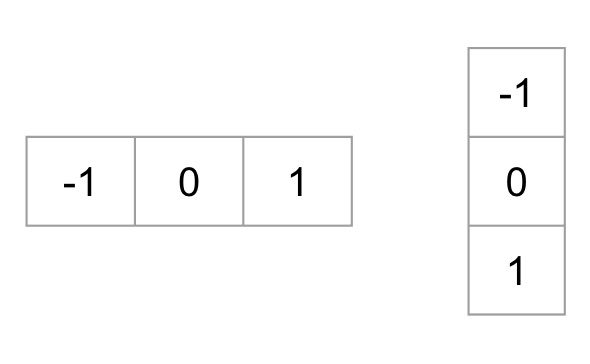
Using the gradient images
and
, we can calculate the magnitude and orientation of the gradient using the following equations.
The calcuated gradients are “unsigned” and thereforeis in the range 0 to 180 degrees.
- Cells : Divide the image into 8×8 cells.
- Calculate histogram of gradients in these 8×8 cells : At each pixel in an 8×8 cell we know the gradient ( magnitude and direction ), and therefore we have 64 magnitudes and 64 directions — i.e. 128 numbers. Histogram of these gradients will provide a more useful and compact representation. We will next convert these 128 numbers into a 9-bin histogram ( i.e. 9 numbers ). The bins of the histogram correspond to gradients directions 0, 20, 40 … 160 degrees. Every pixel votes for either one or two bins in the histogram. If the direction of the gradient at a pixel is exactly 0, 20, 40 … or 160 degrees, a vote equal to the magnitude of the gradient is cast by the pixel into the bin. A pixel where the direction of the gradient is not exactly 0, 20, 40 … 160 degrees splits its vote among the two nearest bins based on the distance from the bin. E.g. A pixel where the magnitude of the gradient is 2 and the angle is 20 degrees will vote for the second bin with value 2. On the other hand, a pixel with gradient 2 and angle 30 will vote 1 for both the second bin ( corresponding to angle 20 ) and the third bin ( corresponding to angle 40 ).
- Block normalization : The histogram calculated in the previous step is not very robust to lighting changes. Multiplying image intensities by a constant factor scales the histogram bin values as well. To counter these effects we can normalize the histogram — i.e. think of the histogram as a vector of 9 elements and divide each element by the magnitude of this vector. In the original HOG paper, this normalization is not done over the 8×8 cell that produced the histogram, but over 16×16 blocks. The idea is the same, but now instead of a 9 element vector you have a 36 element vector.
- Feature Vector : In the previous steps we figured out how to calculate histogram over an 8×8 cell and then normalize it over a 16×16 block. To calcualte the final feature vector for the entire image, the 16×16 block is moved in steps of 8 ( i.e. 50% overlap with the previous block ) and the 36 numbers ( corresponding to 4 histograms in a 16×16 block ) calculated at each step are concatenated to produce the final feature vector.What is the length of the final vector ?
The input image is 64×128 pixels in size, and we are moving 8 pixels at a time. Therefore, we can make 7 steps in the horizontal direction and 15 steps in the vertical direction which adds up to 7 x 15 = 105 steps. At each step we calculated 36 numbers, which makes the length of the final vector 105 x 36 = 3780.
Step 3 : Learning Algorithm For Classification
In the previous section, we learned how to convert an image to a feature vector. In this section, we will learn how a classification algorithm takes this feature vector as input and outputs a class label ( e.g. cat or background ).
Before a classification algorithm can do its magic, we need to train it by showing thousands of examples of cats and backgrounds. Different learning algorithms learn differently, but the general principle is that learning algorithms treat feature vectors as points in higher dimensional space, and try to find planes / surfaces that partition the higher dimensional space in such a way that all examples belonging to the same class are on one side of the plane / surface.
To simplify things, let us look at one learning algorithm called Support Vector Machines ( SVM ) in some detail.
How does Support Vector Machine ( SVM ) Work For Image Classification?
Support Vector Machine ( SVM ) is one of the most popular supervised binary classification algorithm. Although the ideas used in SVM have been around since 1963, the current version was proposed in 1995 by Cortes and Vapnik.
In the previous step, we learned that the HOG descriptor of an image is a feature vector of length 3780. We can think of this vector as a point in a 3780-dimensional space. Visualizing higher dimensional space is impossible, so let us simplify things a bit and imagine the feature vector was just two dimensional.
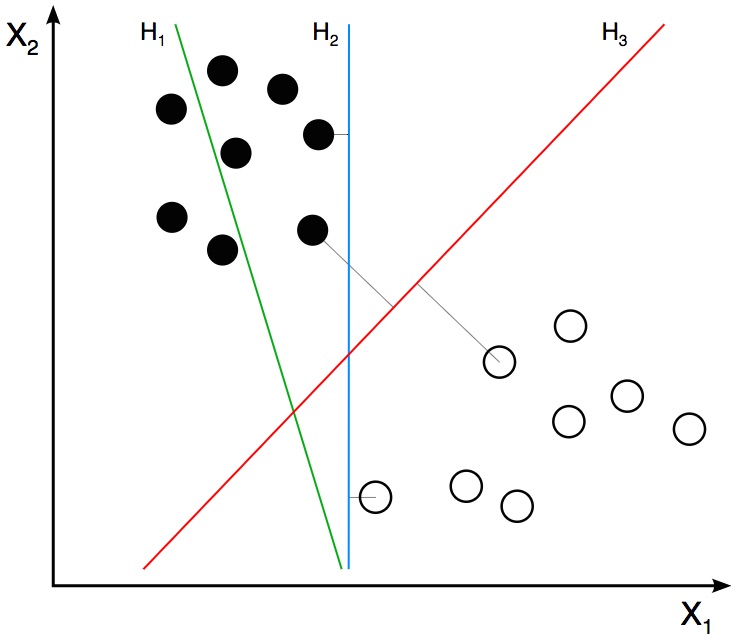
In our simplified world, we now have 2D points representing the two classes ( e.g. cats and background ). In the image above, the two classes are represented by two different kinds of dots. All black dots belong to one class and the white dots belong to the other class. During training, we provide the algorithm with many examples from the two classes. In other words, we tell the algorithm the coordinates of the 2D dots and also whether the dot is black or white.
Different learning algorithms figure out how to separate these two classes in different ways. Linear SVM tries to find the best line that separates the two classes. In the figure above, H1, H2, and H3 are three lines in this 2D space. H1 does not separate the two classes and is therefore not a good classifier. H2 and H3 both separate the two classes, but intuitively it feels like H3 is a better classifier than H2 because H3 appears to separate the two classes more cleanly. Why ? Because H2 is too close to some of the black and white dots. On the other hand, H3 is chosen such that it is at a maximum distance from members of the two classes.
Given the 2D features in the above figure, SVM will find the line H3 for you. If you get a new 2D feature vector corresponding to an image the algorithm has never seen before, you can simply test which side of the line the point lies and assign it the appropriate class label. If your feature vectors are in 3D, SVM will find the appropriate plane that maximally separates the two classes. As you may have guessed, if your feature vector is in a 3780-dimensional space, SVM will find the appropriate hyperplane.
Optimizing SVM
So far so good, but I know you have one important unanswered question. What if the features belonging to the two classes are not separable using a hyperplane ? In such cases, SVM still finds the best hyperplane by solving an optimization problem that tries to increase the distance of the hyperplane from the two classes while trying to make sure many training examples are classified properly. This tradeoff is controlled by a parameter called C. When the value of C is small, a large margin hyperplane is chosen at the expense of a greater number of misclassifications. Conversely, when C is large, a smaller margin hyperplane is chosen that tries to classify many more examples correctly.
Now you may be confused as to what value you should choose for C. Choose the value that performs best on a validation set that the algorithm was not trained on.
Subscribe & Download Code
If you liked this article and would like to download code (C++ and Python) and example images used in this post, please click here. Alternately, sign up to receive a free Computer Vision Resource Guide. In our newsletter, we share OpenCV tutorials and examples written in C++/Python, and Computer Vision and Machine Learning algorithms and news.Image Credits
Can PCA be directly applied to reduce the large dimensionality of HoG vector?
I tried applying PCA directly using OpenCV on the HoG vectors obtained using 64 x 196 training images. The length of vectors is between 7000 – 8000. But the program is crashing. Any idea why this could be happening? Also, can you provide some insights into how to merge HoG with Haar or LBP to improve results?
You can use PCA to reduce dimensionality, but 7000 element vector is not that big. Also, your feature vector size should be around 5736 and not really between 7000 – 8000. Not sure the cause of your crash, but trying using 64×192.
Great article!
Thanks!
Perfect, sir i couldnt find the code
There is no code for this post, but if you have subscribed for the newsletter you must have received an email with a link to all code used on this site.
Buenas noches, existe una implementacion del SIFT para java.
SIFT se implementa en OpenCV y tiene soporte para Java.
http://docs.opencv.org/2.4/doc/tutorials/introduction/desktop_java/java_dev_intro.html
Satya Mallick, thank you so much for this post, it´s been a great help for me! I´m in the last year of my engeneering career and i´m looking for something to do for my thesis. I think I´m going to do something related to computer vision.
I have one question ( Probably the first of many ): When you are explaining HOG, you write this : “64 x 128 x 3 = 24,576”, Where is the x 3 coming from?
Hi Danny,
It is because the image has 3 channels – R, G and B.
Satya
Thank you !
when will you post part 2??
The second post in the series is already out
https://learnopencv.com/histogram-of-oriented-gradients/
The second part mentioned in the post will become part 3.
when will you post part 6 and 7?
It may be a month or more before I get there.
Can you explain a bit more about “while Deep Learning based algorithms bypass the feature extraction step completely” , Does this mean there is no used or zero gain .. at all to do the feature extraction prior to feed data into the deep leaning or cnn ? Thanks,
Yes, especially in CNN, you pass in raw images and features are learned implicitly and automatically. You may however augment the dataset by creating variations of the same image ( e.g. by rotation, change in brightness / contrast etc. ). But you would never want to obtain a HOG descriptor of the image and train a neural network based on HOG descriptors of images.
Thank you Satya, for you fast reply. That totally make sense. I’m just curious since I just read paper about SIFT and SURF. What would be your thought on that , I assume would be the same as HOG ? If I apply SIFT , for example, will there be a chance in your opinion that I would improve the accuracy of the CNN model or would it perform worse or the same.
It will most likely worsen CNN performance by a lot because CNN automatically obtains features far richer than SIFT / SURF from the raw images. If you use SIFT / SURF in a CNN, you are eliminating the chance of it learning features present in the raw pixels.
Thank you so much. This blog is amazingggggggg !! I can not wait until you finish the series. 🙂
Sir , there’s something i don’t fully understand here :
” A pixel where the magnitude of the gradient is 2 and the angle is 20 degrees will vote for the second bin with value 2. On the other hand, a pixel with gradient 2 and angle 30 will vote 1 for both the second bin ( corresponding to angle 20 ) and the third bin ( corresponding to angle 40 ).”
It’s seems like deviding the gradient value if the value isn’t 0,20,40…etc and votes for the nearest bins.
What would i have a pixel that the magnitude of the gradient is 3 and the angle is 30 degrees , would it vote 1.5 for the second & third bin ?
Thats right. In some implementations they may round it up to 2.
Dear sir I want to count total number of people in ATM data set of images , some images haves more than two people in a image and also double images in many camera channel please guide me what i do for counting the total number of peoples of all data sets .
You can try OpenCV’s HOG based pedestrian detection. But if you want the state of the art solution you should look at Deep Learning Based approaches like Faster R-CNN or Single Shot Multibox or R-FCN ( Google those terms )
Thank you sir I applying to do it
Hi sir i want to detect fish from the image.the image contains people and other stuffs.can u please help me
Can you share an example image ?
https://uploads.disquscdn.com/images/fa1c684b4e2038f8895aa773b0b71c76988e1036a47728f7eced892ea6a6ae35.jpg
sir this is the image.
Hi Sudhakar,
You need to collect 1000 or more images of fish and then train an object detector. You can use this post for guidance.
https://learnopencv.com/training-better-haar-lbp-cascade-eye-detector-opencv/
I have the same problem
Good morning dear sir, i have read many of you post, very interesting. Now am working on real time object identification, and while reading i notice that the first step to detect the moving object in scene. for that i propose an hybrid approach based on MoG and frame difference. I have the binary mask and can extract the moving object easily on a white background with an algorithm that i have propose also. The problem now is how to link the result(object extracted) to an object recognition algorithm, where should i start. Thanks in advance
Sop Lionel
You need to first create a classifier that is able to take in an image and return what it contains. Next, you need to create a bounding box around the object you have extracted based on motion and crop out the image. Feed this cropped image to a classifier. If you do not know how to build a classifier, you can start by looking at this tutorial.
https://learnopencv.com/deep-learning-example-using-nvidia-digits-3-on-ec2/
Thanks dear sir for your advice, i did what you told me, even more i have use a trained neural network with combination of libraries such as opencv, openface i am able to pass an image to the trained network and it tells mewha is the identity of the person in the image. sorry to disturb again in purpose of research, what can i improve in it and where to continue? as i have seen on one of you post i am also following a course on coursera on machine learning, please some guidelines on wat to do next,
sincerelly
Sir Thank you so much for such a great Newsletter.
I am working on Iris Recognition using OpenCv-Python. Sir I need your Suggestion regarding the feature Extraction, Which Feature Extraction algorithm should i use for Iris Feature Extraction. I am working on CASIA iris database.
Thank you
Ayush Agrawal
Hi Ayush,
I have never worked in Iris recognition, but people use 2D Gabor wavelets. In OpenCV, the implementation of Gabor wavelets can be found here
http://docs.opencv.org/3.0-beta/modules/imgproc/doc/filtering.html#getgaborkernel
Sir I am looking to find distance of object from camera. I don’t much idea of it but I want to know that is it possible that we can find distance of object with moving camera?
I’m sorry in advance because I don’t have much idea of it. So kindly suggest me something that can help me out in this. Thank you so much in advance.
Finding a distance of an object from a single camera is not possible. There are special cases when you can do it ( e.g. when you are looking at a plane in 3D and there is object of known dimensions on that plane ), but depth from a single camera in general is not possible. You can use a depth camera like Kinect.
Got it!
Is there any way to find obstacles from moving camera(Not a specially designed camera)?
Thank you sir 🙂
Yes. In the usual case you’d have two cameras with a know distance between them and take two images, one with each camera. But of course you can take an image with one camera, then move the camera a known, exact distance to one side and take a second image. Then proceed as in the first case. But this only works for static scenes where other in the image changes while you are doing the camera.
Also the key point is to move a “known distance” so if this is a moving robot you need some way to measure movement such as wheel odometer or possibly an IMU or most likely a kaman filters that fuses multiple sensors. It is simpler to just use two cameras as a stereo pair.
In nature are are some birds who move their heads from side to side very quickly to get better depth perception. These birds are hunting incests that are in moving streams of water and only get one chance to grab the insect. The bird is small and the eye distance is not enough for good depth at their hunting distance.
In short yes. Depth from a single moving camera is possible BUT you need static scenes and good measurements of the camera’s motion
Thank you so much 🙂 🙂 Really nice answer, very much helpful for me…
Hello Satya,
Great post and I really enjoyed reading it. As suggested by you in the above comment about the distance estimation. I wonder if you could elaborate on the method discussed above.
Suppose i am using single camera and I know the dimension of the object. For example, there is brand sign with a dimension of 65 mm. How one should predict the distance of that sign from the moving camera? Is there any detailed blog of yours or any links on this using OpenCV. Is it possible to do in OpenCV or using CNN (deep learning).
Any help is appreciated.
Thank you,
Sir. Can this method identify foods based on the image?
In this post, I just described some general principles. For detecting food in pictures, you will need to train your own classifier.
I subscribed the page but I didn’t receive the code. please, could you explain me how to get the code.
What would you say is the best algorithm for detecting objects from Open CV (and to be compatible with iOS)
Good Morning Sir, I am college student from Indonesia University of Education.
Can you make an article about How Features can be merge?
and is there any requirement to merge features?
I would be very grateful if you would make the article.
no
Sorry for this late reply. Could you please elaborate more on the question ( possibly with an example )?
Thanks
Good morning sir…
After subscribing successfully i am still not able to download the code for Object Detection
Hi Chintan,
This particular post explains the theory and has no associated code. However, you must have received a link to the code used in other posts. If not, please send me an email at [email protected]
Thanks
Satya
Good Morning Sir ,i am college student who is trying to make an automated light system using human detection sitting in a room ,how can i implement using OPENCV and python? Thank you .
Hi Sir,
i read about HOG from https://learnopencv.com/histogram-of-oriented-gradients
and i have some doubts..
The final HOG feature vector which is normalized is 36×105? and not 9×10⁵? the overlapping part was not merged correct?
However, at the visualizing HOG part, 9×1 normalized histograms is used instead of 36×1?
So the visualizing data is different from the final HOG feature vector??
Can anyone please send me HOG python code.i am new to python so please help me out
Vinayashree Ugrani: You can find it in this course: https://courses.learnopencv.com/courses/227056/lectures/3804017
Thanks a lot for the history part.
Thanks, Ajmal.
Great article, thank you! This is really great help for many people who are interested in this topic. We have also made a research on different Image Recognition APIs, you may find it useful: https://opsway.com/blog/image-recognition-research-choice-api
Hi. Well written technical article. For those of you who would like to harness the power of image recognition without the need to dig deep into machine learning, we have developed easy to use custom visual artificial intelligence @ http://www.vize.it
is there any way to get the relevant code for this particular SVM example (or similar)
I sent email [email protected] but did not get a response
Here is an example.
https://learnopencv.com/handwritten-digits-classification-an-opencv-c-python-tutorial/
Hello, can I reach same accuracy as deep neural networks on this website? https://vize.ai
David: I think the answer is no. As you can see in this tutorial, Satya already mentioned about this: “Every decade or so a new idea comes along that is so effective and powerful that you abandon everything that came before it and wholeheartedly embrace it. Deep Learning is that idea of this decade”
Bonjour Monsieur je cherche un programme sur Python qui nous permet la reconnaissance des formes en utilisant un Raspberry et une caméra et qui affiche sur un lecteur LCD le retard et l’avance par rapport au temps réel
Hello Sir I am looking for a program on Python which allows us the recognition of the forms using a Raspberry and a camera and which displays on an LCD reader the delay and the advance with respect to the real time thanks and i really need your help
Mr. Satya , thank you for you valuable sharing of CV knowledge.
This articles is valuable for me. I appreciate it.
Thanks for the kind words, Fuad. Our course on Computer Vision for Faces will launch again in about a month or so. We have an entire module on Object Detection. You should also check out Deep Learning courses Coursera and Fast.ai.
Sir i am working on the landmark recognition via machine learning…My Project is android based…therefore i am in trouble…
1.Which machine learning algorithm will be best in this situation
2. Which feature extraction algorithm will be best in my case
Sir please guide me … i read you articles these are very helpful
Thanks in advance…
Good work
Thanks!
Amazing thank you
Thanks for the kind words!
Great read!. Thank you
How can I leverage this approach to detect/match hair color in an image
Thanks in advance!
Hi Sir, Great Tutorial, the explanations are so simple and easy to grasp. I was just wondering, are there going to be no further tutorials in the series?
Hi Shubham,
The post has been updated with the links. We have several articles in this series now.
Satya
why am i not able to subscibe? I filled up my email id but did not get any mail. please help!
Hi Ishita,
Sometimes it can take up to 10 minutes. If you did not get it, please send me an email at [email protected]
Wow, such clear clean tutorial. Really excited for more!
Amazing tutorial, can I translate it to Vietnamese with your permission?
Excellent article! It explain the somewhat complex conception in a clear and simple way! Thank you!
By the way, I have one question about HoG, why the algorithm choose 36 bins instead of 9 bins in the procedure of Histogram? Is it a practical way rather than the theoretical way because based on the practices, the performance of 36 bins is better than 9 bins?
Hi,
Can I use face landmarks to train my classifier with svm ? (For emotion recognition)
You could, but the results will not be very good because the landmarks only capture the rough geometry of the face, while emotions have so much more going on.
Hi,
I am really inspired by your works. I am a software engineer, specialise in Inertial navigation and robotics. I am truly interested in image processing and machine vision. I would like to ask a simple question, and hope you can enlighten me.
Is it important (or a must) to find and crop the image of the cat (in your example above) before subject it to feature extractions and then classification? What if the picture is a cat in a living room?
Thank you so much.
Hi Ang,
Thanks for the kind words.
A tight crop does improve results quite a bit. If the crop is too lose, the classifier will get confused because
1. The actual object (cat) may be too small to recognize in the resized image.
2. There may be other objects in the scene which may confuse the classifier.
So, although it is not absolutely necessary, it is very desirable to have the dominant class be prominent in the picture.
Good morning sir, I am a college student from phillipines can you help me on what will I use in leaf recognition?
Hi Ian,
If you have enough data, it is just a matter of using Deep Learning based image classification on your dataset. Use this post as a guide
https://learnopencv.com/image-classification-using-convolutional-neural-networks-in-keras/
Satya
Hello sir
i need svm code in python through open cv by extracting haar features .if you have please share with me
thank you
Thanks for the awesome work, Satya! I’ve learned a lot from your posts.
Now, I’m kind of lost as to how to implement an object detection algorithm that makes the following:
1) detect all objects belonging to a certain class, in an image;
2) crop these objects from the image
All of the tutorials I’ve read so far only classify the image as a whole. Could you please give me some directions? Thank you very much!
Vinicius
Hi
I want to know whether deep learning can be applied to shape faetures of object instaed of direclty applying to the image? Is it feasible?
I want to protect some of the original writing on my website & was wondering how to do this…. a)Can I put the Copyright notation on it without revealing my real name? . b)How do I have proof that it is my original work? How about saving the writing in MS Word?. c)Is there any point in copyrighting the articles/website?.