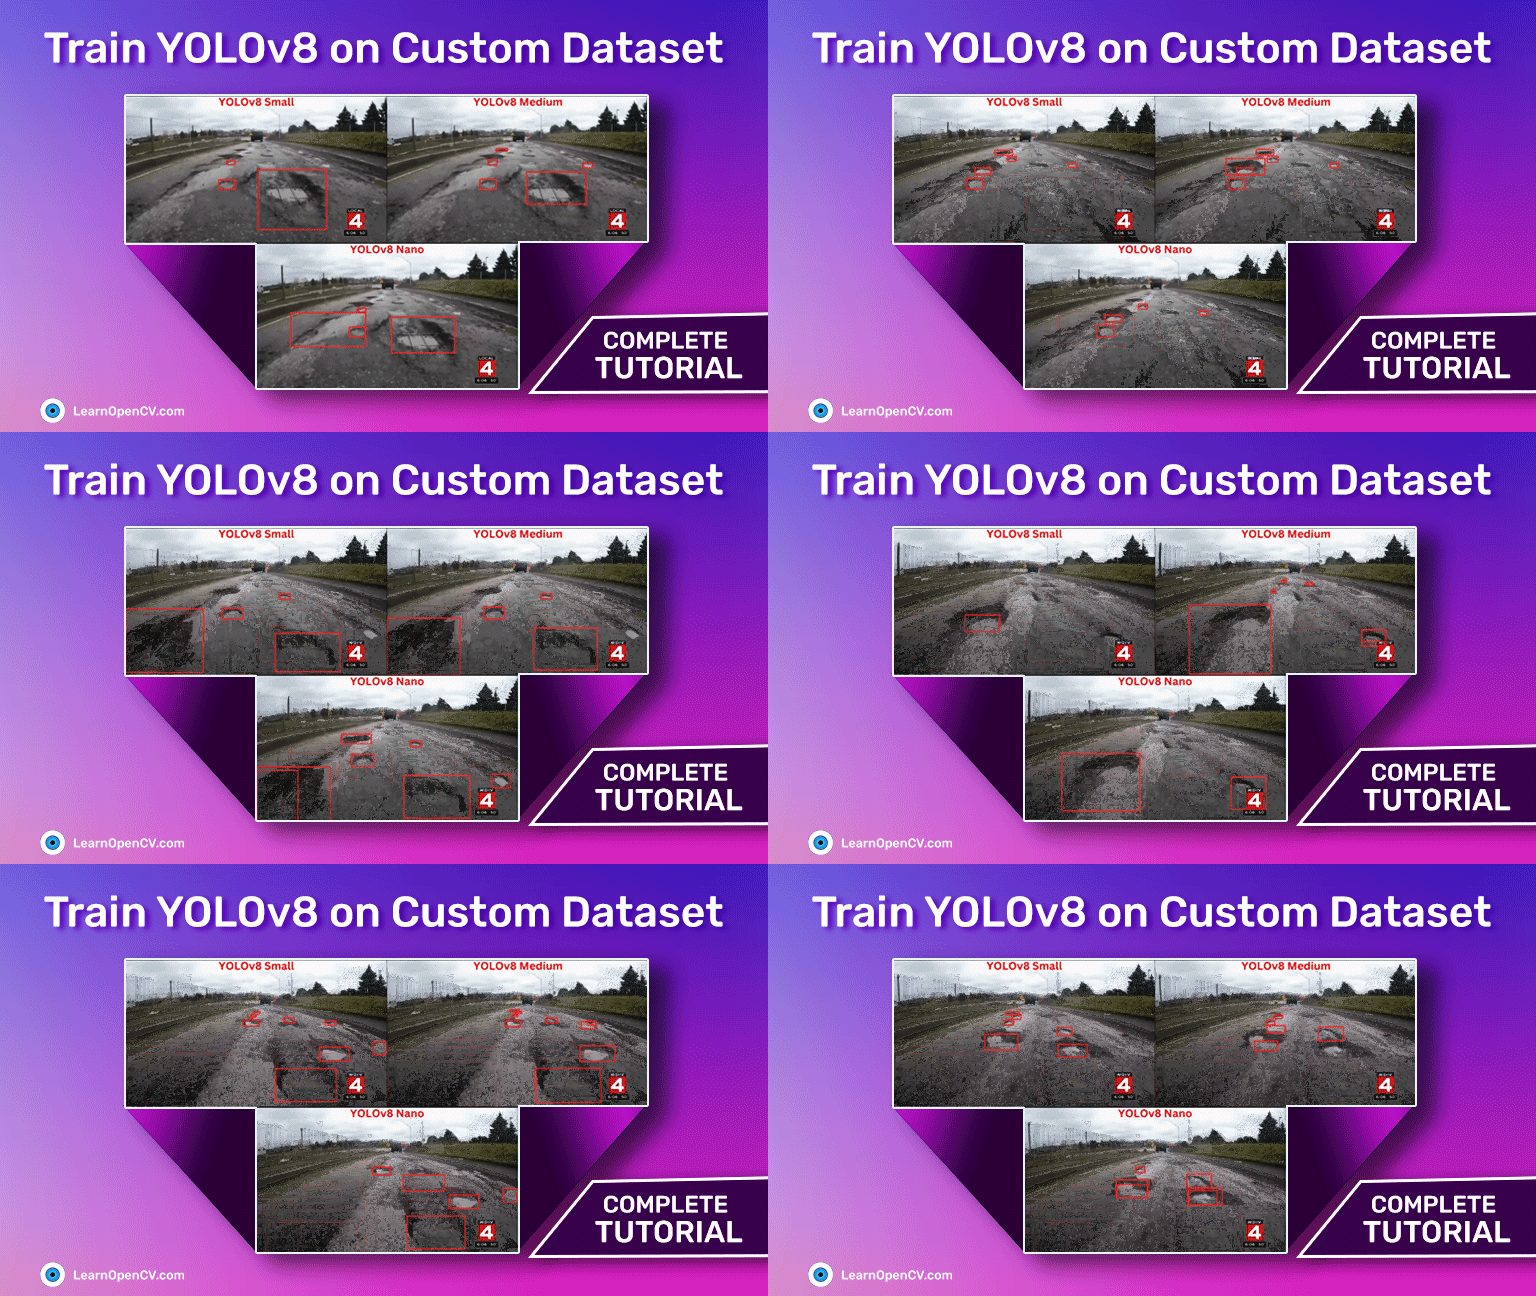
Ultralytics recently released the YOLOv8 family of object detection models. These models outperform the previous versions of YOLO models in both speed and accuracy on the COCO dataset. But what about the performance on custom datasets? To answer this, we will train YOLOv8 models on a custom dataset. Specifically, we will train it on a large scale pothole detection dataset.
While fine tuning object detection models, we need to consider a large number of hyperparameters into account. Training the YOLOv8 models is no exception, as the codebase provides numerous hyperparameters for tuning. Moreover, we will train the YOLOv8 on a custom pothole dataset which mainly contains small objects which can be difficult to detect.
To get the best model, we need to conduct several training experiments and evaluate each. As such, we will train three different YOLOv8 models:
- YOLOv8n (Nano model)
- YOLOv8s (Small model)
- YOLOv8m (Medium model)
After training, we will also run inference on videos to check the real-world performance of these models. This will give us a better idea of the best model among the three.
In addition to these, you will also learn how to use ClearML for logging and monitoring YOLOv8 model training.
- The Pothole Detection Dataset to Train YOLOv8
- Setting Up YOLOv8 to Train on Custom Dataset
- Train YOLOv8 on the Custom Pothole Detection Dataset
- YOLO8 Nano Training on the Pothole Detection Dataset
- YOLO8 Small Training on the Pothole Detection Dataset
- YOLO8 Medium Training on the Pothole Detection Dataset
- YOLOv8n vs YOLOv8s vs YOLOv8m
- Inference using the Trained YOLOv8 Models
- Summary and Conclusion
YOLO Master Post – Every Model Explained
Don’t miss out on this comprehensive resource, Mastering All Yolo Models for a richer, more informed perspective on the YOLO series.
The Pothole Detection Dataset to Train YOLOv8
We are using quite a large pothole dataset in this article which contains more than 7000 images collected from several sources.
To give a brief overview, the dataset includes images from:
- Roboflow pothole dataset
- Dataset from a research paper publication
- Images that have been sourced from YouTube videos and are manually annotated
- Images from the RDD2022 dataset
After going through several annotation corrections, the final dataset now contains:
- 6962 training images
- 271 validation images
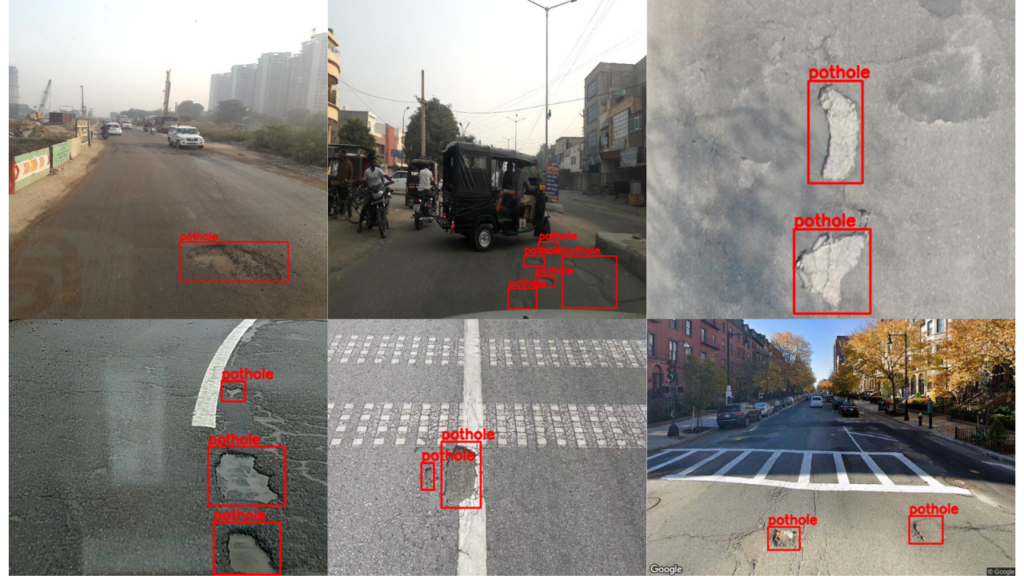
Here are a few images from the dataset, along with the annotations.
It is very clear from the above image that training YOLOv8 on a custom pothole dataset is a very challenging task. The potholes can be of various sizes, ranging from small to large.
Download the Dataset
If you plan to execute the training commands on your local system, you can download the dataset by executing the following command.
$ wget https://www.dropbox.com/s/qvglw8pqo16769f/pothole_dataset_v8.zip?dl=1 -O pothole_dataset_v8.zip
Next, unzip it in the current directory.
unzip pothole_dataset_v8.zip
Inside the directory, we are the dataset is contained in the train and valid folders. As with all other YOLO models, the labels are in the text files with normalized xcenter, ycenter, width, height.
The Pothole Dataset YAML File
For training, we need the dataset YAML to define the paths to the images and the class names.
According to the training commands, we will execute further in this article, this YAML file should be in the project root directory. We will name this file pothole_v8.yaml.
path: pothole_dataset_v8/
train: 'train/images'
val: 'valid/images'

# class names
names:
  0: 'pothole'
According to the above file, the pothole_dataset_v8 directory should be present in the current working directory.
Setting Up YOLOv8 to Train on Custom Dataset
To train YOLOv8 on a custom dataset, we need to install the ultralytics package. This provides the yolo Command Line Interface (CLI). One big advantage is that we do not need to clone the repository separately and install the requirements.
Note: Before moving further into the installation steps, please install CUDA and cuDNN if you want to execute the training steps in your system.
We can install the package using pip.
pip install ultralytics
The above package will install all the dependencies, including Torchvision and PyTorch.
Setting Up ClearML
We do not want to be monitoring our deep learning experiments manually. So, we will use the ClearML integration, which Ultralytics YOLOv8 supports by default. We just need to install the package and initialize it using the API.
pip install clearml
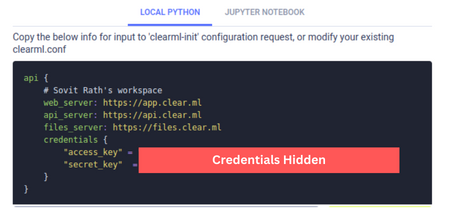
Next, we need to add the API key. But before that, we need to generate a key. Follow the steps to generate and add the key:
- Create a ClearML account.
- Go to Settings => Workspace and click on create new credentials
- Copy the information under the LOCAL PYTHON tab.
- Open the terminal and activate the environment in which CearML is installed. Type and execute
clearml-init. - This will prompt you to paste the above-copied information. That’s it; your ClearML credentials are added to the system.
From now on, any YOLOv8 training experiments that you run in this terminal will be logged into your ClearML dashboard.
Train YOLOv8 on the Custom Pothole Detection Dataset
In this section, we will conduct three experiments using three different YOLOv8 models. We will train the YOLOv8 Nano, Small, and Medium models on the dataset.
Hyperparameter Choices to Train YOLOv8 on Custom Dataset
Here are a few pointers explaining the hyperparameter choices that we make while training:
- We will train each model for 50 epochs. As a concept project, to get started, we will try to get the best possible results with limited training. As we have almost 7000 images, even 50 epochs will take quite some time to train and should give decent results.
- To have a fair comparison between the models, we will set the batch size to 8 in all the experiments,
- As the potholes can be quite small in some images, we will set the image size to 1280 resolution while training. Although this will increase the training time, we can expect better results compared to the default 640 image resolution training.
All the training experiments were carried out on a machine with 24 GB RTX 3090 GPU, Xeon E5-2697 processor, and 32 GB RAM.
As the pothole detection dataset is quite challenging, we will mostly focus on the mAP at 0.50 IoU (Intersection over Union).
Commands for Training YOLOv8 on Custom Dataset
We can either use the CLI or Python API to train the YOLOv8 models. Before moving on to the actual training phase, let’s check out the commands and the possible arguments we may need to deal with.
This is a sample training command using the Nano model.
yolo task=detect mode=train model=yolov8n.pt imgsz=640 data=custom_data.yaml epochs=10 batch=8 name=yolov8n_custom
Here are the explanations of all the command line arguments that we are using:
task: Whether we want todetect,segment, orclassifyon the dataset of our choice.mode: Mode can either betrain,val, orpredict. As we are running training, it should betrain.model: The model that we want to use. Here, we use the YOLOv8 Nano model pretrained on the COCO dataset.imgsz: The image size. The default resolution is 640.data: Path to the dataset YAML file.epochs: Number of epochs we want to train for.batch: The batch size for data loader. You may increase or decrease it according to your GPU memory availability.name: Name of the results directory forruns/detect.
You may also create a Python file (say train.py) and use the Ultralytics Python API to train the model. The following is an example of the same.
from ultralytics import YOLO

# Load the model.
model = YOLO('yolov8n.pt')

# Training.
results = model.train(
   data='custom_data.yaml',
   imgsz=640,
   epochs=10,
   batch=8,
   name='yolov8n_custom'
In the next section, we will move on to the actual training experiments and modify the command line arguments wherever necessary.
YOLO8 Nano Training on the Pothole Detection Dataset
Starting with the YOLO8 Nano model training, the smallest in the YOLOv8 family. This model has 3.2 million parameters and can run in real-time, even on a CPU.
You may execute the following command in the terminal to start the training. This is using the Yolo CLI.
yolo task=detect mode=train model=yolov8n.pt imgsz=1280 data=pothole_v8.yaml epochs=50 batch=8 name=yolov8n_v8_50e
Here are a few pointers regarding the training:
- We are training the model for 50 epochs, which will stay the same for all the models.
- As discussed earlier, we are training with a 1280 which is higher than the default 640.
- The batch size is 8.
The following code block shows the same training setup but using the Python API.
from ultralytics import YOLO

# Load the model.
model = YOLO('yolov8n.pt')

# Training.
results = model.train(
   data='pothole_v8.yaml',
   imgsz=1280,
   epochs=50,
   batch=8,
   name='yolov8n_v8_50e'
)
The training will take a few hours to complete depending on the hardware.
Following are the final plots saved to the local directory after the entire training completes.
We can also evaluate the best model using the following command.
yolo task=detect mode=val model=runs/detect/yolov8n_v8_50e/weights/best.pt name=yolov8n_eval data=pothole_v8.yaml imgsz=1280
We get the following result on the validation set.
Class Images Instances Box(P R mAP50 mAP50-95) all 271 716 0.579 0.369 0.404 0.189
The highest mAP (Mean Average Precision) at 0.50 IoU is 40.4 and at 0.50:0.95 IoU is 18.9. It may seem less but considering that it is a Nano model, it’s not that bad.
YOLO8 Small Training on the Pothole Detection Dataset
Now, let’s train the YOLOv8 Small model on the pothole dataset and check it’s performance.
yolo task=detect mode=train model=yolov8s.pt imgsz=1280 data=pothole_v8.yaml epochs=50 batch=8 name=yolov8s_v8_50e
As was in the previous case, we can also use the Python API to train the model.
We only need to change the model from yolov8n.pt to yolov8s.pt.

Using the YOLOv8 Small model, we reach almost an mAP of 50 at 0.50 IoU. Let’s run the evaluation command to check the actual value.
yolo task=detect mode=val model=runs/detect/yolov8s_v8_50e/weights/best.pt name=yolov8s_eval data=pothole_v8.yaml imgsz=1280
Here are the results.
Class     Images  Instances      Box(P          R      mAP50  mAP50-95):
  all        271        716      0.605      0.468      0.489      0.224
The model reaches an mAP of 49. It is quite good for a small model. Mostly, the image size of 1280 is helping a lot in reaching such numbers.
YOLO8 Medium Training on the Pothole Detection Dataset
For the final experiment, we will train the YOLOv8 Medium model on the pothole dataset.
yolo task=detect mode=train model=yolov8m.pt imgsz=1280 data=pothole_v8.yaml epochs=50 batch=8 name=yolov8m_v8_50e
Following is the corresponding Python API code.
This time, we are passing the model as yolov5m.pt.
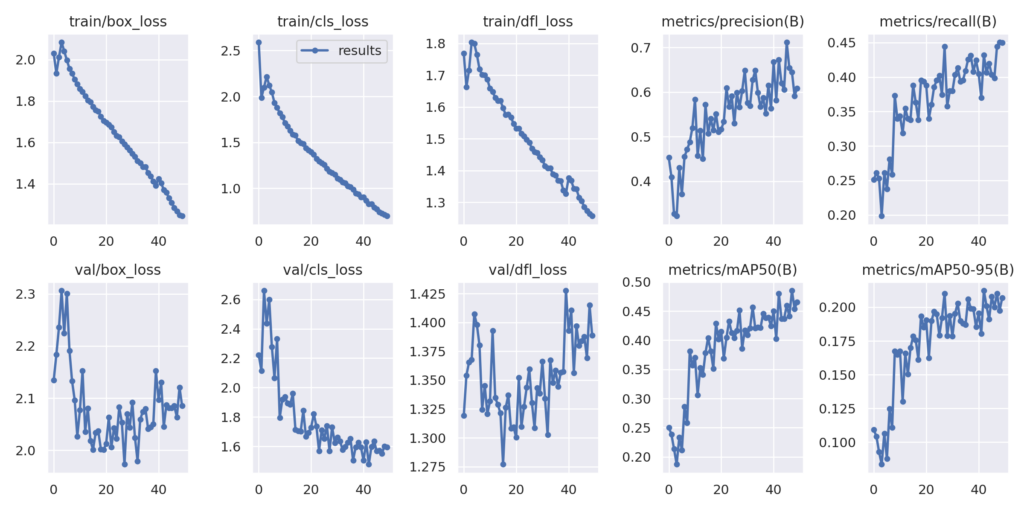
The YOLOv8 medium model also seems to reach an mAP of nearly 50. Let’s run the evaluation to get the actual numbers.
yolo task=detect mode=val model=runs/detect/yolov8m_v8_50e/weights/best.pt name=yolov8m_eval data=pothole_v8.yaml imgsz=1280
Class     Images  Instances      Box(P          R      mAP50  mAP50-95)
all        271        716      0.672      0.429       0.48      0.215
Interestingly, the YOLOv8 Medium model reaches an mAP of 48 within 50 epochs compared to the mAP of 49 using the small model.
YOLOv8n vs YOLOv8s vs YOLOv8m
As you may remember, we set up ClearML at the beginning of the article. All the training results were logged into the ClearML dashboard for each experiment.
Here is a graph from ClearML showing the comparison between each of the YOLOv8 models trained on the pothole dataset.
The above graph showing the mAP of all three models at 0.50 IoU is giving a much clearer picture. Apart from the YOLOv8 Nano model, the other two models are improving all the way through training. And we can train these two models for even longer to get better results.
Inference using the Trained YOLOv8 Models
Currently, we have three well performing models with us. For the next step of experiments, we will run inference and compare the results.
Note: The inference experiments were performed on a laptop with 6 GB GTX 1060 GPU, 8th generation i7 CPU, and 16 GB RAM.
Let’s run inference on a video using the trained YOLOv8 Nano model.
yolo task=detect mode=predict model=runs/detect/yolov8n_v8_50e/weights/best.pt source=inference_data/video_1.mp4 show=True imgsz=1280 name=yolov8n_v8_50e_infer1280 hide_labels=True
To run inference, we change the mode to predict and provide the path to the desired model weights. The source takes either path to a folder containing images and videos or the path to a single file. You may provide the path to a video file of your choice to run inference.
Remember to provide the same imgsz as we did while training to get the best results. As we have only one class, we use hide_labels=True to make the visualizations a bit cleaner.
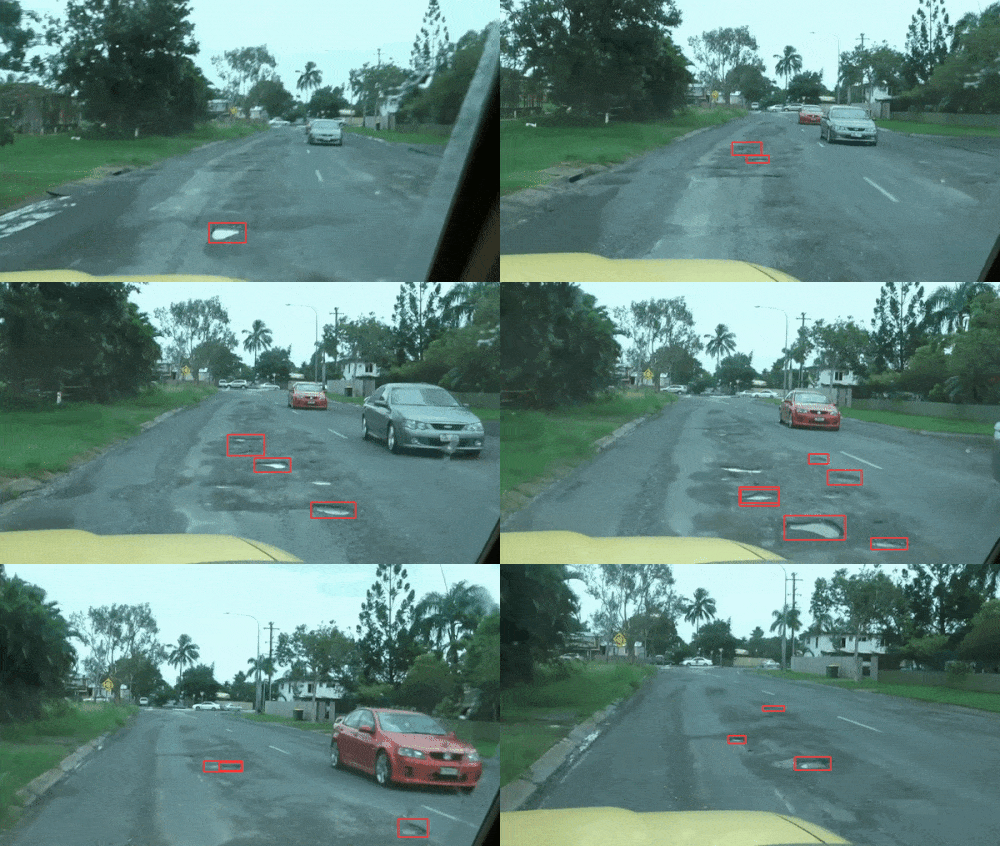
Here are the results.
On the GTX 1060 GPU, the forward pass was running at almost 58 FPS which is pretty fast with a 1280 image resolution.
The results are fluctuating a bit, and also the model is only able to detect the potholes only when they are near.
Here is a comparison between all three on the same video to get a better idea of which model performs the best.
Interestingly, the medium model is detecting more potholes farther away in the first few frames, even though it had less mAP compared to the YOLOv8 Small model.
For reference, the YOLOv8 Small model runs at 35 FPS and the YOLOv8 Medium model runs at 14 FPS.
Here is another comparison between the YOLOv8 Medium and YOLOv8 Small models.
The results look almost identical here due to their very close validation mAP. But in a few frames, the YOLOv8 Medium model seems to detect smaller potholes.
Most probably, with longer training, the YOLOv8 Medium model will surpass the YOLOv8 Small model.
Summary and Conclusion
In this article, we had a detailed walkthrough to train the YOLOv8 models on a custom dataset. In the process, we also carried out a small real-world training experiment for pothole detection.
The experiments revealed that training object detection models on small objects could be challenging even with sufficient samples. We could observe this as training for 50 epochs was insufficient, and the mAP graphs were still increasing. Also, with smaller objects, larger object detection models (YOLOv8 Medium vs Nano in this case) seem to perform better when carrying out detection on new images and videos.
Here is a quick summary of all the points that we covered:
- We started with the setting up of YOLOv8 and Ultralytics.
- Then we saw how to set up ClearML for logging.
- After preparing the dataset, we conducted three different YOLOv8 training experiments.
- Finally, we ran evaluation and inference to compare the three trained models.
If you extend this project, we would love to hear about your experience in the comment section.
References
- Ultralytics
- YOLOv8 Docs
- Dataset references:


