

OpenCV library is widely used due to its extensive coverage of the computer vision tasks, and availability to involve it in various projects, including deep learning. Usually, OpenCV is used with C++ and Python API; even though it can be used with Java. In this article, we will show an example of how it can be used together using OpenCV Java API.
We will explore how convolutional neural networks could be included in the pipeline of Java application using the OpenCV DNN module.
This post will be helpful for people who are familiar with Java and would like to experiment with the deep learning field.
Here is what we will do in the post:
- Convert the MobileNet classification model trained in PyTorch to ONNX
- Check the model prediction on a simple example
- Construct a Java pipeline for image classification
MobileNet
MobileNets are a family of mobile-first low-latency and low-power DNN models. In this post, we use the MobileNetV2 model to transform the final Java application.
The MobileNetV2 architecture, based on MobileNetV1, was introduced in MobileNetV2: Inverted Residuals and Linear Bottlenecks in 2019. The idea of the network is its aptness to mobile devices and platforms with constrained resources. It was achieved with the reduction of the operations and memory consumption without impact on the model accuracy through the novel layer module called “inverted residual with linear bottleneck”.
Network input data is filtered with lightweight depthwise convolutions. Further linear convolutions will transform the obtained features into a low-dimensional representation.


ONNX Format
Open Neural Network Exchange (ONNX) is an open-source AI project. Its goal is to make the interchange between neural network models and other frameworks possible.
Thus, if you faced a necessity to exploit a DNN model in a project, composed with another tool, which differs from the model tool, you can easily deal with it, transferring the model into ONNX format. Afterwards, it is ready for importing into another framework.
The examples of such transfers can be PyTorch to CoreML conversion or, in our case, PyTorch to org.opencv.dnn.Net conversion.
Code Implementation
In this section, we will learn how to convert PyTorch MobileNetV2 into org.opencv.dnn.Net, exploring both Python and Java examples.
PyTorch Model into ONNX Conversion
We have provided a Python script (Mobilenetv2ToOnnx.py) for converting the model trained in PyTorch to ONNX format. It consists of the following pipeline:
- Data loading and preprocessing
- Initialization of the configured PyTorch model
- PyTorch model conversion to ONNX
- Evaluation and prediction comparison of the models – original and converted
Here is how its main function looks like:
# read and process the input image
image = get_preprocessed_image(image_name=args.input_image)

# obtain original model
pytorch_model = models.mobilenet_v2(pretrained=True)

# provide inference of the original PyTorch model
pytorch_model.eval()
pytorch_predictions = pytorch_model(torch.Tensor(image)).detach().numpy()

# obtain OpenCV generated ONNX model
onnx_model_path = get_onnx_model(original_model=pytorch_model, input_image=image)

# check if conversion succeeded
onnx_model = onnx.load(onnx_model_path)
onnx.checker.check_model(onnx_model)

# check onnx model output
compare_pytorch_onnx(
    pytorch_predictions, onnx_model_path, image,
)

# decode classification results
get_predicted_class(pytorch_preds=pytorch_predictions)

To run the script for the model conversion to ONNX format and its further evaluation execute the below line:
python Mobilenetv2ToOnnx.py
The default input image for inference is images/coffee.jpg:

For more details, check the README.md file in the GitHub repository.
Let’s take a look through the code in detail.
1. Data Preparation
It introduces the necessary image transformations (resize, center crop, normalization) and shape transformations:
def get_preprocessed_image(image_name):
  # read image
    original_image = cv2.imread(image_name)

    # convert original image to RGB format
    image = cv2.cvtColor(original_image, cv2.COLOR_BGR2RGB)

    # transform input image:
    # 1. resize the image
    # 2. crop the image
    # 3. normalize: subtract mean and divide by standard deviation
    transform = Compose(
        [
            Resize(height=256, width=256),
            CenterCrop(224, 224),
            Normalize(
                 mean=[0.485, 0.456, 0.406],
                 std=[0.229, 0.224, 0.225]),
        ],
    )
    image = transform(image=image)["image"]

    # change the order of channels
    image = image.transpose(2, 0, 1)
    return np.expand_dims(image, axis=0)
2. Initializing the Pre-trained PyTorch MobileNetV2 model
pytorch_model = models.mobilenet_v2(pretrained=True)
3. Converting PyTorch model to ONNX
We convert PyTorch model to pytorch_mobilenet.onnx with torch.onnx.export function and OpenCV Net extraction with cv2.dnn.readNetFromONNX(...):
torch.onnx.export(
    original_model, torch.Tensor(input_image), model_name, verbose=True,
)

converted_onnx_model = cv2.dnn.readNetFromONNX(model_name)
4. Evaluation and predictions comparison:
To do so, we should:
- configure ONNX InferenceSession and get the inference results:
    # get onnx result
    session = onnxruntime.InferenceSession(onnx_model_path)
    input_name = session.get_inputs()[0].name
    onnx_result = session.run([], {input_name: input_image})
    onnx_result = np.squeeze(onnx_result, axis=0)
- compare predictions obtained from the initial PyTorch model and ONNX:
for test_onnx_result, gold_result in zip(onnx_result, original_model_preds):
        np.testing.assert_almost_equal(
            gold_result, test_onnx_result, decimal=3,
        )
Code Execution
Following is the output after executing the python script.
ONNX model was successfully generated: models/pytorch_mobilenet.onnx

Checking PyTorch model and converted ONNX model outputs ...
PyTorch and ONNX output values are equal!

Predicted class by PyTorch model:  cup
OpenCV Java Model Inference
Now that we have obtained the network model (pytorch_mobilenet.onnx) with the help of Mobilenetv2ToOnnx.py script, we can transfer it into the desired environment; in our case it’s Java. The general transferring and inference pipeline is described in the below code:
public static void main(String[] args) {
    String imageLocation = "images/coffee.jpg";

    // load the OpenCV native library
    System.loadLibrary(Core.NATIVE_LIBRARY_NAME);

    // read and process the input image
    Mat inputBlob = DnnOpenCV.getPreprocessedImage(imageLocation);

    // read generated ONNX model into org.opencv.dnn.Net object
    Net dnnNet = Dnn.readNetFromONNX(DnnOpenCV.MODEL_PATH);
    System.out.println("DNN from ONNX was successfully loaded!");

    // set OpenCV model input
    dnnNet.setInput(inputBlob);

    // provide inference
    Mat classification = dnnNet.forward();

    // decode classification results
    DnnOpenCV.getPredictedClass(classification);
}
Data Preprocessing
Let’s begin with data preprocessing. Firstly, we define some constant values significant for the image transformations:
private static final int TARGET_IMG_WIDTH = 224;
private static final int TARGET_IMG_HEIGHT = 224;

private static final double SCALE_FACTOR = 1 / 255.0;

private static Mat imageRead;
Here SCALE_FACTOR will be multiplied by the pixel values to scale them between 0 and 1.
imageRead is initialised outside the function scope to make it accessible for the whole class.
The below code presents image reading into org.opencv.core.Mat and its resizing:
// get the image from the internal resource folder
imageRead = Imgcodecs.imread(imagePath);

// this object will store the preprocessed image
Mat image = new Mat();

// resize input image
Imgproc.resize(imageRead, image, new Size(256, 256));
For further image manipulations, we need to convert the Mat object into CvType.CV_32FC3 floating-point type for the correct representation of values:
// create empty Mat images for float conversions
Mat imgFloat = new Mat(image.rows(), image.cols(), CvType.CV_32FC3);

// convert input image to float type multiplying by SCALE_FACTOR
image.convertTo(imgFloat, CvType.CV_32FC3, SCALE_FACTOR);
During the conversion process, the image values were multiplied by the SCALE_FACTOR. Thus, we have scaled values in the imgFloat org.opencv.core.Mat of the float type.
Center Cropping
The next step is image center cropping:
// crop input image
imgFloat = centerCrop(imgFloat);
The below lines are centerCrop core:
int y1 = Math.round((inputImage.rows() - TARGET_IMG_HEIGHT) / 2);
int y2 = Math.round(y1 + TARGET_IMG_HEIGHT);
int x1 = Math.round((inputImage.cols() - TARGET_IMG_WIDTH) / 2);
int x2 = Math.round(x1 + TARGET_IMG_WIDTH);

Rect centerRect = new Rect(x1, y1, (x2 - x1), (y2 - y1));
Prepare image for input
The final stage is model input preparation with Dnn.blobFromImage(...) function, which provides 4-dimensional NCHW Mat, where H and W are equal to the appropriate Size(TARGET_IMG_WIDTH, TARGET_IMG_HEIGHT) values:
// prepare DNN input
Mat blob = Dnn.blobFromImage(
    imgFloat,
    1.0, /* default scalefactor */
    new Size(TARGET_IMG_WIDTH, TARGET_IMG_HEIGHT), /* target size */
    mean,  /* mean */
    true, /* swapRB */
    false /* crop */
);

// divide on std
Core.divide(blob, std, blob);
It is worth noting that the function Dnn.blobFromImage(...) has all the necessary operations for basic image transformations:
- scaling between 0 and 1
- mean subtraction
- BGR to RGB conversion
- central crop.
This set of transformations is perfectly suited for Caffe models. However, in our case, we need to divide pixel values by std, and implementing it with Core.divide(...). Another important detail is scaling. In blobFromImage function image is scaled after mean subtraction:
images[i] -= mean;
images[i] *= scalefactor;
Hence, we scale the image with convertTo(imgFloat, CvType.CV_32FC3, SCALE_FACTOR) to fit the PyTorch data preprocessing pipeline.
We also have to use the central crop before blobFromImage. The reason is the initial image resizing to 256 × 256. There are the following lines in OpenCV documentation:
“If [the] crop is true, [the] input image is resized, so one side after resize is equal to [the] corresponding dimension in size, and another one is equal or larger. Then, a crop from the center is performed”
Thus, applying blobFromImage cropping differs from the PyTorch preprocessing pipeline.
Read the ONNX model
To obtain converted MobileNetV2 model we use Dnn.readNetFromONNX(DnnOpenCV.MODEL_PATH)
// read generated ONNX model into org.opencv.dnn.Net object
Net dnnNet = Dnn.readNetFromONNX(DnnOpenCV.MODEL_PATH);
System.out.println("DNN from ONNX was successfully loaded");
For the inference process, we pass the prepared inputBlob and initiate forward().
// set OpenCV model input
dnnNet.setInput(inputBlob);

// provide inference
Mat classification = dnnNet.forward();
Decode the classification results
To below code preforms the class name decoding:
// prepare ArrayList from the file with listed classes
ArrayList<String> imgLabels = new ArrayList<String>();
try {
    imgLabels = getImgLabels(IMAGENET_CLASSES);
} catch (IOException ex) {
    System.out.printf("Could not read %s file:%n", IMAGENET_CLASSES);
    ex.printStackTrace();
}
// obtain max prediction result
Core.MinMaxLocResult mm = Core.minMaxLoc(classificationResult);
double maxValIndex = mm.maxLoc.x;
System.out.println("Predicted Class: " + imgLabels.get((int) maxValIndex));
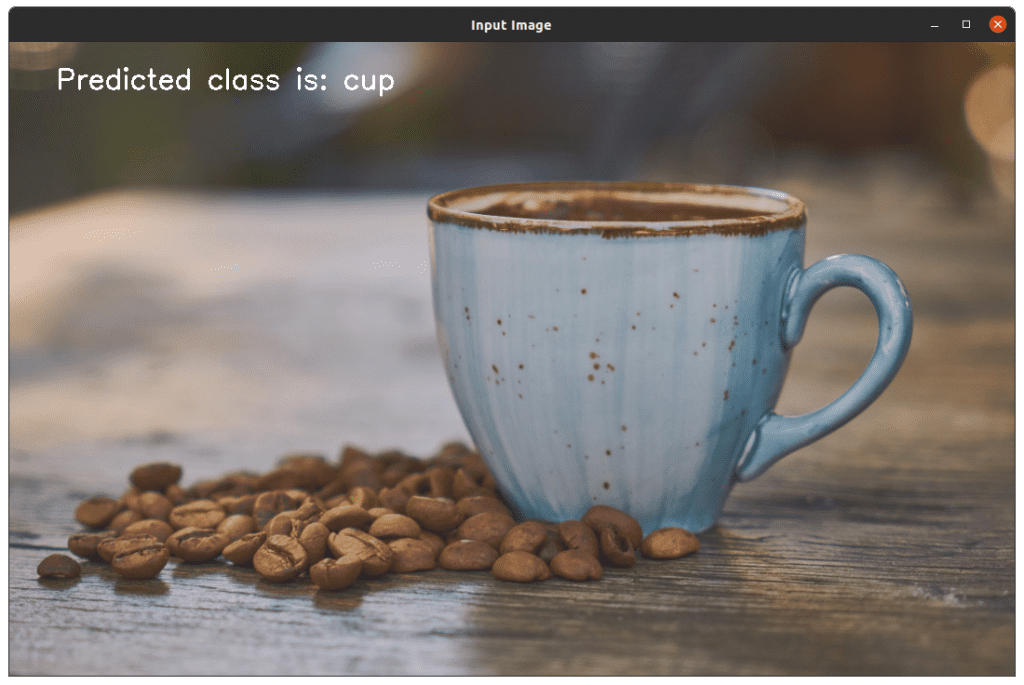
OpenCV Java Code Execution
When the java code is executed, it predicts the object in the image on the terminal
DNN from ONNX was successfully loaded!
Predicted class: cup
Moreover, a window pops up, which displays the input image and the predicted object.
As a result, we get the equivalent classification results. The implemented classification logic in Java can be built into an Android application. Refer this post to learn how this could be done.