

The life of a machine learning engineer consists of long stretches of frustration and a few moments of joy!
First, struggle to get your model to produce good results on your training data. You visualize your training data, clean it up, and train again. You read about bias variance tradeoff in machine learning to systematically approach the training process.
One fine day your PyTorch model is trained to perfection, and it is ready for production.
That’s pure joy!
You are proud of the accuracy, you mark your task as completed in your project tracker, and inform your CTO the model is ready.
She shakes her head in disapproval and informs you the model is not ready for production! Training a model is not enough. You need to modify the model, so it is efficient at run time (a.k.a inference).
You don’t know how to proceed. Your kind CTO tells you to read this post on TensorRT at LearnOpenCV.com. So here you are to be delighted with yet another learning experience.
In this post, you will learn how to quickly and easily use TensorRT for deployment if you already have the network trained in PyTorch.
We will use the following steps.
- Train a model using PyTorch
- Convert the model to ONNX format
- Use NVIDIA TensorRT for inference
In this tutorial, we simply use a pre-trained model and skip step 1. Now, let’s understand what are ONNX and TensorRT.
What is ONNX?
There are many frameworks for training a deep learning model. The most popular ones are Tensorflow and PyTorch. However, a model trained by Tensorflow cannot be used with PyTorch and vice-versa.
ONNX stands for Open Neural Network Exchange. It is an open format built to represent machine learning models.
You can train your model in any framework of your choice and then convert it to ONNX format.
The huge benefit of having a common format is that the software or hardware that loads your model at run time only needs to be compatible with ONNX.
ONNX is to machine learning models what JPEG is to images or MPEG is to videos.


What is TensorRT?
NVIDIA’s TensorRT is an SDK for high performance deep learning inference.
It provides APIs to do inference for pre-trained models and generates optimized runtime engines for your platform.
There are a variety of ways in which this optimization is achieved. For example, TensorRT enables us to use INT8 (8-bit integer) or FP16 (16-bit floating point) arithmetic instead of the usual FP32. This decrease in precision can significantly speed up inference with a tiny decrease in accuracy.
Other kinds of optimizations include minimizing GPU memory footprint by reusing memory, fusing layers and tensors, selecting the appropriate data layers based on hardware, and so forth.
Environment Setup for TensorRT
To reproduce the experiments mentioned in this article you’ll need an NVIDIA graphics card. Any architecture newer than Maxwell, which compute capability is 5.0, will do. You can find your GPU compute capability in the table here: https://developer.nvidia.com/cuda-gpus#compute. Don’t forget to install appropriate drivers.
Install PyTorch, ONNX, and OpenCV
Install Python 3.6 or later and run
python3 -m pip install -r requirements.txt
Requirements.txt content:
torch==1.2.0
torchvision==0.4.0
albumentations==0.4.5
onnx==1.4.1
opencv-python==4.2.0.34
The code was tested on specified versions. But it’s okay to try to launch it on other versions if you have some of those components already installed.
Install TensorRT
- Download and install NVIDIA CUDA 10.0 or later following by official instructions: link
- Download and extract CuDNN library for your CUDA version (login required): link
- Download and extract NVIDIA TensorRT library for your CUDA version (login required): link. The minimum required version is 6.0.1.5. Please follow the Installation Guide for your system and don’t forget to install Python’s part
- Add the absolute path to CUDA, TensorRT, CuDNN libs to the environment variable
PATHorLD_LIBRARY_PATH - Install PyCUDA
We are now ready to for our experiment.
How to Convert a PyTorch Model to TensorRT
Let’s go over the steps needed to convert a PyTorch model to TensorRT.
1. Load and launch a pre-trained model using PyTorch
First of all, let’s implement a simple classification with a pre-trained network on PyTorch. For example, we will take Resnet50 but you can choose whatever you want. You can find more info and explanations of how to work with PyTorch here: # PyTorch for Beginners: Image Classification using Pre-trained models
from torchvision import models
model = models.resnet50(pretrained=True)
Next important step: preprocess the input image. We need to know what transformations were made during training to replicate them for inference. We recommend the following modules for the preprocessing step: albumentations and cv2 (OpenCV).
The model was trained on images with size 224×224. Then input data was normalized (divide pixel values by 255, subtract mean and divide by standard deviation).

import cv2
import torch
from albumentations import Resize, Compose
from albumentations.pytorch.transforms import  ToTensor
from albumentations.augmentations.transforms import Normalize

def preprocess_image(img_path):
    # transformations for the input data
    transforms = Compose([
        Resize(224, 224, interpolation=cv2.INTER_NEAREST),
        Normalize(mean=[0.485, 0.456, 0.406], std=[0.229, 0.224, 0.225]),
        ToTensor(),
    ])

    # read input image
    input_img = cv2.imread(img_path)
    # do transformations
    input_data = transforms(image=input_img)["image"]
Prepare batch to pass to the network. There is only one image in batch in our case. Note we upload input data to GPU to execute the program faster and to make our comparison with TensorRT honest.
    batch_data = torch.unsqueeze(input_data, 0)
    return batch_data

input = preprocess_image("turkish_coffee.jpg").cuda()
Now we can do the inference. Don’t forget to switch the model to evaluation mode and copy it to GPU too. As a result, we’ll get tensor[1, 1000] with confidence on which class object belongs to.
model.eval()
model.cuda()
output = model(input)
To have human-readable results we need the post-processing step. Class names can be found at imagenet_classes.txt. Calculate Softmax to get percentages for every class and print top predicted classes by the network.
def postprocess(output_data):
    # get class names
    with open("imagenet_classes.txt") as f:
        classes = [line.strip() for line in f.readlines()]
    # calculate human-readable value by softmax
    confidences = torch.nn.functional.softmax(output_data, dim=1)[0] * 100
    # find top predicted classes
    _, indices = torch.sort(output_data, descending=True)
    i = 0
    # print the top classes predicted by the model
    while confidences[indices[0][i]] > 0.5:
        class_idx = indices[0][i]
        print(
            "class:",
            classes[class_idx],
            ", confidence:",
            confidences[class_idx].item(),
            "%, index:",
            class_idx.item(),
        )
        i += 1

postprocess(output)
Time to test our script! Our input image:

And results:
class: cup, confidence: 92.430747%, index: 968
class: espresso, confidence: 6.138075%, index: 967
class: coffee mug, confidence: 0.728557%, index: 504
2. Convert the PyTorch model to ONNX format
To convert the resulting model you need just one instruction torch.onnx.export, which required the following arguments: the pre-trained model itself, tensor with the same size as input data, name of ONNX file, input and output names.
ONNX_FILE_PATH = 'resnet50.onnx'
torch.onnx.export(model, input, ONNX_FILE_PATH, input_names=['input'],
                  output_names=['output'], export_params=True)
To check that the model converted fine, call onnx.checker.check_model:
onnx_model = onnx.load(ONNX_FILE_PATH)
onnx.checker.check_model(onnx_model)
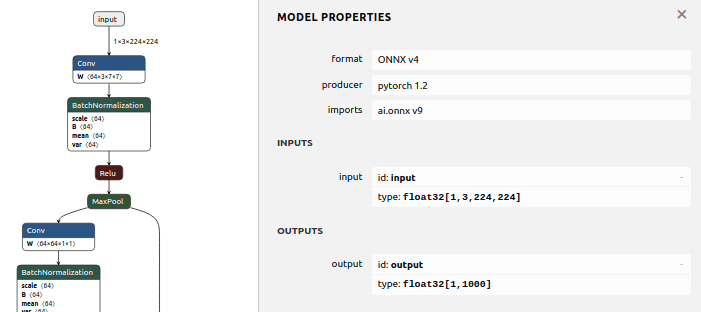
3. Visualize ONNX Model
Now, let’s visualize our ONNX graph using Netron. To install this, launch:
python3 -m pip install netron
Type netron in command line and open http://localhost:8080/ at your browser. You will see the full network graph. Check that input and output have the expected size.
4. Initialize model in TensorRT
Now it’s time to parse the ONNX model and initialize TensorRT Context and Engine. To do it we need to create an instance of Builder. The builder can create Network and generate Engine (that would be optimized to your platform\hardware) from this network. When we create Network we can define the structure of the network by flags, but in our case, it’s enough to use the default flag, which means all tensors would have an implicit batch dimension. With Network definition we can create an instance of Parser and finally, parse our ONNX file.
import pycuda.driver as cuda
import pycuda.autoinit
import numpy as np
import tensorrt as trt

# logger to capture errors, warnings, and other information during the build and inference phases
TRT_LOGGER = trt.Logger()

def build_engine(onnx_file_path):
    # initialize TensorRT engine and parse ONNX model
    builder = trt.Builder(TRT_LOGGER)
    network = builder.create_network()
    parser = trt.OnnxParser(network, TRT_LOGGER)

    # parse ONNX
    with open(onnx_file_path, 'rb') as model:
        print('Beginning ONNX file parsing')
        parser.parse(model.read())
    print('Completed parsing of ONNX file')
It’s possible to configure some engine parameters such as maximum memory allowed by TensorRT’s engine or set FP16 mode. We also should specify the size of the batch.
    # allow TensorRT to use up to 1GB of GPU memory for tactic selection
    builder.max_workspace_size = 1 << 30
    # we have only one image in batch
    builder.max_batch_size = 1
    # use FP16 mode if possible
    if builder.platform_has_fast_fp16:
        builder.fp16_mode = True
After that, we can generate the Engine and create the executable Context. The engine takes input data, performs inferences, and emits inference output.
# generate TensorRT engine optimized for the target platform
    print('Building an engine...')
    engine = builder.build_cuda_engine(network)
    context = engine.create_execution_context()
    print("Completed creating Engine")

    return engine, context
Tips: Initialization can take a lot of time because TensorRT tries to find out the best and faster way to perform your network on your platform. To do it only once and then use the already created engine you can serialize your engine. Serialized engines are not portable across different GPU models, platforms, or TensorRT versions. Engines are specific to the exact hardware and software they were built on. More info can be found here: https://docs.nvidia.com/deeplearning/tensorrt/developer-guide/index.html#serial_model_c.
5. Main pipeline
So what would the full pipeline look like for inference in TensorRT? Let’s take a look at the main function. First, let’s parse the model and initialize the engine and the context:
def main():
    # initialize TensorRT engine and parse ONNX model
    engine, context = build_engine(ONNX_FILE_PATH)
When we have the initialized engine we could find out the dimensions of the input and output in our program. To know that we can allocate memory required for input data and output data. In common cases, a model can have a bunch of inputs and outputs, but in our case, we know that we have only one input and one output.
    # get sizes of input and output and allocate memory required for input data and for output data
    for binding in engine:
        if engine.binding_is_input(binding):  # we expect only one input
            input_shape = engine.get_binding_shape(binding)
            input_size = trt.volume(input_shape) * engine.max_batch_size * np.dtype(np.float32).itemsize  # in bytes
            device_input = cuda.mem_alloc(input_size)
        else:  # and one output
            output_shape = engine.get_binding_shape(binding)
            # create page-locked memory buffers (i.e. won't be swapped to disk)
            host_output = cuda.pagelocked_empty(trt.volume(output_shape) * engine.max_batch_size, dtype=np.float32)
            device_output = cuda.mem_alloc(host_output.nbytes)
CUDA functions could be called asynchronously in streams, sequences of commands that execute in order. All commands in one stream will be executed sequentially, but different streams can execute their commands concurrently or out of order. When you execute asynchronous CUDA commands without specifying a stream, the runtime uses the default null stream. In our simple script, we’ll create only one stream and it would be enough. In more complicated cases, you can use different streams to process different images concurrently, for example.
    # Create a stream in which to copy inputs/outputs and run inference.
    stream = cuda.Stream()
To get the same result in TensorRT as in PyTorch we would prepare data for inference and repeat all preprocessing steps that we’ve taken before. The main benefit of the Python API for TensorRT is that data preprocessing and postprocessing can be reused from the PyTorch part. The only additional things we should do is place data contiguously and use page-locked memory where it’s possible. Then we can copy that data to GPU and use it for inference.
   # preprocess input data
    host_input = np.array(preprocess_image("turkish_coffee.jpg").numpy(), dtype=np.float32, order='C')
    cuda.memcpy_htod_async(device_input, host_input, stream)
Do inference and copy the result from device to host:
# run inference
    context.execute_async(bindings=[int(device_input), int(device_output)], stream_handle=stream.handle)
    cuda.memcpy_dtoh_async(host_output, device_output, stream)
    stream.synchronize()
The result would be stored at host_output as an array with one dimension. So before using the postprocessing from PyTorch’s part to get human-readable values, we should reshape it.
# postprocess results
    output_data = torch.Tensor(host_output).reshape(engine.max_batch_size, output_shape[0])
    postprocess(output_data)
That’s all! Now you can launch your script and test it.
6. Accuracy Test
We did some ad-hoc testing that is summarized in the table below.
| Class | Index | PyTorch | TensorRT : FP32 | TensorRT : FP16 |
|---|---|---|---|---|
| cup | 968 | 92.430747% | 92.430747% | 92.142623% |
| espresso | 967 | 6.138075% | 6.138075% | 6.369128% |
| coffee mug | 504 | 0.728557% | 0.728557% | 0.760683% |
As we can see, the predicted classes match. Confidence is almost the same in FP32 mode (error less than 1e-05). In FP16 mode error is bigger (~0.003), but it’s still enough to get correct predictions.
Keep in mind there is no guarantee that you’ll get the same error in tests with different hardware, software, or even input picture. The error can depend on the initial benchmark decision and can be different with different cards. We get these results with the following configuration:
Ubuntu 18.04.4, AMD® Ryzen 7 2700x eight-core processor × 16, GeForce RTX 2070 SUPER, TensorRT 6.0.1.5, CUDA 10.0
7. Speed-up using TensorRT
To compare time in PyTorch and TensorRT we wouldn’t measure the time of initialization of model because we initialize it only once. So we’ll compare inference time. At the first launch, CUDA initializes and caches some data so the first call of any CUDA function is slower than usual. To account for this we run inference a few times and get an average time. And what we have:
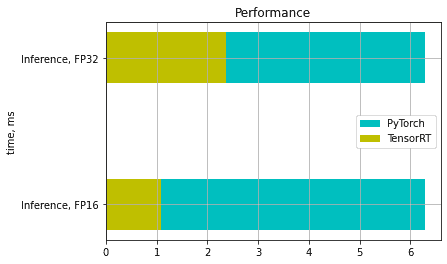
In our example, we have achieved 4-6 times speed-up in FP16 mode and 2-3 times speed-up in FP32 mode.