This blog post continues with our previous article, “Roadmap to Automated Image Annotation Tool using OpenCV”. Here, we will take a look at how to use pyOpenAnnotate and delve into the details of the software development workflow.
- What is PyOpenAnnotate?
- Install PyOpenAnnotate for Labeling Images
- Annotate Images
- Annotate Videos
- Command Line Flags
- Automated Annotation Tool Base Loop
- Adding Manual Annotation and Feedback Controls
- Navigation Loop in PyOpenAnnotate
- pyOpenAnnotate Main Loop
What is PyOpenAnnotate?
PyOpenAnnotate is an automated annotation tool built using OpenCV. It is a simple tool that is designed to help users label and annotate images and videos using computer vision techniques. It is particularly well-suited for annotating simple datasets, such as images with plain backgrounds or infrared images. It is especially useful for annotating collections of images or videos that contain a single class of objects.

This FREE annotation tool has been designed to make the annotation pipeline faster and simpler. It is a cross-platform pip package developed with educational intent for learners and researchers.
Install PyOpenAnnotate for Labeling Images
To install pyOpenAnnotate, you must have Python and pip (the Python package manager) installed on your computer. Once you have these tools set up, you can use the following command to install pyOpenAnnotate.
pip install pyOpenAnnotate
Alternatively, install pyOpenAnnotate by cloning the package’s source code from its GitHub repository and install locally. Make sure you have Git installed on your computer.
Open a terminal or command prompt window and navigate to the directory where you want to clone the pyOpenAnnotate repository. Use the git clone command to download the repository to your local machine. Do leave a star if you like it.
git clone <repository_link>
cd pyOpenAnnotate
pip install -U pip
pip install .
This will install pyOpenAnnotate and any required dependencies from the source code you just cloned.
Annotate Images using pyOpenAnnotate
To use PyOpenAnnotate to annotate images, you will need to use the annotate command and specify the –img flag followed by the path to the directory that contains the images you want to annotate.
annotate --img /path/to/images
This will start the annotation process and prompt you to begin labeling the objects or features in the images. You can use the mouse and keyboard controls that are provided by PyOpenAnnotate to interact with the annotation process and label the objects in the images.
Mouse controls:
- Click, drag, and release to draw a bounding box around an object in an image.
- Double-click to remove an existing bounding box.
Keyboard controls:
- N or D: Save and go to the next image.
- A or B: Save and go to the previous image.
- T: Toggle the display of object masks.
- Q: Save and Exit.
The annotation files are saved to a file called `annotations.txt` (YOLO format) and stored in the `labels` directory. The image names are written in the `names.txt` file.
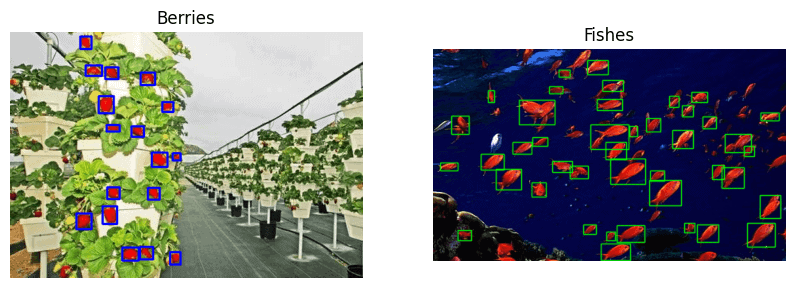
Following are some example datasets annotated using PyOpenAnnotate.

Video Annotation using PyOpenAnnotate
To use PyOpenAnnotate to annotate a video, you will need to use the annotate command and specify the –vid flag followed by the path to the video file you want to annotate.
By default, PyOpenAnnotate does not skip any frames when processing a video. However, you can use the –skip flag to specify that you want to skip a certain number of frames. For example, you might use the following command to skip every other frame:
annotate --vid /path/to/video.mp4 --skip 2
It starts processing the video and saves the frames to images directory. None of the frames are skipped unless you specify –skip flag followed by skip count. Once video processing ends, or keyboard interrupt is provided, annotation canvas starts. This part is the same as the image annotation explained above.
Command Line Flags
PyOpenAnnotate also includes a number of helpful command line flags that can be used to customize the annotation process.
The –resume flag allows you to resume annotation from where you left off. This can be useful if you need to interrupt the annotation process for any reason or if you want to divide the annotation process into multiple sessions. To skip frames while annotating videos, use –skip flag. Adding -T flag initiates mask display window from the start. Check documentation for more information on command line flags.
Automated Annotation Workflow
PyOpenAnnotate has been designed to keep simplicity as the top priority. The entire pipeline can be broken down into the following three units.
- Base Loop
- Navigation Loop
- PyOpenAnnotate Main Loop
We will review the annotation tool flow chart and occasionally look at code snippets. You can download the code and do a side-by-side analysis for a clearer understanding.
Automated Annotation Tool Base Loop
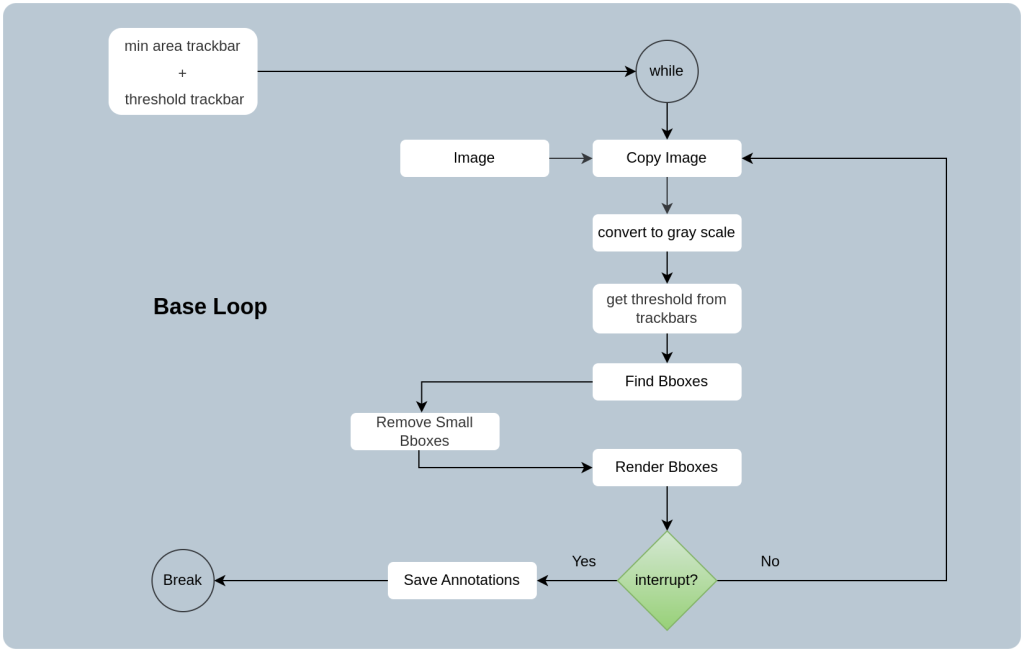
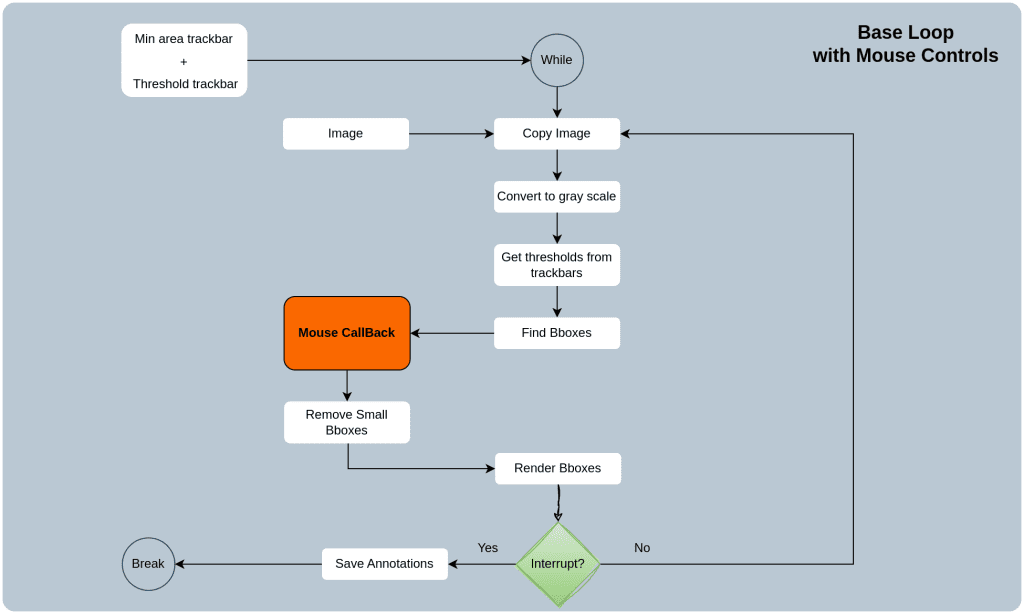
Let’s start with the base loop to understand how PyOpenAnnotate has been designed. Here, the copy of the original image runs on a 1 ms duration infinite loop. A grayscale conversion of the copy is analyzed to obtain the bounding boxes automatically. These bounding boxes are rendered on the image instance.
Here, if you provide keyboard interrupt [Q], the annotations are written to a filename.txt file, and the loop breaks.
6.1 Bounding Box Retrieval
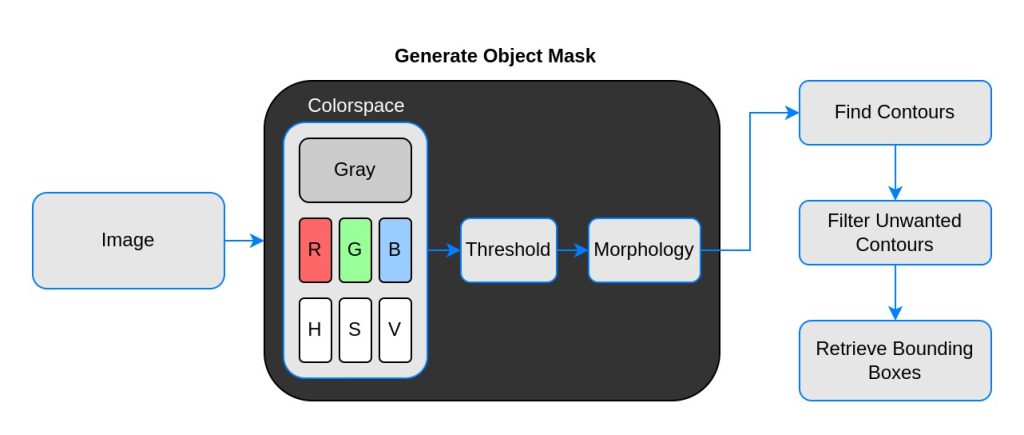
Bounding boxes are retrieved using contour analysis. In our previous blog post, Roadmap to automated image annotation tool”, we discussed contour analysis in detail with code. The flow chart looks as shown below. In summary, we are applying binary thresholding on a grayscale image.
6.2 Save Annotation
The bounding box coordinates are obtained in `topleft` and `bottomright` corner fashion. These are converted to YOLO format before saving. It is `class`, `x_center`, `y_center`, `box_width`, `box_height`. Excluding `class`, the rest of the parameters are normalized.
6.3 Trackbars
We have integrated the following trackbars for adjusting threshold parameters while annotating the images.
- Binary thresholding value
- Min area filtration threshold
Any noise or small unwanted blobs are also detected as objects. We have used an area filtration method to remove very small detections. Since small boxes vary from image to image, we have set a dynamic threshold of 1/10000th of the maximum area.
However, having a flexible, dynamic threshold would be much better. Therefore, a slider (trackbar) is introduced to adjust the threshold across a range.
Adding Manual Annotation and Feedback Controls
Automated annotation using computer vision may not always produce the desired result. There will be erroneous annotations many times. Therefore, it is necessary to add a feedback pipeline where you can create or delete bounding boxes if required.
7.1 Details of Mouse CallBack Module
Mouse controls have been set to be simple and intuitive for pyOpenAnnotate. There are two ways to interact with the annotation canvas.
- Click-Drag-Release: Draw bounding boxes manually.
- Double click: Remove the existing bounding box.
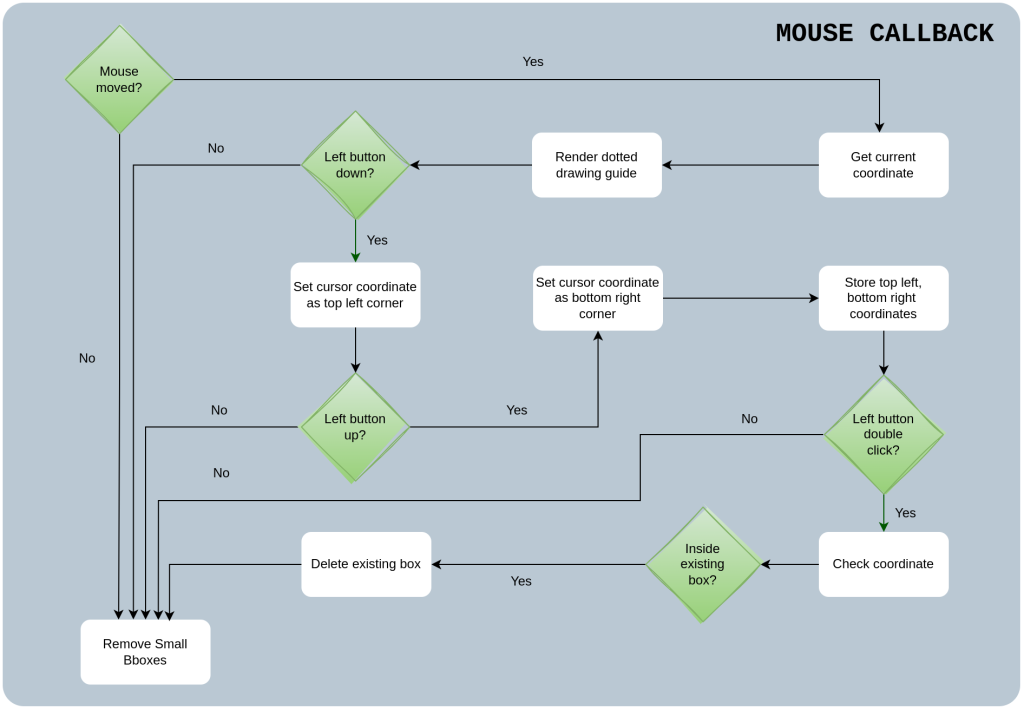
We are utilizing OpenCV mouse events `LBUTTONDOWN`, `LBUTTONUP`, and `LBUTTONDBLCLCK` to interact with the canvas. Note that we are calling the `left mouse button down` event as `click` for simplicity.
Click registers coordinate as the top left corner. When the left mouse button is released, the coordinate at that instant is registered as `bottom right corner`. These coordinates are stored in a container to be processed while saving.
Event `MOUSEMOVE` is used to acquire the coordinates of the mouse cursor. Here, a dotted cross line is rendered on the window, taking the mouse cursor as the center. This serves as the drawing guide while performing annotation. Check the flow chart below for details. Click on the image for a clearer view.
7.2 Logic Behind Double Click to Remove Event
When a double-click event occurs, the hit point P(x, y) is passed through a check function. It scans the existing bounding boxes to see whether P(x, y) is inside any box. If matches are found (can be multiple boxes), the boxes are deleted from the container.
The boxes are then stored in a deleted_entries container. These remind the automated bounding box analyzer module not to accept boxes in those areas. This is valid till the base loop is running. The following code block will explain this point.
for point in bboxes:
   x1, y1 = point[0][0], point[0][1]
   x2, y2 = point[1][0], point[1][1]
   # Arrange small to large. Swap variables if required.
   if x1 > x2:
      x1, x2 = x2, x1
   if y1 > y2:
      y1, y2 = y2, y1
   if hit_point[0] in range(x1, x2) and hit_point[1] in range(y1, y2):
      del_entries.append(point)
      bboxes.remove(point)
Navigation Loop in Annotation Workflow
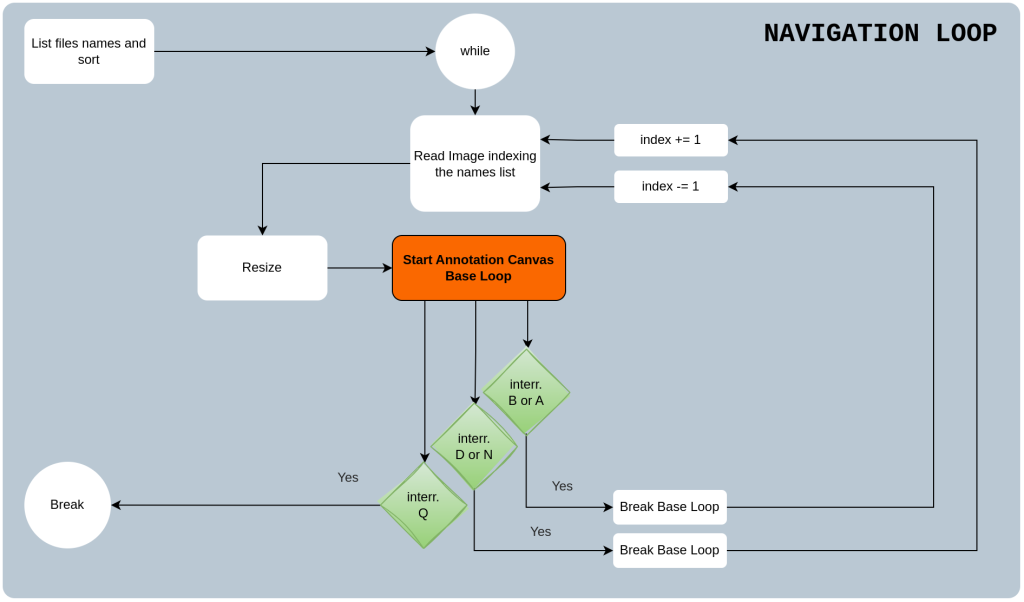
Let’s move one step up to add navigation features. The objective is to be able to go to the next image or go back using some keyboard commands. Keyboard events are obtained through OpenCV waitKey() trigger.
As mentioned earlier, the mapped actions are as follows:
- Q: Save and exit
- N or D: Go to next
- B or A: Go back
Let’s go through the navigation loop shown below for a better understanding. As you can see, the path to the images (from a directory) is stored in a list. The sorted list is then fed to the navigation loop, where one image is processed by indexing paths from the list.
8.1 Resize According to Display Resolution
Resize module keeps a check on the size of the display window. The image is resized not to exceed 1280x720p resolution. Three possible situations where an image can exceed the display window size.
- Width > 1280 px but Height < 720 px
- Width < 720 px but Height > 720 px
- Width > 1280 px and Height > 720 px
The image is resized to the set limit by maintaining the aspect ratio. The code below should make it more clear.
def aspect_resize(img):
    prev_height, prev_width = img.shape[:2]
    # print(prev_h, prev_w)
    if prev_width > prev_height:
        current_width = 960
        aspect_ratio = current_width / prev_width
        current_height = int(aspect_ratio*prev_height)
    elif prev_width < prev_height:
        current_height = 720
        aspect_ratio = current_height / prev_height
        current_width = int(aspect_ratio*prev_height)
    else:
        if prev_height != 720:
            current_height, current_width = 720, 720
    res = cv2.resize(img, (current_width, current_height))
    return res
8.2 Adding Navigation Keys
Say there are `n` image paths stored in a list `image_paths`. Then we can easily access the paths by indexing from the list as `image_paths[n]`. To go forward or backward, we only need to change the value of `n`. Pressing the keys N or D increments `n` by 1. On the other hand, A or B decrements `n` by 1.
PyOpenAnnotate Main Loop
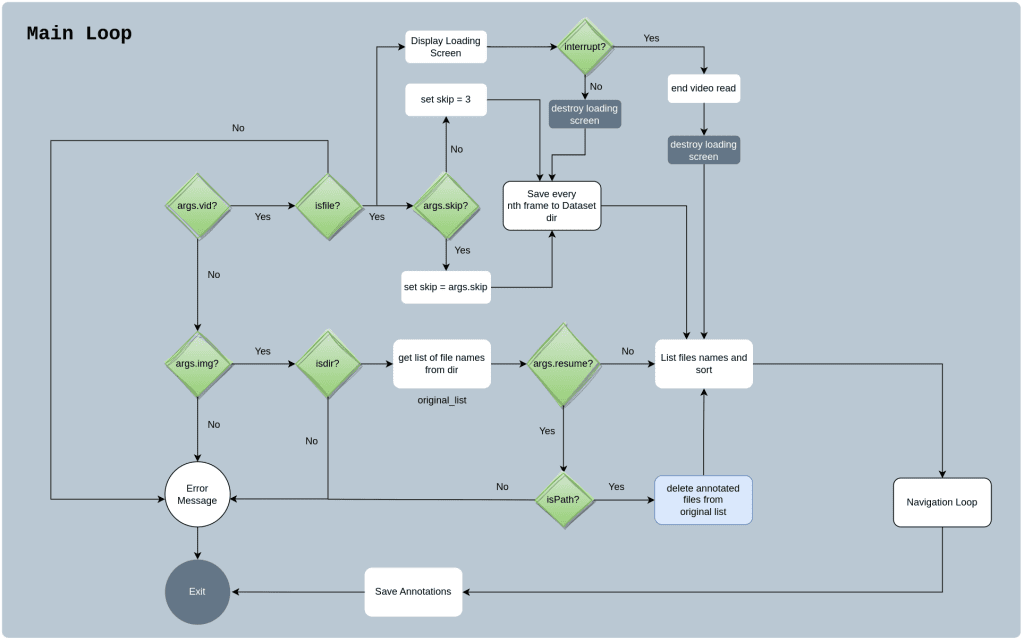
The features above round up a very basic automated annotation pipeline. However, it is still incomplete without video processing and command line flags. Let’s add these features to complete the main loop.
9.1 Argument Parser Function
Argument parser enhances the application by adding command line flags. We have already discussed pyOpenAnnotate command line flags above. The following snippet shows the command line argument function.
def parser_opt():
    parser = argparse.ArgumentParser()
    parser.add_argument(
        '-img', '--img',
        help='path to the images file directory'
    )
    parser.add_argument(
        '-vid', '--vid',
        help='path to the video file'
    )
    parser.add_argument(
        '-T', '--toggle-mask',
        dest='toggle',
        action='store_true',
        help='Toggle Threshold Mask'
    )
    parser.add_argument(
        '--resume',
        help='path to annotations/labels directory'
    )
    parser.add_argument(
        '--skip',
        type=int,
        default=3,
        help="Number of frames to skip."
    )
    if len(sys.argv) == 1:
        parser.print_help()
        sys.exit()
    else:
        args = parser.parse_args()
    return args
9.2 Video Processing Functionality
We also want to provide video files directly and extract frames for annotation. This is introduced before the navigation loop. All the frames (by default) are saved as `file_name_n.jpg` to the `images` directory unless the `–skip` flag is provided.
Conclusion
So that’s all about designing an automated annotation tool. We hope that the article helped you get a broader perspective. PyOpenAnnotate GUI is based on OpenCV drawing primitives. Hence, we cannot expect a lot of functionalities like buttons, scroll window, drop down menu etc. After All, it is a simple automated annotation tool that is well-suited for simple datasets. It is particularly useful for bulk datasets that contain a single class of objects.

