
In this post, we will learn how to squeeze the maximum performance out of OpenCV’s Deep Neural Network (DNN) module using Intel’s OpenVINO toolkitpost, we compared the performance of OpenCV and other Deep Learning libraries on a CPU. We will discuss optmizing OpenCV with OpenVINO.
OpenCV’s reference C++ implementation of DNN does astonishingly well on many deep learning tasks like image classification, object detection, object tracking and pose estimation.
We will see in today’s post that it is possible to speed things up quite a bit using Intel’s OpenVINO toolkit with OpenCV. We will cover the following topics.
- Training versus Inference
- Introduction to OpenVINO Toolkit
- Deep Learning using OpenVINO
- OpenVINO Toolkit Installation for Linux
- Image Classification using OpenCV with OpenVINO IE
- Performance Comparison of OpenCV and OpenCV with IE
1. Training versus Inference
Before we proceed with this post, we want to make it clear that this post is about speeding up inference and not training. Let’s understand the difference
- Training : Think of the Deep Neural Network as a black box with many knobs (parameters). When the knob settings are right, the neural network gives the correct answer to the problem it is trying to solve with a high probability. Training is the process of feeding the network with millions of training data points so that it systematically adjusts the knobs close to the correct values. This process is computationally intensive because the data is passed through the network millions of times and it is almost always performed on a GPU. Currently, OpenCV does not provide any way to train a DNN. However, you can train a DNN model using frameworks like Tensorflow, MxNet, Caffe etc, and import it into OpenCV for your application.
- Inference: Once the network is trained, it is ready to take new unseen data as input and provide an answer it was trained to output. This process of using a trained neural network and quickly coming up with an answer is called inference. A naive inference engine will simply pass the input data through the network and output the result. However, there are a lot of optimizations that can be performed that make the inference speed fast. For example, an efficient inference engine would provide tools for pruning part of the neural network that isn’t activated and fusing multiple layers into a single computational step. If the hardware supports 16-bit floating point operations (which is usually 2x faster than 32-bit floating point operations), an inference engine may utilize this fast to speed up processing by 2x with little or no loss in accuracy. This process of using a fewer number of bits to represent model parameters is called quantization.


2. Introduction to OpenVINO Toolkit
OpenVINO stands for Open Visual Inferencing and Neural Network Optimization.
As the name suggests, OpenVINO is specifically designed to speed up networks used in visual inferencing tasks like image classification and object detection. Almost all DNNs used for solving visual tasks these days are Convolutional Neural Networks (CNN). OpenVINO speeds up computation by first optimizing the neural network model in a hardware agnostic way using a model optimizer followed by hardware-specific acceleration accomplished using the OpenVINO Inference Engine for the particular hardware.
2.1 Why OpenVINO?
If you are new to AI and are not aware of the AI landscape, you will find this section entertaining. When we think of AI, we usually think about companies like Google, Facebook, Amazon, IBM, Baidu etc. Well, they are indeed leading the way in algorithms but AI is computationally expensive during training as well as inference. Therefore, it is equally important to understand the role of hardware companies in the rise of AI.
Convolutional Neural Networks (CNN) are usually trained on a GPU. NVIDIA provides the best GPUs as well as the best software support using CUDA and cuDNN for Deep Learning. NVIDIA pretty much owns the market for Deep Learning when it comes to training a neural network.
However, GPUs are expensive and not always necessary for inference. In fact, most of the inference in the world is done on CPUs! For example, Dropbox uses its CPU farm for performing OCR on documents.
GPUs are prohibitively expensive when you want to bring your deep learning model to inexpensive devices. For example, you cannot afford a GPU that costs a few hundred dollars to make a surveillance camera. These small devices, like a surveillance camera or a Raspberry PI, are often called edge devices or IoT devices.
In the inference space, Intel is a big player. In addition to the CPUs, it manufactures Vision Processing Units (VPUs), integrated GPUs, and FPGAs — all of which can be used for inference.
Intel understands that while a variety of options is great, it is also a nightmare for AI developers who now have to understand the nitty-gritty of each platform. Fortunately, with OpenVINO, Intel has abstracted away this difficulty and provided a unified framework for AI development.
OpenVINO enables CNN-based deep learning inference on the edge, supports heterogeneous execution across computer vision accelerators, speeds time to market via a library of functions and pre-optimized kernels and includes optimized calls for OpenCV and OpenVX.
2.2 Computer Vision Pipeline with OpenVINO
The basic Computer Vision Pipeline with OpenVINO is shown below.
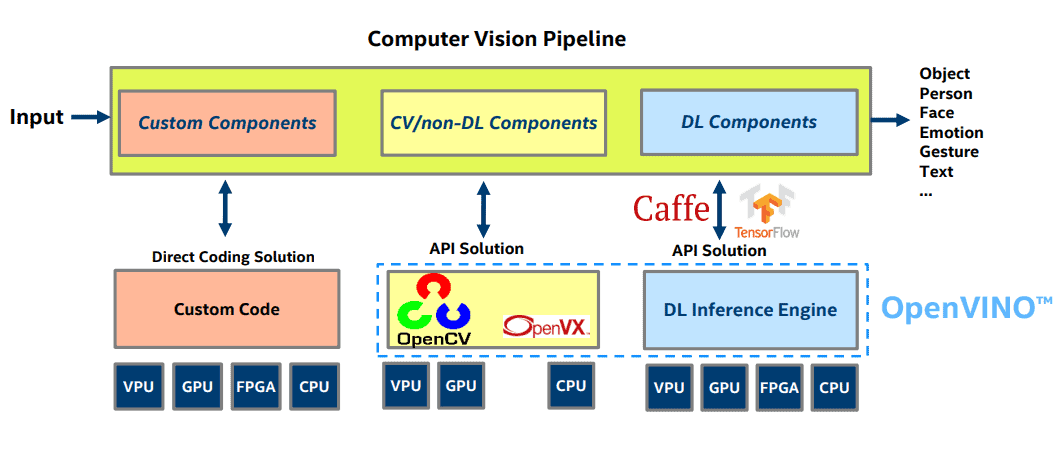
In the above pipeline, you may have some custom non-computer vision components that are implemented on the device using custom code you write. Beyond that, you have two types of vision tasks — 1) Non Deep Learning based Computer Vision 2) Deep Learning based Vision task. OpenVINO affects the performance of both these types of tasks. First, it optimizes many calls in traditional computer vision algorithms implemented in OpenCV, and second, it has specific optimizations for deep learning interference. We get the benefit of both parts when we use OpenCV with OpenVINO.
3. Deep Learning using OpenVINO
In this section, we will go over the steps needed to use OpenVINO in a deep learning application.
3.1. Train a deep learning model
As we have mentioned before, OpenCV or OpenVINO does not provide you tools to train a neural network. You can train a network using one of the following supported types of models or download a model from the model zoo.
- Caffe [ Model Zoo ]
- Tensorflow [ Model Zoo ]
- MxNet [ Model zoo ]
- Open Neural Network Exchange (ONNX) [ Model zoo ]
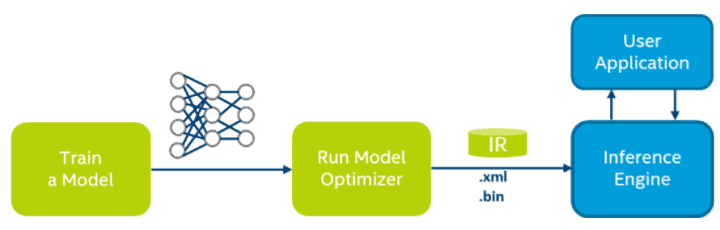
3.2 Optimize Model and create an Intermediate Representation (IR)
The model obtained in the previous step is usually not optimized for performance. Therefore, instead of directly using the trained model for inference, OpenVINO requires us to create an optimized model which they call Intermediate Representation (IR) using a Model Optimizer tool they provide. IR is completely hardware agnostic and only depends on the architecture of the neural network.
The figure below shows the difference between OpenVINO deployment method and most other deep learning framework deployment methods.
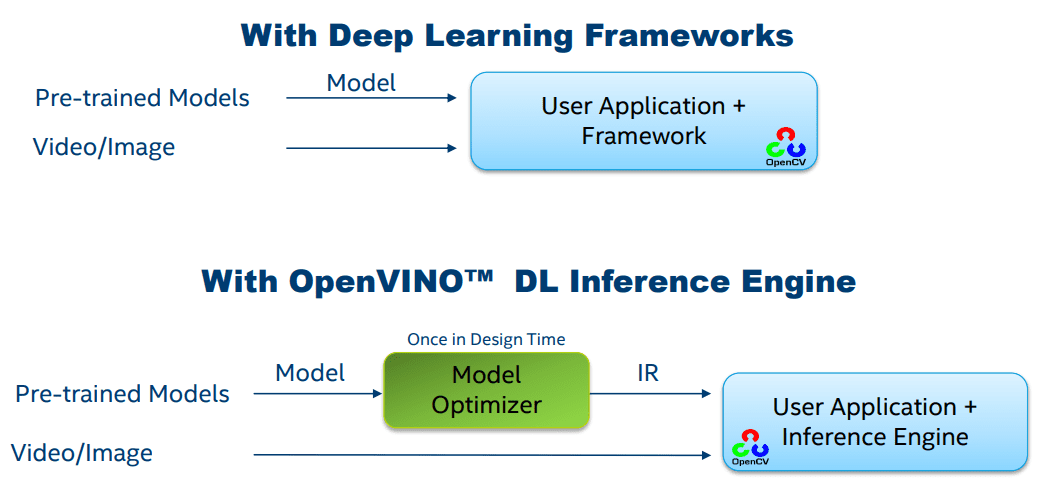
The Model Optimizer optimizes the model by the following mechanism
- Cutting off parts of the model : Removing parts of the network that are required at the time of training, but not at the time of inference. DropOut is an example of such a layer.
- Fusing operations: Sometimes multiple opertions can be combined into a single operation. The model optimizer detects such patterns and performs the necessary fusion.
The result of the optimization process is an IR model. The model is split into two files
- model.xml : This XML file contains the network architecture.
- model.bin : This binary file contains the weights and biases.
3.3. OpenVINO Inference Engine : Hardware Specific Optimizations
The IR model is hardware agnostic, but OpenVINO optimizes running this model on specific hardware through the Inference Engine plugin. This plugin is available for all intel hardware (GPUs, CPUs, VPUs, FPGAs).

.
3.4 OpenVINO with OpenCV
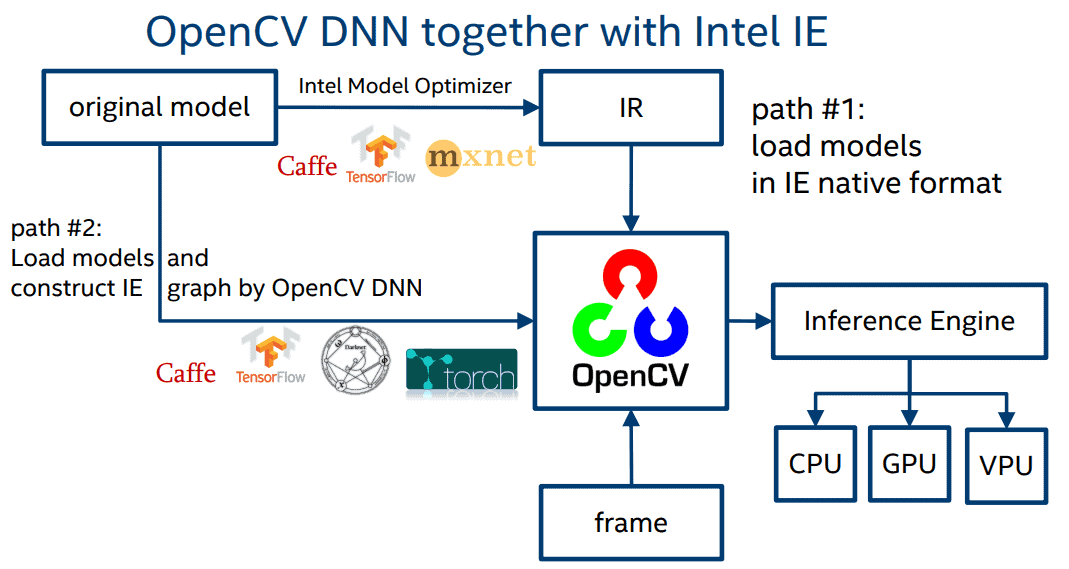
While OpenCV DNN in itself is highly optimized, with the help of Inference Engine we can further increase its performance. The figure below shows the two paths we can take while using OpenCV DNN. We highly recommend using OpenVINO with OpenCV in production when it is available for your platform.
4. OpenVINO Toolkit Installation for Linux
In this section, we will learn how to install and test OpenVINO on Linux.
The installation instructions for OpenVINO for Windows can be found on Intel’s website.
Note : OpenVINO is not available for macOS.
4.1. OpenVINO Toolkit Installation
1. First let’s go to OpenVINO Toolkit Download page and choose the correct download for your operating system. Here we will discuss the installation for Linux (without FPGA). Note that Ubuntu 18.04 is NOT supported by OpenVINO. Once you have registered and downloaded the installer, use the following commands.
mkdir openvino-toolkit
mv ~/Downloads/l_openvino_toolkit_p_<version>.tgz;
tar -xvzf l_openvino_toolkit_p_<version>.tgz;
cd l_openvino_toolkit_p_<version>;
./install_cv_sdk_dependencies.sh
This will install all the dependencies required for the installation.
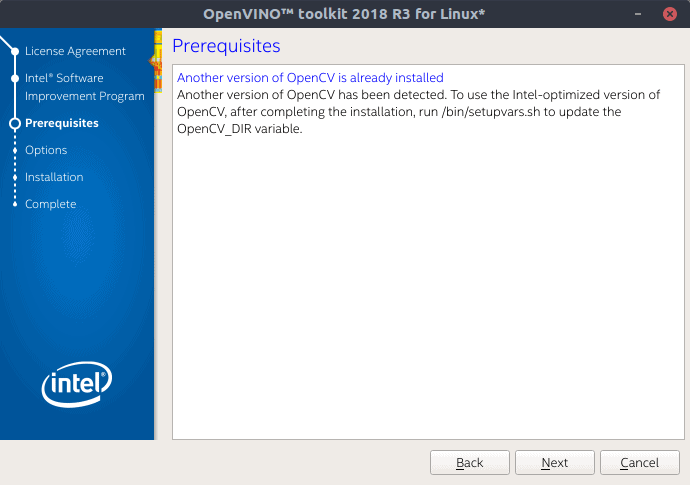
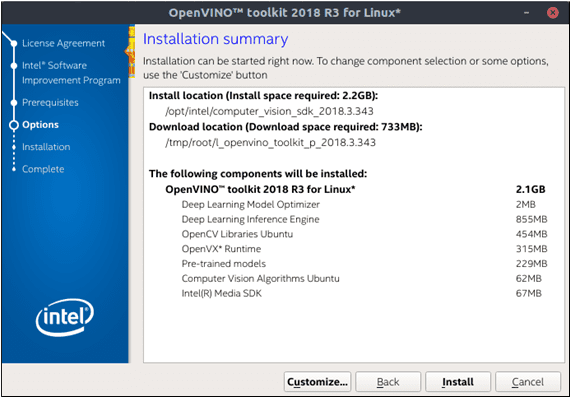
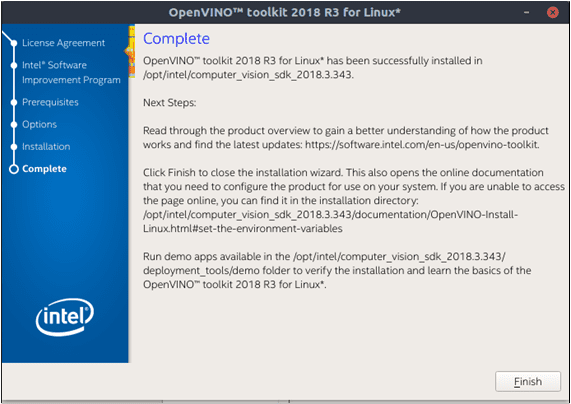
2. Next, let’s use the GUI of the OpenVINO installer.
sudo ./install_GUI.sh
Note that OpenVINO ships with it’s own OpenCV version. You can choose between which OpenCV you want to use by changing the variable OpenCV_DIR.
Note that if you ran the installer using sudo, the path will be /opt/intel/computer_vision_sdk_version/. If you ran it with regular user privileges, the path will be /home/user/intel/computer_vision_sdk_version/.
3. Next, we will setup the variables.
vi ~/.bashrc
Go to the end of the file and add the following line to the file:
source /opt/intel/computer_vision_sdk/bin/setupvars.sh
Save and close the file.
4. Close the terminal and open a new one.
5. Configure Model Optimizers: Let’s go to the Model Optimizer directory and install the pre-requisites and the optimizers.
cd /opt/intel/computer_vision_sdk/deployment_tools/model_optimizer/install_prerequisites sudo ./install_prerequisites.sh
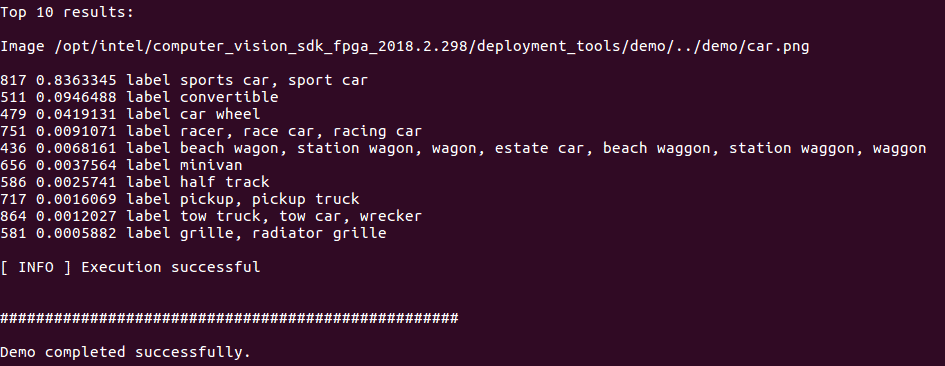
4.2. Test OpenVINO installation
To test the installation, we will run the Image Classification demo.
cd /opt/intel/computer_vision_sdk/deployment_tools/demo
./demo_squeezenet_download_convert_run.sh
We can also run the Inference Pipeline demo.
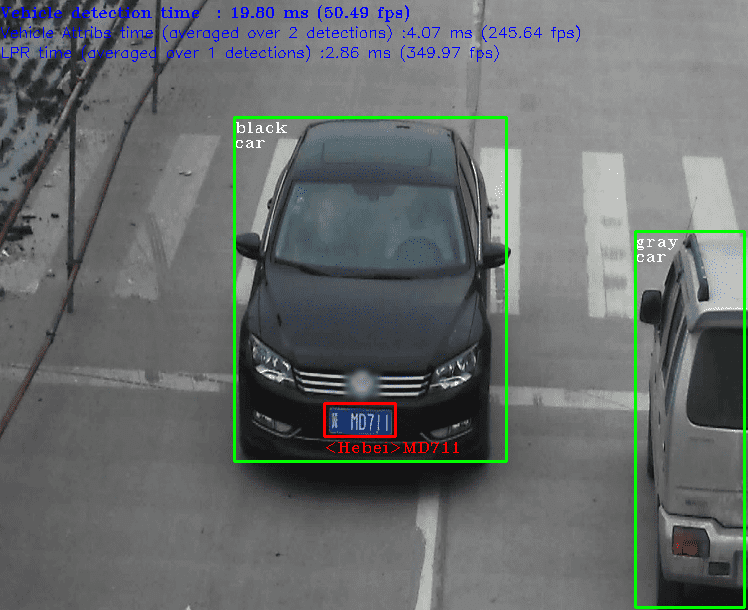
./demo_security_barrier_camera.sh
5. Image Classification using OpenCV with OpenVINO IE
Now, let’s look at how we can use OpenVINO IE with OpenCV for Image Classification.
First let’s load the required modules.

C++
#include <fstream>
#include <sstream>
#include <iostream>
#include <string>
#include <vector>

#include <opencv2/dnn.hpp>
#include <opencv2/imgproc.hpp>
#include <opencv2/highgui.hpp>
#include <opencv2/dnn.hpp>

using namespace std;
using namespace cv;
using namespace cv::dnn;
Python
import numpy as np
import time
import cv2
Next we specify the Caffe root and model path.
C++
string caffe_root = "/home/ubuntu/caffe/";
Mat image = imread("/home/ubuntu/caffe/examples/images/cat.jpg");
string labels_file = "/home/ubuntu/caffe/data/ilsvrc12/synset_words.txt";
string prototxt = "/home/ubuntu/caffe/models/bvlc_reference_caffenet/deploy.prototxt";
string model = "/home/ubuntu/caffe/models/bvlc_reference_caffenet/bvlc_reference_caffenet.caffemodel";
Python
caffe_root = '/home/ubuntu/caffe/'
image = cv2.imread('/home/ubuntu/caffe/examples/images/cat.jpg')
labels_file = caffe_root + 'data/ilsvrc12/synset_words.txt'
prototxt = caffe_root + 'models/bvlc_reference_caffenet/deploy.prototxt'
model = caffe_root + 'models/bvlc_reference_caffenet/bvlc_reference_caffenet.caffemodel'
Next comes the usual Image Classification code with a slight change. We will specify the preferable background as cv2.dnn.DNN_BACKEND_INFERENCE_ENGINE.
C++
// load the labels file
  std::ifstream ifs(labels_file.c_str());
  if (!ifs.is_open())
  {
    CV_Error(Error::StsError, "File " + labels_file + " not found");
    string line;
    while (std::getline(ifs, line))
    {
        classes.push_back(line);
    }
  }

  Mat blob = dnn::blobFromImage(image, 1, Size(224, 224), Scalar(104,117,123));
  cout << "[INFO] loading model..." << endl;
  dnn::Net net = readNetFromCaffe(prototxt, model);
  net.setPreferableBackend(DNN_BACKEND_INFERENCE_ENGINE);
  net.setPreferableTarget(DNN_TARGET_CPU);

  // set the blob as input to the network and perform a forward-pass to
  // obtain our output classification
  net.setInput(blob);
  Mat preds = net.forward();

  double freq = getTickFrequency() / 1000;
  std::vector<double> layersTimes;
  double t = net.getPerfProfile(layersTimes) / freq;
  cout << "
[INFO] classification took " << t << " ms" << endl;
Python
// load the labels file
rows = open(labels_file).read().strip().split("\n")
classes = [r[r.find(" ") + 1:].split(",")[0] for r in rows]

blob = cv2.dnn.blobFromImage(image,1,(224,224),(104,117,123))
print("[INFO] loading model...")
net = cv2.dnn.readNetFromCaffe(prototxt,model)
net.setPreferableBackend(cv2.dnn.DNN_BACKEND_INFERENCE_ENGINE)
net.setPreferableTarget(cv2.dnn.DNN_TARGET_CPU)
# set the blob as input to the network and perform a forward-pass to
# obtain our output classification
net.setInput(blob)
start = time.time()
preds = net.forward()
end = time.time()
print("[INFO] classification took " + str((end-start)*1000) + " ms")
That’s it! That’s the only thing you need to do to use OpenVINO IE instead of pure OpenCV (cv2.dnn.DNN_BACKEND_OPENCV).
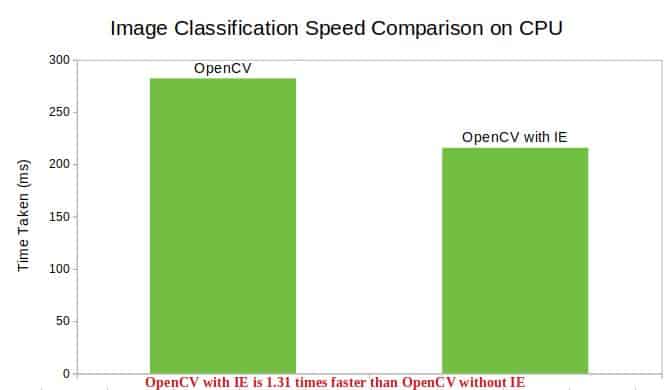
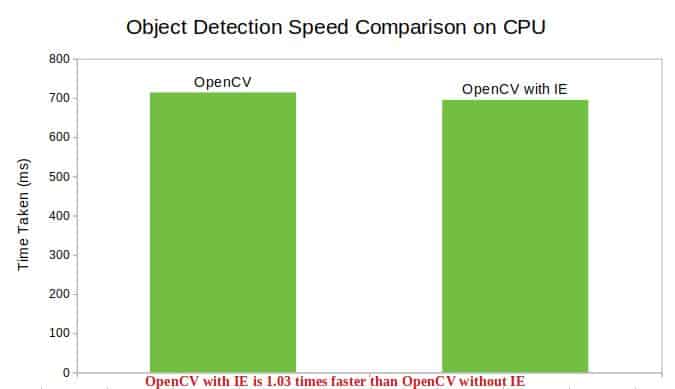
6. Performance Comparison of OpenCV and OpenCV with IE
Now, it’s time to look at some figures. These tasks were performed on an Ubuntu 16.04 AWS instance (CPU only) and used OpenCV-3.4.3. The average time for 100 runs was taken into consideration.
Image Classification
Object Detection
Pose Estimation
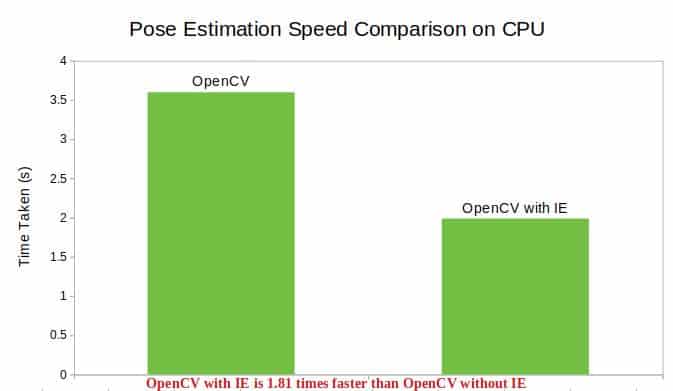
As is clear from these numbers, using OpenVINO along with OpenCV increases the performance of the Computer Vision library. That’s all for now! Hope you enjoyed the post 🙂 . Feel free to comment your query or suggestion in the comment section below.