
Performing Object Detection on edge device is an exciting area for tech enthusiasts where we can implement powerful computer vision applications in compact, efficient packages. Here we show one such interesting embedded computer vision application by deploying models on a popular edge AI device like OAK-D-Lite.

According to the World Health Organization’s 2023 report, road accidents claim 1.19 million lives annually and cause non-fatal injuries to 20 to 50 million people. A major contributor to these unsafe driving conditions is road potholes. To address this issue, we demonstrate the procedure for running a fine-tuned pothole detection model (YOLOv8) on the OAK-D-Lite device. In a broader perspective, this deployment can serve as a baseline reference, which can be extended to assist drivers by providing real-time monitoring and warning indicators, thereby enhancing road safety.
To learn more about OAK-D and its essential applications, we recommend that you bookmark our series on Stereo Depth and OAK-D.
By this article’s end, you can convert and deploy recent lightweight YOLO models on an OAK-D-Lite device.
YOLO Master Post – Every Model Explained
Don’t miss out on this comprehensive resource, Mastering All Yolo Models for a richer, more informed perspective on the YOLO series.
- An Intro to OAK-D-Lite
- DepthAI Pipeline for OAK-D-Lite
- How Does OpenVINO IR Format Optimizes OAK-D-Lite?
- Understanding the Pothole Dataset
- Code Walkthrough
- Video Inference Results on OAK-D-Lite
- Key Takeaways of OAK-D Deployment
- Conclusion
- References
An Intro to OAK-D-Lite
OAK-D-Lite by Luxonis has an Intel Myriad chip or VPU(Vision Processing Unit) that can process 4 Trillion Neural Operations per second. As of 2024, It is priced at $149 USD, which makes it affordable for computer vision engineers to experiment with spatial AI.
OAK-D-Lite is called the Swiss Army Knife of Computer Vision, which is true because of its form factor and impressive performance.
Hardware Specs
OAK-D-Lite has:
- A 13 MP Color Camera
- Depth FOV/ Horizontal FOV / Vertical FOV of 81° / 69° / 54°
- Focus (AF: 8cm – ∞ OR FF: 50cm – ∞ )
- Power Consumption: USB 3 C-Type Cable with 900mA at 5V

OAK-D-Lite has IMU Sensors (BMI270) that can be used for robotics perception, navigation, localization, and motion tracking.
Are you interested in reading further about robotics perception? Starting with our guide on Monocular SLAM with Python can give you good hands-on experience with SLAM and perception.


DepthAI Pipeline for OAK-D-Lite

OAK-D uses a depthai pipeline to do inference and establishes connection between Host (raspberry pi or jetson nano or a laptop) with OAK-D-Lite (Device) via XLinkIn and XLinkOut.
Note: The hardware configuration of the host devices can greatly impact the inference results. The inference results shown in this article were performed on a Host with an Intel i5 13th-gen machine.
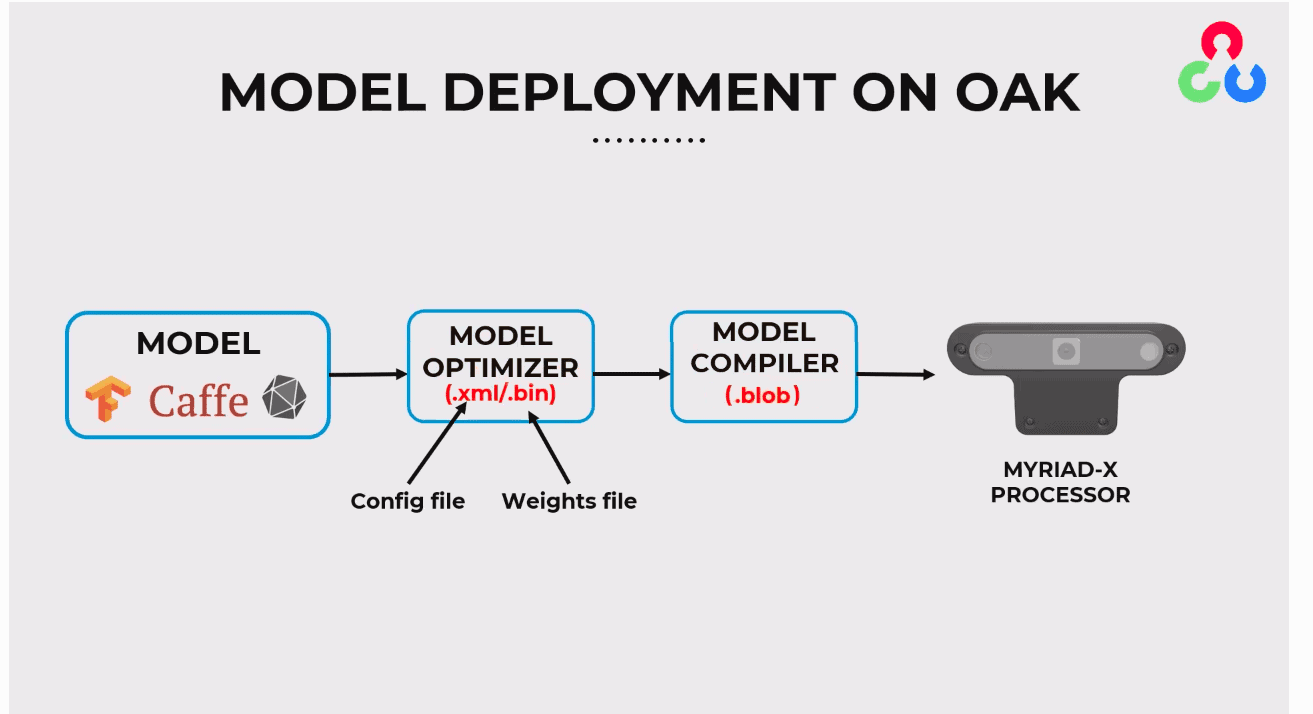
The dai.node.YoloDetectionNetwork expects the model to be in .blob format and the model config with hyperparameters in a .json file. The .blob format compiles the OpenVINO .xml containing model architecture and .bin containing model weights.
How Does OpenVINO IR Format Optimizes OAK-D-Lite?
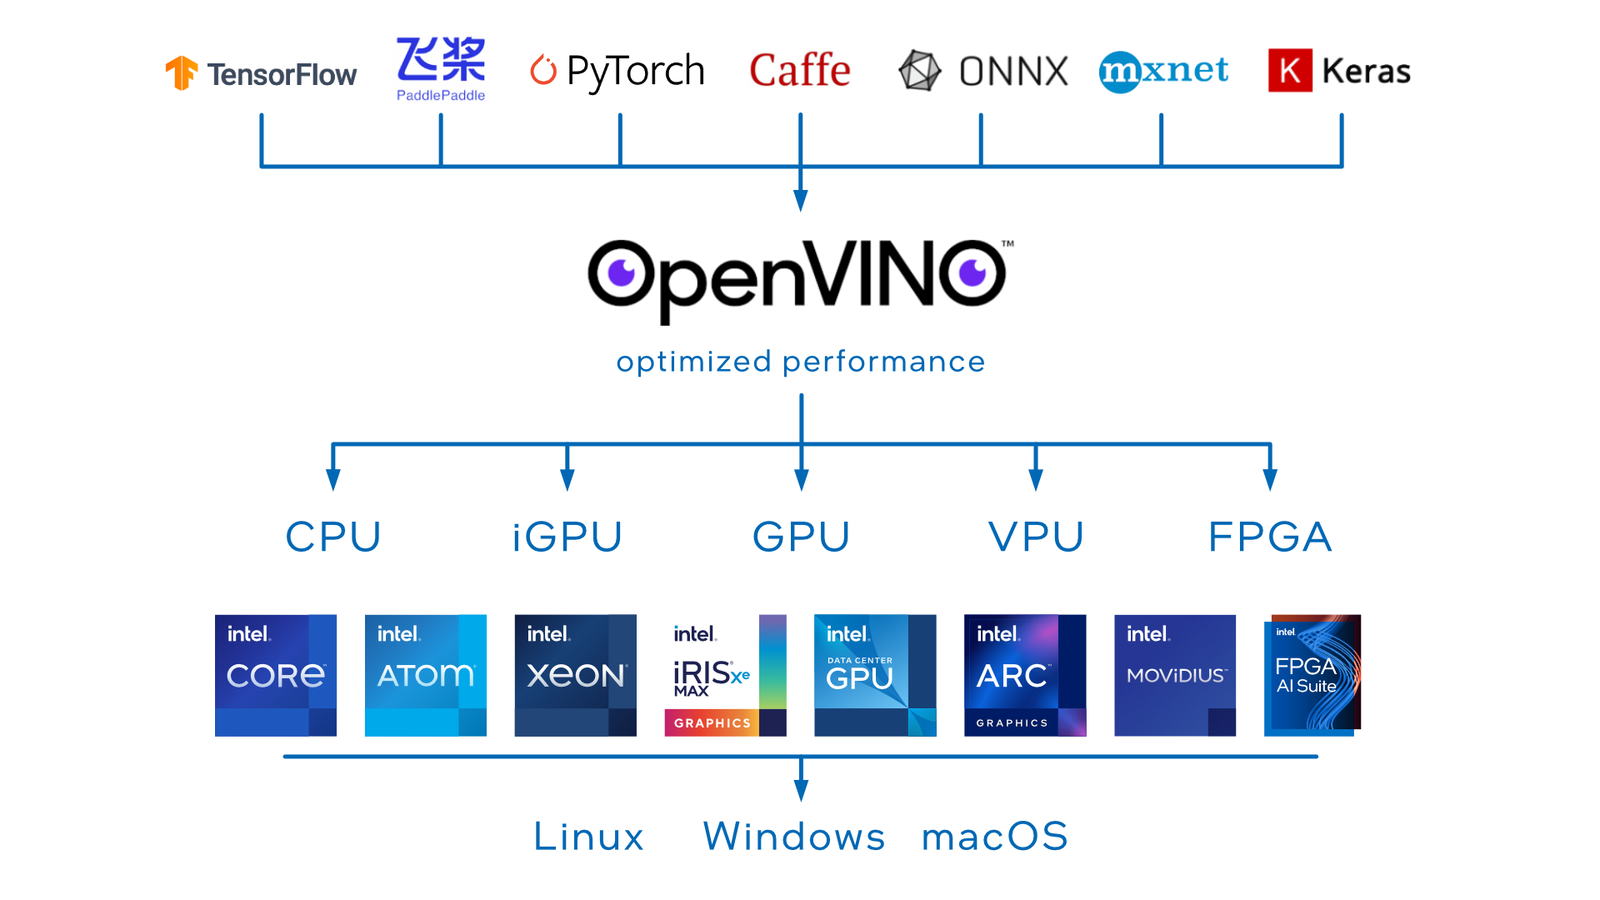
OpenVINO by Intel is an impressive library that can port almost any deep learning model to run in a highly optimized, efficient, and performant manner. As discussed earlier, OAK-D-Lite has an Intel VPU, so we can deploy and run our model with increased fps. OpenVINO supports a wide range of model formats like TensorFlow, PyTorch, MXNet, Caffe, Kaldi, ONNX etc.
You may be interested in learning more about the OpenVINO Toolkit and Workbench, detour to our earlier post.
Understanding the Pothole Dataset
The Pot-hole Dataset contains a single class 0 : Pothole,
- 6962 training images
- 271 validation images
The images contain varying driving scenes captured on car dash cams or street POV.
Common Image Dimensions:
- 512 x 512
- 600 x 600
- 1920 x 1080
- 1024 x 1024
- 720 x 720
- 1280 x 720
- 600 x 600 and so on
Let’s jump into the code; we will start with the standard approach of fine-tuning YOLOv8 on Pothole dataset with Ultralytics.
You can access the code featured here by pressing the ” Download Code ” button in the banner.

Code Walkthrough
Install Dependencies
!pip install ultralytics
Import Dependencies
import zipfile
import requests
import cv2
import matplotlib.pyplot as plt
import glob
import random
import os
import json
import time
from pathlib import Path
from ultralytics import YOLO
Next, download the dataset from the provided Dropbox link and unzip it in the datasets directory
os.makedirs('datasets', exist_ok=True)

def download_file(url, save_name):
   url = url
   if not os.path.exists(save_name):
       file = requests.get(url)
       open(save_name, 'wb').write(file.content)
download_file(  'https://www.dropbox.com/s/qvglw8pqo16769f/pothole_dataset_v8.zip?dl=1',
   'pothole_dataset_v8.zip'
)

# Unzip the data file
def unzip(zip_file=None):
   try:
       with zipfile.ZipFile(zip_file) as z:
           z.extractall("./")
           print("Extracted all")
   except:
       print("Invalid file")
unzip('pothole_dataset_v8.zip')
%cd ..
Creating a .yaml file for yolo training.
The Ultralytics yolo training expects a yaml file that contains the root directory, path to train and val images, and class to index mapping (names).
%%writefile pothole_v8.yaml
path: 'pothole_dataset_v8/'
train: 'train/images'
val: 'valid/images'
# class names
names:
 0: 'pothole'
Let’s run our training for 50 epochs using the default model configuration of unfreezing all the layers and monitoring the training logs.
#training for 50 epoch.
EPOCHS = 50
!yolo task=detect mode=train model=yolov8n.pt imgsz=960 data=pothole_v8.yaml epochs={EPOCHS} batch=32 name=yolov8n_v8_50e
Finally, the fine-tuned model results the following training logs,
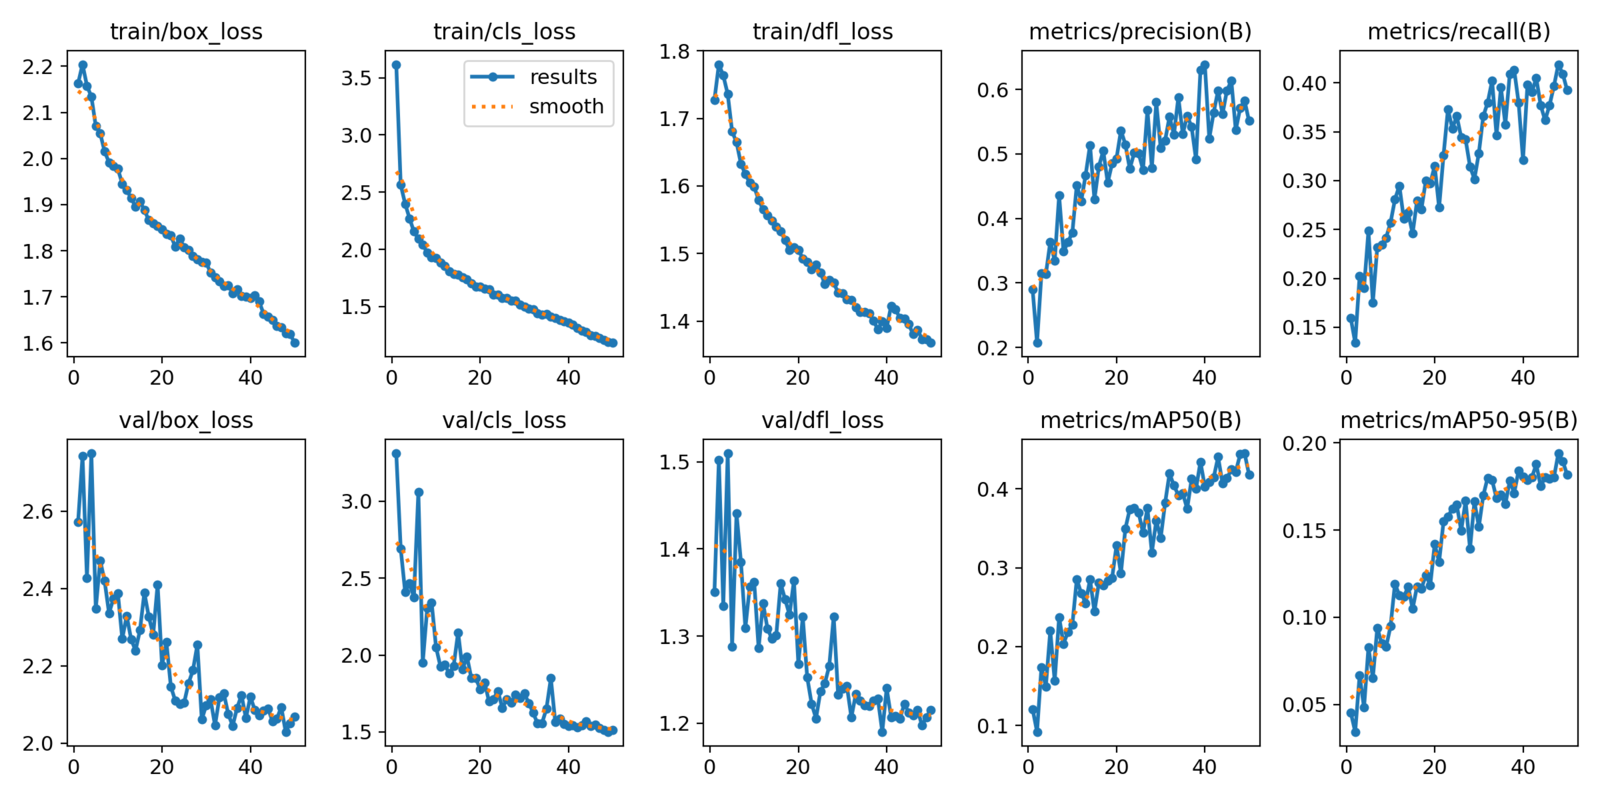
We have carried out a set of three experiments on the YOLOv8 nano model and achieved a highest mAP@0.5 of 0.44 with img_sz = 960 and batch = 8.
| MODEL | TRAIN IMAGE SIZE | mAP@0.5 |
| YOLOv8n | ( 640, 640 ) | 0.332 |
| YOLOv8n | ( 960, 960 ) | 0.44 |
| YOLOv8n | ( 1280, 1280 ) | 0.40 |
In the experiment notebooks attached to this article, you can find these metric logs.
Next, we will run predictions on the entire validation set as a video inference to understand the robustness of our fine-tuned YOLOv8n model on the pothole dataset.
!yolo task=detect \
mode=predict \
model=runs/detect/yolov8n_v8_50e3/weights/best.pt \
source=datasets/pothole_dataset_v8/valid/images \
imgsz=960 \
name=yolov8n_v8_50e_infer640 \
hide_labels=True
Model Conversion: YOLO Pytorch to MyriadX Blob Format
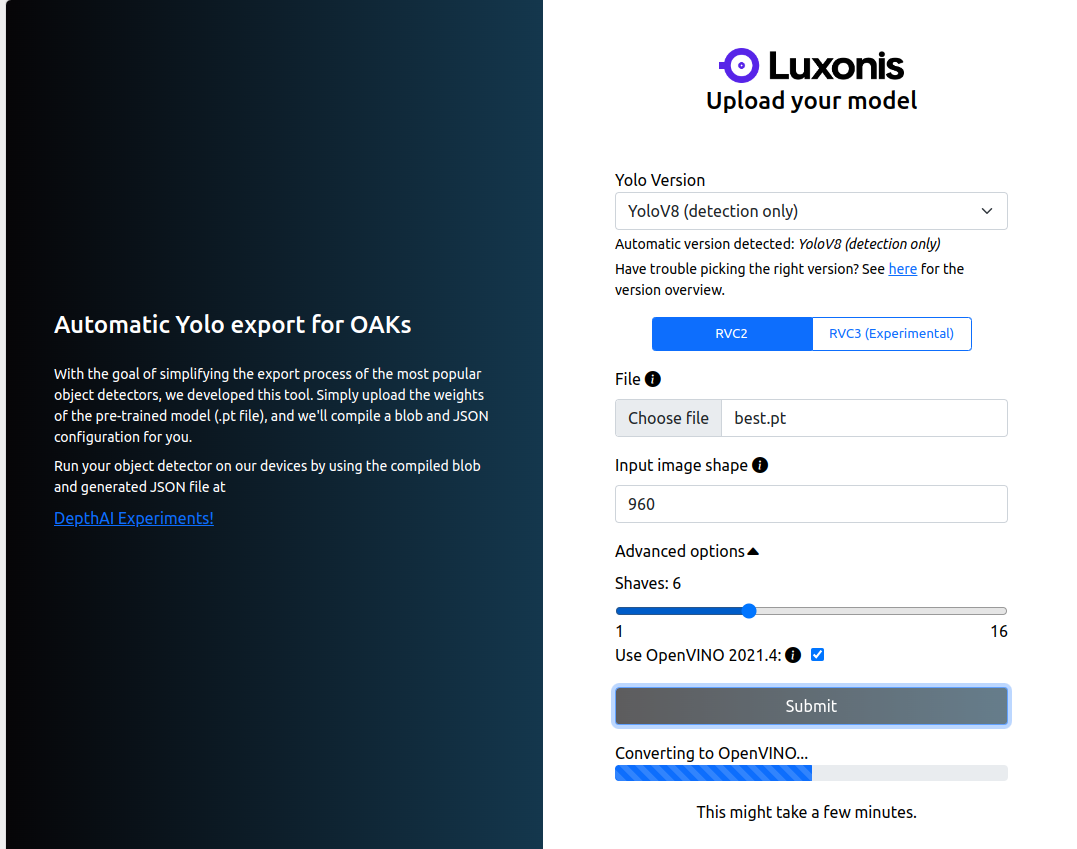
Let’s now discuss the interesting part of converting Yolo models to depthai (OAK-D-Lite) compatible formats. For this, we have several options:
a) An easy approach is to use the Luxonis toolkit, which allows us to convert YOLOv5, YOLOv6, YOLOv8 to blob format by uploading the fine-tuned model weights and specifying the trained input image size.
b) The second option would be to convert the YOLOv8 pytorch model to OpenVINO IR format directly using Ultralytics model.export(‘openvino’, imgsz) or to any other format.
Ultralytics supported export formats are ('torchscript', 'onnx', 'openvino', 'engine', 'coreml', 'saved_model', 'pb', 'tflite', 'edgetpu', 'tfjs', 'paddle', 'ncnn').
c) A step-by-step guide to convert the Pytorch model to OpenVINO
A final choice or generic approach is to convert our model (either custom or pretrain weights) to ONNX( Open Neural Network Exchange) format and then to OpenVINO IR.
# Define a dummy input tensor with the same size as the input the model expects, on the same device as the model

import torch
dummy_input = torch.randn(1, 3, 960, 960, device=DEVICE)
onnx_path = Path(root) / "yolov8n-pothole.onnx"

torch.onnx.export(
           model,
           dummy_input,
           str(onnx_path),  # Convert Path to str
           opset_version = 11)
While performing onnx conversion we have to make sure all the model layers defined are compatible with the opset version according to the openvino tool version that is used. Otherwise we will not be able to convert the model successfully and end up with undesirable errors or warnings.
Then, using the OpenVINO library by providing the input shape, we can convert onnx to OpenVINO IR Format.
!pip install -q openvino onnx
import openvino as ov

ir_path = onnx_path.with_suffix(".xml")

if not ir_path.exists():
   print("Exporting ONNX model to IR... This may take a few minutes.")
   ov_model = ov.convert_model(onnx_path)
   ov.save_model(ov_model, ir_path)
else:
   print(f"IR model {ir_path} already exists.")
Alternatively, we can also convert our onnx model using the OpenVINO model optimizer by specifying the input shape, data type and target layout.
!pip install -q openvino-dev==2022.3.0

!mo --input_model yolov8n-pothole.onnx --input_shape [1,960,960,3] --data_type FP16 --target_layout nchw
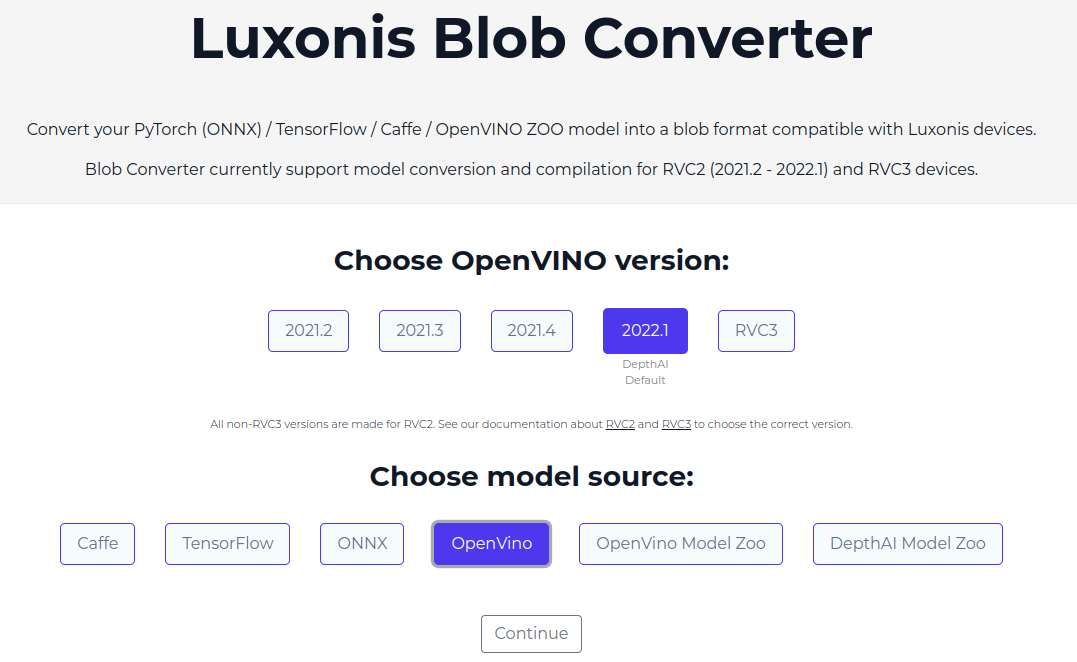
Finally the OpenVINO IR model can be compiled using the BlobConverter toolkit provided by Luxonis. Under the hood, a blob model is a wrapper that is built around OpenVINO toolkit by the Luxonis team.
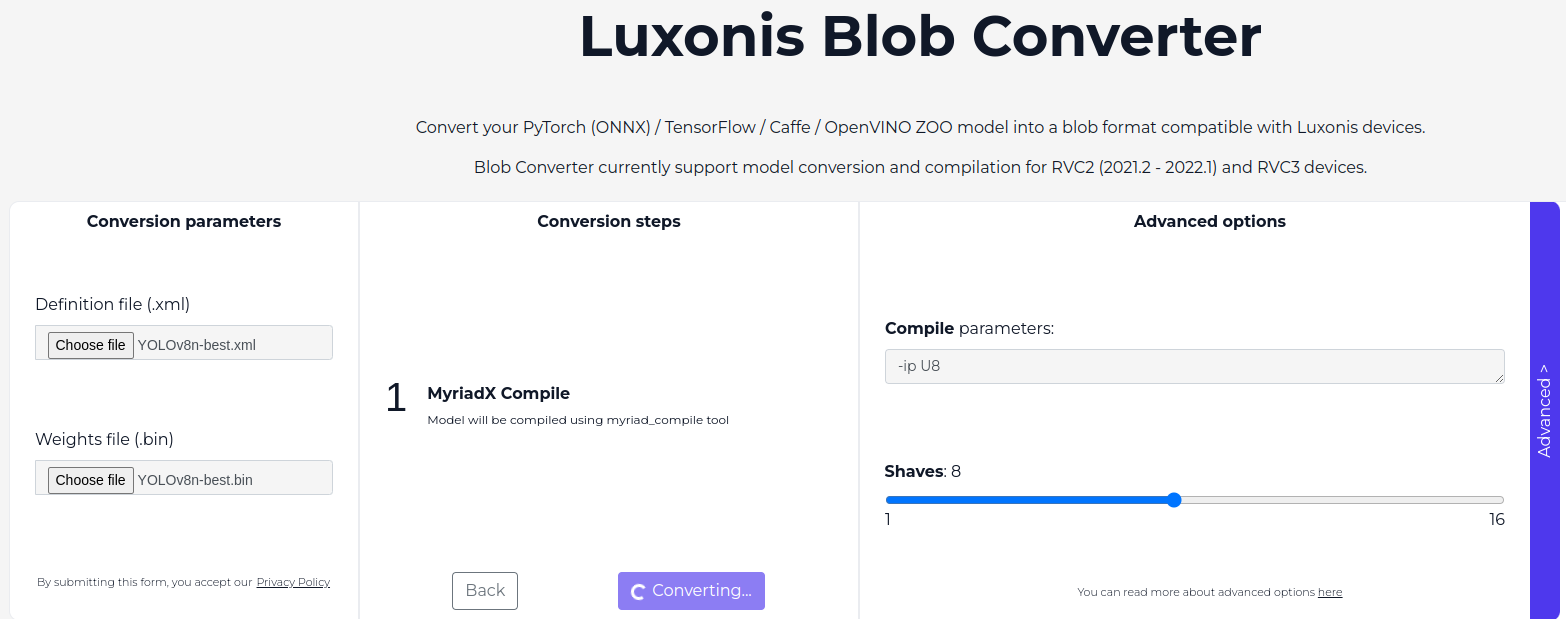
Shaves
In OpenVINO, shaves are specialized processing unit that accelerate neural network inference, especially vector based operations. Usually there are 16 available shaves for OAK-D devices. This helps offload computationally expensive tasks from the main cpu to boost performance on inference workload.
Note: By default, the blob model compiles the output layers in a FP16 data type.
Guess what? The final step is to start our OAK-D-Lite deployment. Hold your excitement still!

OAK-D-Lite Deployment
Our entire Object detection model deployment on OAK-D with DepthAI pipeline looks similar to this,

Install and import DepthAI dependencies,
!python3 -m pip install depthai
import depthai as dai
Let’s specify the path to the model, hyperparameters config, input video, etc.
The model configuration .json file contains:
{
   "model": {
       "xml": "best.xml",
       "bin": "best.bin"
},
   "nn_config": {
       "output_format": "detection",
       "NN_family": "YOLO",
       "input_size": "960x960",
       "NN_specific_metadata": {
           "classes": 1,
           "coordinates": 4,
           "anchors": [], # As YOLOv8 has anchor free detections
           "anchor_masks": {},
           "iou_threshold": 0.5,
           "confidence_threshold": 0.5 }},
   "mappings": {
       "labels": [
           "Class_0"
       ] }, "version": 1}
Then, the camera resolution is set according to our trained model’s img_sz = (960,960).
# Define path to the model, test data directory, and results
YOLOV8N_MODEL = "yolov8_320_fps_check/result/best_openvino_2022.1_6shave.blob"
YOLOV8N_CONFIG = "yolov8_320_fps_check/result/best.json"

INPUT_VIDEO = "potholes-in-a-rural.mp4"
OUTPUT_VIDEO = "vid_result/potholes-in-a-rural_output_video.mp4"

CAMERA_PREVIEW_DIM = (960, 960)
LABELS = ["Pot-hole"]

def load_config(config_path):
   with open(config_path) as f:
       return json.load(f)
Initially, we will start by creating an image pipeline utility with dai.Pipeline(). In the configuration JSON file, we will get the neural network-specific metadata like classes, coordinates, iou_threshold, confidence_threshold, etc.
def create_image_pipeline(config_path, model_path):
   pipeline = dai.Pipeline()
   model_config = load_config(config_path)
   nnConfig = model_config.get("nn_config", {})
   metadata = nnConfig.get("NN_specific_metadata", {})
   classes = metadata.get("classes", {})
   coordinates = metadata.get("coordinates", {})
   anchors = metadata.get("anchors", {})
   anchorMasks = metadata.get("anchor_masks", {})
   iouThreshold = metadata.get("iou_threshold", {})
   confidenceThreshold = metadata.get("confidence_threshold", {})
   ...
- The input to the nn model running on OAK-D-Lite (device) is sent using the
XLinkInnode. - An instance of detection network is created for
YolodetectionNetworkusingpipeline.create() - Output from the model after inference is accessed via the
XLinkOutnode. - To access the input and output stream to the device, we will set a StreamName, which will set a unique name to each stream.
def create_image_pipeline(config_path, model_path):
   ...
  detectionIN = pipeline.create(dai.node.XLinkIn)
   detectionNetwork = pipeline.create(dai.node.YoloDetectionNetwork)
   nnOut = pipeline.create(dai.node.XLinkOut)

   nnOut.setStreamName("nn")
   detectionIN.setStreamName("detection_in")
Then the YoloDetectionNetwork initialized is configured with the metadata we got from our fine-tuned converted model. The Model is compiled using detectionNetwork.setBlobPath().
def create_image_pipeline(config_path, model_path):
   ...
   detectionNetwork.setConfidenceThreshold(confidenceThreshold)
   detectionNetwork.setNumClasses(classes)
   detectionNetwork.setCoordinateSize(coordinates)
   detectionNetwork.setAnchors(anchors)
   detectionNetwork.setAnchorMasks(anchorMasks)
   detectionNetwork.setIouThreshold(iouThreshold)
   detectionNetwork.setBlobPath(model_path)
   detectionNetwork.setNumInferenceThreads(2)
   detectionNetwork.input.setBlocking(False)

   detectionIN.out.link(detectionNetwork.input)
   detectionNetwork.out.link(nnOut.input)

   return pipeline
Next, a pipeline instance for our image pipeline is created for communication, flow of data etc., and the video is read using cv2.VideoCapture().
# Create pipeline
pipeline = create_image_pipeline(YOLOV8N_CONFIG, YOLOV8N_MODEL)

# Ensure output directory exists
os.makedirs(os.path.dirname(OUTPUT_VIDEO), exist_ok=True)

cap = cv2.VideoCapture(INPUT_VIDEO)
frame_width = int(cap.get(cv2.CAP_PROP_FRAME_WIDTH))
frame_height = int(cap.get(cv2.CAP_PROP_FRAME_HEIGHT))
fps = cap.get(cv2.CAP_PROP_FPS)
out = cv2.VideoWriter(OUTPUT_VIDEO, cv2.VideoWriter_fourcc(*'mp4v'), fps, (frame_width, frame_height))
Pre-processing Utility:
We will define two important pre-processing steps:
to_planar(): We ensure the input frame is resized to the inference image size or camera resolution we have set up earlier usingCAMERA_PREVIEW_DIM. We also ensure proper model format, as the DepthAI detection network expects the input frame to be inCHWformat.
frame_norm(): This utility is responsible for converting to normalized frames and ensures they are within a valid pixel range.
def to_planar(arr: np.ndarray, shape: tuple) -> np.ndarray:
   resized = cv2.resize(arr, shape)
   return resized.transpose(2, 0, 1)

def frame_norm(frame, bbox):
   norm_vals = np.full(len(bbox), frame.shape[0])
   norm_vals[::2] = frame.shape[1]
   return (np.clip(np.array(bbox), 0, 1) * norm_vals).astype(int)
Post-processing Utility:
This is a simple utility for drawing the bounding boxes or annotating the inference frames and updating them with real-time FPS.
def annotate_frame(frame, detections, fps):
   color = (0, 0, 255)
   for detection in detections:
       bbox = frame_norm(frame, (detection.xmin, detection.ymin, detection.xmax, detection.ymax))
       cv2.putText(frame, LABELS[detection.label], (bbox[0] + 10, bbox[1] + 25), cv2.FONT_HERSHEY_TRIPLEX, 1, color)
       cv2.putText(frame, f"{int(detection.confidence * 100)}%", (bbox[0] + 10, bbox[1] + 60), cv2.FONT_HERSHEY_TRIPLEX, 1, color)
       cv2.rectangle(frame, (bbox[0], bbox[1]), (bbox[2], bbox[3]), color, 2)

   # Annotate the frame with the FPS
   cv2.putText(frame, f"FPS: {fps:.2f}", (10, 30), cv2.FONT_HERSHEY_SIMPLEX, 1, (0, 255, 0), 2)
   return frame
- The following set of code set up the connection to the OAK-D-Lite device
- The detection is responsible for sending the input to the inference model, and the
detectionNNwill receive the output from the nn model. - The video frames are continuously processed until it hits the last frame of the video which will be reshaped using
to_planar()pre-processing utility.
# Connect to device and start pipeline
with dai.Device(pipeline) as device:
   # Define the queues that will be used in order to communicate with depthai
   detectionIN = device.getInputQueue("detection_in")
   detectionNN = device.getOutputQueue("nn")

   start_time = time.time()
   frame_count = 0

   while cap.isOpened():
       ret, frame = cap.read()
       if not ret:
          break

       frame_count += 1
# Initialize depthai NNData() class which is fed with the image data resized and transposed to model input shape
       nn_data = dai.NNData()
       nn_data.setLayer("input", to_planar(frame, CAMERA_PREVIEW_DIM))
- After pre-processing, the prepared input frame is sent to the detection model for inference as queues for memory efficiency with the nn_data class instance.
- The detection from the model is fetched using
detectionNN.get(). If detections are found in a frame, they are stored as a list.
If detections are found we will get a depthai image detection objects in our CLI,
Detections [<depthai.ImgDetection object at 0x71adcafacd70>]
Then, the annotate_frame() utility is called, and the output video with pot-hole detections is saved locally as a .mp4 file using cv2.VideoWriter().
# Send the image to detectionIN queue further passed to the detection network for inference as defined in pipeline
       detectionIN.send(nn_data)

       # Fetch the neural network output
       inDet = detectionNN.get()
       detections = []
       if inDet is not None:
           detections = inDet.detections
           print("Detections", detections)

       # Calculate the FPS
       elapsed_time = time.time() - start_time
       fps = frame_count / elapsed_time if elapsed_time > 0 else 0

       # Annotate the frame with detections and FPS
       frame = annotate_frame(frame, detections, fps)

       out.write(frame)
cap.release()
out.release()
print(f"[INFO] Processed video {INPUT_VIDEO} and saved to {OUTPUT_VIDEO}")
| Image Size (OAK-D-Lite) | Video Inference (FPS) |
| 320×320 | 14.1 |
| 640×640 | 6.7 |
| 960×960 | 3.3 |
Note: The deployment pipeline should work with any OAK-D variants with difference in inference speed and supported image resolution.
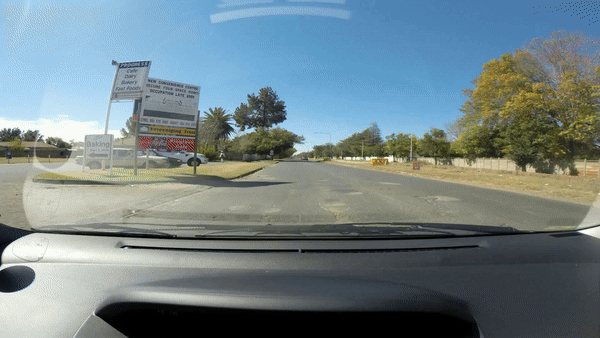
Video Inference Results on OAK-D-Lite
Result 1
Result 2
Result 3
This application is quite impressive. SCROLL UP to check out the implementation details – you might find them surprisingly interesting!
Using OAK-D-Lite Camera Stream
To infer using OAK-D RGB Camera Stream, simply change the image pipeline to create a camera pipeline. Additionally, we should also take into account how the frame is retrieved from the RGB camera stream and how it is sent to the detection network
CAMERA_PREVIEW_DIM = (960, 960)
LABELS = ["Pot-hole"]

def create_camera_pipeline(config_path, model_path):
    pipeline = dai.Pipeline()
    model_config = load_config(config_path)
    nnConfig = model_config.get("nn_config", {})
    metadata = nnConfig.get("NN_specific_metadata", {})
    classes = metadata.get("classes", {})
    coordinates = metadata.get("coordinates", {})
    anchors = metadata.get("anchors", {})
    anchorMasks = metadata.get("anchor_masks", {})
    iouThreshold = metadata.get("iou_threshold", {})
    confidenceThreshold = metadata.get("confidence_threshold", {})

    # Create camera node
    camRgb = pipeline.create(dai.node.ColorCamera)
    camRgb.setPreviewSize(CAMERA_PREVIEW_DIM[0], CAMERA_PREVIEW_DIM[1])
    camRgb.setInterleaved(False)
    camRgb.setBoardSocket(dai.CameraBoardSocket.RGB)
    camRgb.setResolution(dai.ColorCameraProperties.SensorResolution.THE_1080_P)

    detectionNetwork = pipeline.create(dai.node.YoloDetectionNetwork)
    nnOut = pipeline.create(dai.node.XLinkOut)

    nnOut.setStreamName("nn")

    detectionNetwork.setConfidenceThreshold(confidenceThreshold)
    detectionNetwork.setNumClasses(classes)
    detectionNetwork.setCoordinateSize(coordinates)
    detectionNetwork.setAnchors(anchors)
    detectionNetwork.setAnchorMasks(anchorMasks)
    detectionNetwork.setIouThreshold(iouThreshold)
    detectionNetwork.setBlobPath(model_path)
    detectionNetwork.setNumInferenceThreads(2)
    detectionNetwork.input.setBlocking(False)

    # Linking
    camRgb.preview.link(detectionNetwork.input)
    detectionNetwork.out.link(nnOut.input)

    return pipeline

# Create pipeline
pipeline = create_camera_pipeline(YOLOV8N_CONFIG, YOLOV8N_MODEL)

# Connect to device and start pipeline
with dai.Device(pipeline) as device:
    # Define the queue that will be used to receive the neural network output
    detectionNN = device.getOutputQueue("nn", maxSize=4, blocking=False)

    # Video writer to save the output video
    fps = 30  # Assuming 30 FPS for the OAK-D camera
    frame_width, frame_height = CAMERA_PREVIEW_DIM
    out = cv2.VideoWriter(OUTPUT_VIDEO, cv2.VideoWriter_fourcc(*'mp4v'), fps, (frame_width, frame_height))

    start_time = time.time()
    frame_count = 0

    while True:
        inDet = detectionNN.get()
        detections = []
        if inDet is not None:
            detections = inDet.detections
            print("Detections", detections)

        # Retrieve the frame from the camera preview
        frame = inDet.getFrame()

#Other steps are similar to the previous code we have a discussed earlier.
Congrats on deploying your fine-tuned model on an OAK-D device for the first time.
Key Takeaways of OAK-D Deployment
- Running optimized models on edge devices like OAK-D-Lite using OpenVINO toolkit showed promising results and were computationally efficient.
- The future scope of this article can include exploring OpenVINO post training quantization and quantization aware training techniques that can be carried out with OpenVINO model conversion for optimizing the FPS and latency of our OAK-D-Lite device.
- To enhance driver safety, we can extend this experiment by keeping this as a baseline and installing OAK-D-Lite with a Raspberry Pi or Jetson Nano as a Host on a vehicle’s driver seat as a monitoring system that indicates the forthcoming pot-holes in the lane detection.
Having a career in robotics is a “Pursuit of Happiness”. For a foundational understanding, explore our Getting Started with Robotics Series.
Conclusion
Our objective of deploying an Object Detection Model on OAK-D has been achieved to the best of our knowledge. Now, you will be able to deploy the latest YOLO models on OAK-D devices in accordance with the DepthAI pipeline. For models other than YOLO, you can use the third instruction discussed in the Model Conversion section. You can build robust real world applications offering various possibilities by developing hands-on experience with deep neural models and edge AI devices.
References
- Luxonis Docs
- Object Detection on Edge Device – DepthAI Repository
- OpenVINO Documentation
- Ultralytics Model Export
- OpenVINO Post Training Quantization


100K+ Learners
Join Free OpenCV Bootcamp3 Hours of Learning