


Figure 1: On the left is the original image. The second image from left is constructed using 250 EigenFaces, the third using 1000 Eigenfaces and the image on the extreme right using 4000 Eigenfaces.
In this post, we will learn how to reconstruct a face using EigenFaces. This post is written for beginners. If you don’t know about Principal Component Analysis (PCA) or EigenFaces, I recommend you go through the following posts in the series.
What are EigenFaces?
In our previous post, we explained Eigenfaces are images that can be added to a mean (average) face to create new facial images. We can write this mathematically as,
![\[F = F_m + \sum^n_{i=1} \alpha_i F_i\]](https://learnopencv.com/wp-content/ql-cache/quicklatex.com-b60d8db7af6c0d15bc997c6bf060383a_l3.png)
where,
 is a new face.
 is the mean or the average face,
 is an EigenFace.
 are scalar multipliers we can choose to create new faces. These can be positive or negative.
In our previous post, we explained how to calculate the EigenFaces , how to interpret them and how to create new faces by changing weights .
Now suppose, we are given a new facial photo as shown in Figure 1. How can we reconstruct the photo using EigenFaces ? In other words, how do we find the weights that when used in the above equation will produce the facial image as an output? This is exactly the question covered in this post but before we attempt to do that, we need a little background in linear algebra.


Change of coordinates
Consider a 3D coordinate system  ,
,  ,
,  as shown using black in Figure 2. You can imagine another set of perpendicular axes that is rotated and translated (shifted) by
  with respect to the original , , frame. In Figure 2, we show the axes of this rotated and translated coordinate system
  in blue. Let us consider a point (shown using the red dot) whose coordinates in the
  coordinates is
  .
.
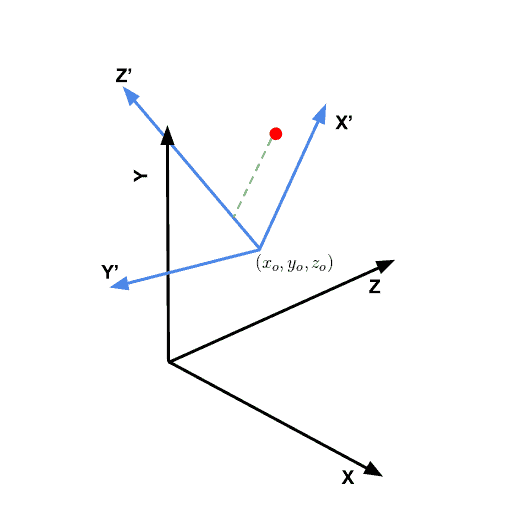
Figure 2.
How do we find the coordinates  of the point in the coordinate system? This can be done in two steps
- Translate : First, we can remove the translation component from
 by subtracting the origin of the new coordinate system. So we have a new vector .
 - Project: Next, we need to project onto , , which is nothing but the dot product of with the direction , and respectively. The green line in Figure 2 shows the projection of the point onto the axis.
 .
. ,
,  ,
,  which is nothing but the dot product of
 Let’s see how this technique applies to reconstructing faces.
Calculating PCA weights for a new facial image
As we had seen in the previous post, to calculate the principal components of facial data, we convert the facial images into long vectors. For example, if we have a collection of aligned facial images of size 100 x 100 x 3, each image can be thought as a vector of length 100 x 100 x 3 = 30,000. Just like a tuple of three numbers represents a point in 3D, we can say that a vector of length 30,000 is a point in a 30,000 dimensional space. The axes of this high dimensional space are perpendicular to each other just like the axes , and of a 3D dimensional space are perpendicular to each other. And just like , the principal components (Eigenvectors) form a new coordinate system in this high dimensional space with the new origin being the mean vector.
Given a new image, here is how we can find the weights
- Vectorize image : We first create a long vector from image data. This is simple a rearrangement of data which requires just a line or two of code.
- Subtract mean vector
- Project onto Principal Components: This can be done by calculating the dot product of the mean subtracted vector with each of the principal components. This gives dot product is the weight
- Assemble face vector : Once the weights have been calculated, we can simply add the multiply each weight to the principal components ( or eigen faces ) and sum them all together. Finally, we need to add the average face vector to this sum.
- Reshape vector into facial image : As a result of the previous step, we obtain a vector that is 30k long and can be reshaped into a 100 x 100 x 3 image. This is the final image.
PCA for dimensionality reduction
In our example, a 100 x 100 x 3 image has 30k dimensions. After doing PCA on 2000 images, we can obtain a space that is 2000 dimensional and yet is able to reconstruct a new face to a reasonable level of accuracy. What used to take 30k numbers to represent is now represented using only 2k numbers (i.e. the weights ). In other words, we just used PCA to reduce the dimension of the space of faces.
Code for Face Reconstruction using EigenFaces (C++/Python)
Assuming you have downloaded the code, we will go over important parts of the code. First, the code for calculating the mean face and the EigenFaces is shared in files createPCAModel.cpp and createPCAModel.py. The method was explained in our previous post and so we will skip that explanation. Instead, we will go over reconstructFace.cpp and reconstructFace.py.

C++
// Recontruct face using mean face and EigenFaces
void reconstructFace(int sliderVal, void*)
{
 // Start with the mean / average face
 Mat output = averageFace.clone();
 for (int i = 0;  i < sliderVal; i++)
 {
  // The weight is the dot product of the mean subtracted
  // image vector with the EigenVector
  double weight = imVector.dot(eigenVectors.row(i));

  // Add weighted EigenFace to the output
  output = output + eigenFaces[i] * weight;
 }

 displayResult(im, output);
}

int main(int argc, char **argv)
{

 string modelFile("pcaParams.yml");
 cout << "Reading model file " << modelFile << " ... " ;

 FileStorage file(modelFile, FileStorage::READ);

 // Extract mean vector
 meanVector = file["mean"].mat();

 // Extract Eigen Vectors
 eigenVectors = file["eigenVectors"].mat();

 // Extract size of the images used in training.
 Mat szMat = file["size"].mat();
 Size sz = Size(szMat.at<double>(1,0),szMat.at<double>(0,0));

 // Extract maximum number of EigenVectors.
 // This is the max(numImagesUsedInTraining, w * h * 3)
 // where w = width, h = height of the training images.
 int numEigenFaces = eigenVectors.size().height;
 cout <<  "DONE" << endl;

 cout << "Extracting mean face and eigen faces ... ";
 // Extract mean vector and reshape it to obtain average face
 averageFace = meanVector.reshape(3,sz.height);

 // Reshape Eigenvectors to obtain EigenFaces
 for(int i = 0; i < numEigenFaces; i++)
 {
   Mat row = eigenVectors.row(i);
   Mat eigenFace = row.reshape(3,sz.height);
   eigenFaces.push_back(eigenFace);
 }
 cout << "DONE" << endl;

 // Read new test image. This image was not used in traning.
 string imageFilename("test/satya1.jpg");
 cout << "Read image " << imageFilename << " and vectorize ... ";
 im = imread(imageFilename);
 im.convertTo(im, CV_32FC3, 1/255.0);

 // Reshape image to one long vector and subtract the mean vector
 imVector = im.clone();
 imVector = imVector.reshape(1, 1) - meanVector;
 cout << "DONE" << endl;

 // Show mean face first
 output = averageFace.clone();

 cout << "Usage:" << endl
 << "\tChange the slider to change the number of EigenFaces" << endl
 << "\tHit ESC to terminate program." << endl;

 namedWindow("Result", CV_WINDOW_AUTOSIZE);
 int sliderValue;

 // Changing the slider value changes the number of EigenVectors
 // used in reconstructFace.
 createTrackbar( "No. of EigenFaces", "Result", &sliderValue, numEigenFaces, reconstructFace);

 // Display original image and the reconstructed image size by side
 displayResult(im, output);

 waitKey(0);
 destroyAllWindows();
}
Python
# Recontruct face using mean face and EigenFaces
def reconstructFace(*args):
 # Start with the mean / average face
 output = averageFace

 for i in range(0,args[0]):
  '''
  The weight is the dot product of the mean subtracted
  image vector with the EigenVector
  '''
  weight = np.dot(imVector, eigenVectors[i])
  output = output + eigenFaces[i] * weight

 displayResult(im, output)

if __name__ == '__main__':

 # Read model file
 modelFile = "pcaParams.yml"
 print("Reading model file " + modelFile, end=" ... ", flush=True)
 file = cv2.FileStorage(modelFile, cv2.FILE_STORAGE_READ)

 # Extract mean vector
 mean = file.getNode("mean").mat()

 # Extract Eigen Vectors
 eigenVectors = file.getNode("eigenVectors").mat()

 # Extract size of the images used in training.
 sz = file.getNode("size").mat()
 sz = (int(sz[0,0]), int(sz[1,0]), int(sz[2,0]))

 '''
 Extract maximum number of EigenVectors.
 This is the max(numImagesUsedInTraining, w * h * 3)
 where w = width, h = height of the training images.
 '''

 numEigenFaces = eigenVectors.shape[0]
 print("DONE")

 # Extract mean vector and reshape it to obtain average face
 averageFace = mean.reshape(sz)

 # Reshape Eigenvectors to obtain EigenFaces
 eigenFaces = []
 for eigenVector in eigenVectors:
  eigenFace = eigenVector.reshape(sz)
  eigenFaces.append(eigenFace)

 # Read new test image. This image was not used in traning.
 imageFilename = "test/satya2.jpg"
 print("Read image " + imageFilename + " and vectorize ", end=" ... ");
 im = cv2.imread(imageFilename)
 im = np.float32(im)/255.0

 # Reshape image to one long vector and subtract the mean vector
 imVector = im.flatten() - mean;
 print("Done");

 # Show mean face first
 output = averageFace

 # Create window for displaying result
 cv2.namedWindow("Result", cv2.WINDOW_AUTOSIZE)

 # Changing the slider value changes the number of EigenVectors
 # used in reconstructFace.
 cv2.createTrackbar( "No. of EigenFaces", "Result", 0, numEigenFaces, reconstructFace)

 # Display original image and the reconstructed image size by side
 displayResult(im, output)

 cv2.waitKey(0)
 cv2.destroyAllWindows()
You can create the model pcaParams.yml using createPCAModel.cpp and createPCAModel.py. The code uses the first 1000 images of the CelebA dataset and scales them to half the size first. So this PCA model was trained on images of size (89 x 109). In addition to the 1000 images, the code also used a vertically flipped version of the original images, and therefore we use 2000 images for training.
Back to the code shared above.
We first read the model file ( lines 24-42 in C++ and lines 23-43 in Python). It contains the mean vector of size 1 x 29,103, and a matrix of EigenVectors of size 2000 x 29,103. The model also includes the size of the images used in training.
Next, we reshape the mean vector to obtain the average face in line 46 of the C++ and Python code. We also, reshape, the Eigen Vectors to obtain the EigenFaces in lines 48-54 in both versions of the code.
Next, we read a new image that was not used in training. Note, the image is also of size 89×109 and the eyes were aligned with the images in the training set. This image is then vectorized (flattened) and the mean vector is subtracted from it. These operations are performed in lines 57-66 in C++ and lines 55-63 in Python.
The reconstruction is done in the function reconstructFace starting at line 2 in both versions of the code. A slider is provided which controls the number of EigenVectors to use. Since the model was trained on 2000 images, we can have a maximum of 2000 EigenVectors.
We start with the average face. The weights are calculated by the dot product of the mean subtracted image vector and the EigenVectors. Finally, the weighted EigenFaces are added to the average face.