

Jupyter Notebook, formerly known as IPython Notebook, in my opinion, is one of the best tools for a programmer. You can interactively experiment with your code while writing it and that makes for a pleasurable programming experience.
The vast range of programming languages covered – R, Python, Julia, MATLAB, etc. along with an amazing set of widgets make it a very powerful and easy-to-use solution. This power of Jupyter Notebook can be witnessed live in the gallery of interesting Jupyter Notebooks.
One thing that I always found missing in Jupyter Notebook was the support for the C++ language. Of course, the reason it was not supported was that C++ programs have to be first compiled and then executed unlike Python which is an interpreted language and that’s why we are able to use it in Python or IPython prompt.
Imagine my surprise when I came across Xeus-Cling kernel which allows users to run their C++ codes on Jupyter Notebook. How? Well, the trick is in the word Cling which is an interactive C++ interpreter built on top of Clang and LLVM. Cling works on the principle of REPL – Read-Evaluate-Print-Loop which is also utilized by programming languages like Julia.
Let’s see how we can use Xeus-Cling kernel to run OpenCV and Dlib C++ code.


1. Installing Xeus-Cling
Xeus-Cling kernel requires conda package and has been built mainly for Linux and OS X platforms. The support for Windows is still experimental.
The best way to install Xeus-Cling is to create a new conda environment and install the kernel there. This is to make sure that the kernel installation doesn’t create any conflict with existing libraries like zeromq.
First, let’s create a new conda environment and activate it.
conda create -n xeus-cling
source activate xeus-cling
Next, we will use conda package installer to install Xeus-Cling.
conda install -c conda-forge xeus-cling
And tada! We are done. 🙂
2. Testing C++ Kernel
Now that we have installed Xeus-Cling, let’s see if it’s even working or not.
Let’s first activate the conda environment and then run a Jupyter Notebook.
source activate xeus-cling
jupyter-notebook
The notebook server will start running on your localhost. Next, create a new Jupyter Notebook and select C++11 kernel.

Once the Jupyter Notebook opens, we can start working on it. Let’s start off with the classic Hello World example.
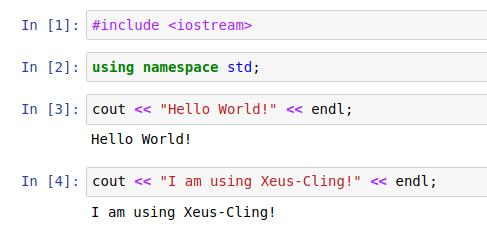
That was pretty simple right?
3. Using OpenCV and Dlib with Xeus-Cling
Now let’s go to some serious stuff. What happens if we want to use OpenCV and Dlib with Xeus-Cling? Well, the solution was not very simple for me, but thanks to the community support, I managed to make it work in the end.
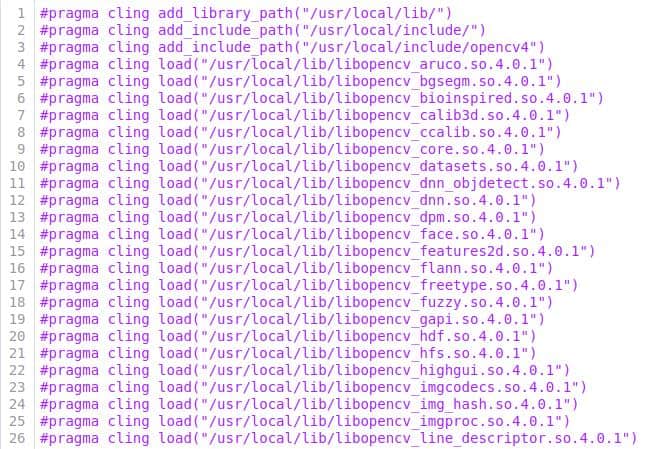
The trick lies in the following set of commands.
- Add library path using #pragma cling add_library_path
- Add include path using #pragma cling add_include_path
- Add an external shared library using #pragma cling load
That’s it! That’s all it takes to make it work.
So, if our OpenCV and Dlib libraries are present in /usr/local/lib we can simply do the following:
#pragma cling add_library_path("/usr/local/lib")
Personally, I find it best to write all these commands in one includeLibraries.h header file and just include it in beginning of the notebook.
Here’s how my includeLibraries.h file looks like:
Dlib library can be added similarly using:
#pragma cling load("/usr/local/lib/libdlib.so")
4. Test OpenCV and Dlib with Xeus-Cling

Once we have the includeLibraries.h file all ready, we can quickly create a new Jupyter-Notebook with C++11 kernel.

The video present in the beginning of the post shows a Facial Landmark Detection demo which requires both OpenCV and Dlib and how the code can be run on Jupyter-Notebook using Xeus-Cling.
I hope you enjoyed the post. Feel free to reach out to us in case of any queries and suggestions. Happy hacking!