Face Detection is a computer vision technique in which a computer program can detect the presence of human faces and also find their location in an image or a video stream. Isn’t it mind-boggling how the mobile camera automatically detects your face every time you try to take a selfie? You must’ve also noted that it captures other people’s faces in the frame. Well, all this wouldn’t have been possible without Face Detection algorithms. Every year, Facial Detection algorithms are evolving faster and becoming more robust.
In this post, you will get an overview of Face Detection itself. We will walk through various state-of-the-art Face Detectors and how they evolved over time.
- What is Face Detection?
- Face Detection Vs Face Recognition
- Why is Facial Detection Important?
- Applications of Face Detection
- Difficulties/Challenges of Detecting a Face
- Benchmarking Datasets for Face Detection
- Metrics used for Evaluating Face Detection models
- Evolution Timeline of Facial Detection Algorithms
- Classical Algorithms of Face Detection
- Deep Learning based Face Detectors
- Comparison of Face Detectors
- Conclusion
What is Face Detection?

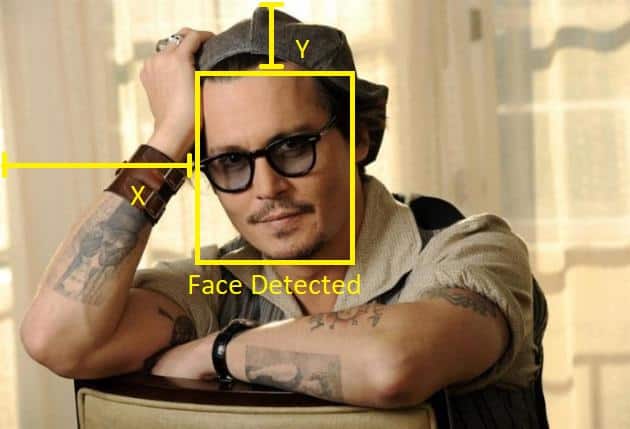
Face Detection is a Computer Vision task in which a computer program can detect the presence of human faces and also find their location in an image or a video stream. This is the first and most crucial step for most computer vision applications involving a face.
Face Detection Vs. Face Recognition
Face detection answers the question, “Is there a face present in an image, and where is that face located inside the image?”. Face recognition goes a step further and answers the question, “Who’s face is that?”.
Facial Detection is a preceding step in the process of Facial Recognition. For an in-depth understanding of Face Recognition, don’t miss out on the following posts,
 Face Detection | 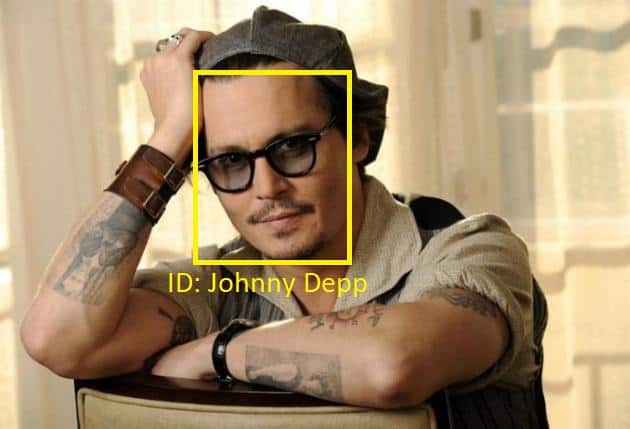 Face Recognition |
Why is Facial Detection Important?
A good facial detector is important as face detection is a necessary starting point for many face-related tasks, like facial landmark detection, gender classification, face tracking, and of course, face recognition.
Applications of Face Detection
Nowadays, Face Detection is being used in a huge number of domains, including Security, Marketing, Healthcare, Entertainment, Law Enforcement, Surveillance, Photography, Gaming, Video Conferencing, etc. Let’s look at some specific use cases.
Camera Autofocus
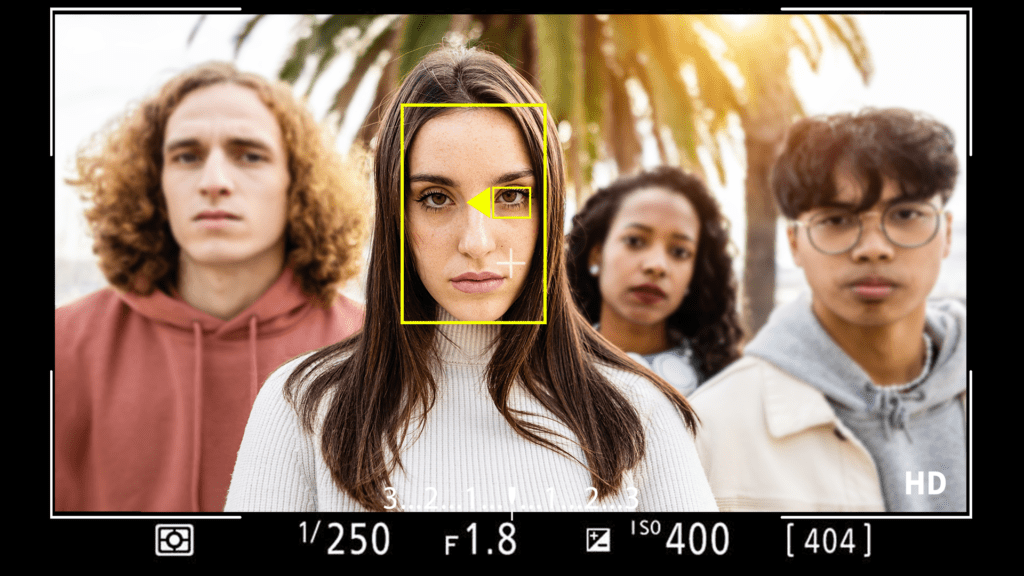
In 2006, an early form of facial feature detection was introduced in digital cameras to aid in autofocus. Since then, almost all digital cameras include some facial detection mode to detect the faces in the camera frame and keep them focused.
Face Recognition
The most popular application of Face Detection is Face Recognition. In any Face Recognition system, detecting the Face is the primary step. The features of the detected face can be used to associate the face with a person for recognition.

Gender Classification
Once we have the detected face region, we can use a classification model on top of that to distinguish between males and females.

Landmark Detection
Many face applications utilize the location of landmarks of the face, such as the eyelids, corner points of the lips, or tip of the nose. These landmarks are localized within the face region we get from the face detector.

Attendance
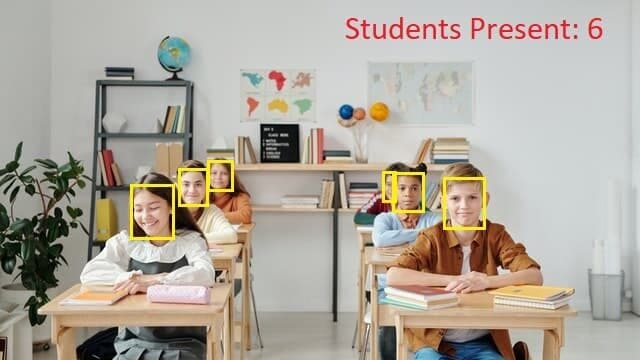
Facial Detection can be used to find the number of people in a classroom or in an event to note the strength of people present.
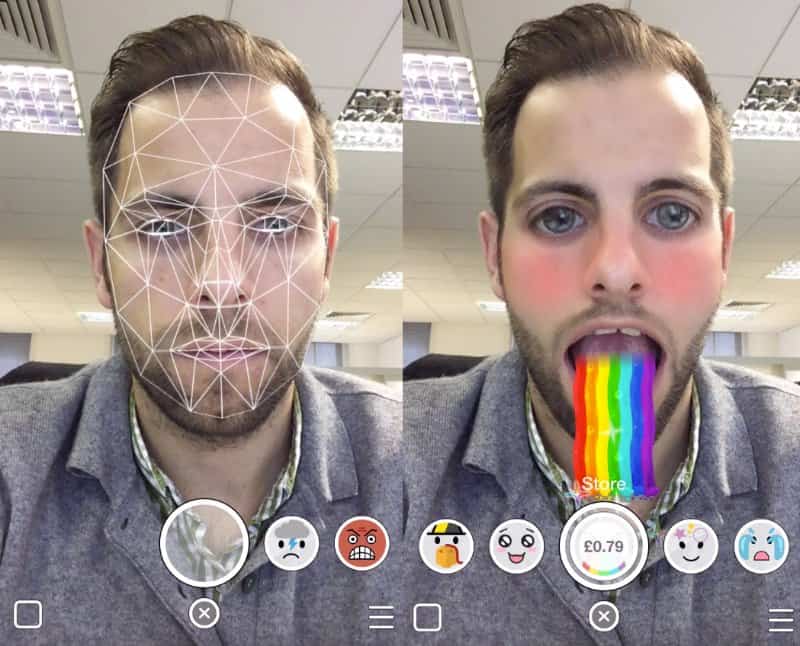
Snapchat/Instagram camera filters
Most of the camera filters on social media applications are built on top of and are made possible with Face Detection.
Want to learn to make your own filters? Look at our post on camera filters and how to create Snapchat and Instagram filters.
Crowd Analysis
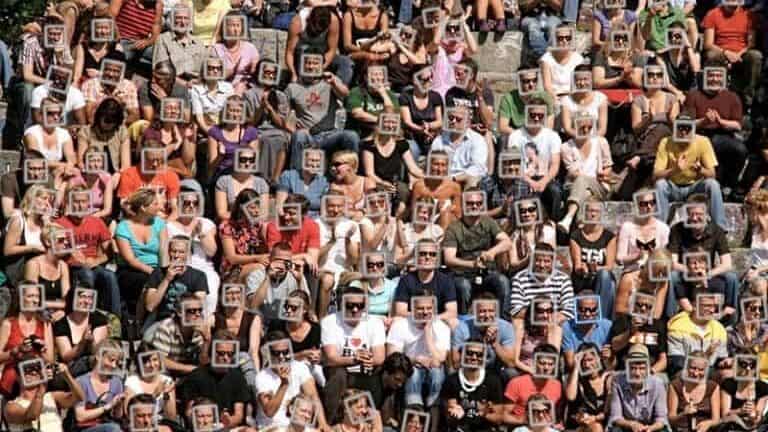
Facial Detection can measure the crowd’s strength and density in a public space for crowd analysis.
Difficulties/Challenges of Detecting a Face
Numerous things hinder the performance of a Face Detector.
Occlusion
Occlusion greatly affects the ability of any system to detect the face as only a part of the face is visible, and it is hard to say with confidence whether there is a face in the frame when only part of it is visible.

Lighting
Any change in the subject’s lighting conditions poses an issue for face detection as it is not necessary that the method is designed/trained to handle the variation in the lighting.

Skin Color
Skin color in facial detection has always been a topic of discussion, as it is found that some of the face detectors were biased toward some skin colors.
Also, a particular skin color might behave differently in various lighting conditions than any other skin color, bringing an added challenge to the detection system.

Pose
The pose or orientation of a face in the image frame affects the performance of the Face detector, as some methods can only detect frontal faces and fail when the face is sideways or turned slightly to one side.

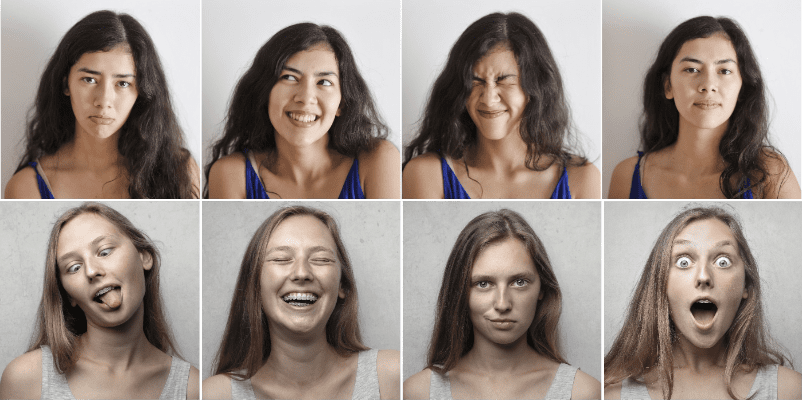
Facial Expressions
Facial expressions should be taken care of when designing the features of a face or training a deep learning model, as the face is unlikely to always be neutral in the real world. Any change in the expressions of the face would mean the features of the face would change, and the detection system might not consider it a real face.
Accessories/Makeup/Facial Hair
The accessories used, facial hair or modifications done on faces might also affect the performance of the Face Detection system if they are not taken into account while designing or training the Face Detector. Sunglasses, Face masks, Beards, Tattoos, and Dramatic makeup are a few examples.

Scale of Face
The scale of the face might change with respect to the image/video frame, and depending on the facial detection system, the face might be too small to be detected.

Benchmarking Datasets for Face Detection
FDDB (Face Detection Dataset and Benchmark)
- From – University of Massachusetts, Amherst
- Introduced – 2010
- Url – http://vis-www.cs.umass.edu/fddb/
- Number of images – 2845
- Samples – 5171
- Paper – FDDB: A Benchmark for Face Detection in Unconstrained Settings
- Remarks – The images are selected from the Faces in the Wild data set.
Annotated Faces in the Wild
- From – Dept. of Computer Science, University of California, Irvine
- Introduced – 2012
- Url – https://docs.activeloop.ai/datasets/afw-dataset
- Number of images – 205
- Samples – 468
- Paper – Face detection, pose estimation, and landmark localization in the wild
- Remarks – The images are taken from Flickr. Aside from the bounding box, the dataset also contains 6 landmarks (the center of the eyes, the tip of the nose, the two corners, and the center of the mouth) for the faces. The dataset is relatively small.
Pascal Face
- From – Center for Biometrics and Security Research & National Laboratory of Pattern Recognition, Institute of Automation, Chinese Academy of Sciences, China.
- Introduced – 2013
- URL : http://host.robots.ox.ac.uk/pascal/VOC/databases.html
- Number of images – 851
- Samples – 1,341
- Paper – Face detection by structural models
- Remarks – The images are taken from the test set of the Pascal person layout dataset, which is a subset of Pascal VOC.
MALF (Multi-Attribute Labelled Faces)
- From – Center for Biometrics and Security Research & National Laboratory of Pattern Recognition Institute of Automation, Chinese Academy of Sciences, China.
- Introduced – 2015
- URL : http://www.cbsr.ia.ac.cn/faceevaluation/
- Number of images – 5,250
- Samples – ∼12,000
- Paper – Fine-grained evaluation on face detection in the wild
- Remarks – It is the largest dataset for evaluating face detection in the wild, and the annotation of multiple facial attributes makes it possible for fine-grained performance analysis.
WiderFace
- From – Department of Information Engineering, The Chinese University of Hong Kong.
- Introduced – 2015
- URL : http://shuoyang1213.me/WIDERFACE/
- Number of images – 32,203
- Training set – 40%
- Validation set – 10%
- Testing set – 50%
- Samples – 393,703
- Paper – WIDER FACE: A Face Detection Benchmark
- Remarks – The images are selected from the publicly available Wider dataset. There is a high degree of variability in scale, pose, occlusion, expression, appearance, and illumination.
UFDD (Unconstrained Face Detection Dataset)
- From – Fujitsu Laboratories Ltd., Kanagawa, Japan
Johns Hopkins University, MD, USA
Rutgers University, NJ, USA - Introduced – 2018
- URL: https://ufdd.info/
- Number of images – 6,424
- Samples – 10,895
- Paper – Pushing the Limits of Unconstrained Face Detection: a Challenge Dataset and Baseline Results
- Remarks –
The dataset contains faces in various conditions, such as weather-based degradations, motion blur, focus blur, and several others.
Metrics Used for Evaluating Face Detection Models
The metrics used in Facial Detection are the same as any other object detection problem. The popular metrics used are
IoU – Intersection over Union
Intersection over Union (IoU) is a metric that quantifies the degree of overlap between two regions. IoU metric evaluates the correctness of a prediction. The value ranges from 0 to 1. With the help of the IoU threshold value, we can decide whether a prediction is True Positive, False Positive, or False Negative.

We have already discussed IoU meaning in-depth in our previous article, Intersection over Union in Object Detection and Segmentation. You will learn how the IoU metric is designed and implemented.
Precision
Precision measures the proportion of predicted positives that are correct. If you are wondering how to calculate precision, it is simply the True Positives out of total detections. Mathematically, it’s defined as follows.
P = TP / (TP + FP)
= TP / Total Predictions
The value ranges from 0 to 1.
Recall
Recall measures the proportion of actual positives that were predicted correctly. It is the True Positives out of all Ground Truths. Mathematically, it is defined as follows.
R = TP / (TP + FN)
= TP / Total Ground Truths
Similar to Precision, the value of Recall also ranges from 0 to 1.
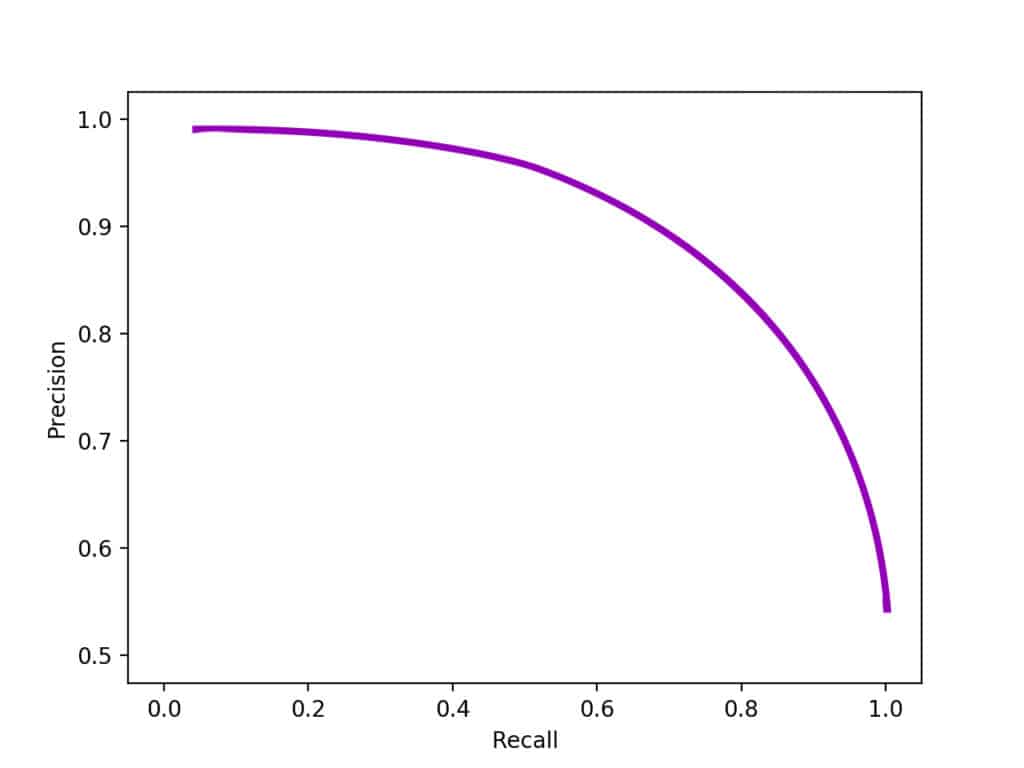
PR Curve – Precision-Recall Curve
The Precision-Recall Curve is a plot with Precision on the y-axis and recall on the x-axis. It shows the precision as a recall function for all different threshold values.
ROC Curve – Receiver Operating Characteristic
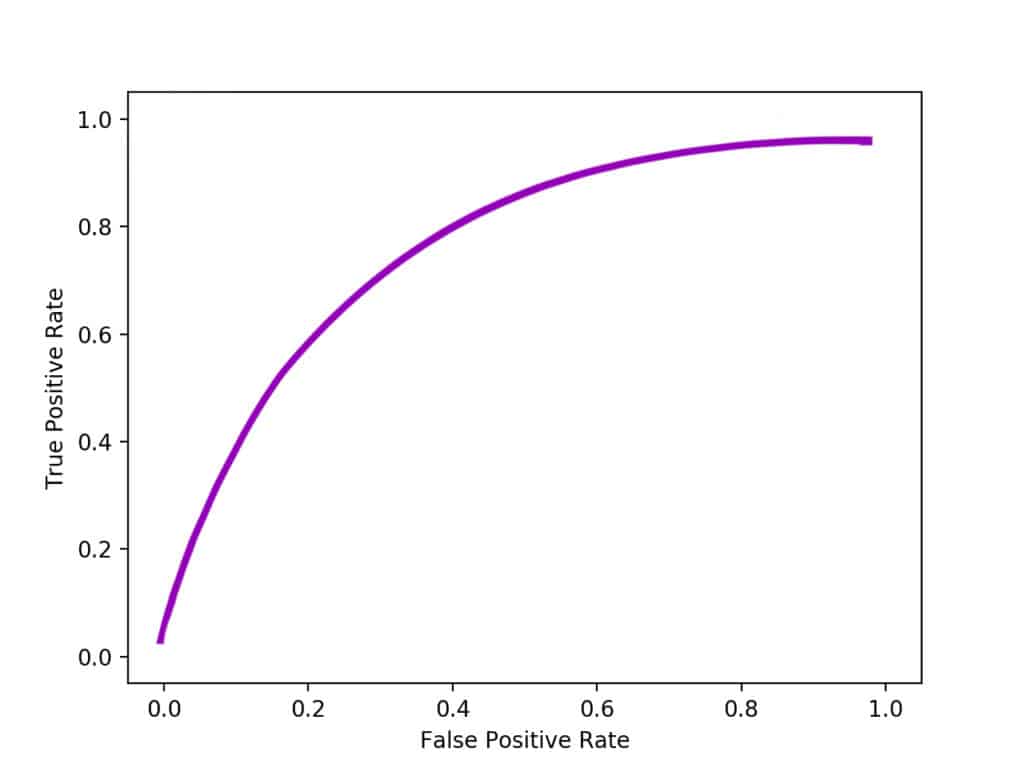
The Receiver Operating Characteristic (ROC) curve is a plot that shows the performance of a model as a function of its cut-off threshold (similar to the precision-recall curve).
It essentially shows the Recall against the false positive rate (FPR) for various threshold values.
AP – Average Precision
Interestingly, Average Precision (AP) is not the average of Precision (P). The term AP has evolved with time. For simplicity, we can say that it is the area under the precision-recall curve.
The area under the curve is used to summarize the performance of a model into a single measure. It is important when comparing the performance of different models. A model with a high AUC can occasionally score worse in a specific region than another model with a lower AUC. But in practice, the AUC performs well as a general measure of predictive accuracy.
MAP – Mean Average Precision
As the name suggests, Mean Average Precision or mAP is the average of AP over all detected classes in multiclass object detection
mAP = 1/n * sum(AP), where n is the number of classes.
To arrive at the mAP, while evaluating a model, Average Precision (AP) is calculated for each class separately.
Evolution Timeline of Face Detection Algorithms
The figure below highlights the important Face Detection algorithms over time. This is NOT an exhaustive list by any means. Please let us know in the comments section if you want us to include any other models.

Classical Algorithms of Face Detection
Haar Cascades (2001)
The Viola-Jones face detector proposed by researchers Paul Viola and Michael Jones in 2001 signaled one of the first major breakthroughs in this field.
Employing the line or edge-detection features proposed in the Viola-Jones detector, Haar Cascades provided the much-needed breakthrough in facial detection. Though it significantly improved the speed and accuracy of the detections, it had its limitations and failed when called upon to detect faces in noisy images. Over the years, there have been many improvements. The Haar Cascade algorithm was used not only for Face Detection but also for Eye Detection, License Plate Detection, etc.
The classifier looks at the intensities of the pixels and tries to find multiple predefined features in the image. If it finds enough matches for a certain region, it can be sure that there is an object.
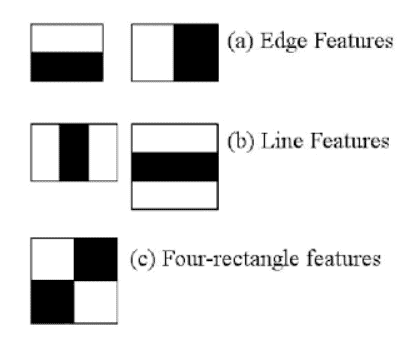

You can easily load the available Haar Cascade Classifier XML files using OpenCV’s CascadeClassifier function. Have a look at the documentation and read up on the theory in-depth.
Code Syntax to Implement Haar Cascades in OpenCV
# Initialize the cascade classifiers for face
face_cascade = cv2.CascadeClassifier('haarcascade_frontalface_default.xml')
# Read image
img = cv2.imread("image.jpg")
# Getting the detections
face_rect = face_cascade.detectMultiScale(img, scaleFactor = 1.2, minNeighbors = 5)
DLib-HOG (2005)
A widely used Face Detector, Dlib uses the classical Histogram of Gradients (HoG) feature combined with a linear classifier, an image pyramid, and a sliding window detection scheme. Learn more about the Histogram of Oriented Gradients. Dlib employs 5 HOG filters:
- Front looking
- Left looking
- Right looking
- Front looking, but rotated left
- Front looking, but rotated right
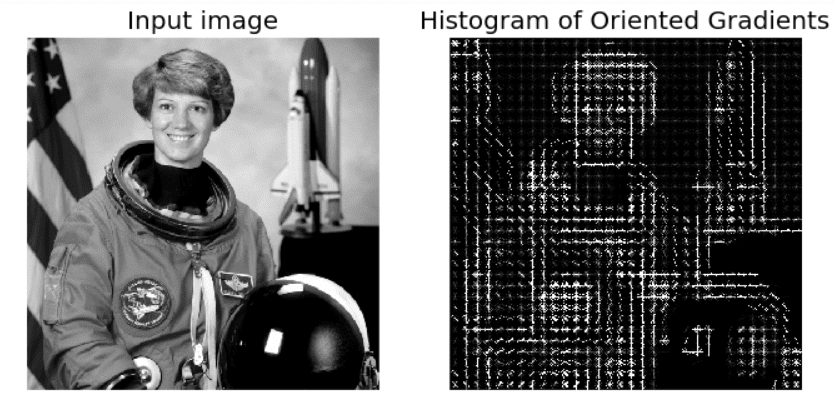
Our earlier study on Face Detection Dlib comparison shows how it is implemented (in Python and C++) and where Dlib stands compared to Haar Cascade or other CNN-based Face Detectors.
Code Syntax to Implement Dlib Face Detector
# Initializing the Dlib Face Detector
detector = dlib.get_frontal_face_detector()
# Read image
img = cv2.imread("image.jpg")
# Getting the detections
detections = detector(img)
Deep Learning Based Face Detectors
With all these face detectors discussed above doing their job, do we really need newer face-detection techniques? The answer is yes. While they may provide decent accuracy, the speed is found wanting.
- A classical Face-Detection technique might fail to detect a face in a few frames, which may lead to the application not performing as desired or cause complications in the system.
- Even if the faces are detected in every frame, the process might take too long. This slows down the application and, at times, robs it of its whole essence.
No wonder we needed to switch to newer state-of-the-art Face Detectors. These provide high accuracy (such that no face goes undetected) at very high speeds and can also be used in microprocessors with low computing power.
SSD (Dec 2015)
Single Shot Multibox Detector, the method’s name reveals most of the details about the model. The SSD model detects the object in a single pass over the input image. Unlike other models, which traverse the image more than once to get an output detection.

The SSD model is made up of 2 parts, namely
The Backbone model
The Backbone model is a typical pre-trained image classification network that works as the feature map extractor. Here, the image final image classification layers of the model are removed to give us only the extracted feature maps.
The SSD head
SSD head is made up of a couple of convolutional layers stacked together, and it is added to the top of the backbone model. This gives us the output as the bounding boxes over the objects. These convolutional layers detect the various objects in the image.
Code Syntax to Implement SSD Detector in OpenCV
# Intialize detector
detector = cv2.dnn.DetectionModel("ssd.caffemodel", "deploy.prototxt")
# Read image
img = cv2.imread("image.jpg")
# Getting detections
detections = detector.detect(img)
MTCNN (April 2016)
A more recent model, MTCNN, stands for Multi-Task Cascaded Convolutional Neural Network. Published in 2016 by Zhang et al., this commonly used model consists of neural networks connected in a cascade fashion.
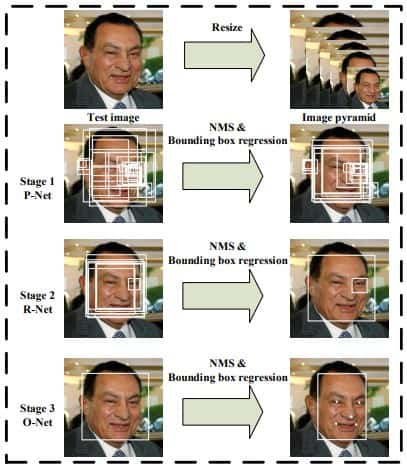
The proposed MTCNN architecture consists of three stages of CNNs. In the first stage, P-Net (Proposal Network), it produces candidate windows quickly through a shallow CNN. Then in the R-Net (Refine Network) stage, it refines the windows by rejecting many non-face bounding boxes through a more complex CNN. Finally, the O-Net (Output Network) stage uses a more powerful CNN to refine the result again and output five facial landmarks positions.
Though an accurate model, it isn’t fast enough for real-time applications.
Code Syntax to Implement MTCNN
from mtcnn.mtcnn import MTCNN
# Initialize detector
dett image ector=MTCNN()
# Read image
img = cv2.imread("image.jpg")
# Geshape
img_W = int(img.shape[1])
img_H = int(img.shape[0])
# Set input size
detector.setInputSize((img_W, img_H))
# Get detections
detections = detector.detect_faces(img)
Dual Shot Face Detector (April 2019)
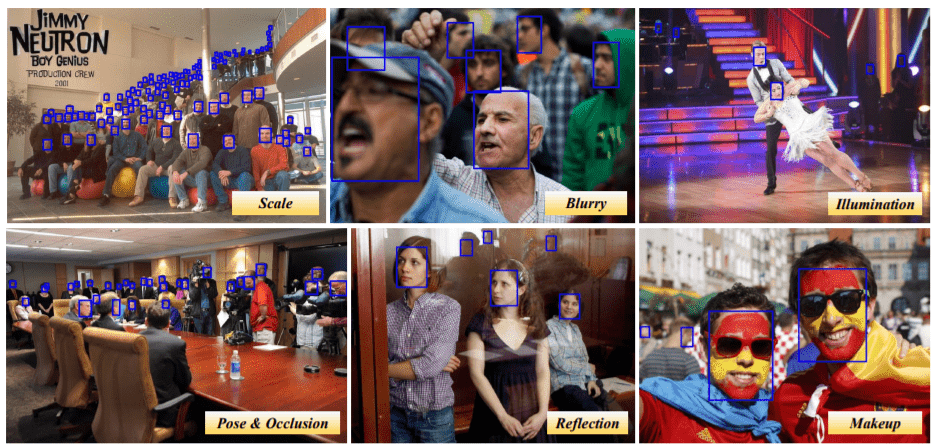
Dual Shot Face Detector is a novel Face Detection approach that addresses the following three major aspects of Facial Detection:
- Better feature learning –
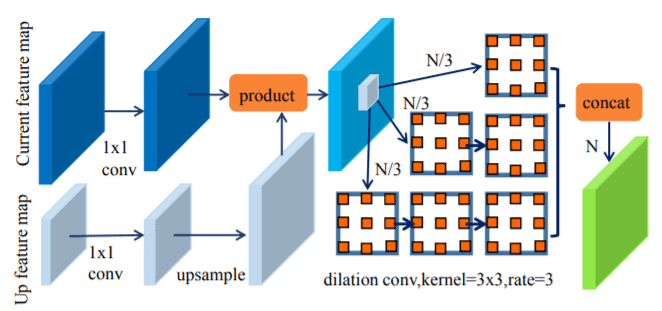
DSFD involves a Feature-Enhance Module (FEM) that enhances the originally received feature maps, thus extending the single shot detector to a dual shot detector. This module helps incorporate the current layer’s information along with the feature maps of the previous layers and maintains a context relationship between the anchors. This helps obtain more discriminate and robust features.
- Progressive loss design – Loss functions such as Focal Loss and Hierarchical Loss address the class-imbalance problem and consider original and enhanced learning features, respectively. However, they are not equipped to progressively learn the feature maps at different levels and shots. DSFD involves a Progressive Anchor Loss (PAL) computed by two sets of anchors. It assigns smaller anchor sizes in the first shot and larger ones in the second. This helps facilitate the features effectively.
- Anchor assign-based data augmentation – Anchors are generated for each feature map. Some research involves strategies to increase positive anchors. Such a strategy ignores the random sampling in data augmentation, resulting in an imbalance between positive and negative anchors. DSFD uses Improved Anchor Matching (IAM), which involves anchor-based data augmentation. This provides a better match between the anchors and ground truth and leads to better initialization for the face-box regressor.
All the above-mentioned aspects are mutually exclusive and can work simultaneously to improve performance. As you can see, all these techniques relate to a two-stream design, so it has been named Dual Shot Face Detector. It has the ability to remain robust even under variations in illumination, pose, scale, occlusion, etc.
When introduced, it achieved state-of-the-art results on the WIDER Face dataset.
| Easy | Medium | Hard | |
| Validation Set | 96.6 | 95.7 | 90.4 |
| Test Set | 96 | 95.3 | 90 |
Code Syntax to Implement DSFD
import face_detection
# Initialize detector
detector = face_detection.build_detector("DSFDDetector", confidence_threshold=.5, nms_iou_threshold=.3)
# Read image
img = cv2.imread("image.jpg")
# Getting detections
detections = detector.detect(img)
RetinaFace (May 2019)
RetinaFace is a practical single-stage SOTA (State Of The Art) face detector initially introduced in the arXiv technical report and then accepted by CVPR 2020. It is a part of the InsightFace project from DeepInsight, which is also credited with many more top Face-Recognition techniques like ArcFace, SubCenter ArcFace, PartialFC, and multiple facial applications too.
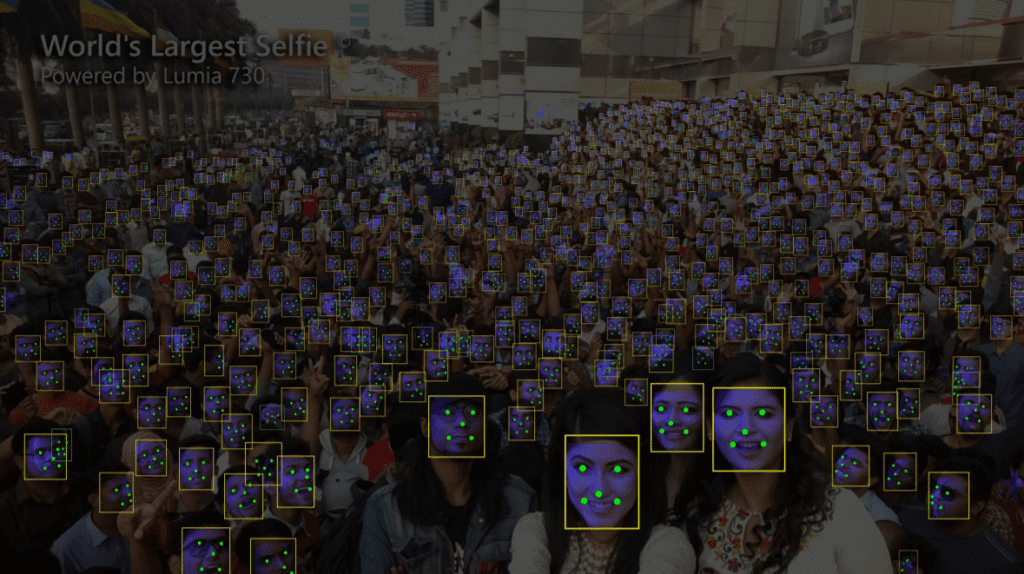
It takes pixel-wise face localization to the next level. RetinaFace cleverly takes advantage of extra-supervised and self-supervised multi-task learning to perform face localization on various scales of faces, as seen in the above figure.
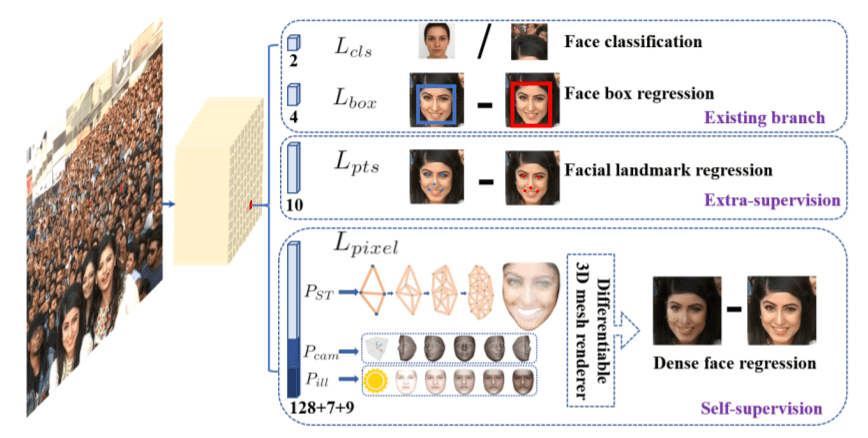
Many recent state-of-the-art methods focus on single-stage face detection techniques, which densely sample face locations and scales on feature pyramids. Such a technique provides better performance at a faster speed compared to two-stage methods.
RetinaFace improves this single-stage framework by:
- Exploiting multi-task losses coming from strongly supervised and self-supervised signals.
- Employing a multi-task learning strategy to simultaneously predict the face score, face box, five facial landmarks, and 3D position and correspondence of each face pixel.
The multitask loss function used by RetinaFace includes the following losses:
- Face classification loss is a softmax loss for binary classes (face/not face).
- Face box regression loss – The target bounding boxes are normalized and are in the format [(x_center, y_center, width, height]).
- Facial landmark regression loss – This regression technique also normalizes the target.
- Dense regression loss – Supervised signals increase the significance of better face box and landmark locations.
It achieves state-of-the-art results on the WIDER Face dataset.
| Easy | Medium | Hard | |
| Validation Set | 96.9 | 96.1 | 91.8 |
| Test Set | 96.3 | 95.6 | 91.4 |
Code Syntax to Implement RetinaFace Detector
import face_detection
# Initialize detector
detector = face_detection.build_detector("DSFDDetector", confidence_threshold=.5, nms_iou_threshold=.3)
# Read image
img = cv2.imread("image.jpg")
# Getting detections
detections = detector.detect(img)
MediaPipe (June 2019)
A framework for building perception pipelines that perform inferences over arbitrary sensory data, MediaPipe includes images, video streams, and audio data.
It can be used to rapidly prototype perception pipelines with reusable components and in production-ready Machine Learning applications.
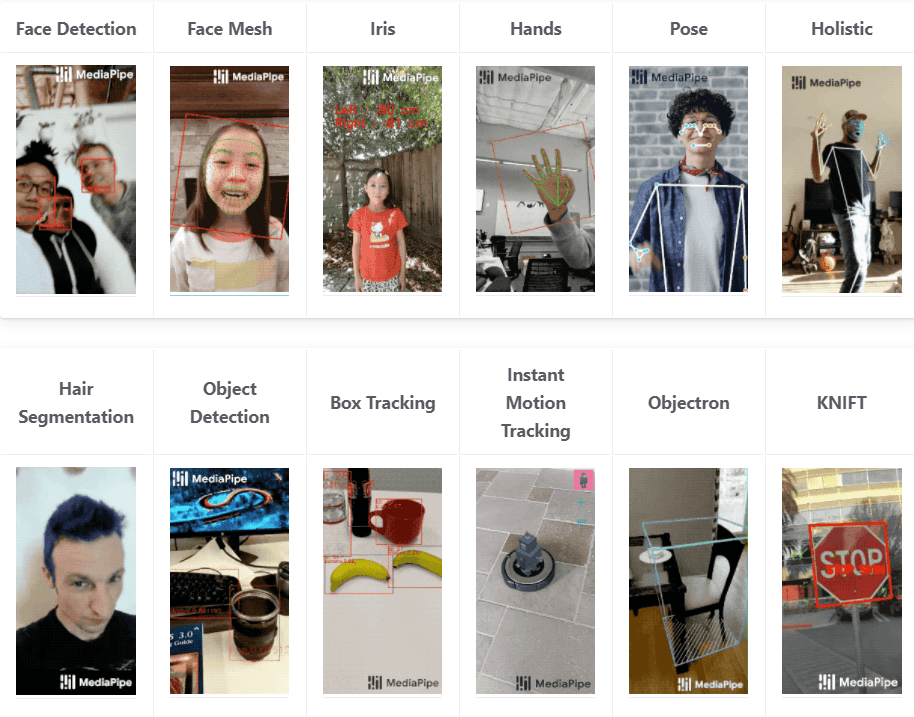
MediaPipe provides an ultrafast Face Detection solution that is based on BlazeFace. And what does BlazeFace do?
- It uses a lightweight feature extractor inspired by the MobileNet model and a GPU-friendly anchor scheme modified from Single Shot Multibox Detector (SSD).
- It also replaces Non-Maximum Suppression with an improved tie-resolution strategy.
The model can detect 6 facial landmarks.
It provides a JavaScript API to implement Facial Detection on the web and an API to include it on Android, iOS, and Desktop applications.
Code Syntax to Implement MediaPipe Face Detector
import mediapipe as mp
# Initialize detector
mp_face_detection = mp.solutions.face_detection
facedetection = mp_face_detection.FaceDetection(min_detection_confidence=0.4)
# Read image
img = cv2.imread("image.jpg")
# Getting detections
predictions = facedetection.process(img)
YuNet (Oct 2021)
Traditionally OpenCV face detection was equipped with the face detectors like Haar cascades and HOG detectors that worked well for frontal faces but failed otherwise. The recent release of OpenCV (4.5.4 Oct 2021) saw the addition of a face detection model called YuNet that solves this problem.
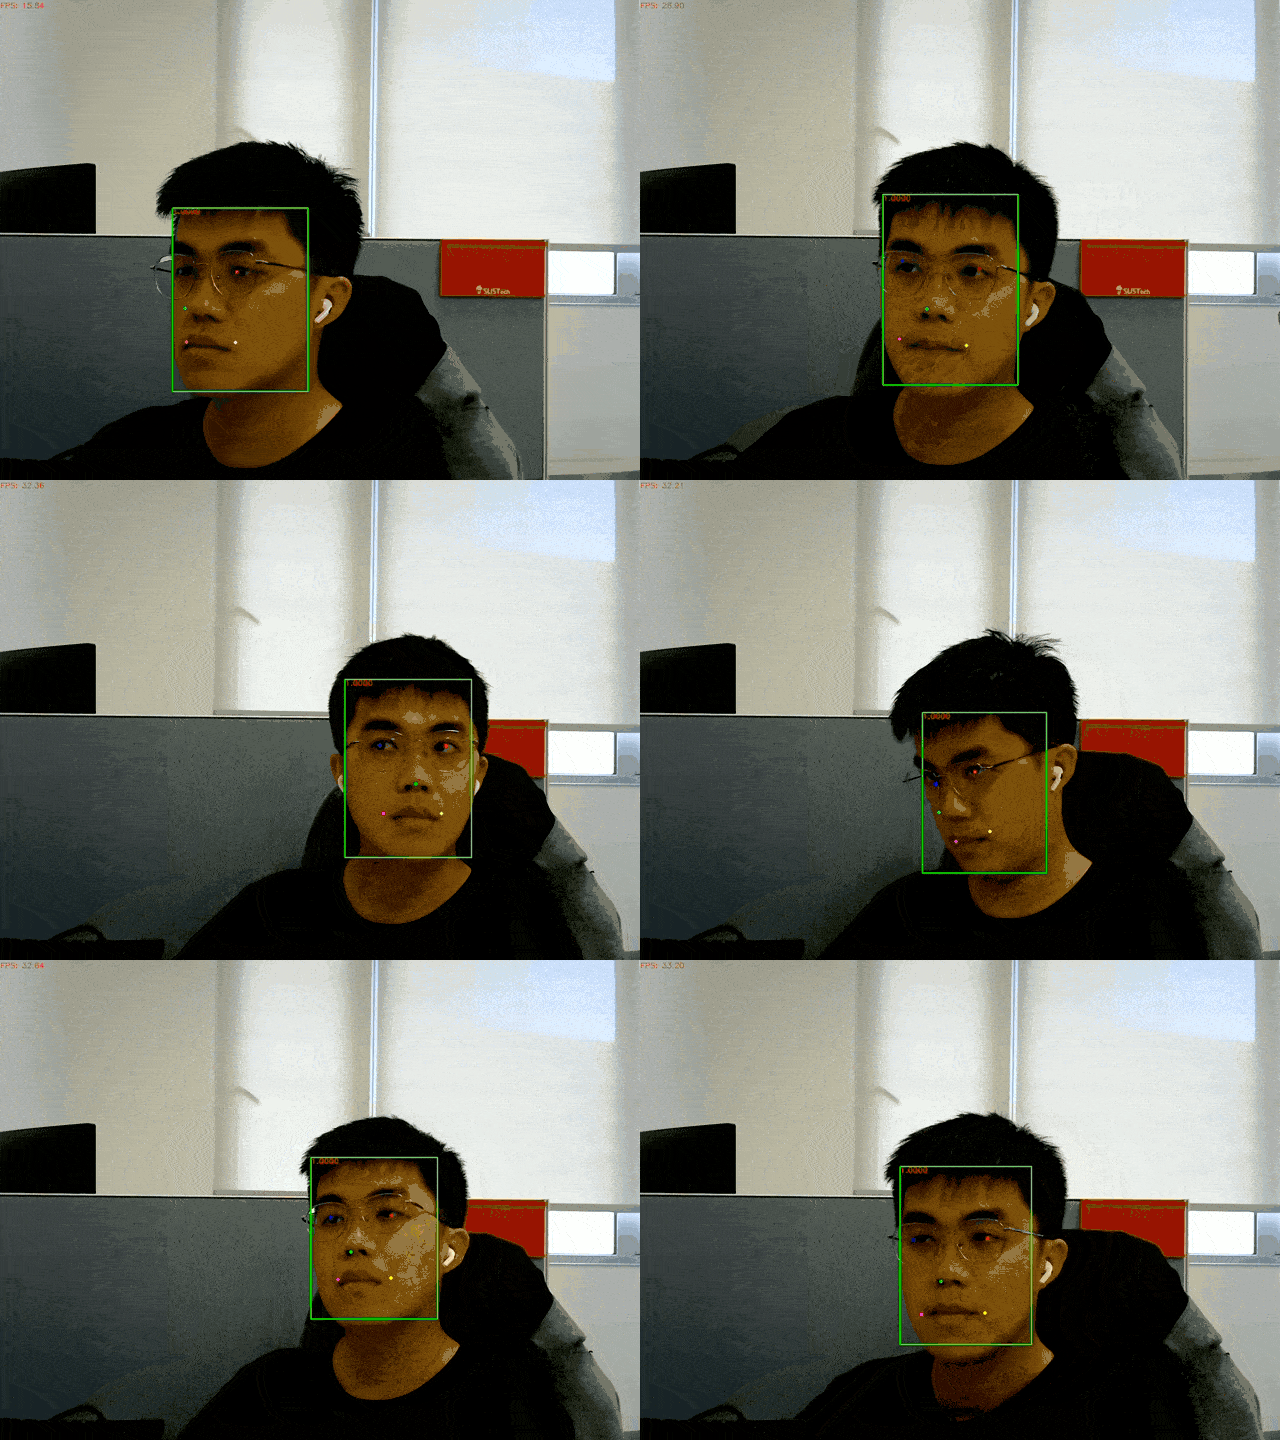
It is a CNN-based face detector developed by Chengrui Wang and Yuantao Feng. It is a very lightweight and fast model. With a model size of less than an MB, it can be loaded on almost any device. It adopts mobilenet as its backbone and contains 85000 parameters in total.
The main and well-known repository, libfacedetection, takes YuNet as the detection model and offers pure C++ implementation without dependence on DL frameworks, and reaches a detection rate of 77.34 FPS for 640 × 480 images to 2,027.74 FPS for 128 × 96 images on an INTEL i7-1065G7 CPU at 1.3 GHz
It achieves a respectable score on the validation set of the WIDER Face dataset for such a lightweight model.
| Easy | Medium | Hard | |
| Validation Set | 0.856 | 0.842 | 0.727 |
Code Syntax for Implementing YuNet Face Detector
# Initialize detector
detector = cv2.FaceDetectorYN.create("face_detection_yunet_2022mar.onnx", "", (320, 320))
# Read image
img = cv2.imread("image.jpg")
# Get image shape
img_W = int(img.shape[1])
img_H = int(img.shape[0])
# Set input size
detector.setInputSize((img_W, img_H))
# Getting detections
detections = detector.detect(img)
Comparison of Face Detectors
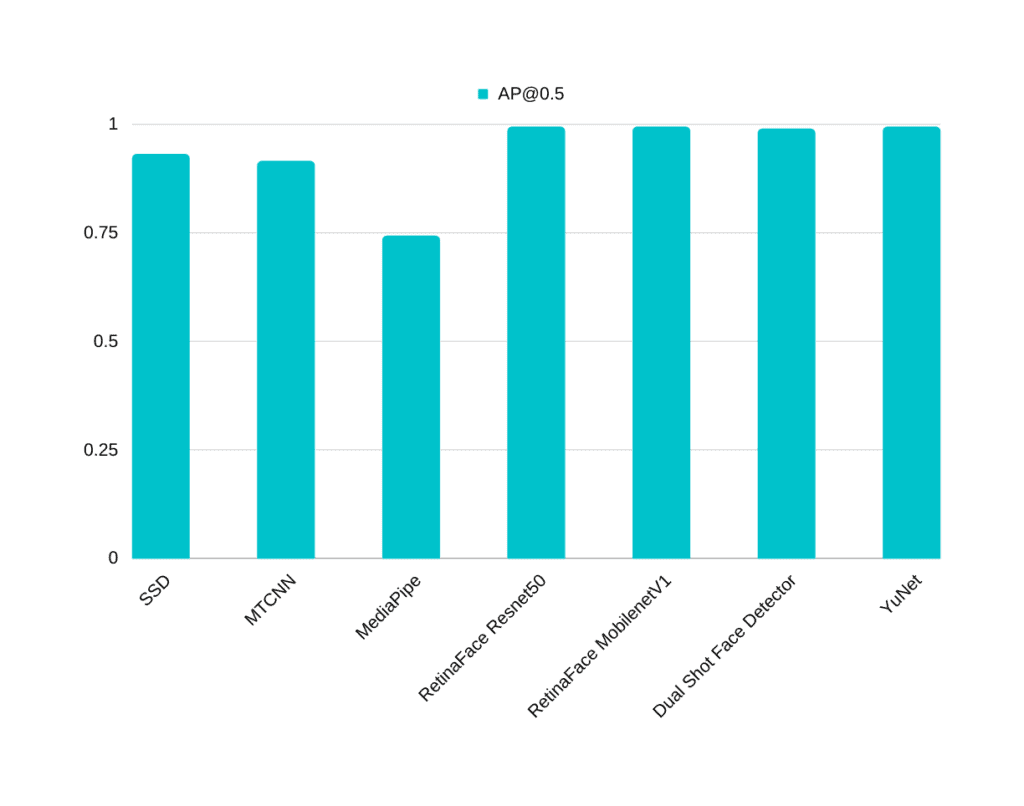
The following table presents a comparison of all the above Face-Detection models based on their inference speed in Frames Per Second (FPS) and Average Precision (AP).
System Configuration:
- Processor – Intel(R) Xeon(R) CPU
- Operating speed – 2.20 GHz
- Total RAM – 12.69 GB
We used the Tesla P100-16GB GPU on the google colab environment.
Performance Comparison of Face Detectors (Speed/FPS)
| Model | FPS (On Colab GPU) | FPS (On Colab CPU) |
| Haar cascade | – | 19.95 |
| Dlib | – | 33.92 |
| SSD | 19.90 | 15.58 |
| MTCNN | 2.11 | 1.81 |
| MediaPipe | 323.63 | 225.34 |
| RetinaFace Resnet50 | 72.24 | 1.43 |
| RetinaFace MobilenetV1 | 69.50 | 28.89 |
| Dual Shot Face Detector | 18.89 | 0.22 |
| YuNet | – | 49.43 |

Performance Comparison of Face Detectors (Average Precision)
| Model | AP@0.5 |
| SSD | 0.931 |
| MTCNN | 0.915 |
| MediaPipe | 0.743 |
| RetinaFace Resnet50 | 0.994 |
| RetinaFace MobilenetV1 | 0.994 |
| Dual Shot Face Detector | 0.989 |
| YuNet | 0.994 |
Inference Comparison under Various Conditions
Let’s compare the inference results for all methods in different conditions that affect the detections.
Face Accessories and Make-up
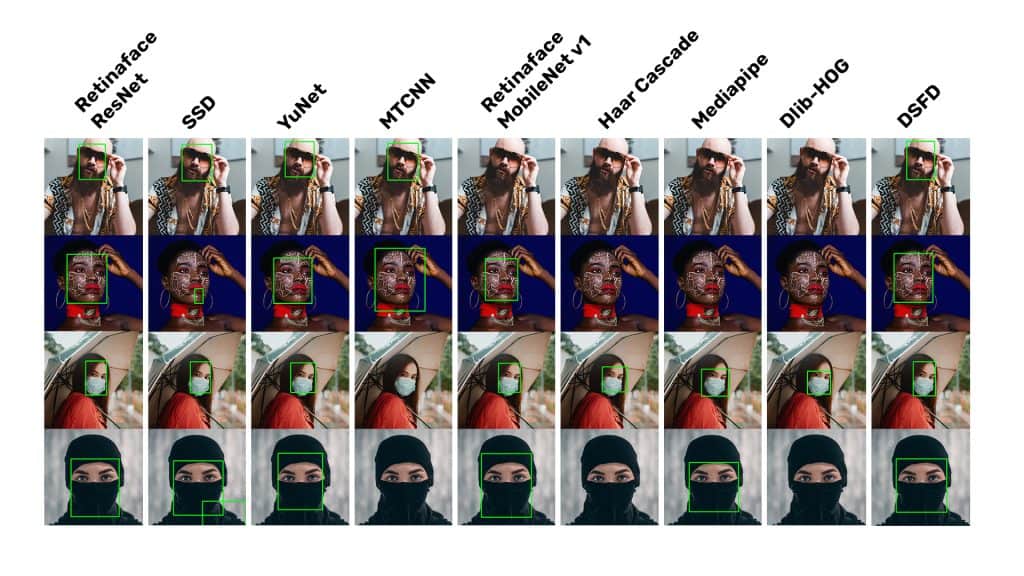
RetinaFace-Resnet50, YuNet, and DSFD work perfectly and are not affected, while the other models fail in multiple cases, with Haar Cascades and DLib-HOG performing the worst, as they have hand-crafted features.
Facial Expressions
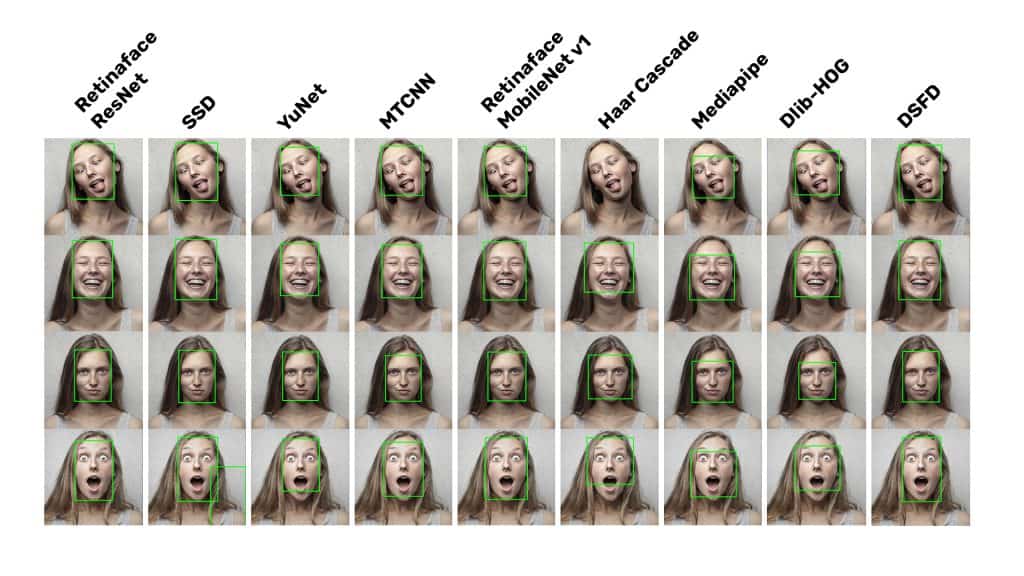
Virtually all face detection methods discussed above work well for faces with different expressions. Haar Cascade misses one face, which is expected as the face is tilted, and the hand-crafted features don’t consider such wide variations in facial features.
Lighting Conditions
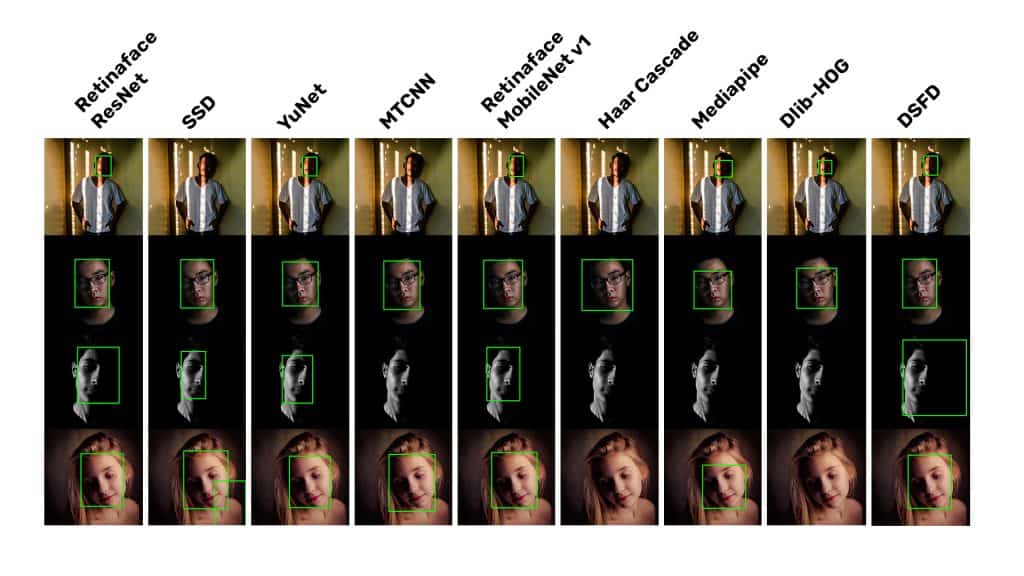
In different lighting conditions, MTCNN, DLib-HOG, and Haar Cascades perform the worst, failing in two or more images. Many methods fail for the third image as only half of the facial features are visible for detection.
Occlusion
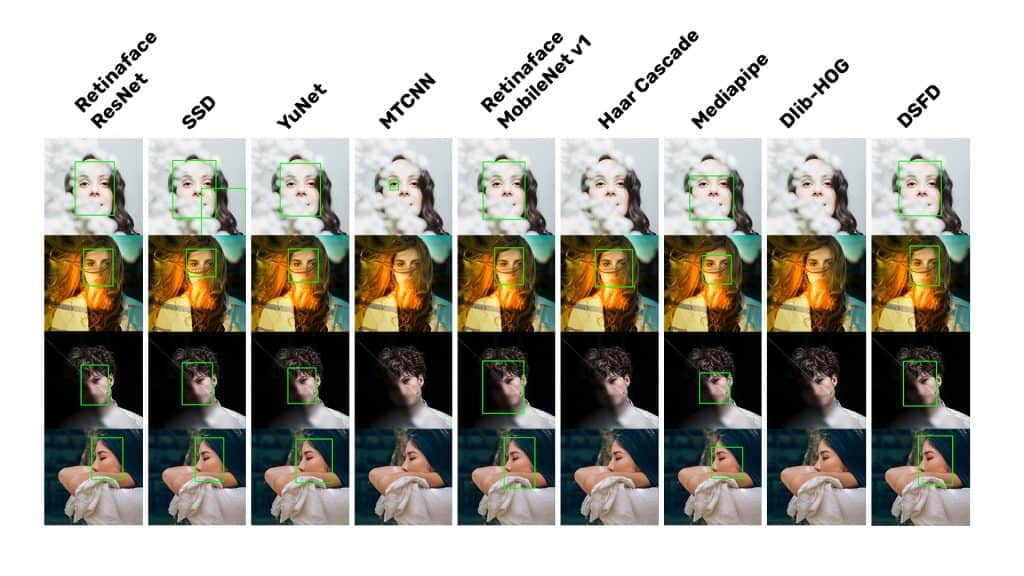
MTCNN, DLib-Hog, and Haar Cascades fail miserably to detect occluded faces. Other methods manage to detect faces in all the images.
Pose
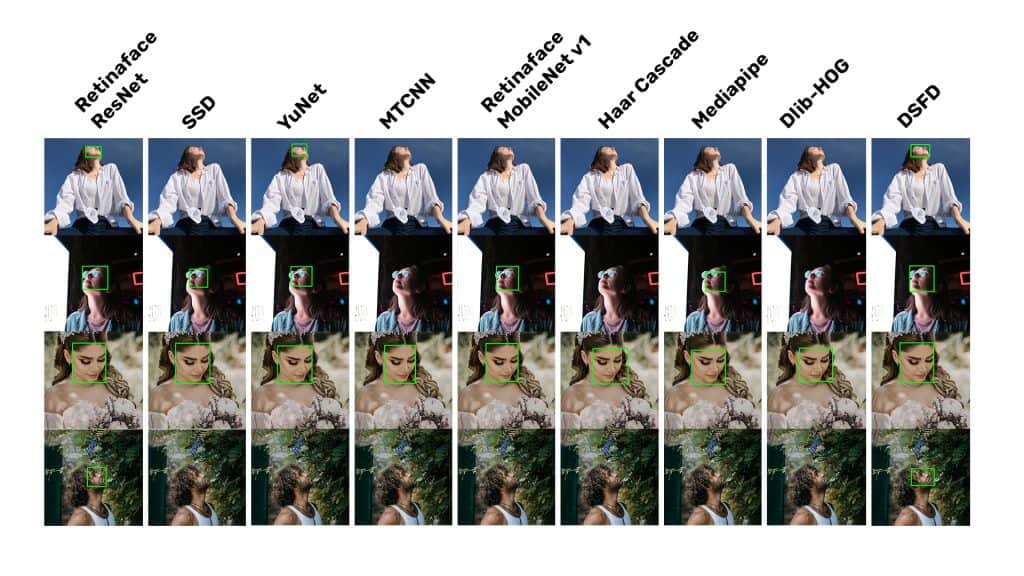
DSFD and RetinaFace-Resnet50 win the race for detecting faces in different poses, with YuNet performing respectably.
Scale of face
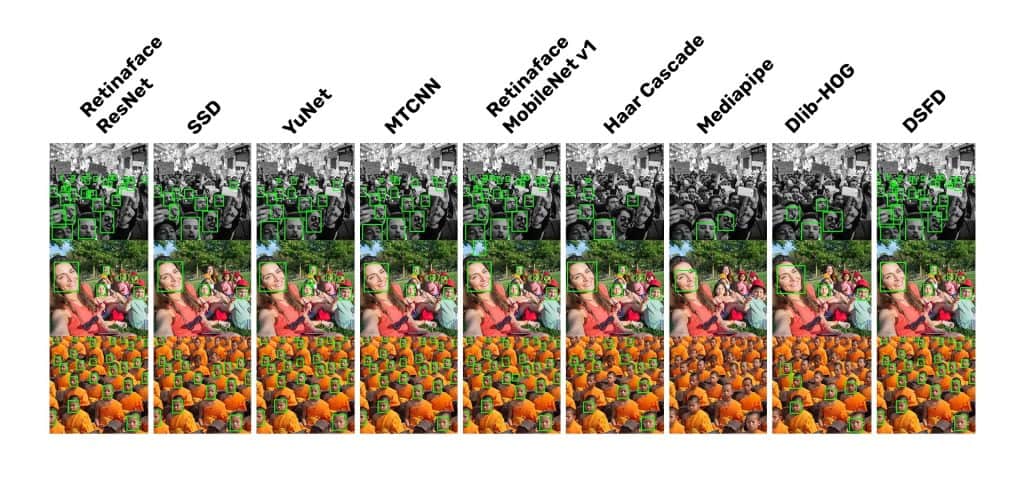
Both the RetinaFace models and DSFD take the lead here, detecting even the tiniest of faces. Interestingly MediPipe is greatly affected by changes in the scale of faces and misses most of them.
Skin color
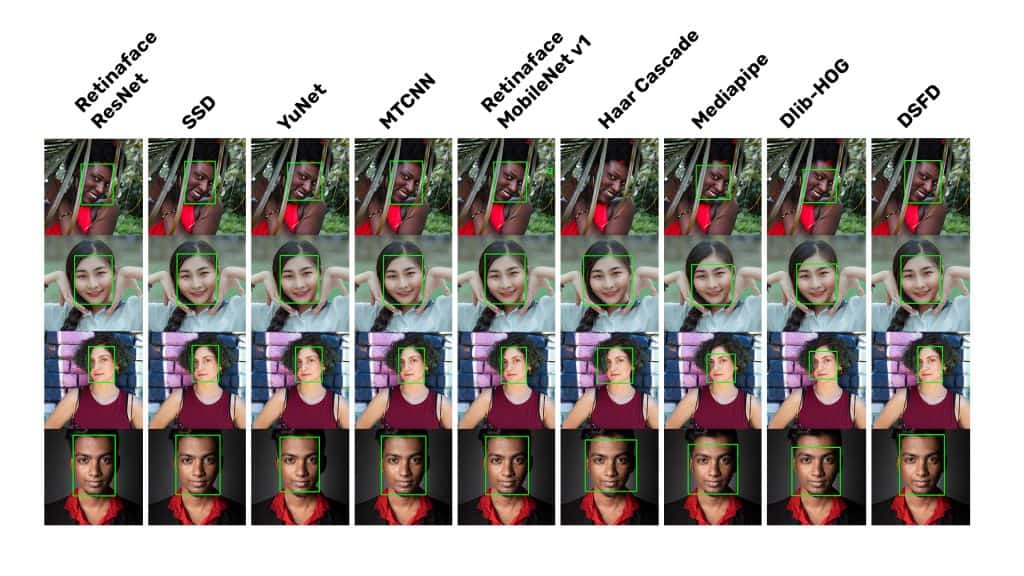
It’s good to see almost all the methods working well to detect faces of different skin colors.
Choosing the Best Face Detection Model
After discussing all the above methods, which one should you be using? Choosing the model that best suits you will depend on the requirements of your particular application. Below are the three conditions that might define your requirements.
Best Detection Accuracy
If you want the best-in-class detection accuracy and don’t want to miss any faces, then DSFD or Retinaface-resnet50 model is what you should go for.
Remember that it will be very slow and won’t make sense for real-time inference.
Best Detection Speed
If you want the utmost inference speed and don’t mind missing faces in uncontrolled conditions, then MediaPipe’s face detection solution is what you want.
Best Overall – Balanced speed and accuracy
If a good balance of speed and performance is what you are after, you should check out the YuNet and RetinaFace-Mobilenetv1 models. Both are very fast models with real-time inference speed while still maintaining decent accuracy.
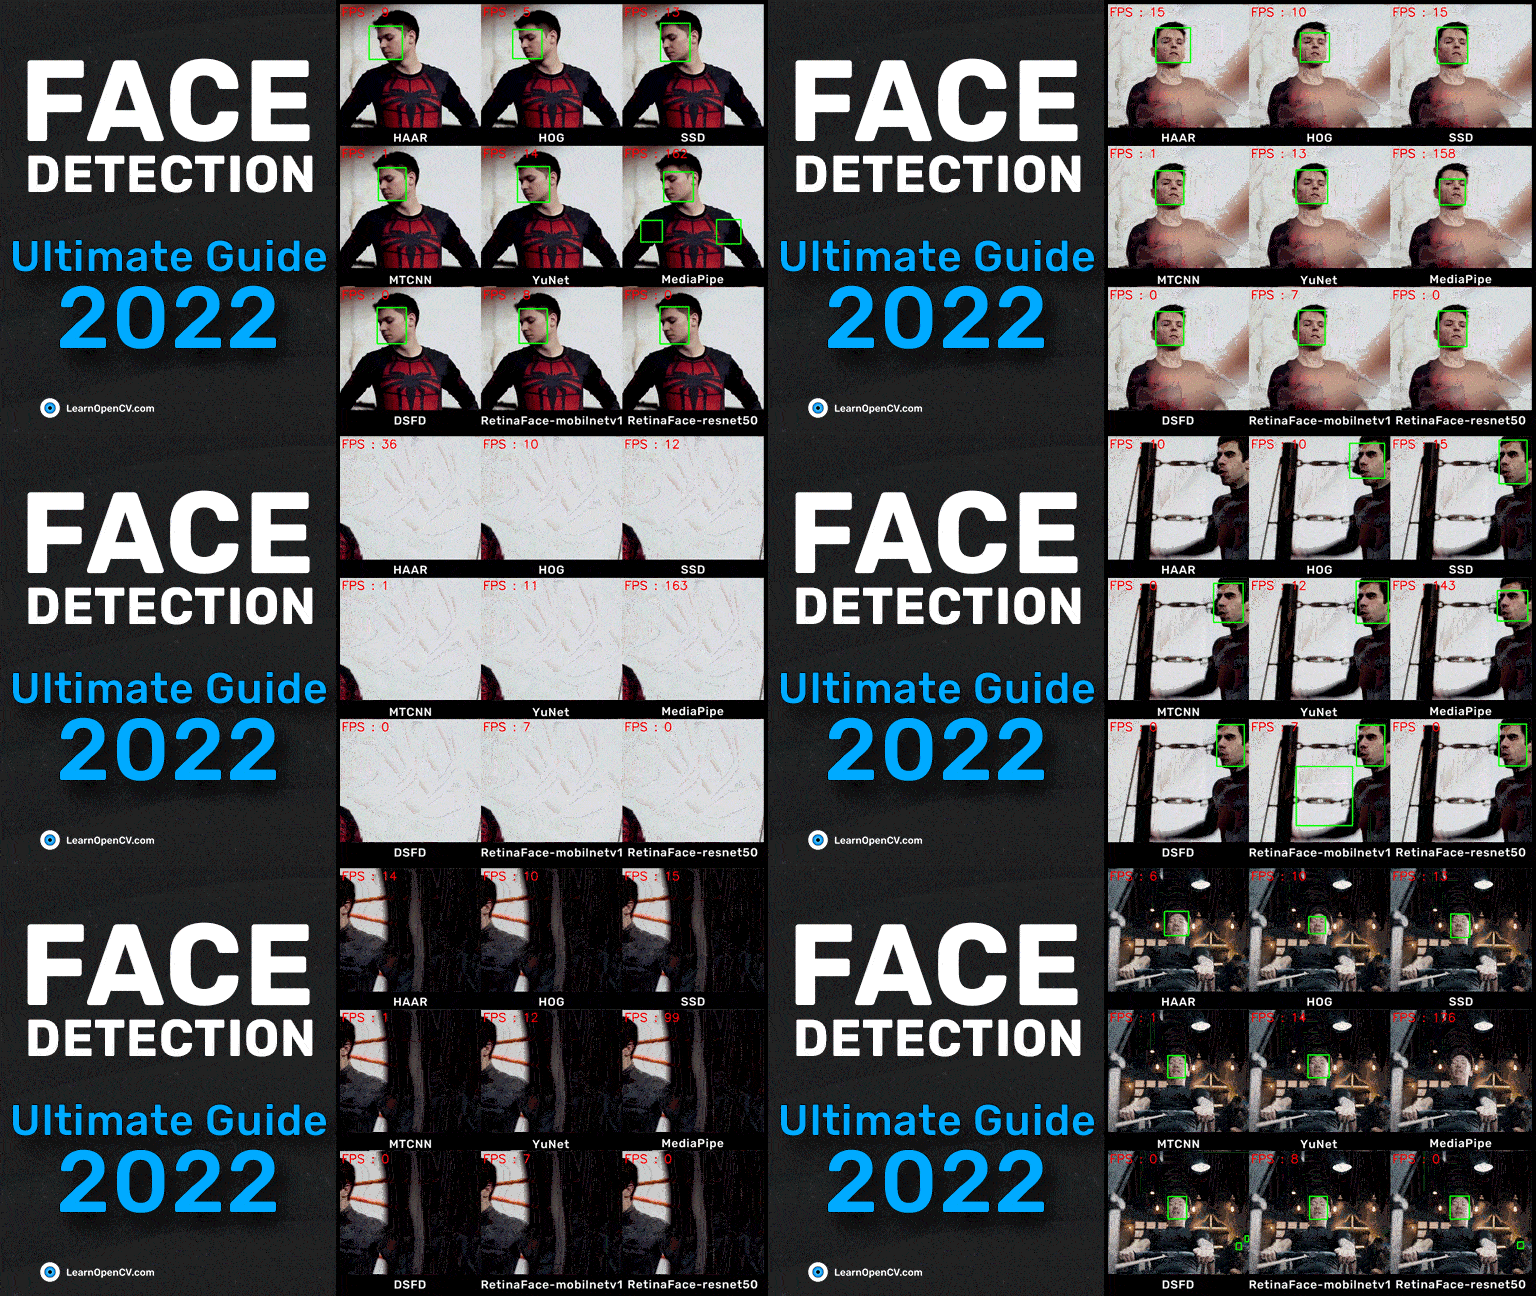
Video Comparison of Face Detectors
Conclusion
- At the end of the post, you should thoroughly understand Face Detection. Its benchmark, datasets, applications, and how to implement its different algorithms using python.
- We looked at different classical face detection methods, their limitations, and the need for state-of-the-art detectors.
- How Facial detection evolved into the modern deep learning-based face algorithm.
- After closely examining some commonly used face detectors, you studied the SOTA models, which were again based on Deep-Learning techniques.
- Not only did you understand the idea behind these SOTA detectors, but you also saw how they improvised on the shortcomings of the earlier commonly-used models.
- Finally, we studied the comparison of all the mentioned techniques based on their speed and AP.
You can implement these models for your facial application confidently now, for you know clearly in your head exactly which model will work best for your application.
Must Read Articles
| We have crafted the following articles on Face Detection & Face Recognition especially for you. 1. Anti-Spoofing Face Recognition System using OAK-D and DepthAI 2. Face Recognition with ArcFace 3. Face Recognition: An Introduction for Beginners 4. Face Detection – OpenCV, Dlib and Deep Learning ( C++ / Python ) |
References
- https://ieeexplore.ieee.org/document/990517
- https://docs.opencv.org/4.5.3/db/d28/tutorial_cascade_classifier.html
- https://arxiv.org/abs/1512.02325
- https://kpzhang93.github.io/MTCNN_face_detection_alignment/paper/spl.pdf
- https://arxiv.org/abs/1810.10220
- https://openaccess.thecvf.com/content_CVPR_2020/html/Deng_RetinaFace_Single-Shot_Multi-Level_Face_Localisation_in_the_Wild_CVPR_2020_paper.html
- https://github.com/opencv/opencv_zoo/tree/master/models/face_detection_yunet



100K+ Learners
Join Free OpenCV Bootcamp3 Hours of Learning