
In this post, we will explain various technical aspects of a DSLR camera. We will explain the focal length, f-stop, depth of field, aperture, shutter speed, ISO setting, image stabilization, and auto exposure bracketing.
A digital SLR (or DSLR – Digital, Single, Lens, Reflex) is a digital camera that uses a mirror mechanism to reflect the light from the camera lens to an optical viewfinder — or to let the light pass on to the image sensor to capture the photo.
In essence, the mirror of the camera allows you to see the image in the viewfinder, and when you take the photo, that mirror flips up for the image sensor.
Let’s go over some of the technical aspects of the digital SLR and learn what they exactly mean.
Focal Length
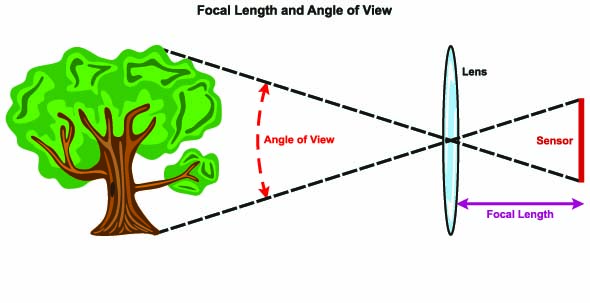
The focal length of a lens is the distance over which a lens focusses a parallel beam of light to one point. Usually the image sensor is placed at the focal point so the subject being photographed is in focus. It’s usually represented in millimeters. The focal length tells us the angle of view for a particular lens — and also, how much of a scene will be captured when using that lens. The focal length also gives a sense of magnification.
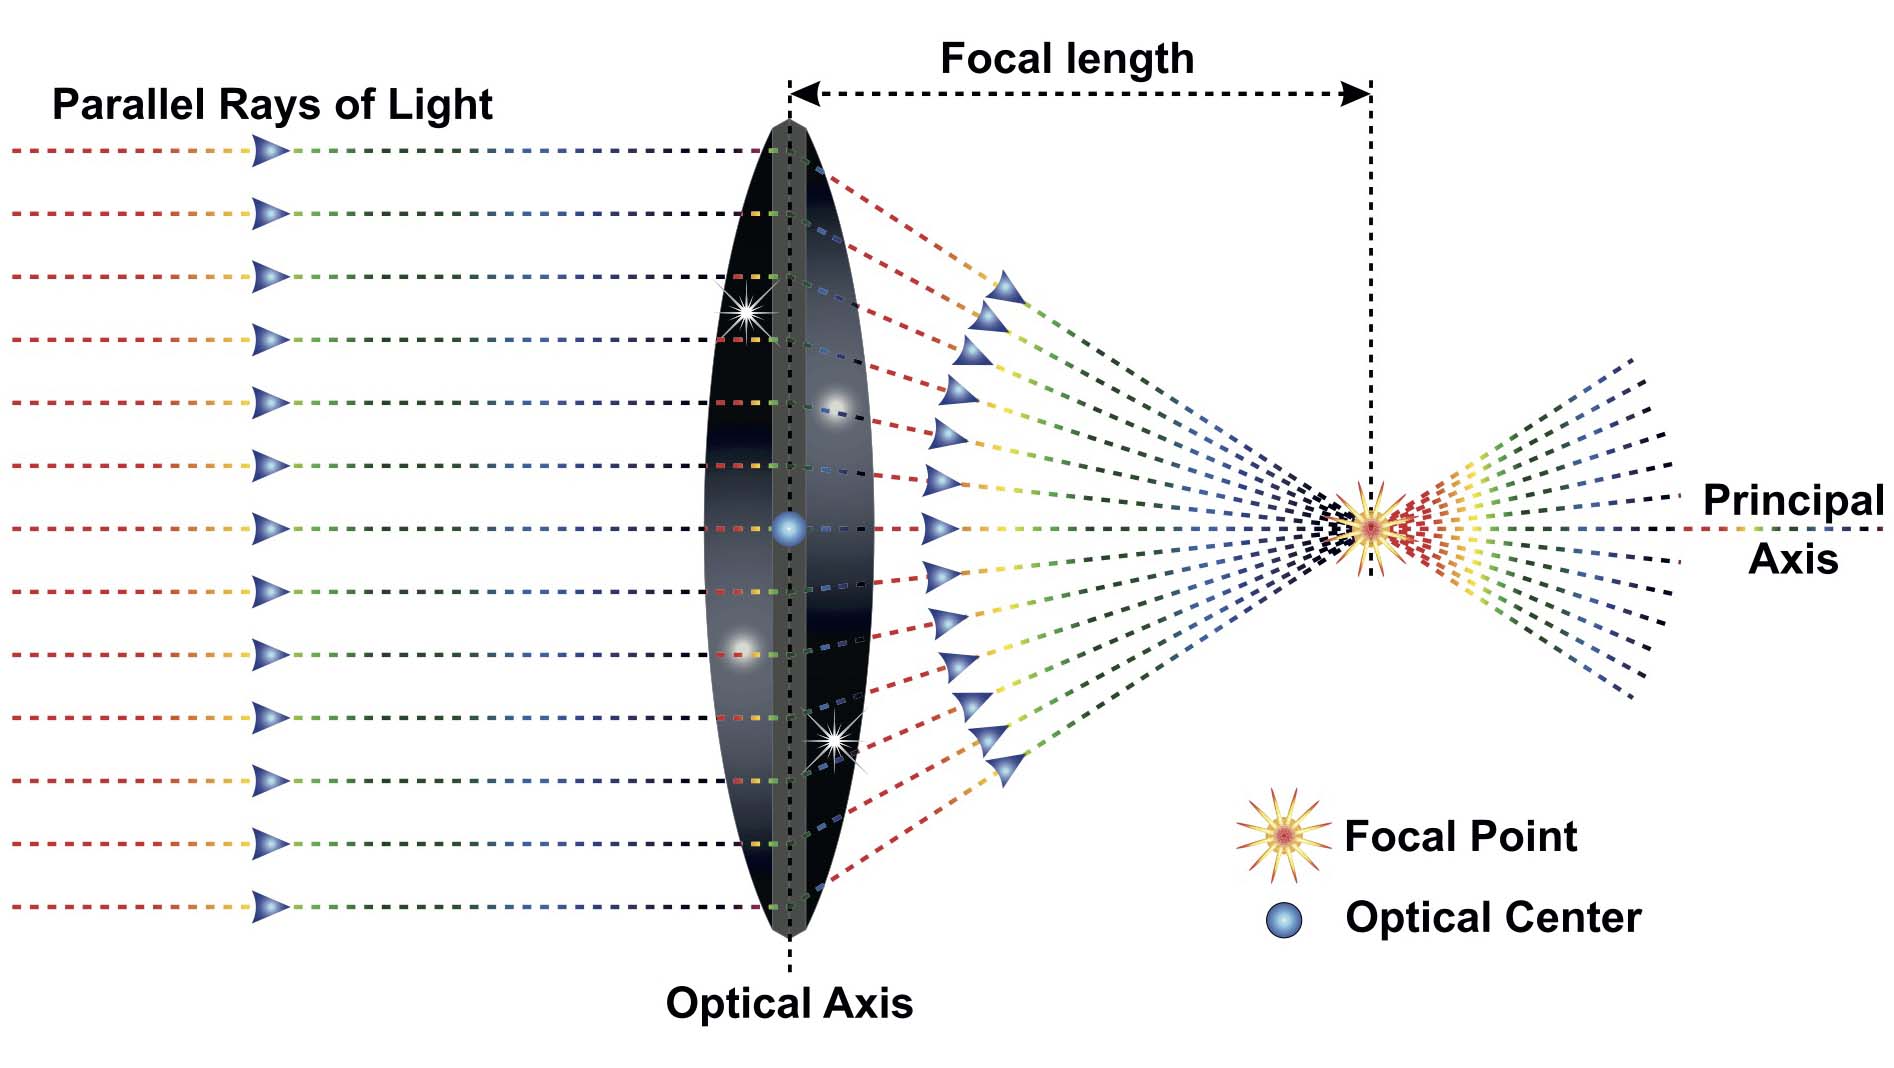
The shorter the focal length is, the wider the angle of view will be. Similarly, the longer the focal length is, the narrower and more “zoomed in” the field of view will be.


Depth of Field
The depth of field is one of the most widely recognized terms when it comes to photography — though if you’re not familiar with what it is exactly, you might not be utilizing it to the best of its ability in your photographs.
Theoretically, when we focus a lens on a subject, the lens is focussed at to take a sharp image at a fixed distance from the lens. Anything closer or further away from that distance is out of focus. This effect is called the depth of field effect. In essence, the depth of field refers to the zone of sharpness within an image where its elements appear in focus. This zone of focus can either be shallow or deep. A shallow depth of field means that the background is blurred with the subject standing out in focus. Deep depth of field means that the background is about as sharp as the subject.
When it comes to depth of field, here are the three main factors that will affect how you control it:
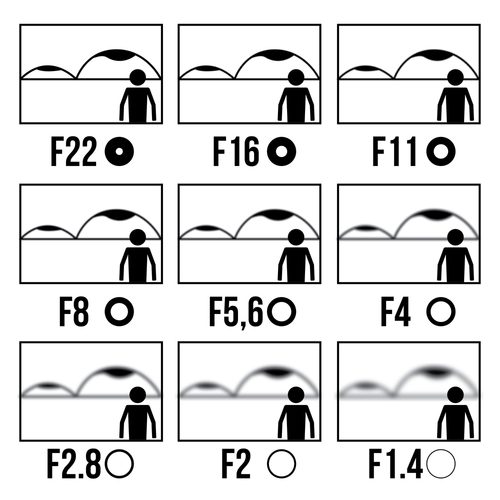
The Aperture
The aperture is the opening which lets light into the camera. A large aperture means a small f-number and a shallow depth of field. A small aperture means a larger f-number and a deeper depth of field.

The Subject’s Distance to the Camera
The depth of field is shallower the closer the subject is to the camera. As the camera moves away from the subject, the depth of field becomes deeper.
Focal Length of the Lens
To keep it simple, the longer the focal length, the shallower the depth of field will be.
Optical Image Stabilization
Optical image stabilization compensates for the movement of the camera or lens to produce a sharper image. There are two types of image stabilizations
- Lens stabilization : In this case the stabilization apparatus resides within the lens. Lens manufacturers claim that superior stabilization is achieved using this method because it can be fine-tuned based on individual lenses taking into account the size, weight and focal length of the lens. Lens stabilization is also more appropriate for large lens and low-light situations.
- In-camera stabilization : In this case, the stabilization is achieved by adjusting the sensor inside the camera. It works with all lenses and means you can purchase lighter and less expensive lenses (because your camera is already stabilized from within).
To know more about image stabilization, click here.
Exposure Time
Exposure is a combination of three factors that together work to tell us how much light accumulates on the sensor to make the image.

- Aperture : As mentioned earlier, the aperture refers to the size of the opening that controls the amount of light entering the camera. It is measured in f-stops. Think of the aperture as blinds in your home — the more you open the blinds, the more light comes through. As the aperture on your lens is opened, more light accumulates on the sensor. The smaller the aperture number, the larger the aperture. And the smaller the aperture number, the larger the opening, the more light and the shallower the depth of field. Alternatively, the larger the aperture number, the smaller the opening, the less light, and the deeper the depth of field.
- Shutter speed : This controls how long the shutter remains open to let light accumulate on the sensor. The longer the amount of time the shutter is open, the more light the sensor receives. However, if there are fast moving objects in the scene you are photographing, you want the shutter speed to be fast to avoid motion blur.
- ISO setting : This setting refers to the sensor’s sensitivity to light. The higher the sensitivity (say, 3200 for example) the less time and the less amount of light is needed for the right exposure. The downside of higher sensitivity is a higher level of noise. An ISO of 100 is used on a sunny day because light is abundant and by lowering sensitivity we reduce noise in the image. On the other hand, when photographing a moving object under low light conditions, we may have no choice but to use a higher ISO setting.
The Concept of F-Stop
The f-stop setting determines how much light is allowed to enter the lens and pass through. It also determines how much in front and behind the subject is in focus (the depth of field).
The difference between aperture and f-stop is that the aperture refers to the diameter of the circular entrance of the lens (and is measured in mm). The f-stop refers to the ratio of the focal length as it relates to the diameter of the aperture (f-stop = focal length divided by the aperture diameter).
Automatic Exposure Bracketing
Automatic Exposure Bracketing (or AEB) is used for taking HDR photos. Many DSLR’s come equipped with Automatic Exposure Bracketing which helps photographers automatically take multiple images of the scene at different exposure settings.
Camera Autofocus
A camera’s autofocus system knows how to adjust the camera lens to help get the subject in focus. Each of the sensors assesses the changes in contrast at various points in the image and helps to achieve maximum sharpness.
The three factors that influence autofocus are light level, subject contrast and the motion of the subject or camera.
As the camera attempts to autofocus, it opens the aperture to the largest possible amount to allow for more light. Having a good autofocus in your camera, is similar to having perfect vision — it offers high clarity, detail, and a distinct scene.
RAW Format
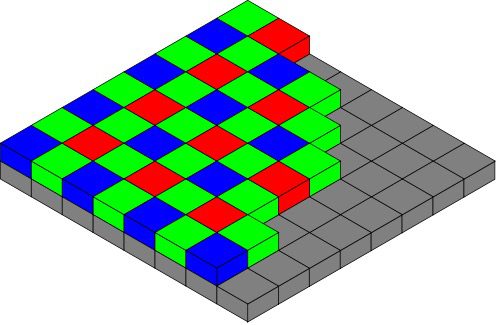
A pixel in an image is composed of three colors — R, G and B. However, the sensor does not have three channels for every pixel. The sensor contains a grid of elements where each element records either red, green or blue color. This grid pattern is called Bayer Pattern.
In addition, a DSLR camera sensor typically records about 12-bits of information instead of the 8-bits we finally see. This 12-bit image is often referred to as a RAW image.
The R, G, and B pixel values for every element are calculated by interpolating from neighboring pixels of the RAW image and then a tone mapping algorithm is used to convert the 12-bits of information to 8-bits per channel.
Shooting in RAW allows for flexibility when it comes to your final image. If you shoot in RAW, your computer (rather than the camera) processes the data and generates the image from it. Shooting in RAW also gives you more control over how your image looks once post-processed and allows for room in mistakes and errors when it comes to how you shot the scene.
If you’re looking to expand your world of photography, a DSLR camera will quickly become an invaluable tool.
From the exposure, to the autofocus, to the optical image stabilization — we hope that mapping out these simple (yet essential) technical elements of a digital SLR will help you on your photo-taking journey ahead!