Traditionally, Deep-Learning models are trained on high-end GPUs. But for inference, Intel CPUs and edge devices like NVidia’s Jetson and Intel-Movidius VPUs are preferred. Most of these Intel CPUs come bundled with an integrated GPU, which though is not always used to its full potential. The scene changes with the Intel OpenVINO toolkit for it lets you run Deep Learning models on the integrated GPU. Come, let’s discover together how to run OpenVINO Models on Intel Integrated GPU.
This post is the third in the OpenVINO series, which consists of the following posts:
- Introduction to OpenVINO Toolkit
- Post Training Quantization with OpenVino Toolkit
- Running OpenVino Models on Intel Integrated GPU
- Introduction to OpenVino Deep Learning Workbench

- Installing Intel-GPU Drivers for OpenVINO Inference
- Precisions that Work iGPU
- Conversion of TensorFlow-FP32 Model to FP16 Model
- Running FP16 Models on iGPU
- Drawbacks of FP16
- Summary
You already got an Introduction to the Intel OpenVINO Toolkit and explored the Post Training Quantization tools in our previous two posts in the series, so let’s take the next step.
Installing Intel-GPU Drivers for OpenVINO Inference
To run Deep-Learning inference, using the integrated GPU, first you need to install the compatible Intel-GPU drivers and the related dependencies.
Follow these steps to install the Intel-GPU drivers for OpenVINO:
- Go inside the install_dependencies directory of your OpenVINO installation. If you installed with root access in the default directory, it should be:
cd /opt/intel/openvino_2021/install_dependencies/
Here, you should find the install_NEO_OCL_driver.sh script, among others. This script installs the correct version of the integrated-GPU driver, one that is compatible with OpenVINO.
2. You will need super-user access to install the drivers and dependencies.
sudo -E su
3. Finally, run the installation script from the terminal.
./install_NEO_OCL_driver.sh
Note:
- The drivers will be downloaded from the internet and compared to the existing installed version.
- If you currently have older versions of the driver, then the latest compatible version will be installed, after removing the older version. So, do not panic when you see a message similar to this:
In case if you already have the driver - script will try to remove it.
Want to proceed (y/n):
- In case, you already have the latest compatible version installed, you get a message similar to this:
Checking processor generation...
Intel(r) Graphics Compute Runtime for OpenCLTM Driver installation skipped because current version greater or equal to 19.41.14441
Installation of Intel(r) Graphics Compute Runtime for OpenCLTM Driver interrupted.
This completes all the steps required to install the integrated-GPU drivers. You are now ready to use your integrated GPU for Deep-Learning inference, using OpenVINO.
Precisions that Work on iGPU
Before we jump to running the Deep-Learning models on the integrated GPU, there are few things you need to be clear about.
In reality, you can run any precision model on the integrated GPU. Be it FP32, FP16, or even INT8. But all do not give the best performance on the integrated GPU. FP32 and INT8 models are best suited for running on CPU. When it comes to running on the integrated GPU, FP16 is the preferred choice. But why? Well, Intel-integrated GPUs have native support for FP16 computation, and therefore support FP16 Deep-Learning models quite well.
Specialized Intel Hardware for FP16 Models
You can actually run FP16 models on both Intel CPUs and integrated GPUs. They perform much better on integrated GPUs though, as you can get higher FPS (Frames per Second) and lower latency. On Intel CPUs, both FP16 and FP32 models perform on par.
Did you know Intel has some specialized hardware supporting FP16 models?. Here’s they are:
- Intel-Integrated GPU
- Vision-Processing Units (MYRIAD X) – (VPU)
The above hardware natively supports FP16 models. Also, it is worthwhile to note that the MYRIAD X VPU supports only FP16-precision models.
Why Does Myriad X Support Only the FP16 Models?
- Because the Myriad X VPU was developed keeping in mind that it is going to be:
- A Vision Processing Unit (VPU)
- And an AI Accelerator to power real-life AI applications
- Just like the iGPUs, it supports FP16 data format natively for it was designed from the ground up to take advantage of the FP16 models.
- Moreover, Myriad-X uses 16 SHAVE (Streaming Hybrid Architecture Vector Engine) vector processors. This is an accelerator microarchitecture, mainly intended for vision processors.
Follow these links to learn more about the SHAVE v2.0 – Microarchitectures and Intel Movidius Myriad X VPU.
Advantages of Running Deep-Learning Models on iGPU
By now, you know that we can run Deep-Learning models that are in the OpenVINO-IR format, on an integrated GPU.
But why carry out the extra step? Didn’t we see in the Post Training Quantization post that you can achieve over 40 FPS even on a CPU, when using INT8-quantized models. Then why bother installing compatible GPU drivers, and obtaining FP16 models to run on the integrated GPU? Well, there are some very good reasons.
The Performance on CPUs Can Be Volatile
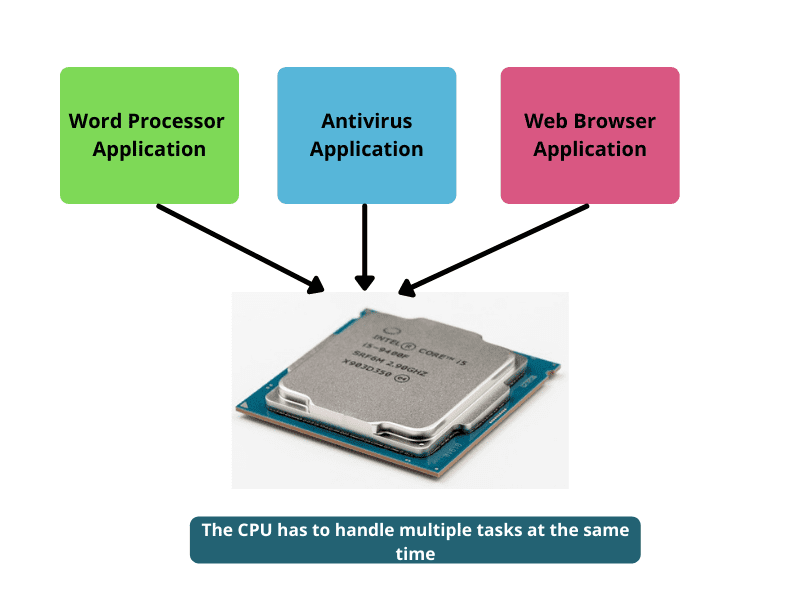
The performance (in terms of FPS) can be very volatile, when running Deep-Learning models on the CPU. One moment you might be getting 40 FPS, and the next moment see a drop to the 30s. The reason being, CPUs are general-purpose compute resources for the entire system.

So, when running Deep-Learning models, the FPS could drop, every time another higher-priority program pops up asking for compute resources. And if you think about it, the integrated GPU’s memory is almost always dedicated for graphics-processing tasks, which are rare. This means, the integrated GPUs sit idle most of the time, so aren’t they the best bet to run Deep-Learning models? Besides good performance, you get hardly any fluctuation in the FPS. This is one of the primary advantages of running Deep Learning models on the integrated GPU.
Dependency on RAM
The CPU cannot independently run the Deep-Learning models. You need to first load them into the main memory, where data transfer takes place, and the CPU acts as the computation resource.

Even in integrated GPUs, data loading happens via the RAM, but they have their own cores (for computation) and also a certain amount of memory (for data transfer). The Deep-earning model can therefore be loaded on the same device where computation takes place. So, only the data loading happens via RAM, other than that the GPU takes care of the Deep-Learning model entirely.
Frees up the CPU and RAM
You saw how dependency on the RAM can hinder independent running of Deep-Learning models in the CPU. The integrated GPU however has its own processors and memory, and can run the models more independently.
From this, you can easily infer that running the Deep-Learning models on the integrated GPU will free up the processor as well as the RAM to handle more important tasks, especially when multitasking. Your system will not slow down, as no Deep-Learning models are running on the CPU or using the RAM.
Advantages of FP16
Enough about the advantages of running models on the integrated GPU! Let’s not forget that it’s the FP16-precision models that help us get the maximum out of these integrated GPUs. So, what makes these FP16 models so special?
Reduced Memory Usage
FP16 models utilize less memory:
- In terms of storage space
- Also, when loading into the main memory, while inferencing
In fact, compared to FP32 models, the memory requirement is almost half in an FP16 model. The reason being, we use half the precision to represent and preserve the model’s weights here.
This also frees up memory bandwidth for other essential applications.
Faster Data Transfer
You already know that data transfer is also an essential part of this inference process using Deep-Learning models. And FP16 models provide faster data transfer than their FP32 counterparts because:
- they require half the size in the main memory
- only half the data needs to be cached, while using the models for inference
Improved Speed and Performance
Compared to the FP32 format, FP16 models have improved speed, in terms of FLOPS, which helps to increase the throughput, when used in a real-time application.
Conversion of TensorFlow-FP32 Models into FP16 Models
In this section, you will learn to convert the Tiny YOLOv4 TensorFlow Model (.pb file) into the OpenVINO-IR format, with 16-bit floating-point operation.
Some Prerequisites
Ensure that you have taken care of the following prerequisites, before proceeding further:
- You should have the OpenVINO-Model Optimizer installed on your system. This is the script that will convert the TensorFlow model to OpenVINO-IR format. To know more about the Model Optimizer and to install it properly on your system, have a look at the first post in this series.
- The TensorFlow model, i.e., the .pb weight file for Tiny YOLOv4 should be present in the current working directory.
- You will also need a configuration file for the conversion. This is a transformation configuration file (.json format), using which the model optimizer converts the TensorFlow model to the OpenVINO-IR format.
In this case, the transformation-configuration file has the following content:
[
  {
    "id": "TFYOLOV3",
    "match_kind": "general",
    "custom_attributes": {
      "classes": 80,
      "anchors": [10, 14, 23, 27, 37, 58, 81, 82, 135, 169, 344, 319],
      "coords": 4,
      "num": 6,
      "masks": [[3, 4, 5], [1, 2, 3]],
      "entry_points": ["detector/yolo-v4-tiny/Reshape", "detector/yolo-v4-tiny/Reshape_4"]
    }
  }
]
Once the prerequisites are in place:
- Run the model optimizer and convert the
.pbweight file to the OpenVINO-IR format. - In the current working directory, where you have the TensorFlow weights and the JSON configuration file, open the terminal and execute the following command:
python /opt/intel/openvino_2021/deployment_tools/model_optimizer/mo.py --input_model frozen_darknet_yolov4_model.pb --transformations_config yolo_v4_tiny.json --batch 1 --output_dir fp16 --data_type FP16
Let’s go over the arguments and flags used in the above command:
- The very first one is the path to the model-optimizer script, i.e., the
mo.pyfile. --input_modelaccepts the path to the TensorFlow weights, which in this case is thefrozen_darknet_yolov4_model.pbfile.--transformations_configaccepts the path to the JSON configuration file, as discussed above.--batch 1means that the model will always execute on a single-input batch, be it an image or a video frame.- The
--output_dirflag tells the script to create afp16directory, where the new models will be stored. - Finally, –data_type defines the data type. And we are converting the TensorFlow model (which is of FP32 precision by default) into a FP16-precision model, in the OpenVINO-IR format.
Successful execution of the script gives the following output in the terminal window:
Note: install_prerequisites scripts may install additional components.
[ SUCCESS ] Generated IR version 10 model.
[ SUCCESS ] XML file: fp16/frozen_darknet_yolov4_model.xml
[ SUCCESS ] BIN file: fp16/frozen_darknet_yolov4_model.bin
[ SUCCESS ] Total execution time: 21.85 seconds.
[ SUCCESS ] Memory consumed: 487 MB.
Note: Converting a FP32 Deep-Learning model to FP16 precision is not model quantization. While running the script, the Model Optimizer just converts all the FP32-precision weights into FP16 weights.
Now that you have the Tiny-YOLOv4 model, with 16-bit floating-point precision, in the OpenVINO-IR format, you’re ready to run inference with the model.
Running FP16 Models on iGPU
No more theory, let’s get on the ground and learn to run FP16 models on the integrated GPU.
We will use Tiny-YOLOv4 FP16 models that have already been converted to the OpenVINO-IR format, using the model optimizer.
Let’s be adventurous and also experiment with different values for the -nireq, -nthreads, and -nstreams flags that we discussed in the previous Post Training Quantization post of the series. Please look it up again if you need any clarification on the many flags we can use while running the inference script. For we are using the same inference script here that we did in the previous post. It is the object-detection Python demo code that comes with the installation of OpenVINO. Only, this time, we switched the model to the Tiny-YOLOv4 FP16 IR format.
Note: All the experiment results you will see here are run on a system with i7 8th Gen CPU, with 16 GB RAM. The CPU already comes bundled with an Intel-HD GPU, which will be used while carrying out the inference.
Let’s use the video from this link as the input file for all the inference experiments. We used the same video in the previous post too to maintain consistency and easily compare the results. Please go ahead and download the video before proceeding forward.
Now, follow these steps to carry out inference, using FP16 models on the integrated GPU.
Step 1: Go Inside the OpenVINO-Object Detection Demo Directory
The script we will be using is present in the /opt/intel/openvino_2021/deployment_tools/open_model_zoo/demos/object_detection_demo/python directory.
Open up your terminal and enter the following command:
cd /opt/intel/openvino_2021/deployment_tools/open_model_zoo/demos/object_detection_demo/python
This contains the object_detection_demo.py script. Run it to carry out inference, on an image or video of your choice.
Step 2: Copy the Tiny-YOLOv4 FP16 Model into the Current Directory
It will be much easier to provide the model paths while executing, if the models are already present in the current directory. Here, we will assume that the FP16 models are present inside the fp16 subfolder.
Along with that, also ensure that the above video file too is present in the current directory.
Step 3: Execute the Inference Command
Finally, type the following command in the terminal to execute the inference script.
python object_detection_demo.py --model fp16/frozen_darknet_yolov4_model.xml -at yolo -i video_1.mp4 -t 0.5 -d GPU -o fp16_output.mp4
Going over some of the important flags in the above command:
--model: This is the path to the Tiny-YOLOv4 FP16 model.xml, which is present in thefp16subfolder. The script will infer the path to the.binfile automatically, which should be present in the samefp16folder.-d: The -d flag accepts the computation device name. It can either be the CPU or the integrated GPU. In this case, the integrated GPU will be used for all the computations.-o: Finally, the output video, with all the detections, will be saved with the file namefp16_output.mp4.
Upon successful execution of the code, you should see similar output in the terminal.
[ INFO ] Initializing Inference Engine...
[ INFO ] Loading network...
[ INFO ] Reading network from IR...
[ INFO ] Loading network to GPU plugin...
[ INFO ] Starting inference...
To close the application, press 'CTRL+C' here or switch to the output window and press ESC key
Latency: 29.2 ms
FPS: 29.0
Take a look at the outputs:
- You can see that the average FPS is 29, with a latency of 29.2 milliseconds.
- The average FPS is just slightly higher than the FP32 model, and the latency is also slightly less.
- The detections are almost the same as the FP32 model.
Now, take a look at this output video too, which has been saved to the disk.
Looking at the current outputs and visualizations, it is hard to realize the full potential of the FP16 model. To know where the FP16 model really shines, you have to play around with the input flags a bit while executing the inference script. Let’s do that next.
Running With 6 Inference Requests
From the previous post, we already know that the nireq flag (number of inference requests) can speed up the inference process. Let’s try with 6 inference requests.
python object_detection_demo.py --model fp16/frozen_darknet_yolov4_model.xml -at yolo -i video_1.mp4 -t 0.5 -d GPU -nireq 6 -o fp16_nireq6_output.mp4
The following is the output on the terminal:
[ INFO ] Initializing Inference Engine...
[ INFO ] Loading network...
[ INFO ] Reading network from IR...
[ INFO ] Loading network to GPU plugin...
[ INFO ] Starting inference...
To close the application, press 'CTRL+C' here or switch to the output window and press ESC key
Latency: 69.7 ms
FPS: 46.3
We have got a huge boost i.e., over 17 FPS more than the previous case. Although, the latency has increased to 69.7 milliseconds, it is still lower than the 90 milliseconds we got with the INT8 model that had the same nireq flag parameter.
The most interesting thing is that you are getting the same detection accuracy, but with much higher FPS.
The following table shows some more detection results with different flags.

From the above table, it is pretty clear that increasing the number of threads is leading to:
- a huge boost in FPS
- a bit of lower latency as well
This could be due to the fact that while reading the video frames from the disk, the CPU threads try to divide the load among themselves, and prepare the frames in an asynchronous manner.
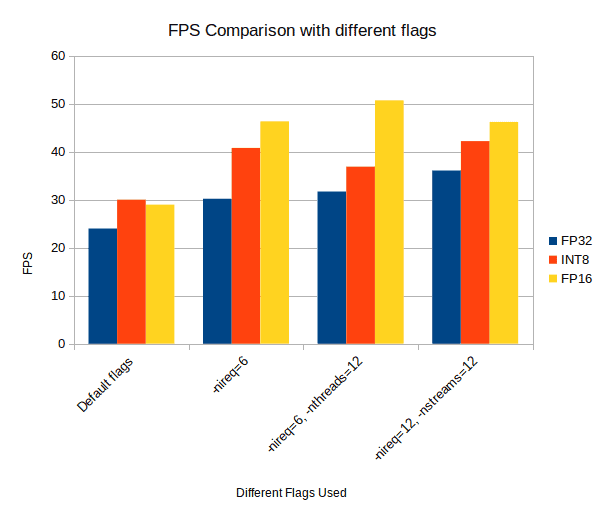
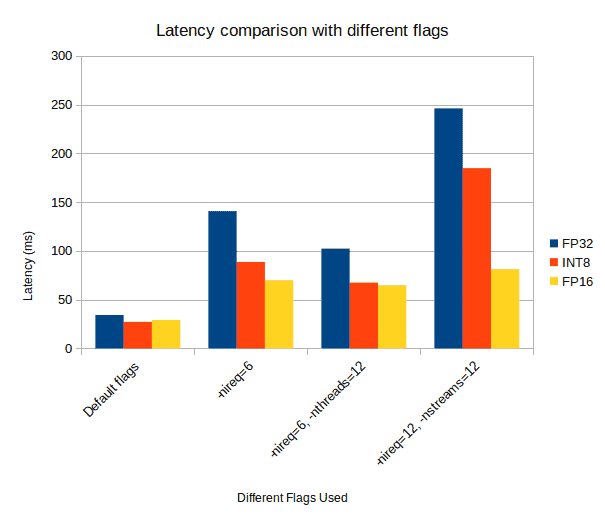
FPS Comparison Between Tiny-YOLOv4 FP32, FP16 and INT8 Models
Till now, we have seen how the Tiny-YOLOv4 FP16 model is performing on the integrated GPU. And in the previous post, we had drawn a comparison between the FP32 and INT8 models. Let’s quickly take a look at the FPS of the three models, when inferencing on the same video.
Note: All experiments are run on a system with i7 8th Gen CPU, with 16 GB RAM, except the FP16 for which use the Intel-Integrated GPU.


You can see that:
- Except the default flag cases, we are always getting highest FPS and lowest latency, when using the GPU for inference.
- Among the three precisions, FP16 is emerging as the clear winner, in terms of both higher FPS and also lower latency.
We discussed above that running models on the integrated GPU gives a more stable FPS, whereas performance on CPU can be volatile. By now, we have completed so many experiments, let’s check the output of both FP32 and FP16 models simultaneously, and analyze whether this is true.
The left clip shows the FP32 results and the right clip the FP16 results. You can clearly see that while the FPS of the FP32 model is varying so much (4-5 FPS at times), the FPS of the FP16 model is quite stable. There is hardly any fluctuation in the output video.
mAP for Tiny-YOLOv4 FP16 Model
After running the evaluation with the COCO API, on the Tiny YOLOv4 FP16 model, using the integrated GPU as the computation device, we get the following results:
 Average Precision  (AP) @[ IoU=0.50:0.95 | area=   all | maxDets=100 ] = 0.152
 Average Precision  (AP) @[ IoU=0.50      | area=   all | maxDets=100 ] = 0.275
 Average Precision  (AP) @[ IoU=0.75      | area=   all | maxDets=100 ] = 0.151
- We have an average precision of 0.152 at 0.50:0.95 IoU (Intersection Over Union).
- And the average FPS over the entire dataset (5000 images) came out to be 47.2.
So, what can we conclude from this?
- First of all, the accuracy is exactly the same as the FP32 model. We see no drop in the Mean Average Precision.
- Secondly, we get a huge boost in terms of FPS. We see a jump from 28.3 FPS to 47.2 FPS. This is really great!
Drawbacks of FP16
In the above sections, you saw how the performance of the FP16 models, when run on GPU, improves greatly, both in terms of higher FPS and reduced latency. But even Deep-Learning models with 16-bit floating point weight have their drawbacks.
Limited Hardware Support
The hardware support for running FP16 Deep-Learning models is quite limited.
- CPUs can run FP16 models, but they cannot provide the performance we generally expect from an FP16 model.
- Only specific hardware like Intel Integrated GPUs and Myriad X VPUs work well. They not only support FP16 models natively, but are also programmed to squeeze great performance out of them.
- Although the scenario is changing with the emergence of RTX GPUs by NVidia, these are neither accessible nor a cost-effective alternative for the masses.
Summary
We have covered a lot of important topics in this OpenVINO series, especially in this post. Here are the key learnings:
- We began by explaining how Deep-Learning models can be run on the Intel-Integrated GPUs, using the OpenVINO toolkit.
- Next, you learned to install Intel-GPU drivers on your system, in order to properly run the Deep-Learning models through OpenVINO.
- After that, you saw which precision formats are supported by the Intel-Integrated GPU. Also, learned which other hardware supports running FP16 Deep-Learning models.
- Next, we went over the disadvantages of running Deep-Learning models on the CPU. Even discussed some of the drawbacks of the FP16-precision format.
- We then used scripts provided by OpenVINO to run Tiny-YOLOv4 FP16 models on the integrated GPU, and analyzed their performance.
- Finally, we saw how limited hardware support can prove a serious drawback to using the FP16 models
Must have been fascinating to discover the OpenVINO toolkit and all those post training quantizationtools that optimize trained models for faster inference. You could take this interest further and invest in a more in-depth knowledge of Deep Learning and start training your own models. Enthusiasts like you who took our Deep Learning with PyTorch Course went on to become experts in advanced topics like object detection and image classification, jumping ahead in their careers and life. Worry not, this course starts with the basics before hitting advanced level, adapting well to your learning curve. So, take that call…


100K+ Learners
Join Free OpenCV Bootcamp3 Hours of Learning