
Ever wondered what runs behind “OK Google?” Well, that’s MediaPipe. If you have just started with MediaPipe and this is one of the first articles you are going through, congratulations, you found the right place. This article will cover the basics of MediaPipe, the difference between Solutions, the Framework and some super interesting real-world Applications!
SCROLL DOWN to the Applications section or click here to read right away.
The official mediapipe documentation states that inferencing is real-time, and it takes just a few lines of code to create a perception pipeline. Is it that simple? Does MediaPipe provide real-time output for any data we throw at it? Follow along with the article to know more.


What is MediaPipe?
MediaPipe is a Framework for building machine learning pipelines for processing time-series data like video, audio, etc. This cross-platform Framework works on Desktop/Server, Android, iOS, and embedded devices like Raspberry Pi and Jetson Nano.
A Brief History of MediaPipe
Since 2012, Google has used it internally in several products and services. It was initially developed for real-time analysis of video and audio on YouTube. Gradually it got integrated into many more products; the following are some.
- Perception system in NestCam
- Object detection by Google Lens
- Augmented Reality Ads
- Google Photos
- Google Home
- Gmail
- Cloud Vision API, etc.
MediaPipe powers revolutionary products and services we use daily. Unlike power-hungry machine learning Frameworks, MediaPipe requires minimal resources. It is so tiny and efficient that even embedded IoT devices can run it. In 2019, MediaPipe opened up a new world of opportunity for researchers and developers following its public release.
MediaPipe Toolkit
MediaPipe Toolkit comprises the Framework and the Solutions. The following diagram shows the components of the MediaPipe Toolkit.
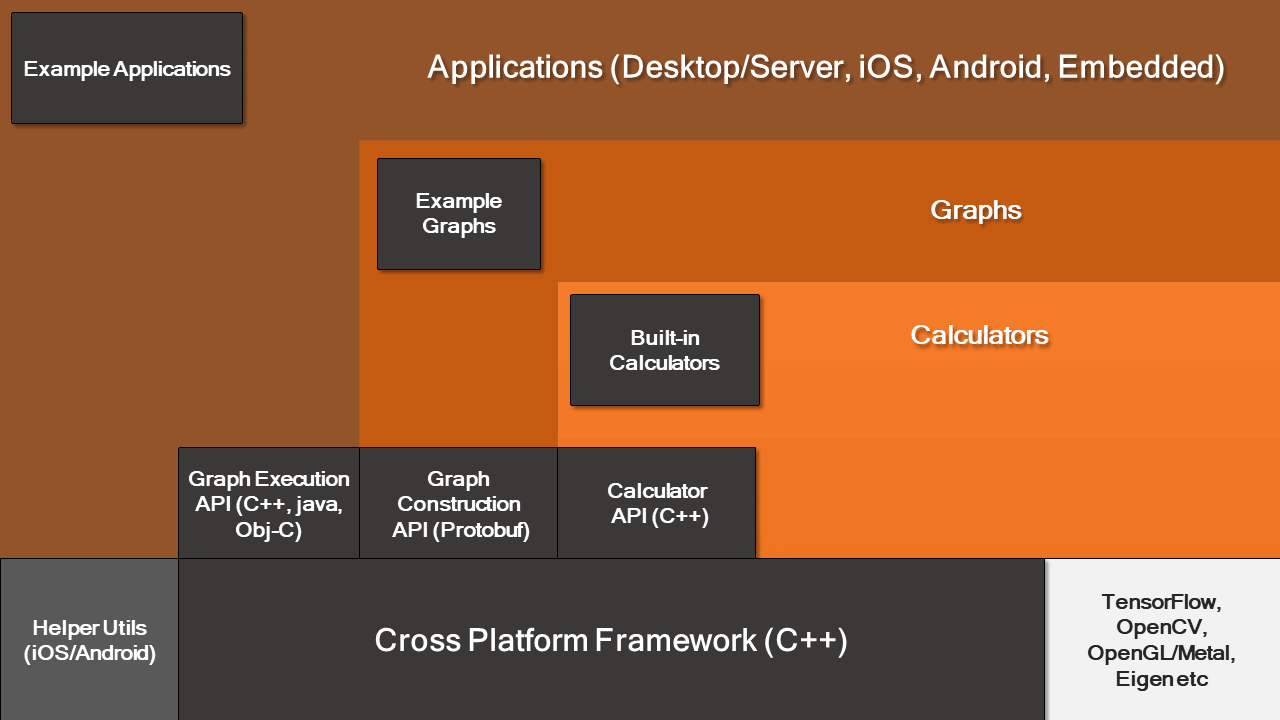
2.1 Framework
The Framework is written in C++, Java, and Obj-C, which consists of the following APIs.
- Calculator API (C++).
- Graph construction API (Protobuf).
- Graph Execution API (C++, Java, Obj-C).
Graphs
The MediaPipe perception pipeline is called a Graph. Let us take the example of the first solution, Hands. We feed a stream of images as input which comes out with hand landmarks rendered on the images.
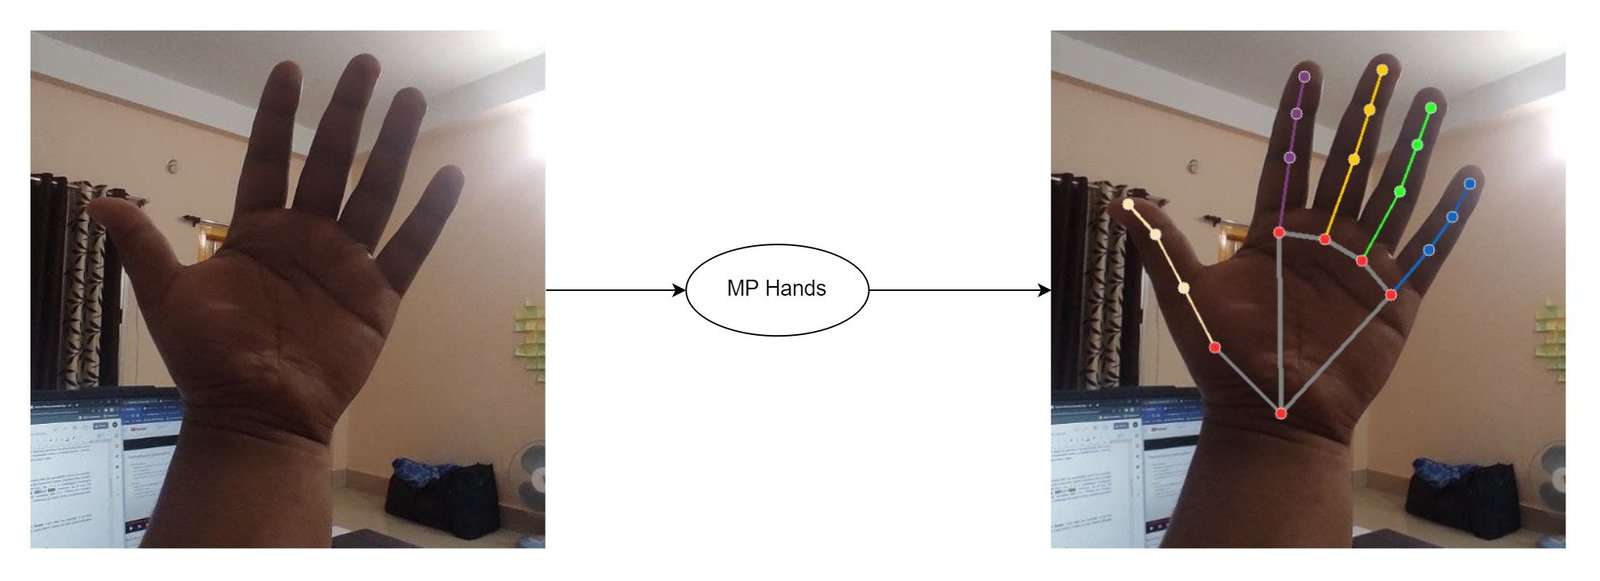
The flow chart below represents the MP (Abbr. MediaPipe) hand solution graph.
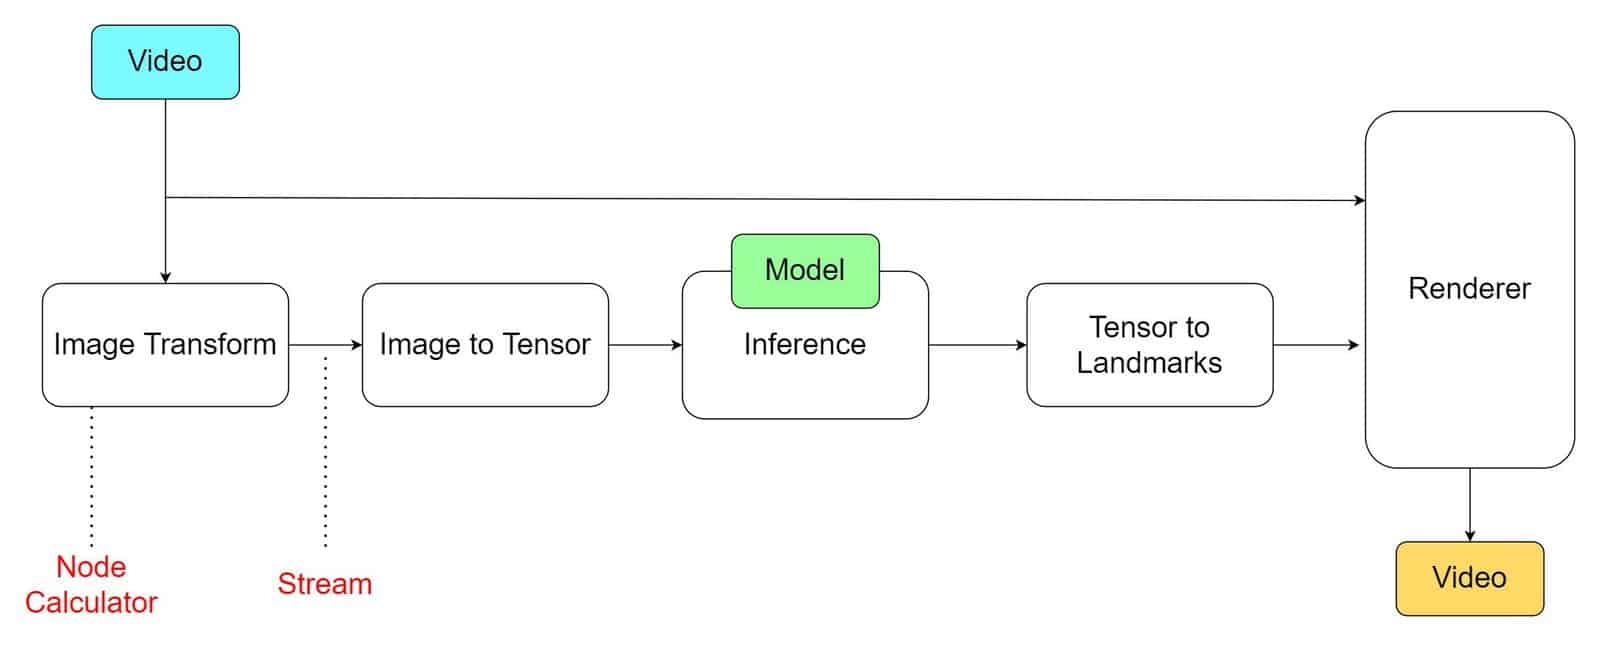
In computer science jargon, a graph consists of Nodes connected by Edges. Inside the MediaPipe Graph, the nodes are called Calculators, and the edges are called Streams. Every stream carries a sequence of Packets that have ascending time stamps.
In the image above, we have represented Calculators with rectangular blocks and Streams using arrows.
MediaPipe Calculators
These are specific computation units written in C++ with assigned tasks to process. The packets of data ( Video frame or audio segment ) enter and leave through the ports in a calculator. When initializing a calculator, it declares the packet payload type that will traverse the port. Every time a graph runs, the Framework implements Open, Process, and Close methods in the calculators. Open initiates the calculator; the process repeatedly runs when a packet enters. The process is closed after an entire graph run.
As an example, consider the first calculator shown in the above graph. The calculator, ImageTransform, takes an image at the input port and returns a transformed image in the output port. On the other hand, the second calculator, ImageToTensor, takes an image as input and outputs a tensor.
Calculator Types in MediaPipe
All the calculators shown above are built-in into MediaPipe. We can group them into four categories.
- Pre-processing calculators are a family of image and media-processing calculators. The ImageTransform and ImageToTensors in the graph above fall in this category.
- Inference calculators allow native integration with Tensorflow and Tensorflow Lite for ML inference.
- Post-processing calculators perform ML post-processing tasks such as detection, segmentation, and classification. TensorToLandmark is a post-processing calculator.
- Utility calculators are a family of calculators performing final tasks such as image annotation.
The calculator APIs allow you to write your custom calculator. We will cover it in a future post.
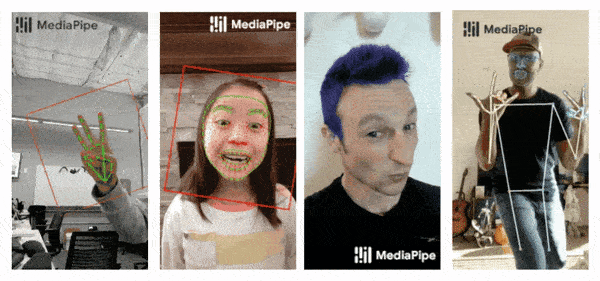
2.2 MediaPipe Solutions
Solutions are open-source pre-built examples based on a specific pre-trained TensorFlow or TFLite model. You can check Solution specific models here. MediaPipe Solutions are built on top of the Framework. Currently, it provides sixteen solutions, as listed below.
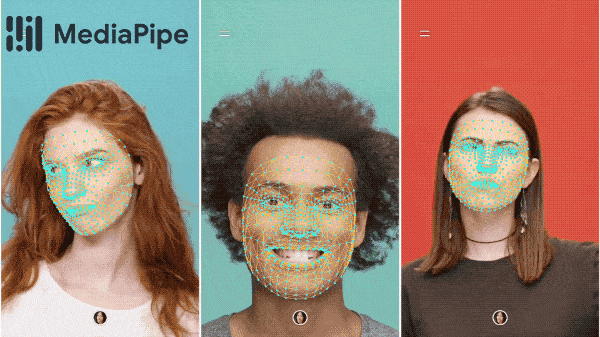
- Face Detection
- Face Mesh
- Iris
- Hands
- Pose
- Holistic
- Selfie Segmentation
- Hair Segmentation
- Object Detection
- Box Tracking
- Instant Motion Tracking
- Objectron
- KNIFT
- AutoFlip
- MediaSequence
- YouTube 8M
The solutions are available in C++, Python, JavaScript, Android, iOS, and Coral. As of now, the majority of the solutions are available only in C++ (except KNIFT and IMT) followed by Android, with Python not too far behind.
The other wrapper languages, too, are growing fast with a very active development state. As you can see, even though MediaPipe Framework is cross-platform, that does not imply the same for the solutions. MediaPipe is currently at version 0.10.9 (as of 2024). We can expect the solutions to get more support with the beta releases. Following are some of the solutions provided by MediaPipe.
Synchronization and Performance Optimization
MediaPipe supports multimodal graphs. To speed up the processing, different calculators run in separate threads. For performance optimization, many built-in calculators come with options for GPU acceleration. Working with time series data must be synchronized properly; otherwise, the system will break. The graph ensures that flow is handled correctly according to the timestamps of packets. The Framework handles synchronization, context sharing, and inter-operations with CPU calculators.
MediaPipe Dependency
MediaPipe depends on OpenCV for video and FFMPEG for audio data handling. It also has other dependencies like OpenGL/Metal, Tensorflow, Eigen [1], etc.
Getting Started with MediaPipe
We recommend you have a basic knowledge of OpenCV before starting with MediaPipe. Check out this simplified series of posts on Getting started with OpenCV.
MediaPipe Python solutions are the easiest for beginners because of the simplicity of the setup process and the popularity of the Python programming language. The modularity of the MediaPipe Framework enables customization. But before plunging into customization, we recommend getting comfortable with various pre-built solutions. Understand internal APIs associated with them and then tweak the outputs to create your exciting applications.
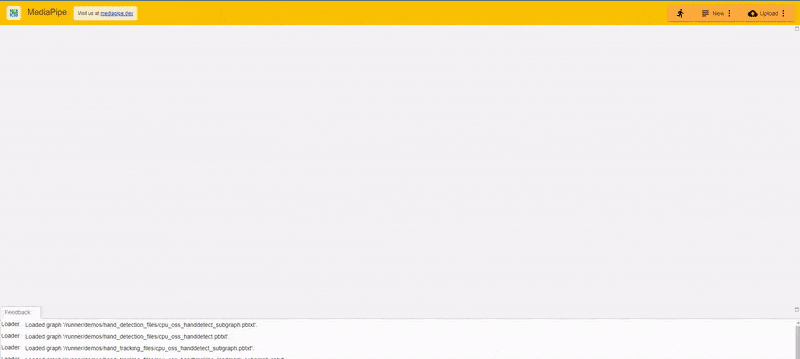
MediaPipe Visualizer
MediaPipe Visualizer provides an easy way to try all the solutions.
In MediaPipe, the protobuf (.pbtxt) text file defines a graph. The MediaPipe Visualizer welcome page greets you with a protobuf file containing a blank graph unit. It has various pre-built graphs of solutions that you can load from the New button at the top right.
The visualizer works within the browser! Let’s give it a try.
The following screenshot shows an in-browser hand detection example.
The desktop version of the pre-built MediaPipe is where you will have fun tweaking and creating your applications. You can install MediaPipe with a single command.
pip install mediapipe
MediaPipe solutions come with easy-to-follow documentation[2], and we leave it to the reader to try them out.
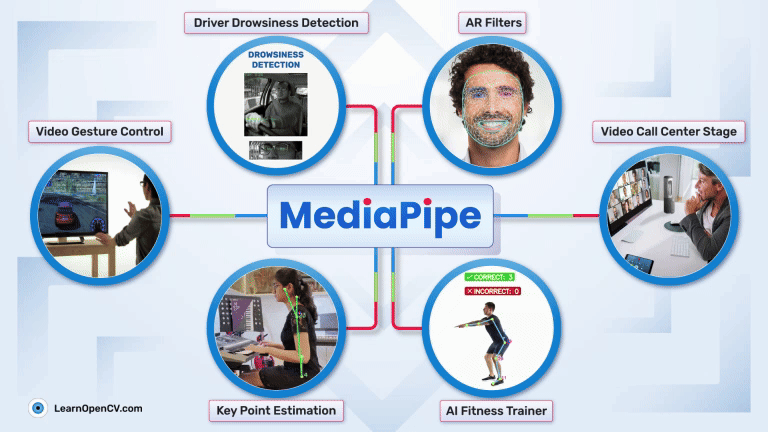
Applications of MediaPipe
Today, there are multiple interesting real-world applications of MediaPipe, in Computer Vision. In this section we will explore a few of these applications and get a comprehensive understanding of them:
Human Pose Estimation
Human pose estimation is a pivotal area in computer vision, focusing on detecting and analyzing human body postures and movements. It uses advanced algorithms to interpret complex poses from images or videos, enabling real-time analysis and interaction. MediaPipe facilitates building robust body posture analysis systems, which is essential for applications like ergonomic assessments and sports training. Integrating MediaPipe, developers can create AI fitness trainers, offering personalized workout guidance and performance feedback.
In pose estimation, human body posture analysis primarily focuses on accurately identifying and assessing human postures. It can analyze body alignments and movements from visual data, providing insights into body language and physical form. This technology is pivotal in areas like ergonomics, sports coaching, and physical therapy, where precise posture evaluation is crucial. It enables the monitoring and correction of body postures in real-time, aiding in injury prevention and enhancing performance.
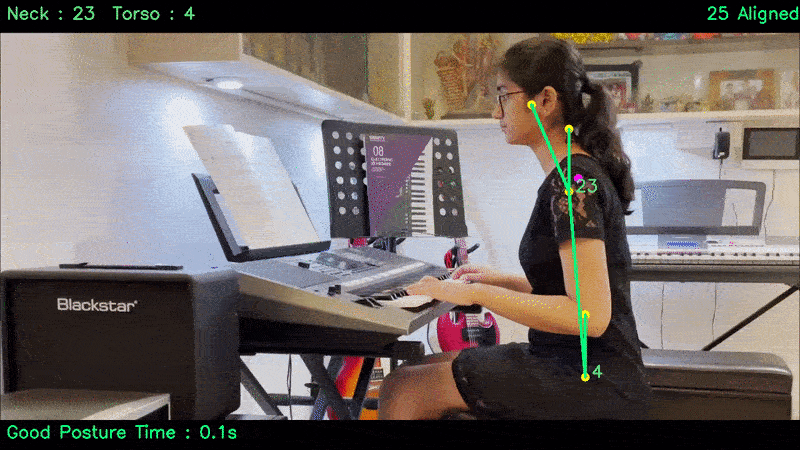
Another interesting application of pose estimation is using MediaPipe as an AI fitness trainer for those perfect workouts! This specific streamlit application has the potential to track positions such as bending forward, and backwards, lower one’s hips, knees falling over toes, and deep squats.
Driver Drowsiness Detection
Recent statistics highlight the significant impact of driver drowsiness on road safety. According to the National Highway Traffic Safety Administration (NHTSA), each year, drowsy driving leads to approximately 100,000 police-reported crashes and results in over 1,500 deaths. This alarming figure underscores the critical need for effective driver drowsiness detection systems.
In 2021, there were 684 fatalities in crashes involving a drowsy driver, accounting for 1.6% of all motor vehicle traffic crash fatalities. This statistic further emphasizes the role of driver fatigue in road accidents and fatalities. Given these figures, the development and implementation of driver drowsiness detection technologies are not only beneficial but potentially life-saving, offering a proactive solution to a prevalent and often overlooked road safety issue.

Clearly, there is a need to develop an integrated system that assists with the task of driver drowsiness detection, and alerts drivers accordingly. MediaPipe has a set of pre-built methods such as Face Mesh pipeline, and the simple yet robust Eye Aspect Ratio (EAR) technique. Both of these methods can be used in combination to accurately detect drowsiness in drivers.
Video Call Experience Enhancements
During the COVID-19 pandemic, video calling applications experienced unprecedented growth, becoming essential tools for maintaining personal and professional connections. With lockdowns and social distancing measures in place, these apps facilitated remote work, online education, and virtual social gatherings. For instance, Zoom, a leading video conferencing app, reported a surge from 10 million to 300 million daily meeting participants in early 2020.
Introducing interactive features into such applications can benefit greatly in-terms of user experience. One such feature is gesture control. What if you were magically able to control certain parameters within the application just by using hand gestures? Using a combination of MediaPipe’s hand, face detection, and selfie segmentation methods, gesture control for your favorite video conference application is just a few lines of Python code away!
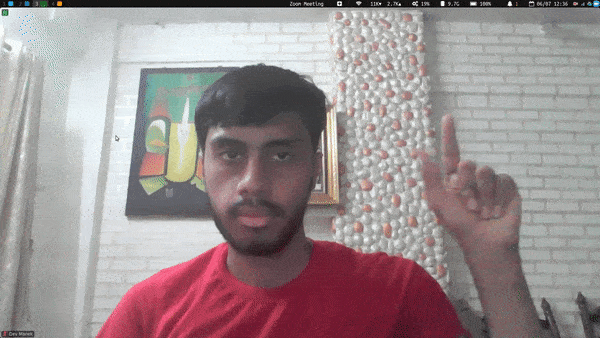
Apple took the world by storm by introducing the revolutionary feature called CenterStage in macOS. We all know that a few folks like to move around their rooms while giving a presentation while working from home, right? But the problem is, since the camera is fixed in a particular location, it cannot account for the movements made by the presenter. CenterStage is magically able to track the position of the presenter and adjust the camera stream accordingly. Sounds crazy, right? But have you ever wondered how such a system works, and how to implement it? It turns out that you can implement CenterStage for zoom calls using MediaPipe and Python.

Designing Snapchat and Instagram Filters
At some point in our lives, we all used Snapchat to share images with our friends. Applications such as Snapchat and Instagram make it more fun to use by introducing interactive filters. But, have you ever wondered how these filters work behind the scenes?
It so happens that you can create Snapchat and Instagram filters using MediaPipe. They use methods such as face detection to detect the presence and location of faces in the input camera stream; then feature keypoints are detected within the face to localize different parts of the face. In the end, the feature is applied on top of the face in real-time.
Do the above mentioned applications seem fascinating to you? SCROLL UP or click here to get started with MediaPipe installation.
Is it Genuinely Real-Time?
MediaPipe Solutions do not always work in real-time.
The solutions are built on top of MediaPipe Framework that provides Calculator API (C++), Graph construction API (Protobuf), and Graph Execution API (C++, Java, Obj-C). With the APIs, we can build our graph and write custom calculators.
The Toolkit is excellent, but its performance depends on the underlying hardware. The following example shows side by side inference comparison of HD(1280×720) and Ultra HD(3840×2160) video.
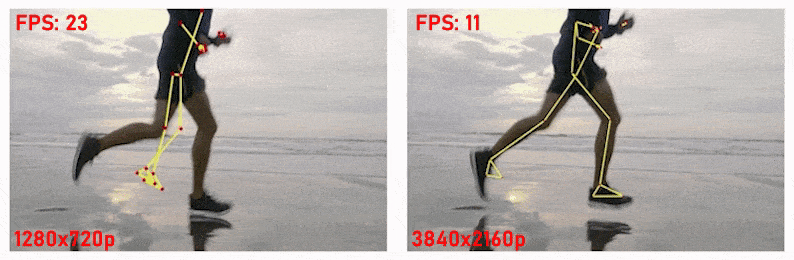
You can try building MediaPipe solutions from scratch and certainly see a jump in performance. However, you may still not achieve real-time inferencing.
Warning: The MediaPipe Framework supports bezel [3] build. Therefore, to harness the full potential of MediaPipe, one needs to be reasonably comfortable with C++ and bezel. The mediapipe documentation is also NOT easy to follow since it is in the active development stage.
Conclusion
MediaPipe solutions are straightforward, and you can cover them in a day or two.
On the other hand, the learning curve can be pretty steep for the C++ MediaPipe Framework. Don’t worry; we will get there by taking baby steps.
Overall, it is a beautiful, fast-growing library that delivers promising results. Implementing MediaPipe in projects nullifies most of the hassles we usually face while working on an ML project. No need to worry about synchronization and cumbersome setups. It allows you to focus on the actual development part.
Questions? Please ask in the comments section.
References
[1] OpenGL/Metal, Tensorflow, Eigen
[3] Bezel build