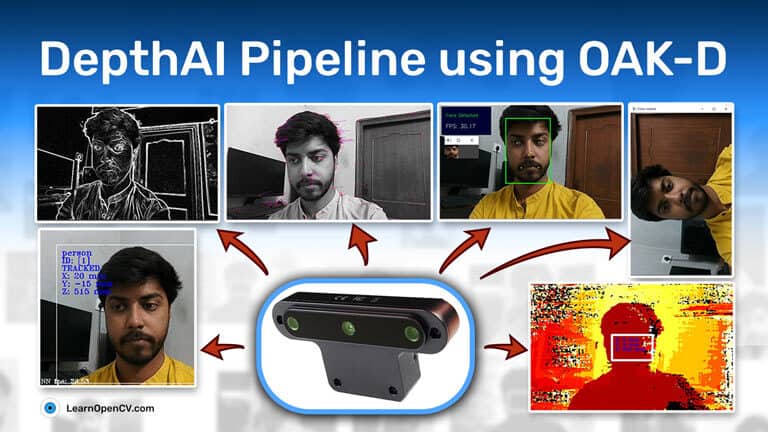
1. Introduction
This is the fourth post in the OAK-D series. If you haven’t checked out the previous posts, you can find them here,
- Introduction to OAK-D and DepthAI
- Stereo Vision and Depth Estimation using OpenCV AI Kit
- Object detection with depth measurement using pre-trained models with OAK-D
Here, we will take a closer look at the DepthAI pipeline, its different nodes, and how these individual nodes come together to create a working system.
We have already seen some of the nodes at work in the previous posts. Here we will focus more on the ones we haven’t tried until now.
2. Pipeline
Any action from DepthAI, whether it’s a neural inference or color camera output, requires a pipeline to be defined, including nodes and connections corresponding to our needs.
In the pipeline, different nodes are connected to one another, and the data flows from one node to another in a defined sequence while different operations are performed on the data at each node.
Here is a simple pipeline to get the output from the mono camera module on OAK-D.
The pipeline is first created on the host, defining the connections between the nodes and the flow of data. The defined pipeline is then sent to the OAK device during initialization and is run with the required inputs from the camera and other modules, and the output is sent back to the host.
Let’s look at the different nodes available to us and how we can use them.
3. Nodes
So far, we know that the nodes are the building blocks of the DepthAI pipeline, but what are the nodes themselves?
You can think of each node as a function that applies some operations on a given set of inputs and produces a set of outputs.
Now, these nodes can be linked together such that the output of one node is used as an input by another node in the pipeline.
We have already seen a few nodes like StereoDepth, MonoCamera, and other NN nodes in previous posts. Let’s look at some more nodes that are available to us and what each of them is used for.
1. XLinkIn/XLinkOut
XLinkIn and XLinkOut are the two most basic nodes. They enable the host computer to interact with the OAK device.
XLinkIn
XLinkIn node is used to send data from the host to the device.
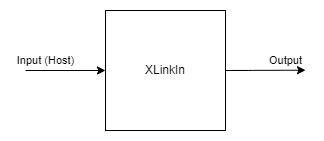
Input:
Any input can be sent from the host side to the device.
Output:
The output of the node is the unchanged input from the host computer that can be used in the pipeline.
Syntax:
pipeline = dai.Pipeline()
xlinkIn = pipeline.create(dai.node.XLinkIn)
XLinkOut
XLinkOut node is used to send data from the device to the host computer.
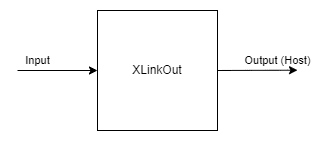
Input:
Any input can be sent from the device to the host side.
Output:
The output of the node is the unchanged input from the device computer that can be used by the host.
Syntax:
pipeline = dai.Pipeline()
xlinkOut = pipeline.create(dai.node.XLinkOut)
2. ColorCamera
ColorCamera node is a source of image frames that are captured from the RGB camera module.
The output image frame from the node can be controlled and manipulated at runtime with the InputControl and InputConfig, which can be used to change the different parameters like white balance, exposure, focus, etc.
The Camera node itself has different components inside it:
1. Image Sensor:
It is the physical image sensor that captures the light and produces a raw image frame.
2. ISP (Image Signal Processor):
The ISP talks to the image sensor and is used for Bayer transformation, demosaicing, noise reduction, and other image enhancements. It also handles the image sensor adjustments such as exposure time, sensitivity (ISO), and lens position based on the 3A algorithms(auto-focus, auto-exposure, and auto-white-balance).
3. Postprocessor:
It converts the planar frames from the ISP into video/preview/still frames.
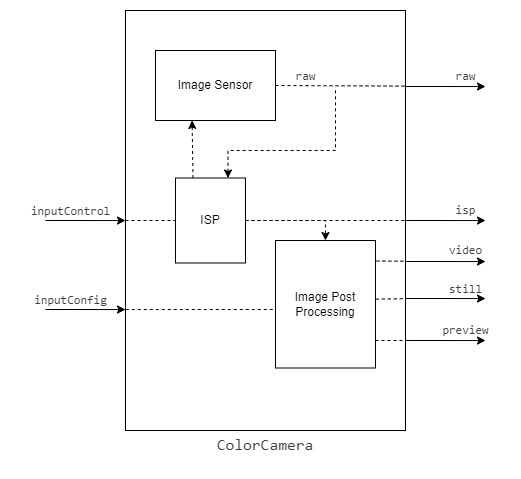
Inputs:
- inputConfig – ImageManipConfig
- inputControl – CameraControl
Output:
- raw – ImgFrame – RAW10 Bayer data.
- isp – ImgFrame – YUV420 planar (same as YU12/IYUV/I420)
- still – ImgFrame – NV12, suitable for bigger size frames. The image gets created when a capture event is sent to the ColorCamera, so it’s like taking a photo
- preview – ImgFrame – RGB (or BGR planar/interleaved if configured), mostly suited for small-size previews and to feed the image into NeuralNetwork
- video – ImgFrame – NV12, suitable for bigger size frames
Syntax:
pipeline = dai.Pipeline()
cam = pipeline.create(dai.node.ColorCamera)
Demo:

3. EdgeDetector
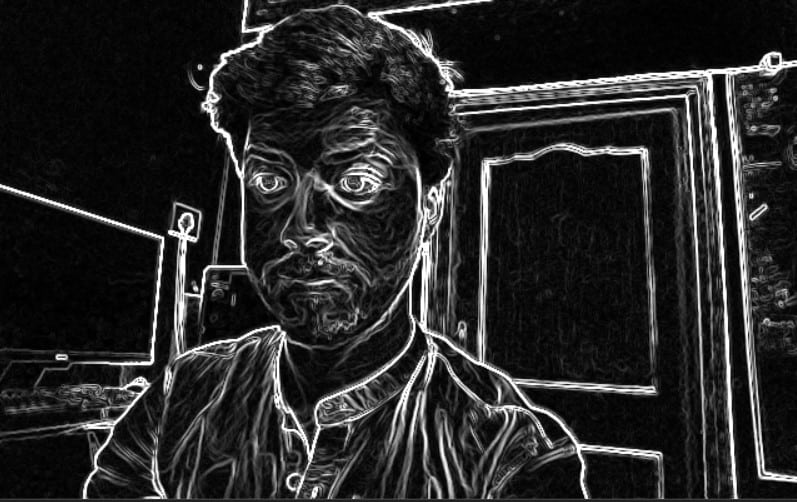
Edge detector node uses Sobel filter to emphasize and find edges in an image frame.
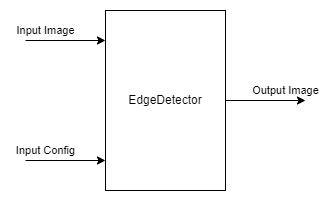
Inputs:
- inputImage – ImgFrame
- inputConfig – EdgeDetectorConfig
Output:
- outputImage – output image frame frame with emphasized edges
Syntax:
pipeline = dai.Pipeline()
edgeDetector = pipeline.create(dai.node.EdgeDetector)
Demo:
4. FeatureTracker
FeatureTracker detects key points (features) on a frame and tracks them on the next frame. These features can be used for feature matching in various applications.
The valid features are obtained from the Harris score or Shi-Tomasi. The default number of target features is 320, and the default maximum number of features is 480.
It currently supports 720p and 480p resolutions.
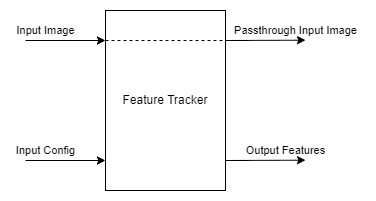
Inputs:
- inputConfig – FeatureTrackerConfig
- inputImage – ImgFrame
Output:
- outputFeatures – TrackedFeatures
- passthroughInputImage – ImgFrame
Syntax:
pipeline = dai.Pipeline()
featureTracker = pipeline.create(dai.node.FeatureTracker)
Demo:

5. ImageManip
ImageManip node can be used to crop, rotate rectangle area or perform various image transforms like rotate, mirror, flip, and perspective transform on an image frame.
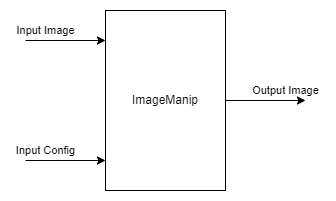
Inputs:
- inputImage – ImgFrame
- inputConfig – ImageManipConfig
Output:
- Modified Image Frame
Syntax:
pipeline = dai.Pipeline()manip = pipeline.create(dai.node.ImageManip)
Demo:

Image frame rotated 90 Degrees
6. IMU
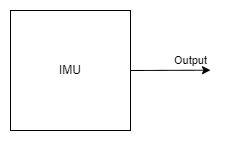
IMU (inertial measurement unit) node can be used to receive data from the IMU chip on the device.
The DepthAI devices use a BNO085 9-axis sensor that supports sensor fusion on the (IMU) chip itself. The IMU chip has a number of sensors onboard, namely an Accelerometer, a Gyroscope, and a Magnetometer.
Note: OAK-D is equipped with an IMU sensor, but OAK-D Lite doesn’t have it. If you want to use the IMU sensor suggest you check the device specs before buying.
Inputs:
This node doesn’t require any input.
Output:
- IMU Data
Syntax:
pipeline = dai.Pipeline()imu = pipeline.create(dai.node.IMU)
Demo:

7. ObjectTracker
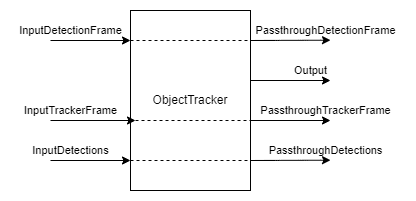
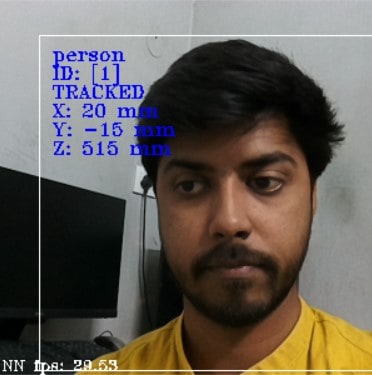
Object tracker node tracks detected objects from the detection input. It uses Kalman filter and Hungarian algorithm for tracking objects.
Inputs:
- inputDetectionFrame – ImgFrame
- inputTrackerFrame – ImgFrame
- inputDetections – ImgDetections
Output:
- out – Tracklets
- passthroughDetectionFrame – ImgFrame
- passthroughTrackerFrame – ImgFrame
- passthroughDetections – ImgDetections
Syntax:
pipeline = dai.Pipeline()objectTracker = pipeline.create(dai.node.ObjectTracker)
Demo:
8. Script
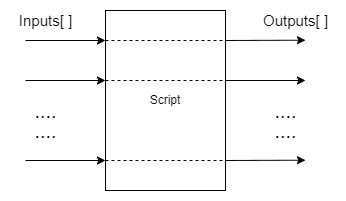
Script node allows users to run custom Python scripts on the device. Due to the computational resource constraints, the script node shouldn’t be used for heavy computing (e.g., image manipulation/CV) but for managing the flow of the pipeline.
Example use cases would be controlling nodes like ImageManip, ColorCamera, SpatialLocationCalculator, decoding NeuralNetwork results, or interfacing with GPIOs.
Inputs/Outputs:
Users can define as many inputs and outputs as they need. Inputs and outputs can be any Message type supported by DepthAI.
Syntax:
pipeline = dai.Pipeline()script = pipeline.create(dai.node.Script)
9. SpatialLocationCalculator
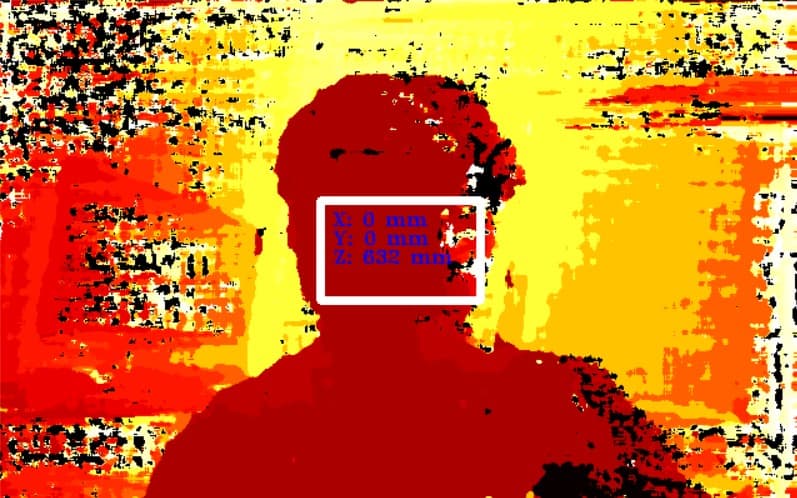
SpatialLocationCalculator can calculate the depth based on the depth map from the inputDepth and ROI (region-of-interest) provided by the inputConfig.
The node will average the depth values in the ROI and remove the ones out of range.

Inputs:
- inputConfig – SpatialLocationCalculatorConfig
- inputDepth – ImgFrame
Output:
- out – SpatialLocationCalculatorData
- passthroughDepth – ImgFrame
Syntax:
pipeline = dai.Pipeline()spatialCalc = pipeline.SpatialLocationCalculator()
Demo:
10. VideoEncoder
VideoEncoder node is used to encode image frames into H264/H265/JPEG. This can be used to save the video outputs from the device.

Inputs:
- input – ImgFrame
Output:
- bitstream – ImgFrame
Syntax:
pipeline = dai.Pipeline()encoder = pipeline.create(dai.node.VideoEncoder)
11. SystemLogger
SystemLogger node is used to get system information about the device.
The node provides the usage information of all the resources onboard the device, like memory and storage. It also provides stats like processor utilization and chip temperature.
Output:
- out – SystemInformation
Syntax:
pipeline = dai.Pipeline()logger = pipeline.create(dai.node.SystemLogger)
Demo:

4. Complex pipeline by Linking nodes
So now we know the different DepthAI nodes and how a simple pipeline is created. Let’s turn things up and use the knowledge to create a slightly complex pipeline.
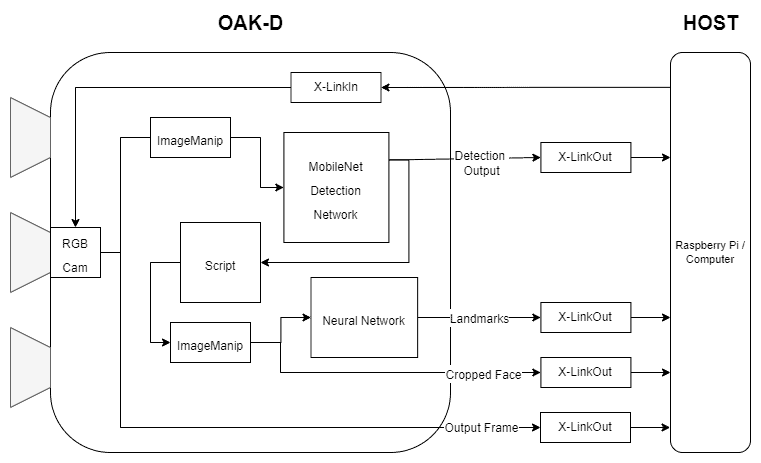
We will be creating a pipeline to do face detection and, furthermore, do landmark detection on the detected face region. All of this will be done on-device, and we will only be getting the final outputs of the pipeline, i.e., the detected face bounding box and the detected landmarks.
Before looking at the code, let’s take an overview of the pipeline and how the different nodes used in the pipeline will be connected.
1. Code (Face detection + Facial Landmark detection)
Import required modules
import cv2
import depthai as dai
import time
import blobconverter
Define Frame size
FRAME_SIZE = (640, 400)
Define Detection NN model name and input size
We will use “face-detection-retail-0004” model from Depthai model zoo.
It’s a Face detection model that gives the bounding box coordinates of a detected face in the image frame.
# If you define the blob make sure the FACE_MODEL_NAME and ZOO_TYPE are None
DET_INPUT_SIZE = (300, 300)
FACE_MODEL_NAME = "face-detection-retail-0004"
ZOO_TYPE = "depthai"
blob_path = None
Define Landmark NN model name and input size
We will use “landmarks-regression-retail-0009” model from Open Model Zoo.
It’s a Facial Landmarks detection model that provides the five landmarks on the face: left eye, right eye, nose, left corner of lips, and right corner of lips.
# If you define the blob make sure the LANDMARKS_MODEL_NAME and ZOO_TYPE are None
LANDMARKS_INPUT_SIZE = (48, 48)
LANDMARKS_MODEL_NAME = "landmarks-regression-retail-0009"
LANDMARKS_ZOO_TYPE = "intel"
landmarks_blob_path = None
Start defining a pipeline
pipeline = dai.Pipeline()
Define a source – RGB camera
cam = pipeline.createColorCamera()
cam.setPreviewSize(FRAME_SIZE[0], FRAME_SIZE[1])
cam.setInterleaved(False)
cam.setResolution(dai.ColorCameraProperties.SensorResolution.THE_1080_P)
cam.setBoardSocket(dai.CameraBoardSocket.RGB)
Define NN node for Face Detection
# Convert model from OMZ to blob
if FACE_MODEL_NAME is not None:
    blob_path = blobconverter.from_zoo(
        name=FACE_MODEL_NAME,
        shaves=6,
        zoo_type=ZOO_TYPE
    )

# Define face detection NN node
faceDetNn = pipeline.createMobileNetDetectionNetwork()
faceDetNn.setConfidenceThreshold(0.75)
faceDetNn.setBlobPath(blob_path)
Define NN node for Landmark detection model
# Convert model from OMZ to blob
if LANDMARKS_MODEL_NAME is not None:
    landmarks_blob_path = blobconverter.from_zoo(
        name=LANDMARKS_MODEL_NAME,
        shaves=6,
        zoo_type=LANDMARKS_ZOO_TYPE
    )

# Define landmarks detection NN node
landmarksDetNn = pipeline.createNeuralNetwork()
landmarksDetNn.setBlobPath(landmarks_blob_path)
Define ImageManip nodes for face and landmark detection
# Define face detection input config
faceDetManip = pipeline.createImageManip()
faceDetManip.initialConfig.setResize(DET_INPUT_SIZE[0], DET_INPUT_SIZE[1])
faceDetManip.initialConfig.setKeepAspectRatio(False)

# Define landmark detection input config
lndmrksDetManip = pipeline.createImageManip()
Linking camera, face imagemanip, and face detection NN nodes
# Linking
cam.preview.link(faceDetManip.inputImage)
faceDetManip.out.link(faceDetNn.input)
Define Script node
Script node will take the output from the face detection NN as an input and set ImageManipConfig for landmark NN
script = pipeline.create(dai.node.Script)
script.setProcessor(dai.ProcessorType.LEON_CSS)
script.setScriptPath("script.py")
script.py
import time


# Correct the bounding box
def correct_bb(bb):
    bb.xmin = max(0, bb.xmin)
    bb.ymin = max(0, bb.ymin)
    bb.xmax = min(bb.xmax, 1)
    bb.ymax = min(bb.ymax, 1)
    return bb


# Main loop
while True:
    time.sleep(0.001)

    # Get image frame
    img = node.io['frame'].get()

    # Get detection output
    face_dets = node.io['face_det_in'].tryGet()
    if face_dets and img is not None:

        # Loop over all detections
        for det in face_dets.detections:

            # Correct bounding box
            correct_bb(det)
            node.warn(f"New detection {det.xmin}, {det.ymin}, {det.xmax}, {det.ymax}")

            # Set config parameters
            cfg = ImageManipConfig()
            cfg.setCropRect(det.xmin, det.ymin, det.xmax, det.ymax)
            cfg.setResize(48, 48)
            cfg.setKeepAspectRatio(False)

            # Output image and config
            node.io['manip_cfg'].send(cfg)
            node.io['manip_img'].send(img)
Linking to Script inputs
cam.preview.link(script.inputs['frame'])
faceDetNn.out.link(script.inputs['face_det_in'])
Linking Script outputs to landmark ImageManipconfig
script.outputs['manip_cfg'].link(lndmrksDetManip.inputConfig)
script.outputs['manip_img'].link(lndmrksDetManip.inputImage)
Linking ImageManip output to Landmark NN
lndmrksDetManip.out.link(landmarksDetNn.input)
Create output streams
# Create preview output
xOutPreview = pipeline.createXLinkOut()
xOutPreview.setStreamName("preview")
cam.preview.link(xOutPreview.input)

# Create face detection output
xOutDet = pipeline.createXLinkOut()
xOutDet.setStreamName('det_out')
faceDetNn.out.link(xOutDet.input)

# Create cropped face output
xOutCropped = pipeline.createXLinkOut()
xOutCropped.setStreamName('face_out')
lndmrksDetManip.out.link(xOutCropped.input)

# Create landmarks detection output
xOutLndmrks = pipeline.createXLinkOut()
xOutLndmrks.setStreamName('lndmrks_out')
landmarksDetNn.out.link(xOutLndmrks.input)
Display info on the image frame
def display_info(frame, bbox, landmarks, status, status_color, fps):
    # Display bounding box
    cv2.rectangle(frame, bbox, status_color[status], 2)

    # Display landmarks
    if landmarks is not None:
        for landmark in landmarks:
            cv2.circle(frame, landmark, 2, (0, 255, 255), -1)

    # Create background for showing details
    cv2.rectangle(frame, (5, 5, 175, 100), (50, 0, 0), -1)

    # Display authentication status on the frame
    cv2.putText(frame, status, (20, 40), cv2.FONT_HERSHEY_SIMPLEX, 0.5, status_color[status])

    # Display instructions on the frame
    cv2.putText(frame, f'FPS: {fps:.2f}', (20, 80), cv2.FONT_HERSHEY_SIMPLEX, 0.6, (255, 255, 255))
Define some variable that we will use in the main loop
# Frame count
frame_count = 0

# Placeholder fps value
fps = 0

# Used to record the time when we processed last frames
prev_frame_time = 0

# Used to record the time at which we processed current frames
new_frame_time = 0

# Set status colors
status_color = {
    'Face Detected': (0, 255, 0),
    'No Face Detected': (0, 0, 255)
}
Main Loop
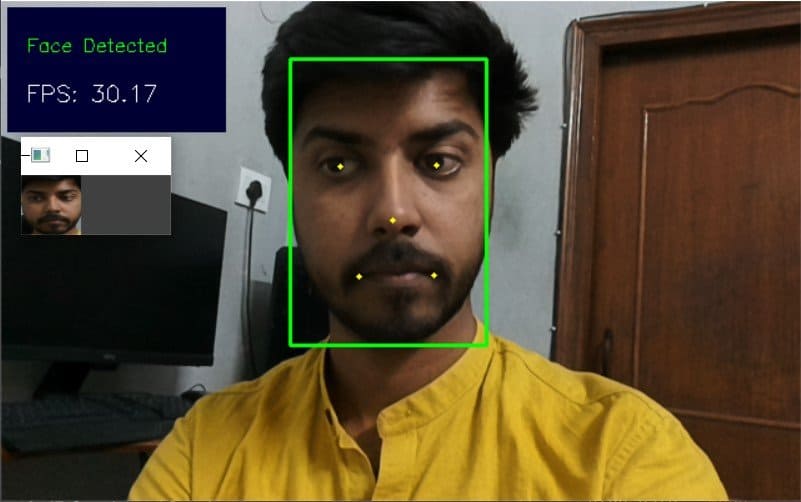
We start the pipeline and acquire video frames from the “preview” queue. We also get the Face and Landmark detection outputs from the “det_out” and “lndmrks_out” queues, respectively.
Once we have the bounding box and landmark outputs, we display them on the image frame.
# Start pipeline
with dai.Device(pipeline) as device:

    # Output queue will be used to get the right camera frames from the outputs defined above
    qCam = device.getOutputQueue(name="preview", maxSize=1, blocking=False)

    # Output queue will be used to get nn detection data from the video frames.
    qDet = device.getOutputQueue(name="det_out", maxSize=1, blocking=False)

    # Output queue will be used to get cropped face region.
    qFace = device.getOutputQueue(name="face_out", maxSize=1, blocking=False)

    # Output queue will be used to get landmarks from the face region.
    qLndmrks = device.getOutputQueue(name="lndmrks_out", maxSize=1, blocking=False)

    while True:
        # Get camera frame
        inCam = qCam.get()
        frame = inCam.getCvFrame()

        bbox = None

        inDet = qDet.tryGet()

        if inDet is not None:
            detections = inDet.detections

            # if face detected
            if len(detections) is not 0:
                detection = detections[0]

                # Correct bounding box
                xmin = max(0, detection.xmin)
                ymin = max(0, detection.ymin)
                xmax = min(detection.xmax, 1)
                ymax = min(detection.ymax, 1)

                # Calculate coordinates
                x = int(xmin*FRAME_SIZE[0])
                y = int(ymin*FRAME_SIZE[1])
                w = int(xmax*FRAME_SIZE[0]-xmin*FRAME_SIZE[0])
                h = int(ymax*FRAME_SIZE[1]-ymin*FRAME_SIZE[1])

                bbox = (x, y, w, h)

        # Show cropped face region
        inFace = qFace.tryGet()
        if inFace is not None:
            face = inFace.getCvFrame()
            cv2.imshow("face", face)

        landmarks = None

        # Get landmarks NN output
        inLndmrks = qLndmrks.tryGet()
        if inLndmrks is not None:
            # Get NN layer names
            # print(f"Layer names: {inLndmrks.getAllLayerNames()}")

            # Retrieve landmarks from NN output layer
            landmarks = inLndmrks.getLayerFp16("95")

            x_landmarks = []
            y_landmarks = []

            # Landmarks in following format [x1,y1,x2,y2,..]
            # Extract all x coordinates [x1,x2,..]
            for x_point in landmarks[::2]:
                # Get x coordinate on original frame
                x_point = int((x_point * w) + x)
                x_landmarks.append(x_point)

            # Extract all y coordinates [y1,y2,..]
            for y_point in landmarks[1::2]:
                # Get y coordinate on original frame
                y_point = int((y_point * h) + y)
                y_landmarks.append(y_point)

            # Zip x & y coordinates to get a list of points [(x1,y1),(x2,y2),..]
            landmarks = list(zip(x_landmarks, y_landmarks))

        # Check if a face was detected in the frame
        if bbox:
            # Face detected
            status = 'Face Detected'
        else:
            # No face detected
            status = 'No Face Detected'

        # Display info on frame
        display_info(frame, bbox, landmarks, status, status_color, fps)

        # Calculate average fps
        if frame_count % 10 == 0:
            # Time when we finish processing last 100 frames
            new_frame_time = time.time()

            # Fps will be number of frame processed in one second
            fps = 1 / ((new_frame_time - prev_frame_time)/10)
            prev_frame_time = new_frame_time

        # Capture the key pressed
        key_pressed = cv2.waitKey(1) & 0xff

        # Stop the program if Esc key was pressed
        if key_pressed == 27:
            break

        # Display the final frame
        cv2.imshow("Face Cam", frame)

        # Increment frame count
        frame_count += 1

# Close all output windows
cv2.destroyAllWindows
6. Results
7. Conclusion
In this post, we got an overview of different parts of the DepthAI pipelines and how we can use them to create connections between the nodes to accomplish a complex task.
In the next post, we will use everything we have learned and create an interesting application.


100K+ Learners
Join Free OpenCV Bootcamp3 Hours of Learning