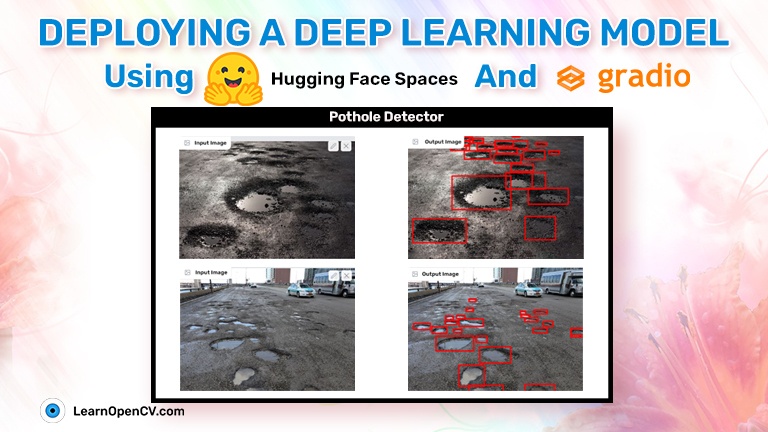
In deep learning, training a model is not the final step. Be it image classification or object detection, a deep learning project becomes worthwhile only when it reaches the masses. That’s where deployment comes in. But we do not need any costly cloud servers for deployment. We can easily do that using Hugging Face Spaces. And that’s exactly what we will cover in this article. We will be deploying a deep learning model using Hugging Face Spaces and Gradio.

In particular, we will be deploying a YOLOv8 Nano model which has been trained on a custom pothole detection dataset. Not only that, you will get to learn how to deploy a model on Hugging Face Spaces which can run inference on both images and videos. All in all, this is going to be very interesting. After going through this post, you will be able to deploy any of your custom trained object detection models.
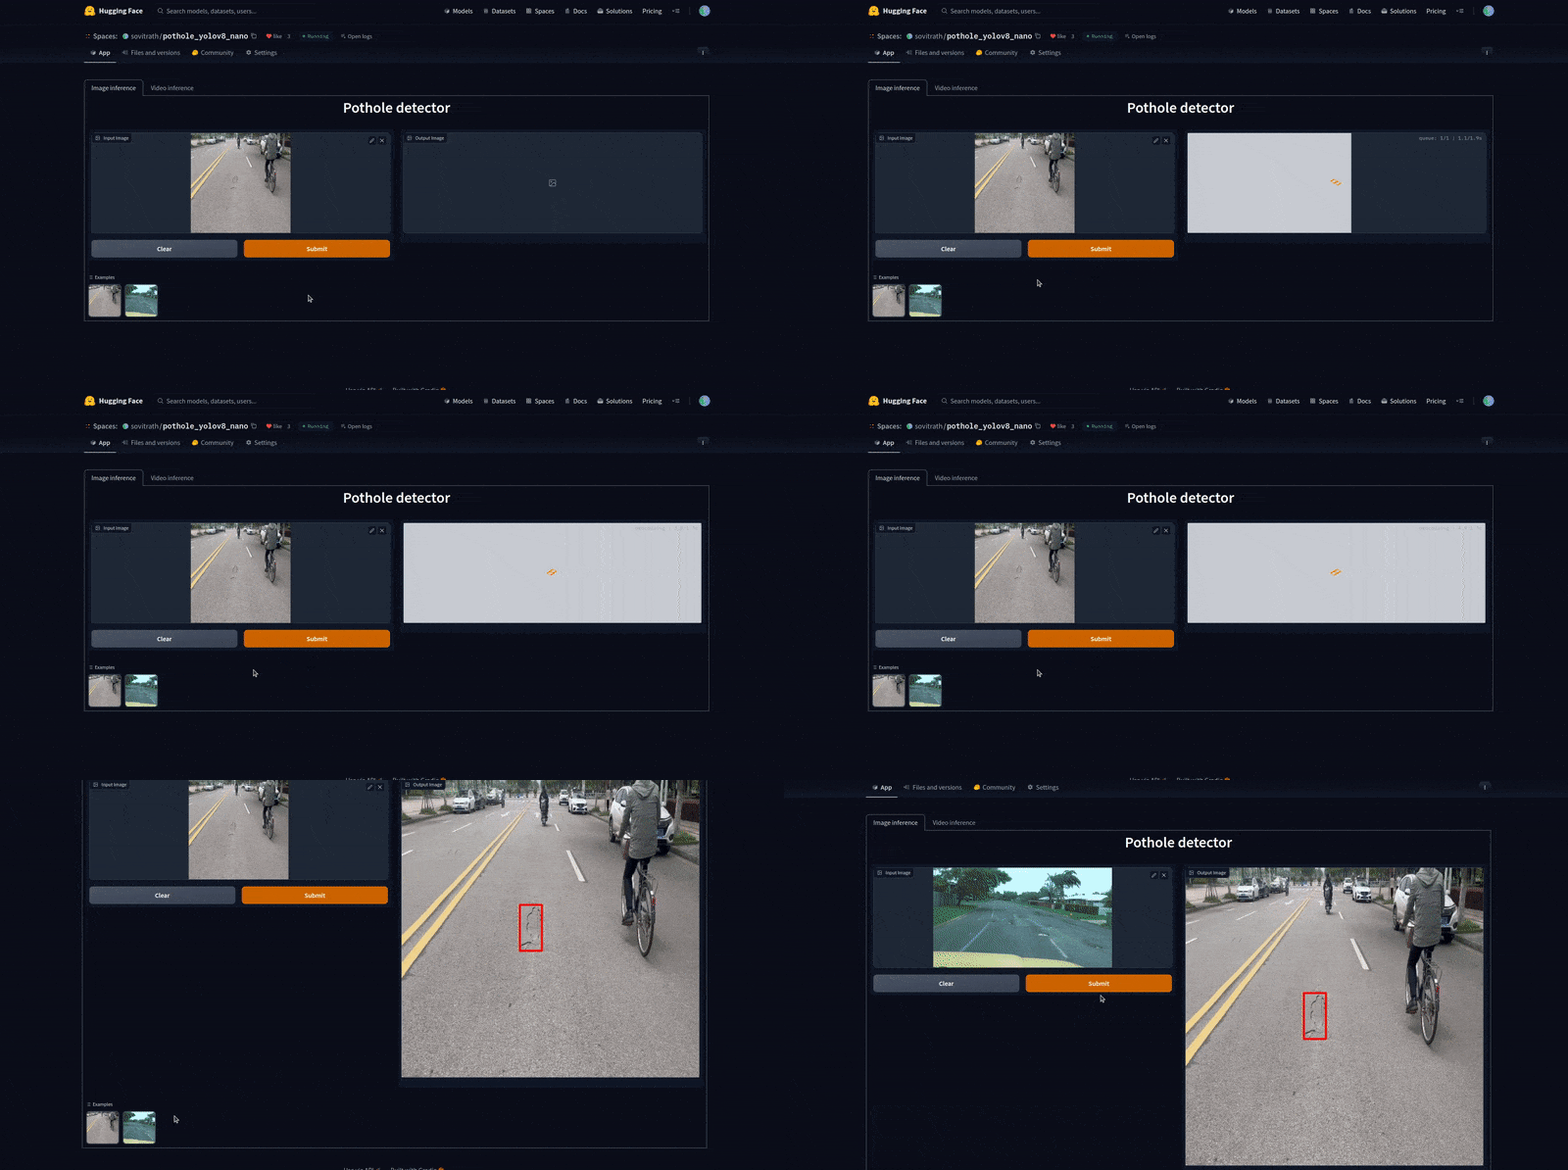
Figure 1 Gradio app demo for pothole detection
- What are Hugging Face Spaces and Gradio and Why Do We Need Them?
- Deploying DL Models on HuggingFace Spaces and Gradio
- Deploying the Pothole Detector Deep Learning Model
- Uploading the Scripts and Model
- Using the Deployed Pothole Detector App on Hugging Face Spaces
- Conclusion
What are Hugging Face Spaces and Gradio and Why Do We Need Them?
Hugging Face Spaces is a collaborative page on the Hugging Face website to deploy and showcase machine learning projects. Anyone can easily host their projects and it will be accessible to the public in an instant.
One just needs a HuggingFace account to deploy any machine learning model to Hugging Face Spaces. We do not need any custom websites or costly backend hardware. Hugging Face provides free CPU deployment spaces and GPU spaces as well with very competitive pricing.
But we need some way to manage the front end of the application through which the users can interact. This is where Gradio comes in. Gradio provides a very easy and intuitive way to build the front-end user interface for machine learning and deep learning applications.
Starting from the very basic tabs to fully functioning image and video components, we can render almost anything that may be needed for an application. Just to give you an idea, we can build projects based on image classification, semantic segmentation, object detection, text generation, question answering, and many more using Gradio.
It has a very well-maintained and detailed documentation page as well which makes using Gradio even easier.
Deploying Deep Learning Models on HuggingFace Spaces and Gradio
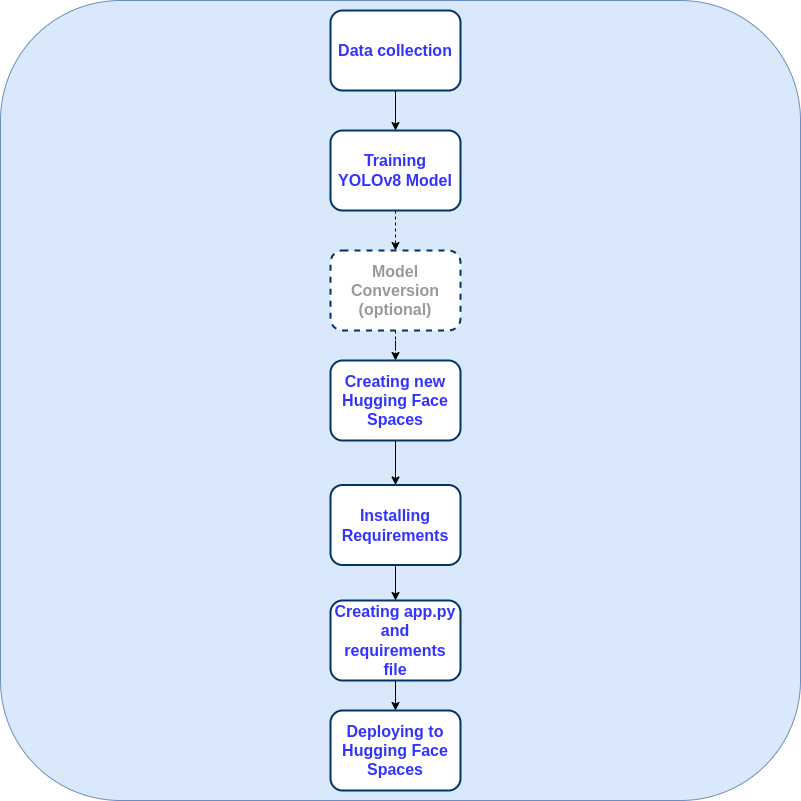
There are a few prerequisites before we can start deploying a deep learning model on Hugging Face Spaces. The following subsections cover these prerequisites.
A Trained YOLOv8 Model
Of course, to deploy a model, we need to train one first. In case, you want to follow through with this article, and deploy your model at the same time, then worry not, we have got you covered. We will be sharing a pretrained model with you.
This is a YOLOv8 model which has been trained on a large scale pothole dataset.
In fact, in our last article, we covered the same dataset for training YOLOv8 on a custom dataset.
You can download the model by directly clicking on this link.
A Hugging Face Account

The next step is to create an account on Hugging Face. In case you don’t have one, you can create an account by clicking here.
Creating a New Spaces Repository
For the Hugging Face Spaces deployment, we need an empty repository. Go to Hugging Face Spaces and click on Create new Space.

This should bring you to a new page where you provide all the information, similar to when creating a Git repository.
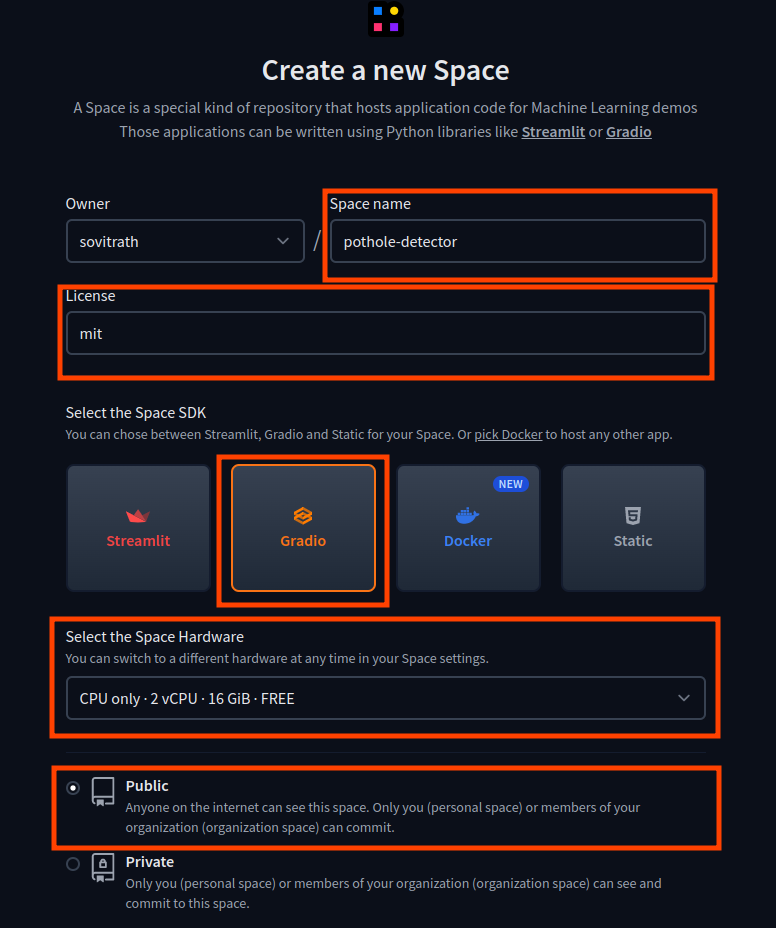
For this project, we have provided the following information:
- The Space Name is pothole-detector.
- We choose the MIT license.
- The SDK is Gradio as we will build the user interface using Gradio.
- And we choose a free hardware environment with 2 CPU cores and 16 GB of RAM. You can upgrade the hardware of the Space later as well.
Next, execute the following command in the directory of your choice to clone this empty project.
git clone https://huggingface.co/spaces/sovitrath/pothole-detector
This creates an empty Git repository in your working directory an all our code files will remain inside the pothole-detector directory. Before moving any further, be sure to make the cloned directory as the working directory.
cd pothole-detector
Install the Gradio Package
Before writing any code, we need to make sure that we install Gradio package. We can easily install this using the pip package manager.
pip install gradio
Install the Utralytics Package
The final requirement that we need is to install the Ultralytics package to import the YOLO module.
pip install ultralytics
We have all the requirements in place. Let’s move on to the coding part now.
Deploying the Pothole Detector Deep Learning Model
For deploying the deep learning model using Gradio, there are mainly three files that we need to take care of.
They are:
app.py: Containing the logic for image and video inference using the trained model.requirements.txt: The packages that we need for the Hugging Face Space to function properly..gitignore: This may seem trivial, but we need to ensure that we do not push any unnecessary files and folders to the deployment space.
Let’s begin with the app.py file.
The Deployment App File
In very simple words, the app.py file is the driver script for deployment. This will contain the object detection logic as well as the user interface code using Gradio.
To begin with, we will write the import statements and some helper functions in the app.py file.
import gradio as gr
import cv2
import requests
import os

from ultralytics import YOLO

file_urls = [
    'https://www.dropbox.com/s/b5g97xo901zb3ds/pothole_example.jpg?dl=1',
    'https://www.dropbox.com/s/86uxlxxlm1iaexa/pothole_screenshot.png?dl=1',
    'https://www.dropbox.com/s/7sjfwncffg8xej2/video_7.mp4?dl=1'
]

def download_file(url, save_name):
    url = url
    if not os.path.exists(save_name):
        file = requests.get(url)
        open(save_name, 'wb').write(file.content)

for i, url in enumerate(file_urls):
    if 'mp4' in file_urls[i]:
        download_file(
            file_urls[i],
            f"video.mp4"
        )
    else:
        download_file(
            file_urls[i],
            f"image_{i}.jpg"
        )
In the above block, we import gradio and YOLO which are two of the most important modules.
Apart from that, we also have a file_urls which contains the URLs of those files that we will directly download into the Hugging Face Space. These will be used as example images and videos for input to the model.
Next, we have a download_file function to download the files.
Initialize the Model, Image, and Video Paths
Let’s initialize the YOLO model and create two lists containing the paths to the image and video files that were downloaded above.
model = YOLO('best.pt')
path  = [['image_0.jpg'], ['image_1.jpg']]
video_path = [['video.mp4']]
Creating the Image Prediction Gradio Interface
We will create two interfaces, one for image inference and another for video inference. The following block contains the code for generating the image prediction interface.
def show_preds_image(image_path):
    image = cv2.imread(image_path)
    outputs = model.predict(source=image_path)
    results = outputs[0].cpu().numpy()
    for i, det in enumerate(results.boxes.xyxy):
        cv2.rectangle(
            image,
            (int(det[0]), int(det[1])),
            (int(det[2]), int(det[3])),
            color=(0, 0, 255),
            thickness=2,
            lineType=cv2.LINE_AA
        )
    return cv2.cvtColor(image, cv2.COLOR_BGR2RGB)

inputs_image = [
    gr.components.Image(type="filepath", label="Input Image"),
]
outputs_image = [
    gr.components.Image(type="numpy", label="Output Image"),
]
interface_image = gr.Interface(
    fn=show_preds_image,
    inputs=inputs_image,
    outputs=outputs_image,
    title="Pothole detector",
    examples=path,
    cache_examples=False,
)
Let’s go over the above code block step-by-step.
First, we have a show_preds_image function which uses the trained YOLOv8 Nano model for prediction on an image. This accepts a single parameter, an image path. After getting the outputs, we get the proper bounding box results in the format supported by OpenCV. Then we annotate these bounding boxes on the image and simply return the result.
In the second step, we create two Gradio components, one for the input and one for the output. Both are of Image type. The only difference is in the type of file they can handle. The inputs_image component accepts a file path whereas the outputs_image can handle a NumPy array. This is because, for the input, we will be either providing an example file path or uploading an image from a file path. And for the outputs, it will always accept the returned NumPy array from the prediction function.
The Image Interface
Finally, we create a Gradio Interface. There are a few arguments that we need to go over:
fn: The function that the interface should act upon. In our case, it is theshow_preds_imagefunction.inputs: The input component.outputs: It accepts the output component.title: The title that we want to give to the component.examples: The example images that get automatically downloaded so that users don’t need to upload images every time.cache_example: We don’t want to cache any examples, so we keep itFalse.
If we render just the image prediction interface, we will get the following output.
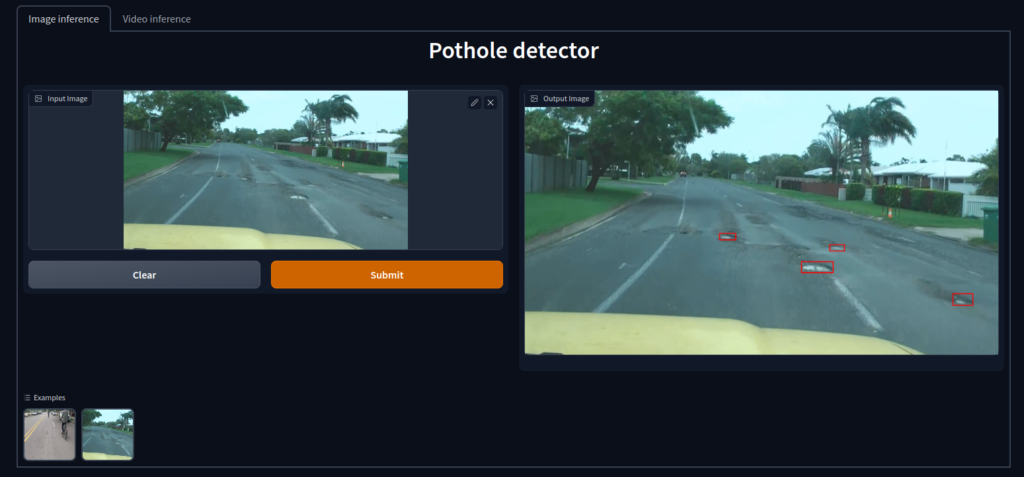
Creating the Video Prediction Gradio Interface
The video prediction interface will be very similar to the image prediction interface with a few small changes.
def show_preds_video(video_path):
    cap = cv2.VideoCapture(video_path)
    while(cap.isOpened()):
        ret, frame = cap.read()
        if ret:
            frame_copy = frame.copy()
            outputs = model.predict(source=frame)
            results = outputs[0].cpu().numpy()
            for i, det in enumerate(results.boxes.xyxy):
                cv2.rectangle(
                    frame_copy,
                    (int(det[0]), int(det[1])),
                    (int(det[2]), int(det[3])),
                    color=(0, 0, 255),
                    thickness=2,
                    lineType=cv2.LINE_AA
                )
            yield cv2.cvtColor(frame_copy, cv2.COLOR_BGR2RGB)

inputs_video = [
    gr.components.Video(type="filepath", label="Input Video"),

]
outputs_video = [
    gr.components.Image(type="numpy", label="Output Image"),
]
interface_video = gr.Interface(
    fn=show_preds_video,
    inputs=inputs_video,
    outputs=outputs_video,
    title="Pothole detector",
    examples=video_path,
    cache_examples=False,
)
This time we have a show_preds_video which accepts a video file path instead of an image file path. For running prediction, as usual, we provide one frame at a time to the YOLO model while looping over the video frames.
One difference here is that we cannot return just one image as that will make the script exit the function. So, after annotating a frame with the bounding boxes, we just yield it so that it becomes a generator.
For the input component this time, we have a Video component. This also accepts a video file path. The output component remains the same, that is a NumPy Image component. This is because we are yielding NumPy frames from the show_preds_video function.
The Gradio Interface remains almost the same with changes to the title and examples path.
Rendering the Interfaces
Because we have two different interfaces, we need to render them in different tabs. For that, Gradio provides the TabbedInterface class. This is the final block of code for the app.py script.
gr.TabbedInterface(
    [interface_image, interface_video],
    tab_names=['Image inference', 'Video inference']
).queue().launch()
The TabbedInterface can handle different interfaces inside a list just like we did above. We can also provide different names to different tabs to recognize them easily.
Finally, we add .queue() and .launch(). This tells the script to queue any video inferences as they cannot run in parallel and then launch the app.
The .gitignore and requirements.txt Files
Let’s create a .gitingore file to avoid the uploading of files that we don’t want.
flagged/
*.pt
*.png
*.jpg
*.mp4
*.mkv
gradio_cached_examples/
We are ignoring the upload of all media files, cached examples, and also the PyTorch trained models. We will upload them manually later.
The requirements.txt file is going to be the same as the Ultralytics requirements.
# Ultralytics requirements
# Usage: pip install -r requirements.txt

# Base ----------------------------------------
hydra-core>=1.2.0
matplotlib>=3.2.2
numpy>=1.18.5
opencv-python>=4.1.1
Pillow>=7.1.2
PyYAML>=5.3.1
requests>=2.23.0
scipy>=1.4.1
torch>=1.7.0
torchvision>=0.8.1
tqdm>=4.64.0
ultralytics

# Logging -------------------------------------
tensorboard>=2.4.1
# clearml
# comet

# Plotting ------------------------------------
pandas>=1.1.4
seaborn>=0.11.0

# Export --------------------------------------
# coremltools>=6.0  # CoreML export
# onnx>=1.12.0  # ONNX export
# onnx-simplifier>=0.4.1  # ONNX simplifier
# nvidia-pyindex  # TensorRT export
# nvidia-tensorrt  # TensorRT export
# scikit-learn==0.19.2  # CoreML quantization
# tensorflow>=2.4.1  # TF exports (-cpu, -aarch64, -macos)
# tensorflowjs>=3.9.0  # TF.js export
# openvino-dev  # OpenVINO export

# Extras --------------------------------------
ipython  # interactive notebook
psutil  # system utilization
thop>=0.1.1  # FLOPs computation
# albumentations>=1.0.3
# pycocotools>=2.0.6  # COCO mAP
# roboflow

# HUB -----------------------------------------
GitPython>=3.1.24
This will handle all the requirements that the deployment Space may need.
Uploading the Scripts and Model
To push the scripts to your repository, you can use the same Git commands as usual.
git add --allgit commit -m "Pothole detector app"git push
After the final command, it will ask for your Hugging Face username and password. Then you can see your Hugging Face repository getting populated with the required files.
Whenever you push any code, the Space will build the app first which may take some time.
The final step is to manually upload the .pt (model) file using the + Add file button.
After building one final time, our pothole detector app is successfully deployed and ready to use.
Using the Deployed Pothole Detector App on Hugging Face Spaces
We have already built an app and deployed it. You can try it by going to the following link.
Pothole Detector Demo App
The best thing about Hugging Face spaces built with Gradio is that we can integrate the HTML code that they provide.
In case you want to try it out, you can do so here by interacting with the app below.
In-Browser Demo
Try out the pothole detector app directly in the browser here.
Conclusion
In this article, you learned how to deploy a deep learning model using Hugging Face Spaces and Gradio. As you might have felt, it was really easy to deploy our custom pothole detector app using Gradio. Starting from creating different inputs and outputs, to creating different interfaces to handle different formats, Gradio has made it really easy for us to deploy apps to Hugging Face Spaces.
If you create your own apps or modify this one with more functionalities, let us know in the comments. We would love to hear about it.


