
A few weeks back we wrote a post on Object detection using YOLOv3. In this post we will discuss Mask RCNN in OpenCV.
The output of an object detector is an array of bounding boxes around objects detected in the image or video frame, but we do not get any clue about the shape of the object inside the bounding box.
Wouldn’t it be cool if we could find a binary mask containing the object instead of just the bounding box?
In this post, we will learn how to do just that. We will show how to use a Convolutional Neural Network (CNN) model called Mask RCNN (Region based Convolutional Neural Network) for object detection and segmentation. Using Mask-RCNN we not only detect the object, we also obtain a greyscale or binary mask containing the object.
The results in this tutorial are obtained using a Mac OS 2.5 GHz Intel Core i7 CPU. The inference time is from 350 ms to 2 seconds per frame on the CPU, depending on the complexity and number of objects in the frame.
Mask-RCNN was initially introduced in Nov 2017 by Facebook’s AI Research team using Python and Caffe2.
The Inception backbone is the fastest of the four. You can even try it on a CPU in a reasonable time and therefore we have chosen it for this tutorial. This model was trained on MSCOCO dataset.
We will share OpenCV code to load and use the model in both C++ and Python.
Before we dive into the code, it is worth understanding a few terms especially if you are a beginner.
What is Image Segmentation?
In computer vision, the term “image segmentation” or simply “segmentation” means dividing the image into groups of pixels based on some criteria. You can do this grouping based on color, texture, or some other criteria that you have decided. These groups are sometimes also called super-pixels.


What is instance segmentation?
In instance segmentation the goal is to detect specific objects in an image and create a mask around the object of interest. Instance segmentation can also be thought as object detection where the output is a mask instead of just a bounding box. Unlike semantic segmentation, which tries to categorize each pixel in the image, instance segmentation does not aim to label every pixel in the image.
Below we see an example of instance segmentation of two sheep on a very similar colored background.
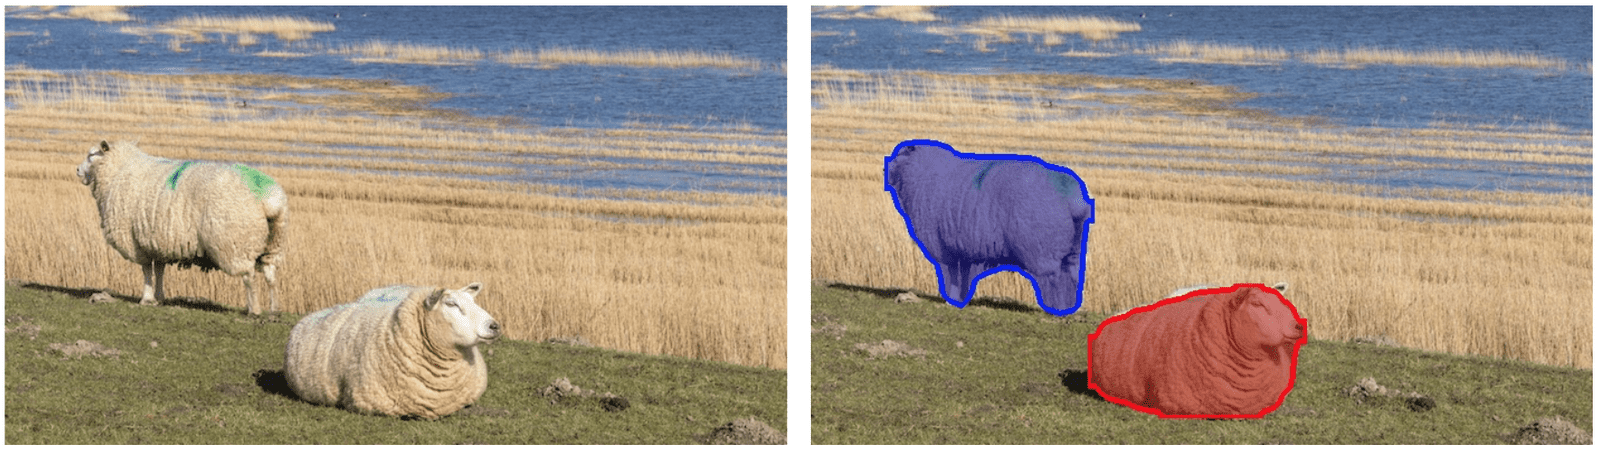
Figure 1 : Instance Segmentation Example
How Mask RCNN works?
Mask-RCNN is a result of a series of improvements over the original R-CNN paper (by R. Girshick et. al., CVPR 2014) for object detection. R-CNN generated region proposals based on selective search and then processed each proposed region, one at time, using Convolutional Networks to output an object label and its bounding box.
Fast R-CNN ( R. Girshik, ICCV 2015) made the R-CNN algorithm much faster by processing all the proposed regions together in their CNN using a ROIPool layer.
Faster R-CNN (S. Run et al., PAMI, 2017 ) pushed it even further by performing the region proposal step too using a ConvNet called Region Proposal Network(RPN). Both the RPN, and the classification and bounding box prediction network worked on common feature maps, thus making inference faster. On a GPU, Faster R-CNN could run at 5 fps.
Mask R-CNN (He et al., ICCV 2017) is an improvement over Faster RCNN by including a mask predicting branch parallel to the class label and bounding box prediction branch as shown in the image below. It adds only a small overhead to the Faster R-CNN network and hence can still run at 5 fps on a GPU. In this tutorial we show results by running on a Mac OS 2.5 GHz Intel Core i7 CPU and it takes around 2 seconds per frame on the CPU, even for the frames with more than 30 objects.

Figure 2 : Architecture of Mask-RCNN (Source)
The Mask-RCNN network has two major parts.
The first one is the Region Proposal Network which generates around 300 region proposals per image. During training, each of these proposals (ROIs) go through the second part which is the object detection and mask prediction network, as shown above. Note that since the mask prediction branch runs in parallel to the label and box prediction branch, for each given ROI, the network predicts masks belonging to all the classes.
During inference, the region proposals go through Non-Maximum Suppression and only the top scoring 100 detection boxes are processed by the mask prediction branch. So, with 100 ROIs and 90 object classes, the mask prediction part of the network outputs a 4D tensor of size 100x90x15x15, where each mask is of size 15×15.
For the sheep image shown above, the network detected two objects. For each object it outputs an array containing the predicted class score(indicating the probability that the object belongs to the predicted class), left, top, right and bottom locations of the bounding box of the detected object in the frame. The class id from this array is used to extract the corresponding mask from the output of the mask prediction branch. The masks for the two objects detected look like the following:

Figure 3 : Masks produced by Mask-RCNN
These masks can then be thresholded to get a completely binary mask.
Like Faster-RCNN, the choice of the backbone architecture is flexible. We chose InceptionV2 because it is faster, but one could get better results with better architectures like ResNeXt-101, as pointed by the authors of the Mask R-CNN paper.
Compared to other object detectors like YOLOv3, the network of Mask-RCNN runs on larger images. The network resizes the input images such that the smaller side is 800 pixels. Below we will go in detail the steps needed to get instance segmentation results. For simplicity and clarity of visualization, we use the same color to indicate objects of the same class in the above video, but we also show a minor code change to color different instances differently.
Object Detection and Instance Segmentation using Mask RCNN (C++/Python)
Let us now see how to run Mask-RCNN using OpenCV.
Step 1 : Download the models
We will start by downloading the tensorflow model to the current Mask-RCNN working directory. After the download is complete we extract the model files. We will be using the frozen graph file frozen_inference_graph.pb to get the model weights.
wget http://download.tensorflow.org/models/object_detection/mask_rcnn_inception_v2_coco_2018_01_28.tar.gz
tar zxvf mask_rcnn_inception_v2_coco_2018_01_28.tar.gz
Step 2 : Initialize the parameters
The Mask-RCNN algorithm produces the predicted detection outputs as the bounding boxes. Each bounding box is associated with a confidence score. All the boxes below the confidence threshold parameter are ignored for further processing.
The object mask output from the network is a greyscale image. One could use it directly for alpha blending purposes, if needed. Since we use binary masks in this tutorial, we use the maskThreshold parameter to threshold the grey mask image. Lowering its value would result in a larger mask. Sometimes this helps include the parts missed near the boundaries, but at the same time, it might also include the background pixels at the more pointy boundary regions.

Python
# Initialize the parameters
confThreshold = 0.5  #Confidence threshold
maskThreshold = 0.3  # Mask threshold
C++
// Initialize the parameters
float confThreshold = 0.5; // Confidence threshold
float maskThreshold = 0.3; // Mask threshold
Step 3 : Load the model and classes
The file mscoco_labels.names contains all the objects for which the model was trained. We read class names. Then we read and load the colors.txt file containing all the colors used to mask objects of various classes.
Next, we load the network using these two files —
- frozen_inference_graph.pb : The pre-trained weights.
- mask_rcnn_inception_v2_coco_2018_01_28.pbtxt : The text graph file that has been tuned by the OpenCV’s DNN support group, so that the network can be loaded using OpenCV.
We set the DNN backend to OpenCV here and the target to CPU. You could try setting the preferable target to cv.dnn.DNN_TARGET_OPENCL to run it on a GPU. But keep in mind that the DNN module in the current OpenCV version is tested only with Intel’s GPUs.
Python
# Load names of classes
classesFile = "mscoco_labels.names";
classes = None
with open(classesFile, 'rt') as f:
   classes = f.read().rstrip('\n').split('\n')

# Load the colors
colorsFile = "colors.txt";
with open(colorsFile, 'rt') as f:
    colorsStr = f.read().rstrip('\n').split('\n')
colors = []
for i in range(len(colorsStr)):
    rgb = colorsStr[i].split(' ')
    color = np.array([float(rgb[0]), float(rgb[1]), float(rgb[2])])
    colors.append(color)

# Give the textGraph and weight files for the model
textGraph = "./mask_rcnn_inception_v2_coco_2018_01_28.pbtxt";
modelWeights = "./mask_rcnn_inception_v2_coco_2018_01_28/frozen_inference_graph.pb";

# Load the network
net = cv.dnn.readNetFromTensorflow(modelWeights, textGraph);
net.setPreferableBackend(cv.dnn.DNN_BACKEND_OPENCV)
net.setPreferableTarget(cv.dnn.DNN_TARGET_CPU)
C++
    // Load names of classes
    string classesFile = "mscoco_labels.names";
    ifstream ifs(classesFile.c_str());
    string line;
    while (getline(ifs, line)) classes.push_back(line);

    // Load the colors
    vector<Scalar> colors;
    string colorsFile = "colors.txt";
    ifstream colorFptr(colorsFile.c_str());
    while (getline(colorFptr, line)) {
        char* pEnd;
        double r, g, b;
        r = strtod (line.c_str(), &pEnd);
        g = strtod (pEnd, NULL);
        b = strtod (pEnd, NULL);
        colors.push_back(Scalar(r, g, b, 255.0));
    }

    // Give the configuration and weight files for the model
    String textGraph = "./mask_rcnn_inception_v2_coco_2018_01_28.pbtxt";
    String modelWeights = "./mask_rcnn_inception_v2_coco_2018_01_28/frozen_inference_graph.pb";

    // Load the network
    Net net = readNetFromTensorflow(modelWeights, textGraph);
    net.setPreferableBackend(DNN_BACKEND_OPENCV);
    net.setPreferableTarget(DNN_TARGET_CPU);
Step 4 : Read the input
In this step we read the image, video stream or the webcam. In addition, we also open the video writer to save the frames with detected output bounding boxes.
Python
outputFile = "mask_rcnn_out_py.avi"
if (args.image):
    # Open the image file
    if not os.path.isfile(args.image):
        print("Input image file ", args.image, " doesn't exist")
        sys.exit(1)
    cap = cv.VideoCapture(args.image)
    outputFile = args.image[:-4]+'_mask_rcnn_out_py.jpg'
elif (args.video):
    # Open the video file
    if not os.path.isfile(args.video):
        print("Input video file ", args.video, " doesn't exist")
        sys.exit(1)
    cap = cv.VideoCapture(args.video)
    outputFile = args.video[:-4]+'_mask_rcnn_out_py.avi'
else:
    # Webcam input
    cap = cv.VideoCapture(0)

# Get the video writer initialized to save the output video
if (not args.image):
    vid_writer = cv.VideoWriter(outputFile, cv.VideoWriter_fourcc('M','J','P','G'), 28, (round(cap.get(cv.CAP_PROP_FRAME_WIDTH)),round(cap.get(cv.CAP_PROP_FRAME_HEIGHT))))
C++
        outputFile = "mask_rcnn_out_cpp.avi";
        if (parser.has("image"))
        {
            // Open the image file
            str = parser.get<String>("image");
            ifstream ifile(str);
            if (!ifile) throw("error");
            cap.open(str);
            str.replace(str.end()-4, str.end(), "_mask_rcnn_out.jpg");
            outputFile = str;
        }
        else if (parser.has("video"))
        {
            // Open the video file
            str = parser.get<String>("video");
            ifstream ifile(str);
            if (!ifile) throw("error");
            cap.open(str);
            str.replace(str.end()-4, str.end(), "_mask_rcnn_out.avi");
            outputFile = str;
        }
        // Open the webcam
        else cap.open(parser.get<int>("device"));

        // Get the video writer initialized to save the output video
        if (!parser.has("image")) {
           video.open(outputFile, VideoWriter::fourcc('M','J','P','G'), 28, Size(cap.get(CAP_PROP_FRAME_WIDTH),          cap.get(CAP_PROP_FRAME_HEIGHT)));
        }
Step 4 : Process each frame
The input image to a neural network needs to be in a certain format called a blob.
After a frame is read from the input image or video stream, it is passed through the blobFromImage function to convert it to an input blob for the neural network. In this process, it takes in the input image frame in its original size and sets the swapRGB parameter to true.
The blob is then passed in to the network as its input and a forward pass is run to get a list of predicted bounding boxes and the object masks from the output layers named as ‘detection_out_final‘ and ‘detection_masks‘ in the network. These boxes go through a post-processing step in order to filter out the ones with low confidence scores. We will go through the post-processing step in more detail in the next section. The inference time for each frame is printed out at the top left. The image with the final bounding boxes and the corresponding overlaid masks is then saved to the disk, either as an image for an image input or using a video writer for the input video stream or webcam.
Python
while cv.waitKey(1) < 0:

    # Get frame from the video
    hasFrame, frame = cap.read()

    # Stop the program if reached end of video
    if not hasFrame:
        print("Done processing !!!")
        print("Output file is stored as ", outputFile)
        cv.waitKey(3000)
        break

    # Create a 4D blob from a frame.
    blob = cv.dnn.blobFromImage(frame, swapRB=True, crop=False)

    # Set the input to the network
    net.setInput(blob)

    # Run the forward pass to get output from the output layers
    boxes, masks = net.forward(['detection_out_final', 'detection_masks'])

    # Extract the bounding box and mask for each of the detected objects
    postprocess(boxes, masks)

    # Put efficiency information.
    t, _ = net.getPerfProfile()
    label = 'Mask-RCNN : Inference time: %.2f ms' % (t * 1000.0 / cv.getTickFrequency())
    cv.putText(frame, label, (0, 15), cv.FONT_HERSHEY_SIMPLEX, 0.5, (0, 0, 0))

    # Write the frame with the detection boxes
    if (args.image):
        cv.imwrite(outputFile, frame.astype(np.uint8));
    else:
        vid_writer.write(frame.astype(np.uint8))

    cv.imshow(winName, frame)
C++
    // Process frames.
    while (waitKey(1) < 0)
    {
        // get frame from the video
        cap >> frame;

        // Stop the program if reached end of video
        if (frame.empty()) {
            cout << "Done processing !!!" << endl;
            cout << "Output file is stored as " << outputFile << endl;
            waitKey(3000);
            break;
        }
        // Create a 4D blob from a frame.
         blobFromImage(frame, blob, 1.0, Size(frame.cols, frame.rows), Scalar(), true, false);

        //Sets the input to the network
        net.setInput(blob);

        // Runs the forward pass to get output from the output layers
        std::vector<String> outNames(2);
        outNames[0] = "detection_out_final";
        outNames[1] = "detection_masks";
        vector<Mat> outs;
        net.forward(outs, outNames);

        // Extract the bounding box and mask for each of the detected objects
        postprocess(frame, outs);

        // Put efficiency information. The function getPerfProfile returns the overall time for inference(t) and the timings for each of the layers(in layersTimes)
        vector<double> layersTimes;
        double freq = getTickFrequency() / 1000;
        double t = net.getPerfProfile(layersTimes) / freq;
        string label = format("Mask-RCNN : Inference time for a frame : %.2f ms", t);
        putText(frame, label, Point(0, 15), FONT_HERSHEY_SIMPLEX, 0.5, Scalar(0, 0, 0));

        // Write the frame with the detection boxes
        Mat detectedFrame;
        frame.convertTo(detectedFrame, CV_8U);
        if (parser.has("image")) imwrite(outputFile, detectedFrame);
        else video.write(detectedFrame);

        imshow(kWinName, frame);
    }
Now lets go into details of some of the postprocess function call used above.
Step 4a : Post-processing the network’s output
The network’s output masks object is a 4-dimensional object, where the first dimension represents the number of detected boxes in the frame, the second dimension represents the number of classes in the model and the third and fourth dimensions represent the mask shape(15×15) in our example.
If the confidence of a box is less than the given threshold, the bounding box is dropped and not considered for further processing.
Python
# For each frame, extract the bounding box and mask for each detected object
def postprocess(boxes, masks):
    # Output size of masks is NxCxHxW where
    # N - number of detected boxes
    # C - number of classes (excluding background)
    # HxW - segmentation shape
    numClasses = masks.shape[1]
    numDetections = boxes.shape[2]

    frameH = frame.shape[0]
    frameW = frame.shape[1]

    for i in range(numDetections):
        box = boxes[0, 0, i]
        mask = masks[i]
        score = box[2]
        if score > confThreshold:
            classId = int(box[1])

            # Extract the bounding box
            left = int(frameW * box[3])
            top = int(frameH * box[4])
            right = int(frameW * box[5])
            bottom = int(frameH * box[6])

            left = max(0, min(left, frameW - 1))
            top = max(0, min(top, frameH - 1))
            right = max(0, min(right, frameW - 1))
            bottom = max(0, min(bottom, frameH - 1))

            # Extract the mask for the object
            classMask = mask[classId]

            # Draw bounding box, colorize and show the mask on the image
            drawBox(frame, classId, score, left, top, right, bottom, classMask)
C++
// For each frame, extract the bounding box and mask for each detected object
void postprocess(Mat& frame, const vector<Mat>& outs)
{
    Mat outDetections = outs[0];
    Mat outMasks = outs[1];

    // Output size of masks is NxCxHxW where
    // N - number of detected boxes
    // C - number of classes (excluding background)
    // HxW - segmentation shape
    const int numDetections = outDetections.size[2];
    const int numClasses = outMasks.size[1];

    outDetections = outDetections.reshape(1, outDetections.total() / 7);
    for (int i = 0; i < numDetections; ++i)
    {
        float score = outDetections.at<float>(i, 2);
        if (score > confThreshold)
        {
            // Extract the bounding box
            int classId = static_cast<int>(outDetections.at<float>(i, 1));
            int left = static_cast<int>(frame.cols * outDetections.at<float>(i, 3));
            int top = static_cast<int>(frame.rows * outDetections.at<float>(i, 4));
            int right = static_cast<int>(frame.cols * outDetections.at<float>(i, 5));
            int bottom = static_cast<int>(frame.rows * outDetections.at<float>(i, 6));

            left = max(0, min(left, frame.cols - 1));
            top = max(0, min(top, frame.rows - 1));
            right = max(0, min(right, frame.cols - 1));
            bottom = max(0, min(bottom, frame.rows - 1));
            Rect box = Rect(left, top, right - left + 1, bottom - top + 1);

            // Extract the mask for the object
            Mat objectMask(outMasks.size[2], outMasks.size[3],CV_32F, outMasks.ptr<float>(i,classId));

            // Draw bounding box, colorize and show the mask on the image
            drawBox(frame, classId, score, box, objectMask);

        }
    }
}
Step 4c : Draw the predicted boxes
Finally, we draw the boxes that were filtered through the post-processing step, on the input frame with their assigned class label and confidence scores. We also overlay the colored masks along with their contours inside the boxes. In this code, we used the same color for all the objects belonging to the same class, but you could color the different instances differently too.
Python
# Draw the predicted bounding box, colorize and show the mask on the image
def drawBox(frame, classId, conf, left, top, right, bottom, classMask):
    # Draw a bounding box.
    cv.rectangle(frame, (left, top), (right, bottom), (255, 178, 50), 3)

    # Print a label of class.
    label = '%.2f' % conf
    if classes:
        assert(classId < len(classes))
        label = '%s:%s' % (classes[classId], label)

    # Display the label at the top of the bounding box
    labelSize, baseLine = cv.getTextSize(label, cv.FONT_HERSHEY_SIMPLEX, 0.5, 1)
    top = max(top, labelSize[1])
    cv.rectangle(frame, (left, top - round(1.5*labelSize[1])), (left + round(1.5*labelSize[0]), top + baseLine), (255, 255, 255), cv.FILLED)
    cv.putText(frame, label, (left, top), cv.FONT_HERSHEY_SIMPLEX, 0.75, (0,0,0), 1)

    # Resize the mask, threshold, color and apply it on the image
    classMask = cv.resize(classMask, (right - left + 1, bottom - top + 1))
    mask = (classMask > maskThreshold)
    roi = frame[top:bottom+1, left:right+1][mask]

    color = colors[classId%len(colors)]
    # Comment the above line and uncomment the two lines below to generate different instance colors
    #colorIndex = random.randint(0, len(colors)-1)
    #color = colors[colorIndex]

    frame[top:bottom+1, left:right+1][mask] = ([0.3*color[0], 0.3*color[1], 0.3*color[2]] + 0.7 * roi).astype(np.uint8)

    # Draw the contours on the image
    mask = mask.astype(np.uint8)
    im2, contours, hierarchy = cv.findContours(mask,cv.RETR_TREE,cv.CHAIN_APPROX_SIMPLE)
    cv.drawContours(frame[top:bottom+1, left:right+1], contours, -1, color, 3, cv.LINE_8, hierarchy, 100)
C++
// Draw the predicted bounding box, colorize and show the mask on the image
void drawBox(Mat& frame, int classId, float conf, Rect box, Mat& objectMask)
{
    //Draw a rectangle displaying the bounding box
    rectangle(frame, Point(box.x, box.y), Point(box.x+box.width, box.y+box.height), Scalar(255, 178, 50), 3);

    //Get the label for the class name and its confidence
    string label = format("%.2f", conf);
    if (!classes.empty())
    {
        CV_Assert(classId < (int)classes.size());
        label = classes[classId] + ":" + label;
    }

    //Display the label at the top of the bounding box
    int baseLine;
    Size labelSize = getTextSize(label, FONT_HERSHEY_SIMPLEX, 0.5, 1, &baseLine);
    box.y = max(box.y, labelSize.height);
    rectangle(frame, Point(box.x, box.y - round(1.5*labelSize.height)), Point(box.x + round(1.5*labelSize.width), box.y + baseLine), Scalar(255, 255, 255), FILLED);
    putText(frame, label, Point(box.x, box.y), FONT_HERSHEY_SIMPLEX, 0.75, Scalar(0,0,0),1);

    Scalar color = colors[classId%colors.size()];
    // Comment the above line and uncomment the two lines below to generate different instance colors
    //int colorInd = rand() % colors.size();
    //Scalar color = colors[colorInd];

    // Resize the mask, threshold, color and apply it on the image
    resize(objectMask, objectMask, Size(box.width, box.height));
    Mat mask = (objectMask > maskThreshold);
    Mat coloredRoi = (0.3 * color + 0.7 * frame(box));
    coloredRoi.convertTo(coloredRoi, CV_8UC3);

    // Draw the contours on the image
    vector<Mat> contours;
    Mat hierarchy;
    mask.convertTo(mask, CV_8U);
    findContours(mask, contours, hierarchy, RETR_CCOMP, CHAIN_APPROX_SIMPLE);
    drawContours(coloredRoi, contours, -1, color, 5, LINE_8, hierarchy, 100);
    coloredRoi.copyTo(frame(box), mask);
}
References:
Mask R-CNN
Faster R-CNN
Fast R-CNN
R-CNN
We used the images and video clips from the following sources:
Pixabay: [1], [4],
Pexels: [1], [2], [3]