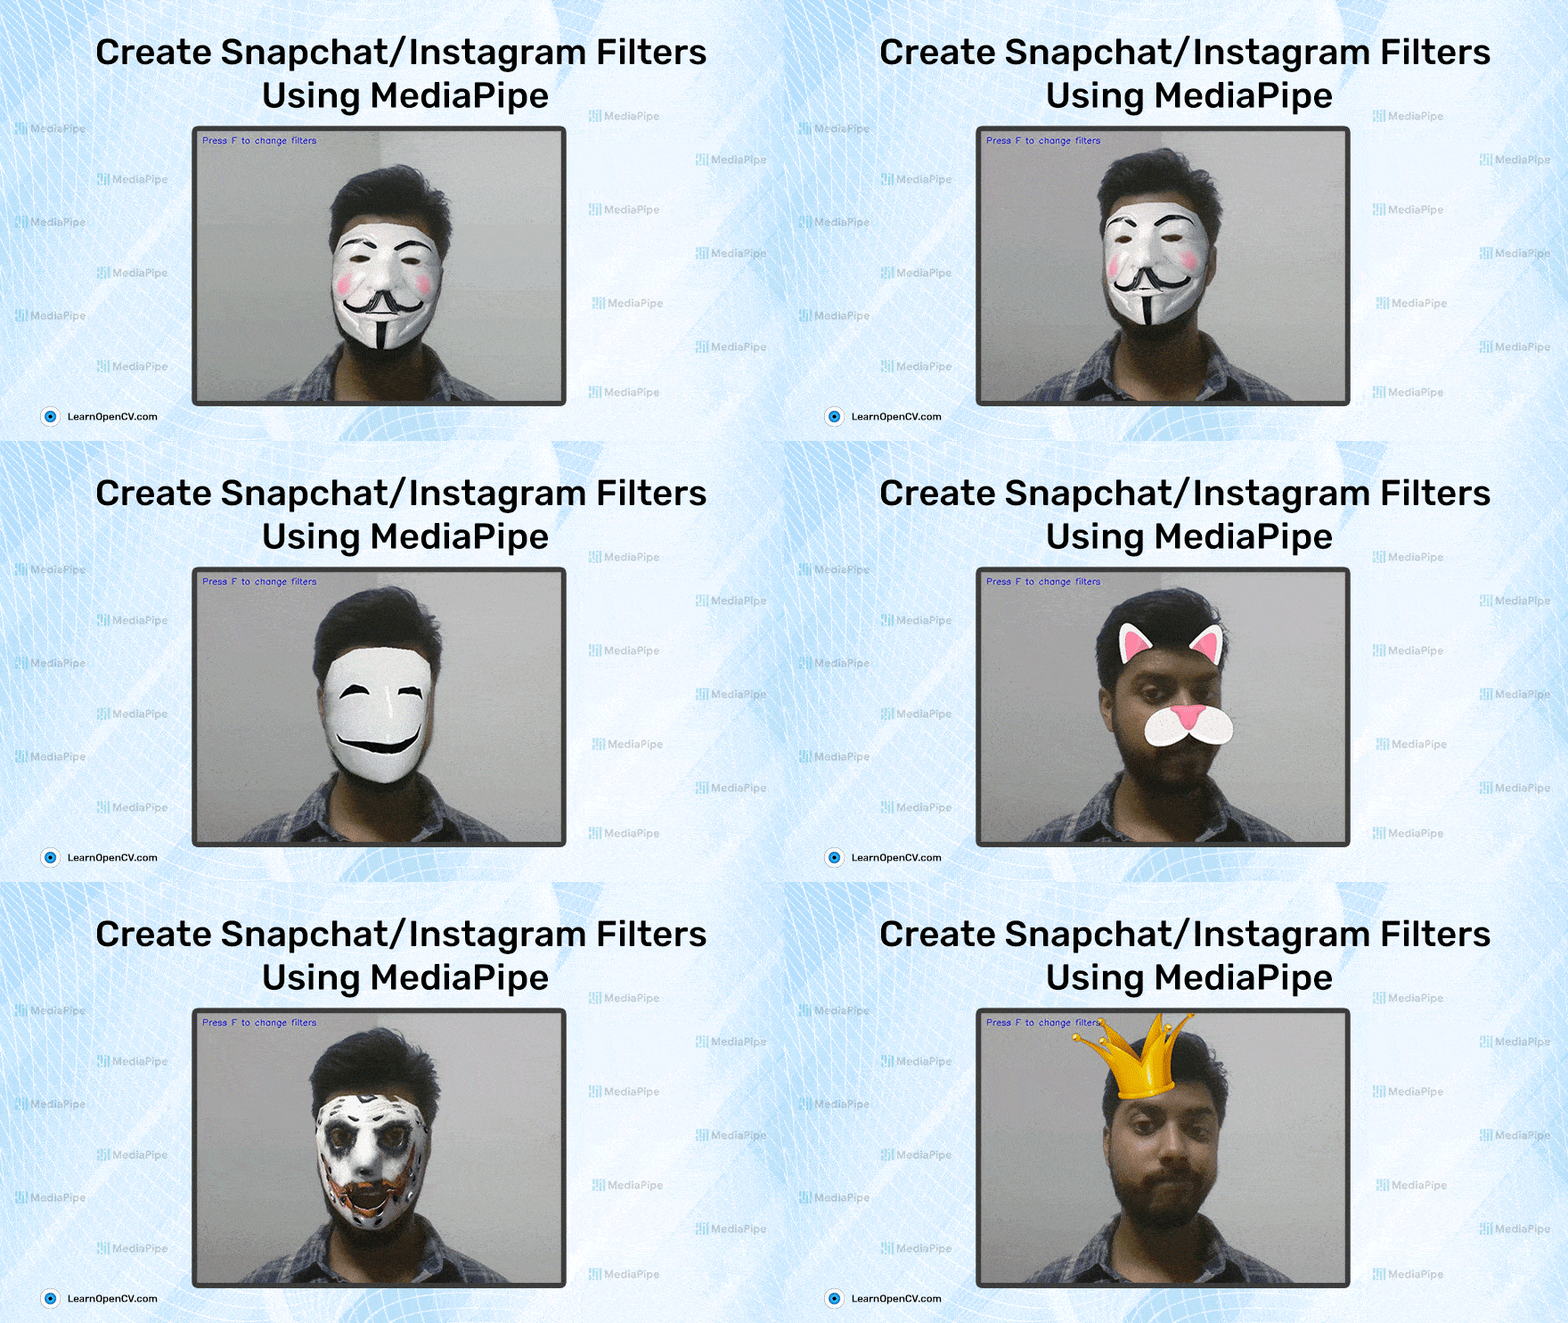
- Introduction
- Augmented Reality
- How AR filters work
- MediaPipe
- Implementation
- Final results
- Conclusion
Introduction
Why invest in make-up or trendy clothes and eyewear when Snapchat and Instagram provide filters that can make you look as wild, exotic, or beautiful as you wish, that too in a matter of seconds.
Maybe you would want just to goof around and turn into a witch or Santa, or perhaps your favorite fictional character just by adding a filter onto your face. There are hundreds of such filters, all powered by Augmented Reality (AR).
In this post, we will learn how these Augmented Reality Filters work and how we can create our own filters using a framework called Mediapipe!
Augmented Reality
Augmented Reality (AR) is an interactive experience of a real-world environment where computer-generated digital objects can reside. It is a combination of the real-world and virtual world, whereas Virtual Reality (VR) completely replaces the real environment with a virtual one.
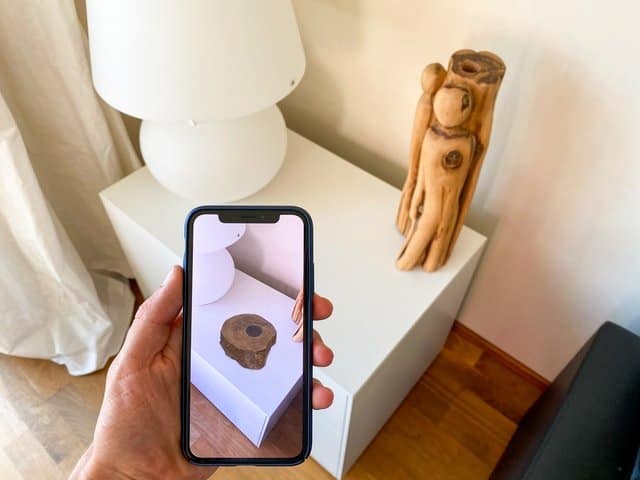
Thanks to the advancements in AI, you can build these seemingly magical Augmented Reality filters and run them on the most modest of hardware.
Augmented Reality has a lot of applications in different domains, such as
- Gaming: We have all heard about PokemonGo. This game allows you to catch and collect virtual cartoon characters.
- Retail: Imagine how seamless would be the shopping experience if you could try on clothes with a click of a button.
- Marketing: Companies can create new experiences to attract the eyes of consumers.
- Education: New interactive AR experiences can be designed to aid the learning process.
If you have heard of Metaverse, you know that Facebook is investing heavily in AR. Apple, too came out with Animojis. But by far, the most popular application of AR camera filters on social media apps like Instagram and Snapchat.
Let’s have a closer look at how they work.
How AR filters work
Although it doesn’t seem like it, there are several technologies working together to produce a simple camera filter on your face. Let’s look at the different parts of the puzzle and how they work together.
- Face detection:
First and foremost, your face is detected in the camera frame. In the past, this was achieved using crude detection methods such as the Viola-Jones algorithm, Histogram of Oriented Gradients ( HOG ), etc. In the present age, with advances in machine learning and mobile hardware getting more and more powerful, it is possible to get good face detection with a significantly modest computational load. - Feature key points detection:
Once the face is detected, the next step is to identify the key points of your facial features. A Facial Landmark predictor is used for this, which aligns the predefined set of feature points to your face. - Applying filter: Finally, the detected key points mesh can be morphed, or a filter can be applied on top of it to change the appearance of the face.
Now that we understand how it works. Let’s implement a couple of face filters using MediaPipe.
MediaPipe

Source: https://mediapipe.dev/assets/img/brand.svg
MediaPipe is an open-source, cross-platform Machine Learning framework developed by Google researchers. It provides customizable ML solutions.
Although the Mediapipe project is still in the Alpha stage, its solutions have already been deployed in many everyday applications that we use. Google’s ‘Motion Stills’ and YouTube’s ‘Privacy Blur’ feature are examples.
Why MediaPipe?
On top of lightweight and blazingly fast performance, MediaPipe supports cross-platform compatibility. The idea is to build an ML model once and deploy it on different platforms and devices with reproducible results.
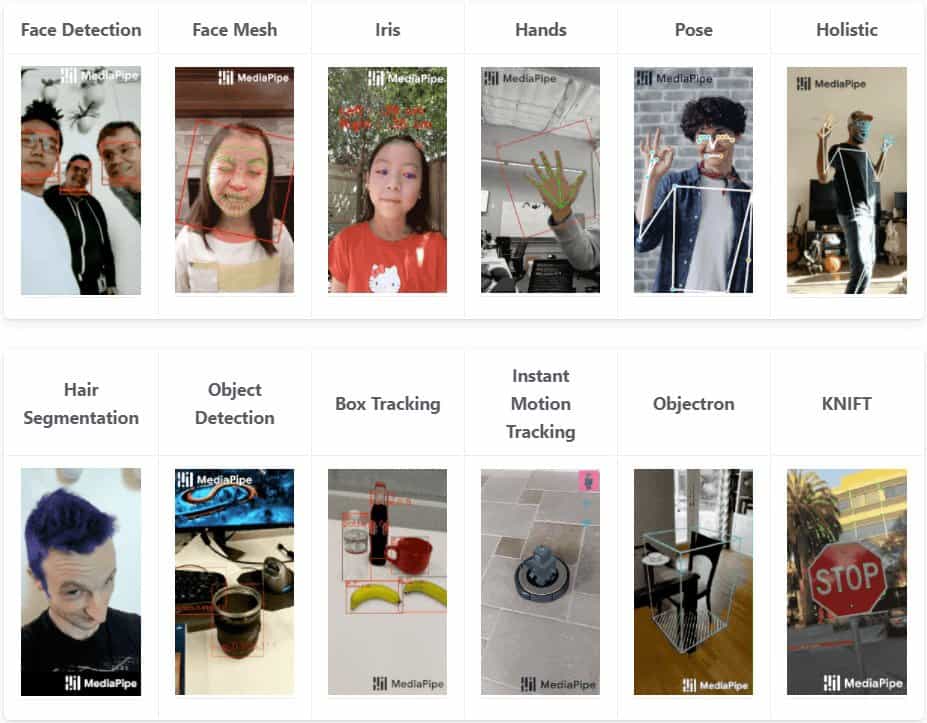
Source: https://google.github.io/mediapipe/
It supports Python, C, Javascript, Android, and IOS platforms and features like Face Detection, Face Mesh, Facial Landmark Detection, Person Segmentation, Object Detection, Human Pose estimation, etc. Can one ask for more?
Here, we shall focus on Face Mesh.
Overview of MediaPipe Face Mesh
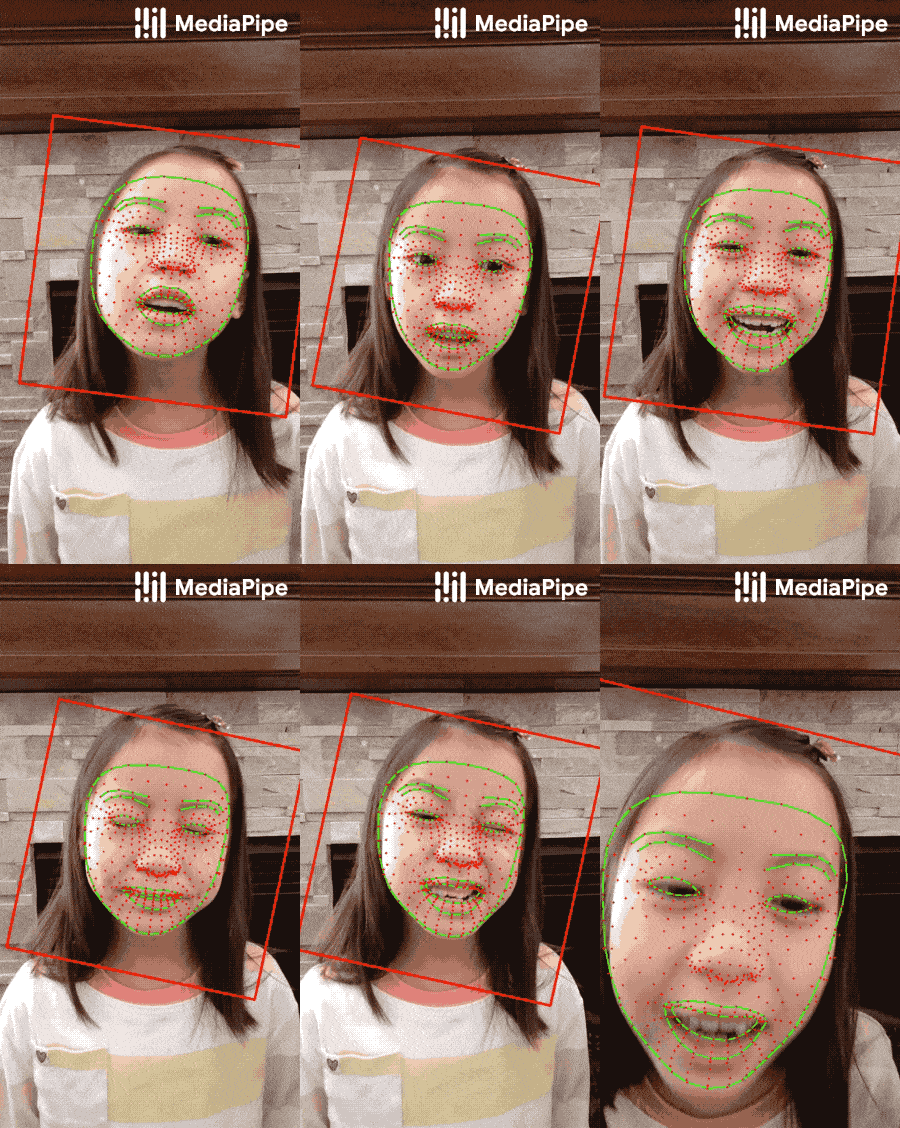
Source: https://google.github.io/mediapipe/solutions/face_mesh.html
MediaPipe Face Mesh provides a whopping 468 3D-face landmarks in real-time, even on mobile devices. Both IOS and Android are supported, so you can build those mobile apps with them and give Snapchat a run for its money. In this blog post, we will use Python with MediaPipe, and OpenCV to implement AR Filters.
Like any Facial-Landmark model, Mediapipe starts with Face Detection and detects landmarks on the detected face. For Face Detection, it uses BlazeFast, which, as the name suggests, is extremely fast and lightweight, and optimized for mobile GPU inference. The Face Detection outputs a cropped region from the video frame. We then run the 3D-Landmark model on the cropped area.
Implementation
Prerequisites
- Python environment
- Python modules:
- OpenCV
- numpy
Installing MediaPipe
Use the following pip command to install the MediaPipe Python package.
pip install mediapipe
Pipeline Overview
Before getting into the nitty-gritty of things, let’s discuss our pipeline for implementing AR filters using Mediapipe and OpenCV:
- Detect 468 Facial Landmarks using Mediapipe Face Mesh.
- Select the relevant landmarks because we do not need 468 landmarks.
- Annotate the filters with the selected landmarks.
- Load annotations.
- Detect landmark points of the face.
- Stabilize the landmark points.
- Transform the Filter on the face using the landmarks.
Now that you have an overview of the pipeline let’s check the details.
Landmark points from Face Mesh
We start by importing MediaPipe. Next, we create an instance of Face Mesh with two configurable parameters for detection and tracking landmarks.
min_detection_confidence=0.5
min_tracking_confidence=0.5
Finally, we pass in an input image and receive a list of face objects.
import cv2
import numpy as np
import mediapipe as mp

# Configuration Face Mesh.
mp_face_mesh = mp.solutions.face_mesh
face_mesh =  mp_face_mesh.FaceMesh(min_detection_confidence=0.5, min_tracking_confidence=0.5)

img = cv2.imread('filters/face.jpg', cv2.IMREAD_UNCHANGED)
image = cv2.cvtColor(cv2.flip(img, 1), cv2.COLOR_BGR2RGB)
# To improve performance.
image.flags.writeable = False
results =  face_mesh.process(image)
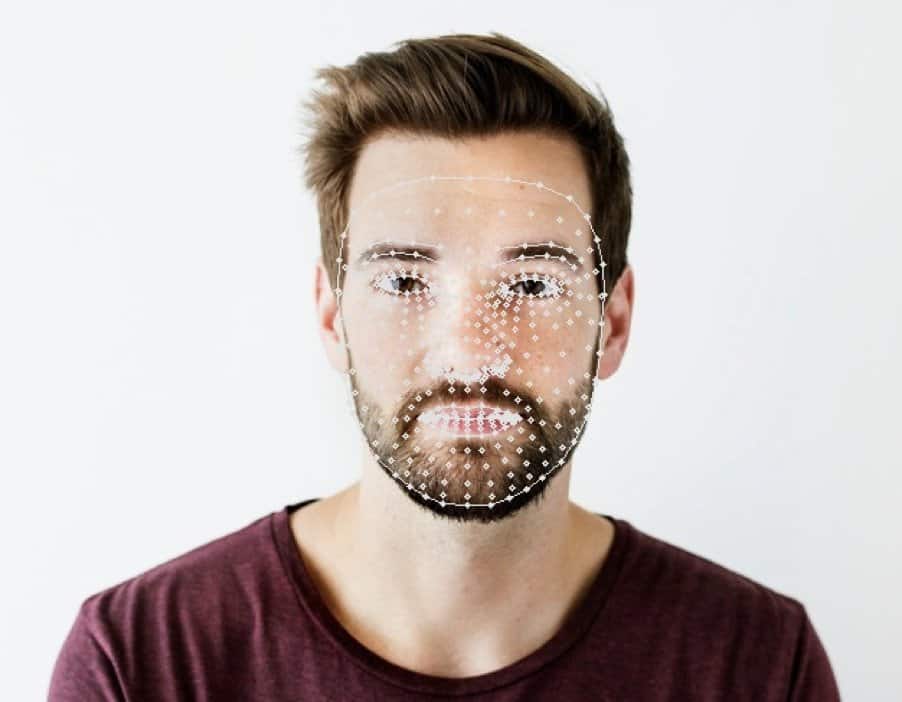
Every face in the list contains 468 landmark points.
Note: The coordinates for the landmark points are normalized to lie between 0 and 1. Before using them, we need to multiply the x and y coordinates with the image’s width and height, respectively. The following code can get you any landmark from the detected ones.
(results.multi_face_landmarks[0].landmark[205].x * image.shape[1], results.multi_face_landmarks[0].landmark[205].y * image.shape[0])
The above code snippet gives us the x and y coordinates of the 205th landmark point of the first face detected in the image. Find the order of the landmark points here.
Selecting relevant Landmarks points
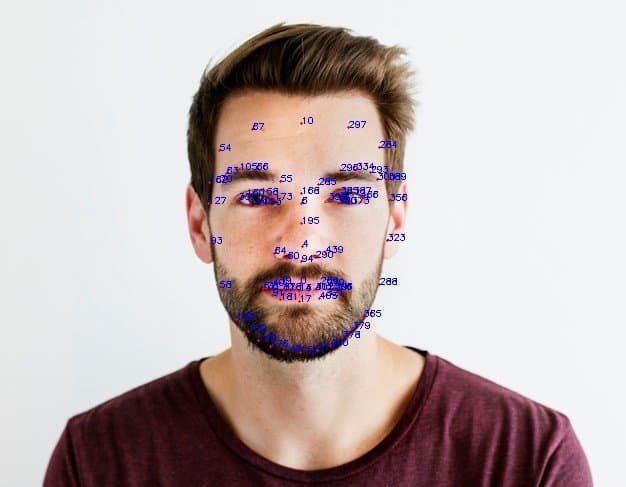
For our application, we have selected the points of the key features of the face, i.e., Eyes, Nose, Lips, Eyebrows, and jawline. These are 75 landmark points similar to those provided by Dlib 68 points face landmark detector with a few points for the forehead added in.
Getting the Filters
Now that you have the coordinates for the landmarks, we will use them to overlay the face with filters. The filters are simply PNG image with transparency.
Here’s a selection of filters:
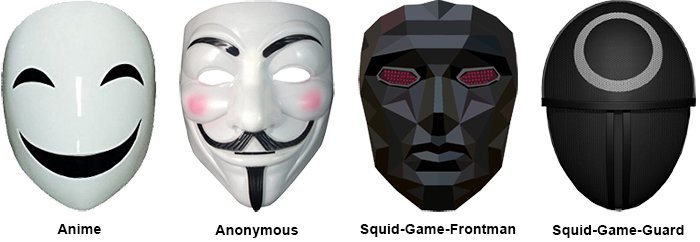
The above filters will cover the entire face.
Annotating filters with points
For annotating the face filter with the selected points, we use a simple annotation tool called Makesense which can run on the browser.
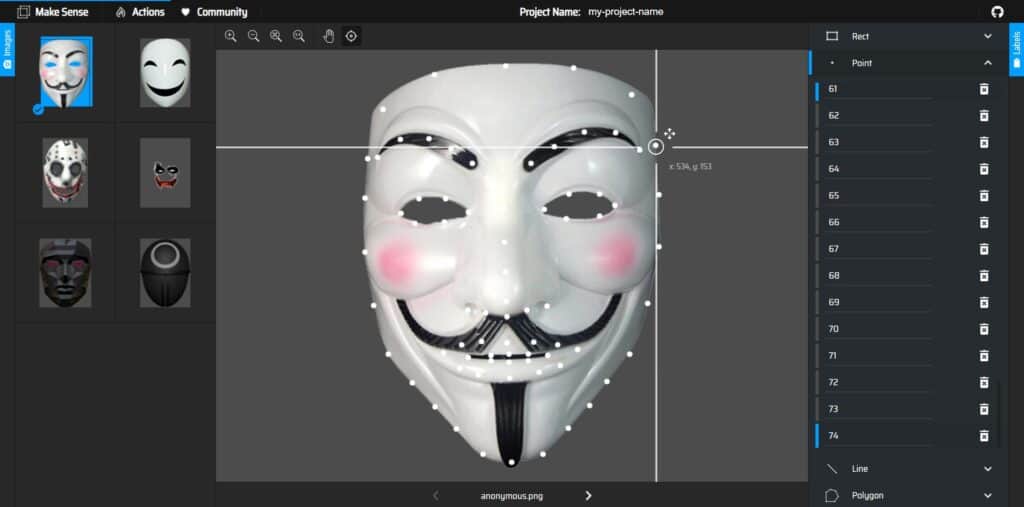
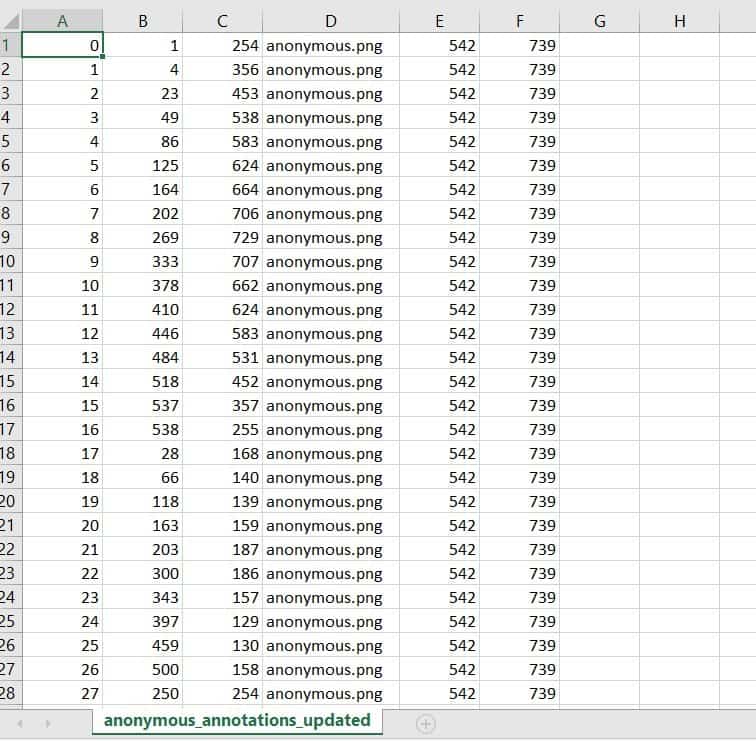
Need to take care of the order of the points. Below are the labels for the points we will be using.

Once all the required points are annotated, the annotations can be exported, and we will have a CSV file containing the coordinates of all the points.
Code overview
Import the required modules
We will be using a faceBlendCommon.py file that contains some function definitions for ‘Delaunay triangulation’ and ‘triangle warping’. We’ll see what they mean when we call them in the code.
import mediapipe as mp
import cv2
import math
import numpy as np
import faceBlendCommon as fbc
import csv
Define paths for filter image and annotations file
VISUALIZE_FACE_POINTS = False

filters_config = {
    'anonymous':
        [{'path': "filters/anonymous.png",
         'anno_path': "filters/anonymous_annotations.csv",
         'morph': True, 'animated': False, 'has_alpha': True}],
    'anime':
        [{'path': "filters/anime.png",
         'anno_path': "filters/anime_annotations.csv",
         'morph': True, 'animated': False, 'has_alpha': True}],
    'dog':
        [{'path': "filters/dog-ears.png",
         'anno_path': "filters/dog-ears_annotations.csv",
         'morph': False, 'animated': False, 'has_alpha': True},
         {'path': "filters/dog-nose.png",
          'anno_path': "filters/dog-nose_annotations.csv",
          'morph': False, 'animated': False, 'has_alpha': True}],
    'cat':
        [{'path': "filters/cat-ears.png",
         'anno_path': "filters/cat-ears_annotations.csv",
         'morph': False, 'animated': False, 'has_alpha': True},
         {'path': "filters/cat-nose.png",
          'anno_path': "filters/cat-nose_annotations.csv",
          'morph': False, 'animated': False, 'has_alpha': True}],
}
Define a function to get landmarks from medipipe
def getLandmarks(img):
    mp_face_mesh = mp.solutions.face_mesh
    selected_keypoint_indices = [127, 93, 58, 136, 150, 149, 176, 148, 152, 377, 400, 378, 379, 365, 288, 323, 356, 70, 63, 105, 66, 55,
                 285, 296, 334, 293, 300, 168, 6, 195, 4, 64, 60, 94, 290, 439, 33, 160, 158, 173, 153, 144, 398, 385,
                 387, 466, 373, 380, 61, 40, 39, 0, 269, 270, 291, 321, 405, 17, 181, 91, 78, 81, 13, 311, 306, 402, 14,
                 178, 162, 54, 67, 10, 297, 284, 389]

    height, width = img.shape[:-1]

    with mp_face_mesh.FaceMesh(max_num_faces=1, static_image_mode=True, min_detection_confidence=0.5) as face_mesh:

        results = face_mesh.process(cv2.cvtColor(img, cv2.COLOR_BGR2RGB))

        if not results.multi_face_landmarks:
            print('Face not detected!!!')
            return 0

        for face_landmarks in results.multi_face_landmarks:
            values = np.array(face_landmarks.landmark)
            face_keypnts = np.zeros((len(values), 2))

            for idx,value in enumerate(values):
                face_keypnts[idx][0] = value.x
                face_keypnts[idx][1] = value.y

            # Convert normalized points to image coordinates
            face_keypnts = face_keypnts * (width, height)
            face_keypnts = face_keypnts.astype('int')

            relevant_keypnts = []

            for i in selected_keypoint_indices:
                relevant_keypnts.append(face_keypnts[i])
            return relevant_keypnts
    return 0
Function to load filter image
Get alpha channel from filter image for later use and convert image to BGR
def load_filter(img_path, has_alpha):
    # Read the image
    img = cv2.imread(img_path, cv2.IMREAD_UNCHANGED)

    alpha = None
    if has_alpha:
        b, g, r, alpha = cv2.split(img)
        img = cv2.merge((b, g, r))

    return img, alpha
Load landmark points from the annotations file
def load_landmarks(annotation_file):
    with open(annotation_file) as csv_file:
        csv_reader = csv.reader(csv_file, delimiter=",")
        points = {}
        for i, row in enumerate(csv_reader):
            # skip head or empty line if it's there
            try:
                x, y = int(row[1]), int(row[2])
                points[row[0]] = (x, y)
            except ValueError:
                continue
        return points
Find a convex hull for Delaunay triangulation using the landmark points.
Then, to the array of convex hull points, we add the points for the facial features lying inside the hull i.e., Lips, Eyes and Nose. We add these points so that the filter fits better and it can be morphed as we change the expressions on our faces.
def find_convex_hull(points):
    hull = []
    hullIndex = cv2.convexHull(np.array(list(points.values())), clockwise=False, returnPoints=False)
    addPoints = [
        [48], [49], [50], [51], [52], [53], [54], [55], [56], [57], [58], [59],  # Outer lips
        [60], [61], [62], [63], [64], [65], [66], [67],  # Inner lips
        [27], [28], [29], [30], [31], [32], [33], [34], [35],  # Nose
        [36], [37], [38], [39], [40], [41], [42], [43], [44], [45], [46], [47],  # Eyes
        [17], [18], [19], [20], [21], [22], [23], [24], [25], [26]  # Eyebrows
    ]
    hullIndex = np.concatenate((hullIndex, addPoints))
    for i in range(0, len(hullIndex)):
        hull.append(points[str(hullIndex[i][0])])

    return hull, hullIndex
The function to load a filter and apply denaulay Triangulation is the filter needs to be warped onto the face
def load_filter(filter_name="dog"):

    filters = filters_config[filter_name]

    multi_filter_runtime = []

    for filter in filters:
        temp_dict = {}

        img1, img1_alpha = load_filter_img(filter['path'], filter['has_alpha'])

        temp_dict['img'] = img1
        temp_dict['img_a'] = img1_alpha

        points = load_landmarks(filter['anno_path'])

        temp_dict['points'] = points

        if filter['morph']:
            # Find convex hull for delaunay triangulation using the landmark points
            hull, hullIndex = find_convex_hull(points)

            # Find Delaunay triangulation for convex hull points
            sizeImg1 = img1.shape
            rect = (0, 0, sizeImg1[1], sizeImg1[0])
            dt = fbc.calculateDelaunayTriangles(rect, hull)

            temp_dict['hull'] = hull
            temp_dict['hullIndex'] = hullIndex
            temp_dict['dt'] = dt

            if len(dt) == 0:
                continue

        if filter['animated']:
            filter_cap = cv2.VideoCapture(filter['path'])
            temp_dict['cap'] = filter_cap

        multi_filter_runtime.append(temp_dict)

    return filters, multi_filter_runtime
What is Delaunay Triangulation ?
Given a set of points in a plane, Triangulation refers to the subdivision of the plane into triangles, with the points as vertices. But Delaunay triangulation stands out because it has some nice properties. In a Delaunay triangulation, triangles are chosen such that no point is inside the circumcircle of any triangle.
In the following Figure, we see a set of landmarks in the left image and the triangulation in the right image. To know more about how Delaunay triangulation works, refer to this blog.
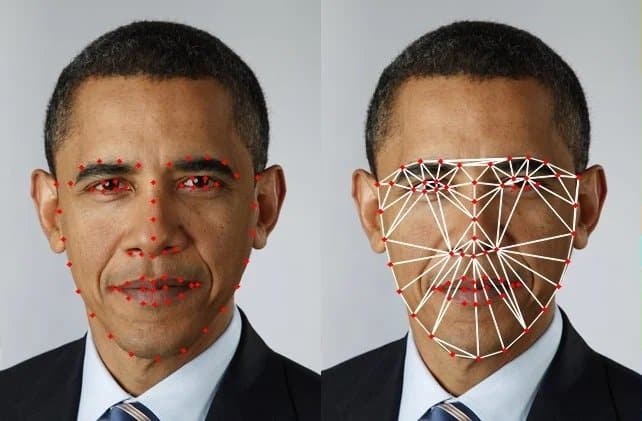
After we have the Delaunay triangulation for the filter, we can find the same triangulation for the face of the person.
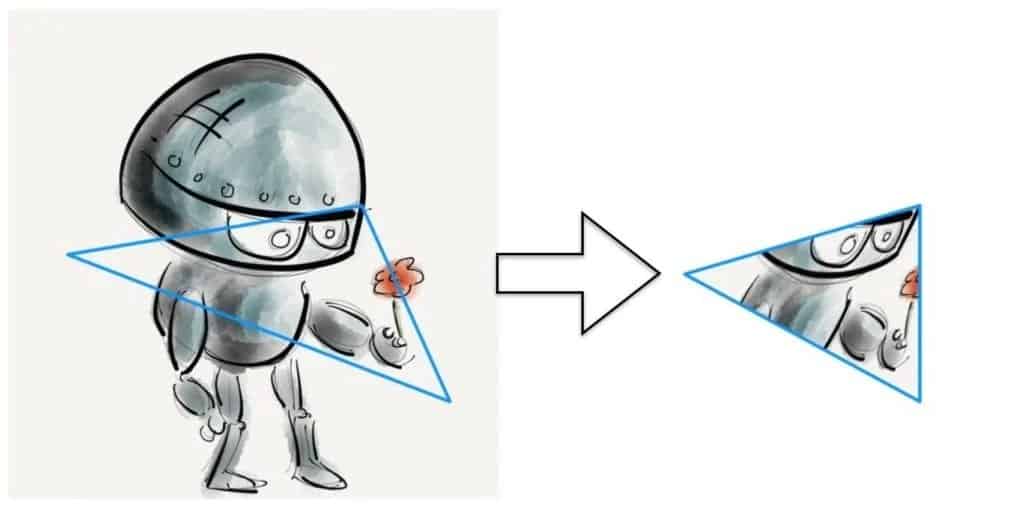
Once we have triangulations of both images, we can transform the triangles from one image(filter) to fit onto another image(person’s face). We achieve this by using the Affine transform that requires 3 points (aka a triangle) on the images to warp them onto each other. To know more about how Affine transform works, refer to this blog.
Create cap object to process input from a webcam or video file
# Process input from webcam or video file
cap = cv2.VideoCapture(0)

# Some variables we will need later
count = 0
isFirstFrame = True
sigma = 50

# Load an initial filter
iter_filter_keys = iter(filters_config.keys())
filters, multi_filter_runtime = load_filter(next(iter_filter_keys))
We also use Optical Flow to stabilize the points in each video frame.
What is Optical Flow?
The main idea of Optical Flow is to estimate the object’s displacement vector caused by its motion or camera movements. Using that, we can predict the location of landmarks in the next frame and stabilize them.

Main loop to apply the filter to frames of the video
# The main loop
while True:

    ret, frame = cap.read()
    if not ret:
        break
    else:

        points2 = getLandmarks(cv2.cvtColor(frame, cv2.COLOR_BGR2RGB))

        # if face is partially detected
        if not points2 or (len(points2) != 75):
            continue

        ################ Optical Flow and Stabilization Code #####################
        img2Gray = cv2.cvtColor(frame, cv2.COLOR_BGR2GRAY)

        if isFirstFrame:
            points2Prev = np.array(points2, np.float32)
            img2GrayPrev = np.copy(img2Gray)
            isFirstFrame = False

        lk_params = dict(winSize=(101, 101), maxLevel=15,
                         criteria=(cv2.TERM_CRITERIA_EPS | cv2.TERM_CRITERIA_COUNT, 20, 0.001))
        points2Next, st, err = cv2.calcOpticalFlowPyrLK(img2GrayPrev, img2Gray, points2Prev,
                                                        np.array(points2, np.float32),
                                                        **lk_params)

        # Final landmark points are a weighted average of detected landmarks and tracked landmarks

        for k in range(0, len(points2)):
            d = cv2.norm(np.array(points2[k]) - points2Next[k])
            alpha = math.exp(-d * d / sigma)
            points2[k] = (1 - alpha) * np.array(points2[k]) + alpha * points2Next[k]
            points2[k] = fbc.constrainPoint(points2[k], frame.shape[1], frame.shape[0])
            points2[k] = (int(points2[k][0]), int(points2[k][1]))

        # Update variables for next pass
        points2Prev = np.array(points2, np.float32)
        img2GrayPrev = img2Gray
        ################ End of Optical Flow and Stabilization Code ###############

        if VISUALIZE_FACE_POINTS:
            for idx, point in enumerate(points2):
                cv2.circle(frame, point, 2, (255, 0, 0), -1)
                cv2.putText(frame, str(idx), point, cv2.FONT_HERSHEY_SIMPLEX, .3, (255, 255, 255), 1)
            cv2.imshow("landmarks", frame)

        for idx, filter in enumerate(filters):

            filter_runtime = multi_filter_runtime[idx]
            img1 = filter_runtime['img']
            points1 = filter_runtime['points']
            img1_alpha = filter_runtime['img_a']

            if filter['morph']:

                hullIndex = filter_runtime['hullIndex']
                dt = filter_runtime['dt']
                hull1 = filter_runtime['hull']

                # create copy of frame
                warped_img = np.copy(frame)

                # Find convex hull
                hull2 = []
                for i in range(0, len(hullIndex)):
                    hull2.append(points2[hullIndex[i][0]])

                mask1 = np.zeros((warped_img.shape[0], warped_img.shape[1]), dtype=np.float32)
                mask1 = cv2.merge((mask1, mask1, mask1))
                img1_alpha_mask = cv2.merge((img1_alpha, img1_alpha, img1_alpha))

                # Warp the triangles
                for i in range(0, len(dt)):
                    t1 = []
                    t2 = []

                    for j in range(0, 3):
                        t1.append(hull1[dt[i][j]])
                        t2.append(hull2[dt[i][j]])

                    fbc.warpTriangle(img1, warped_img, t1, t2)
                    fbc.warpTriangle(img1_alpha_mask, mask1, t1, t2)

                # Blur the mask before blending
                mask1 = cv2.GaussianBlur(mask1, (3, 3), 10)

                mask2 = (255.0, 255.0, 255.0) - mask1

                # Perform alpha blending of the two images
                temp1 = np.multiply(warped_img, (mask1 * (1.0 / 255)))
                temp2 = np.multiply(frame, (mask2 * (1.0 / 255)))
                output = temp1 + temp2
            else:
                dst_points = [points2[int(list(points1.keys())[0])], points2[int(list(points1.keys())[1])]]
                tform = fbc.similarityTransform(list(points1.values()), dst_points)
                # Apply similarity transform to input image
                trans_img = cv2.warpAffine(img1, tform, (frame.shape[1], frame.shape[0]))
                trans_alpha = cv2.warpAffine(img1_alpha, tform, (frame.shape[1], frame.shape[0]))
                mask1 = cv2.merge((trans_alpha, trans_alpha, trans_alpha))

                # Blur the mask before blending
                mask1 = cv2.GaussianBlur(mask1, (3, 3), 10)

                mask2 = (255.0, 255.0, 255.0) - mask1

                # Perform alpha blending of the two images
                temp1 = np.multiply(trans_img, (mask1 * (1.0 / 255)))
                temp2 = np.multiply(frame, (mask2 * (1.0 / 255)))
                output = temp1 + temp2

            frame = output = np.uint8(output)

        cv2.putText(frame, "Press F to change filters", (10, 20), cv2.FONT_HERSHEY_SIMPLEX, .5, (255, 0, 0), 1)

        cv2.imshow("Face Filter", output)

        keypressed = cv2.waitKey(1) & 0xFF
        if keypressed == 27:
            break
        # Put next filter if 'f' is pressed
        elif keypressed == ord('f'):
            try:
                filters, multi_filter_runtime = load_filter(next(iter_filter_keys))
            except:
                iter_filter_keys = iter(filters_config.keys())
                filters, multi_filter_runtime = load_filter(next(iter_filter_keys))

        count += 1

cap.release()
cv2.destroyAllWindows()
Results
Check out the results of our code:
Conclusion
Limitations
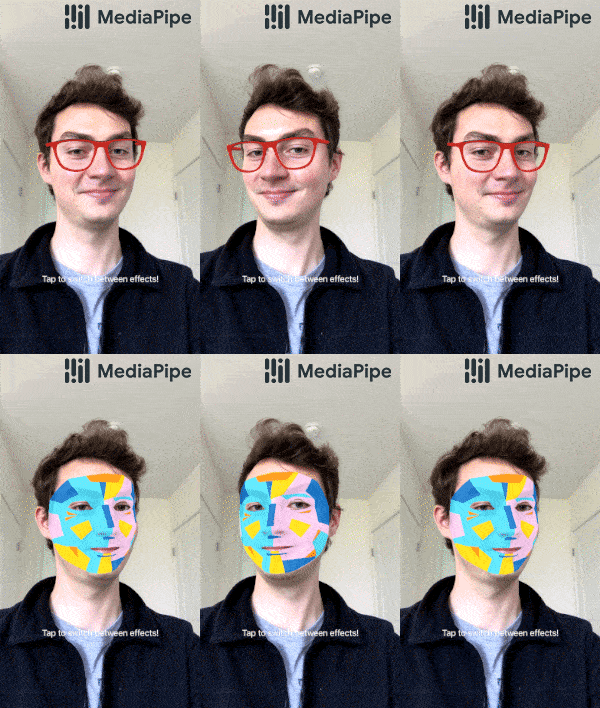
It is important to note that we are only working in 2 dimensions, i.e., the x-y plane. Although it gives the illusion of being 3d, our approach thus falls short when 3d object filters come into play, like sunglasses.
Source: https://google.github.io/mediapipe/solutions/face_mesh.html
Possibilities

Source: https://google.github.io/mediapipe/solutions/face_mesh.html
Don’t forget that the filters we have been using till now have all been two-dimensional images. Mediapipe provides a z-axis, which can be used to create a 3D filter with significant effect.
Just switch to 3D filters and see for yourself how realistic and exciting the results are. The possibilities are only limited by your imagination and creativity.
More on Mediapipe
| Hang on; the journey doesn’t end here. We have some more exciting blog posts for you to explore!!! 1. Building a Poor Body Posture Detection and Alert System using MediaPipe 2. Gesture Control in Zoom Call using Mediapipe 3. Center Stage for Zoom Calls using MediaPipe 4. Drowsy Driver Detection using Mediapipe 5. Comparing Yolov7 and Mediapipe Pose Estimation models Never Stop Learning!!! |
References
- https://google.github.io/mediapipe/solutions/face_mesh.html
- https://arxiv.org/abs/1907.05047
- https://arxiv.org/abs/1907.06724


100K+ Learners
Join Free OpenCV Bootcamp3 Hours of Learning