Automatic Speech Recognition (ASR) is a complex domain within AI, serving as a primary medium that echoes the seamless Human-Machine Interactions depicted in films like Ironman (Jarvis) and HER (Samantha).
Have you ever felt like having a conversation with our gadgets was straight out of a sci-fi movie? This isn’t just about cool tech from sci-fi movies anymore; it’s about real tools that you can use right now to make interacting with machines simpler and more intuitive, like GPT-4o or Gemini screen share.

We’ll explore the best open-source model, OpenAI Whisper, and compare it to some of the leading proprietary speech-to-text services. Additionally, using the Nvidia NeMo toolkit, we’ll show you how to identify different speakers in a conversation, an essential feature for tasks like customer service management and meeting transcriptions. Whether you’re a developer looking to integrate speech recognition into your applications or a business interested in automating and improving the efficiency of call auditing, this guide will provide you with a practical understanding and the tools needed to get started.
Throughout this article, Attention is All You Need.
Buckle up, fellow enthusiasts. This article marks the first iteration of our blog series on exploring the world of Speech modality. Looking for fine-tuning whisper on custom dataset? you may find useful in reading our recent article in this speech recognition series.
- Understanding Audio Signals
- Architecture Overview: Whisper
- OpenAI Whisper + Nemo Toolkit for ASR with Diarization Pipeline
- Code Walkthrough of Whisper with Nemo Toolkit
- Automatic Speech Recognition Pipeline
- Diarization Pipeline: Nvidia Nemo
- Results: Whisper v3 Large Output Transcription
- Comparison of Open Source Whisper v/s Commercial Speech2Text API Providers
- Key Takeaways
- Future Advancements
- References
Understanding Audio Signals
At its core, sound is a mechanical wave traveling through a medium (such as air) by causing pressure variations. So, while we record voice, microphones capture these sound waves created by the vibration of the vocal cord. These waves are continuous and analog by nature, but digital systems require discrete numerical values. So, the Analog-to-Digital Conversion (ADC) is done through Sampling.
Sampling:
- The sampling rate is the frequency at which the analog signal is sampled or measured per second, and its unit is hertz (Hz). Typically, the sampling rate determines how many times per second the audio is captured. For example, CD-quality audio has a sampling rate of 44,100 Hz, i.e., the audio is sampled 44,100 times per second. Our audio sampling rate is guided by the Nyquist Theorem.
Usually, a sampling rate of 16 kHz is more than sufficient for human speech to capture all necessary details without the need to capture additional data.
Automatic Speech Recognition (ASR) Techniques
Classical Automatic Speech Recognition Techniques
Incorporating classical techniques like N-grams, Hidden Markov Models (HMMs), and Dynamic Time Warping (DTW) alongside these modern methods may add a layer of sophistication to our Automatic Speech Recognition systems.
LSTM and RNN
At the heart of modern ASR systems lie advanced deep neural networks. These intricate architectures include encoder-decoder structures that break down the audio data and then reconstruct it as text. The encoder is often a Recurrent Neural Network (RNN) with a Long Short-Term Memory.
Transformers with CNN
Transformers have revolutionized Automatic Speech Recognition by introducing self-attention mechanisms. Unlike RNNs, which process information sequentially, self-attention allows the model to evaluate the significance of different audio signal segments simultaneously. It’s like having multiple pairs of ears listening to the audio all at once! This parallel processing approach helps to capture contextual relationships across the entire speech more effectively.

To know more about how the self-attention mechanism in Transformers works, give a quick read.
Automatic Speech Recognition Applications
- Call centers use Automatic Speech Recognition to automatically transcribe agent calls, providing a text transcript for quality auditing and compliance purposes.
- Video conferencing platforms like Zoom, G-meet, and Microsoft Teams internally provide Automatic Speech Recognition features to generate meeting transcripts, complete with summaries and timestamps, allowing users to review and search through the conversation easily.
- ASR can also generate subtitles for media content, such as movies, TV shows, and YouTube videos, making it more accessible to a wider audience.
- In the field of robotics and the Internet of Things (IoT), Automatic Speech Recognition enables voice control capabilities, allowing users to issue voice commands to control and interact with robots and smart devices.
Thinking about a career in robotics? Bookmark our ultimate guide to robotics and read later.
Attention based ASR Models
Encoder-Only Transformer Models: Pioneering Speech Recognition
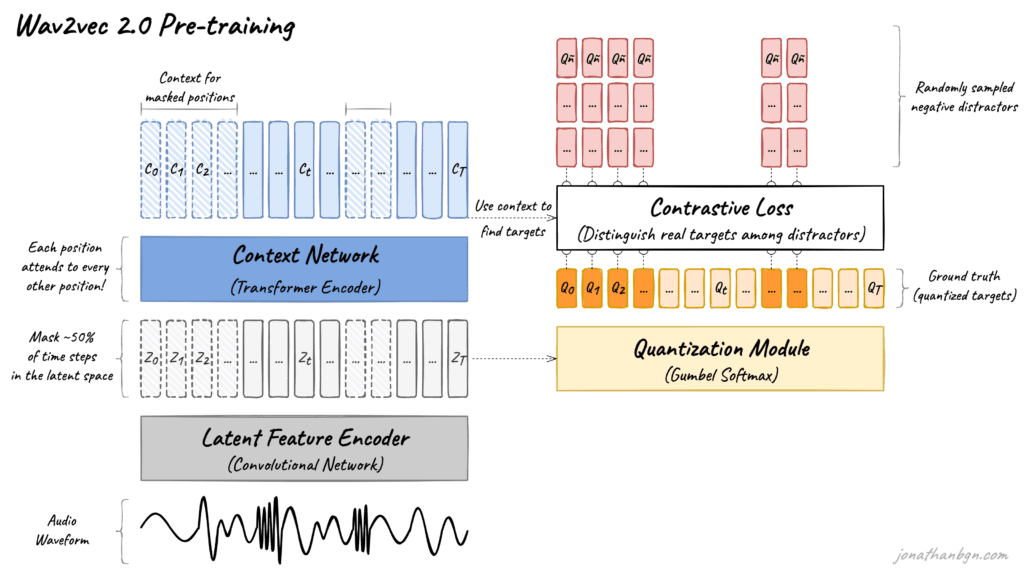
Before the advent of more complex architectures like Whisper, encoder-only transformer models like Wav2Vec2.0 were SOTA in the field of automatic speech recognition (ASR). These models, including the HuBERT and M-CTC-T architectures, focus on encoding audio input into robust feature representations without an accompanying decoder module.
Wav2Vec2.0 trained on 1,000,000 hours of unlabeled data, processes audio for speech recognition by segmenting raw audio into 20-millisecond clips with a partial overlap of 25 milliseconds between consecutive segments. This overlapping ensures comprehensive coverage of audio features but can initially lead to redundant outputs, such as
“hhheeelllllooo wwwwooorrrllddd” for the phrase “hello world.”
These segments are then transformed by a convolutional neural network into embeddings, which are analyzed by a transformer encoder. The apparent redundancy is efficiently managed by Connectionist Temporal Classification (CTC) loss, which refines these outputs by collapsing repeated characters and aligning the sequence to produce clear, concise transcriptions. CTC’s role is crucial as it eliminates the need for explicit alignment between audio and text, effectively decoding verbose sequences into accurate text.
Conformer: Bridging CNNs and Transformers
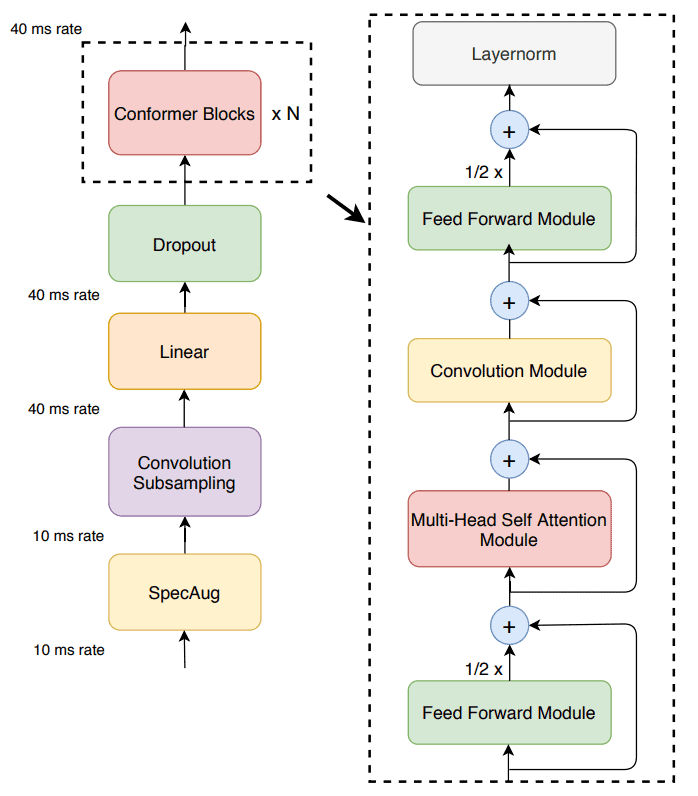
The Conformer paper published by Google Brain represents a significant evolution in speech recognition technology.
It combines the locality-sensitive features of Convolutional Neural Networks (CNNs) with Transformers’ long-range dependency modeling capabilities. This hybrid approach allows Conformers to capture both fine-grained acoustic details and global contextual information, making them exceptionally effective for complex speech recognition tasks. The architecture’s flexibility and power make it a preferred choice for commercial Automatic Speech Recognition solutions like Assembly AI’s Conformer 1, 2, and Nvidia Stt-Conformer, providing enhanced accuracy over purely Convolutional Neural Networks (CNN) or transformer-based models.
OpenAI Whisper: Seq2Seq for Automatic Speech Recognition
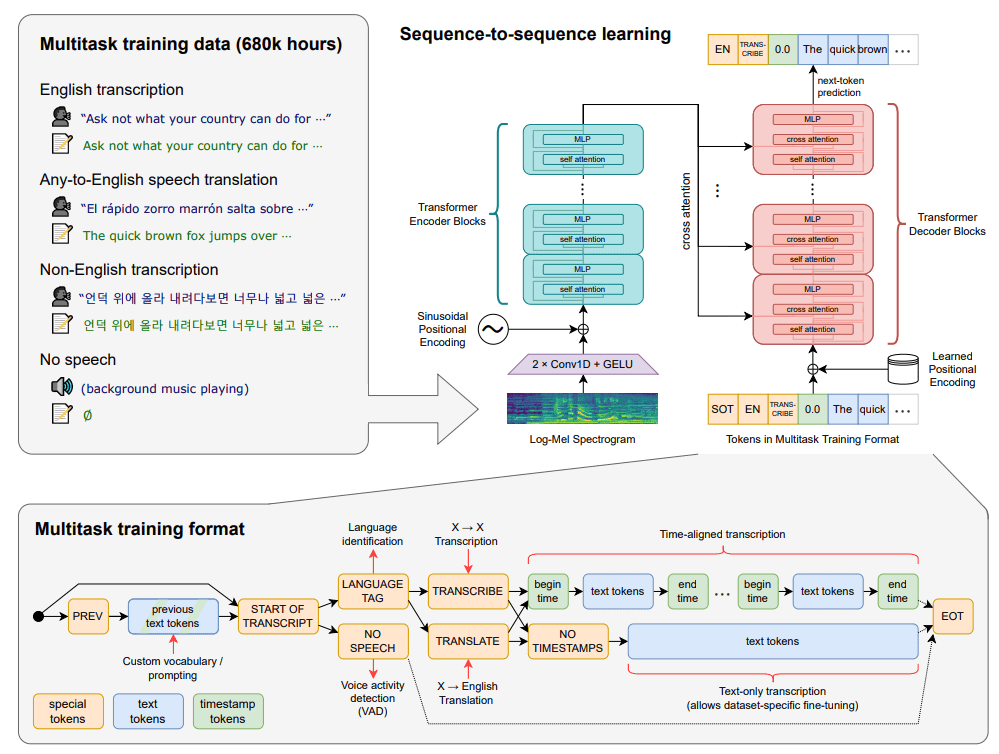
OpenAI’s Whisper model marks a pinnacle in applying seq2seq (sequence-to-sequence) models for ASR trained on 6,80,000 hours of weakly supervised data across 96 languages with Byte-pair gpt2 tokenizer. As whisper is trained on weakly supervised data, it is prone to hallucination.
In the Whisper model, audio inputs are:
i) Resampled to 16kHz
ii) Transformed into an 80-channel log-Mel spectrogram using:
- 25ms window
- 10ms stride
iii) Normalized by scaling features globally between -1 and 1 to ensure zero mean across the pre-training dataset.
Techniques like beam search, which explored multiple hypothesis sequences simultaneously, further improved transcription accuracy, thereby reducing the likelihood of errors in the final output.

Architecture Overview: Whisper
Whisper is a sequence-to-sequence (seq2seq) model utilizing a Transformer-based architecture that incorporates both an encoder and a decoder. The model is designed to handle various speech processing tasks, such as speech recognition, speech translation, and language identification, intent classification.
1. Encoder:
- Input Processing: Initially, an audio input is first converted into a log-Mel spectrogram, which is a time-frequency representation capturing the perceptual and acoustic characteristics of sound.
- Feature Extraction: This spectrogram is then passed through a small neural network ‘stem’ consisting of two convolutional layers with GELU activation to enhance local feature extraction.
- Positional Encoding: After the convolution layer, sinusoidal positional encodings are added to provide the model with information about the sequence order of the input features.
- Transformer Blocks: The processed features are fed into several Transformer encoder blocks. Here the self attention helps the model to understand the context within the audio sequence by allowing it to weigh the importance of different segments of the audio input.
2. Decoder:
- Learned Positional Encoding: The decoder uses learned positional encodings, which differ from the encoder’s sinusoidal version, which may help it adapt to the specific demands of the output sequence structure.
- Transformer Blocks: Similar to the encoder, the decoder consists of multiple Transformer blocks. However, these blocks also include cross-attention layers that attend to the encoder’s output. This structure enables the decoder to generate text output that corresponds to the processed audio input to the encoder.
- Multitask Learning: The decoder is capable of handling multiple tasks simultaneously by predicting a sequence of tokens that represent different aspects of the speech-processing task, such as the language, the content of the speech, or the presence of speech.
Whisper is trained on 30-second audio segments, aligning with the natural breaks in spoken content as much as possible. This segment length balances, between providing sufficient context for understanding longer utterances and maintaining manageable computational requirements.
Segmentation and Processing:
- Timestamps: For each 30-second audio segment, the model predicts text tokens and timestamps, which are crucial for aligning the text with specific audio parts.
- Buffered Strategy: In real-world applications where audio might be longer than 30 seconds, Whisper employs a buffered strategy for transcription. It processes consecutive 30-second windows of the longer audio stream and adjusts them based on the predicted timestamps to ensure continuity and coherence in the output transcription.
Performance on Long Audio:
While the model effectively handles 30-second chunks, a strategic approach is used to manage longer audio streams. This is done using a sophisticated decoding strategy to seamlessly overlap and stitch these chunks, thus enabling effective transcription of long-form audio without loss of context or coherence.
OpenAI’s Whisper does not natively support batching and can be inaccurate for several seconds. So, we will leverage WhisperX , which supports batched inference and offers real-time transcription.
WhisperX : Automatic Speech Recognition Pipeline
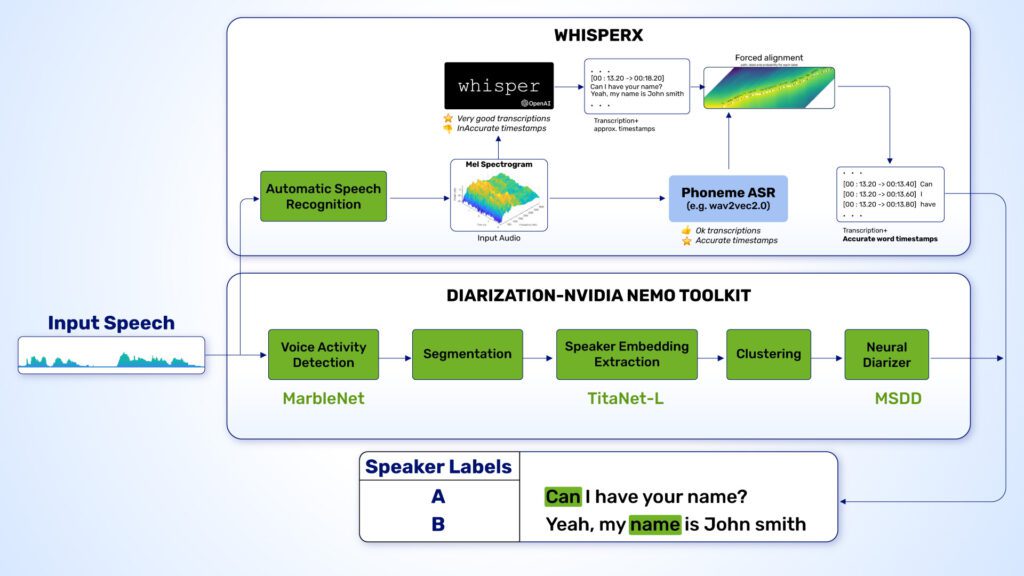
In a typical WhisperX pipeline, input audio gets chopped, only where a sound activity is detected with a VAD model, into 30-second chunks and sent on a two-track adventure. Track one is the OpenAI Whisper model, a transcription maestro adept at capturing spoken words but occasionally stumbling over precise timings. It’s like a talented lyricist who can’t quite keep up with the rhythm. Running parallel is track two, the timestamp tsar Wav2Vec2.0, which may not have Whisper’s lyrical prowess but boasts an uncanny ability to pinpoint each word’s timing in the audio. So, why not combine the strengths of these two models and get the best of both worlds? It’s like having a dynamic duo – one handles the lyrics, and the other keeps the beat. Together, they can create a harmonious symphony of transcriptions with accurate timestamps.

Automatic Speech Recognition Evaluation Metric
- Word Error Rate (WER) is a metric used to evaluate the accuracy of Automatic Speech Recognition (ASR) systems by calculating the minimum number of substitutions, deletions, and insertions required to transform the ASR-generated transcript into the correct reference text. WER is essentially a form of edit distance, specifically a Levenshtein distance, calculated between the words in a reference text and the words in a hypothesis text.
The formula for WER is:
WER = (Substitutions + Insertions + Deletions) / Total Words in Reference
Lower WER is better.
Example: Let’s take a historic phrase spoken by Neil Armstrong,
Original: “That’s one small step for man, one giant leap for mankind.”
Automatic Speech Recognition Output: “Thats won small step four a man one giant leap four mankind.”
Substitutions: 2 (“one” to “won”, “for” to “four” twice)
Insertions: 0
Deletions: 1 (“a” is missing)
WER = (2 + 0 + 1) / 11 = 0.273 (or 27.3%)
Note: Text normalization can reduce WER by standardizing word forms and ignoring punctuation and capitalization differences. For instance, “That’s” and “Thats” would be considered the same, potentially lowering the WER by reducing substitutions due to format discrepancies.
- Diarization Error Rate (DER)
is defined as the duration of false alarms, missed detection, and speaker confusion errors divided by the ground truth duration.
DER = (false alarm + missed detection + speaker confusion) / ground truth duration
where,
- False alarm is the duration of non-speech classified as speech i.e., false positive diarizations.
- Missed detection is the duration of speech classified as non-speech, i.e., false negative in our diarizations.
- Speaker confusion is the duration of speech that has been misidentified.
Lower DER is better.
OpenAI Whisper + Nemo Toolkit for ASR with Diarization Pipeline
NVIDIA NeMo is a dynamic framework with advanced parallelism techniques designed for researchers and developers using PyTorch, focusing on large language models (LLMs), multimodal models, automatic speech recognition (ASR), and text-to-speech synthesis (TTS).
While OpenAI’s Whisper model is a powerful tool for transcription and translation, it does not inherently support speaker diarization, which is essential for distinguishing between different speakers in an audio segment. To address this limitation, in our following experiment, we will actively integrate Whisper with NVIDIA NeMo’s robust tools for voice activity detection (VAD) and multi-speaker diarization (MSDD). This enhancement will enable precise speaker identification and speech segmentation, which is crucial for applications that require detailed, speaker-specific annotations.
Such capabilities are particularly important in settings like meetings, interviews, and teleconferences where multiple speakers are involved.
Alternatively, we also have another standard method of using the HuggingFace Diarizer pipeline with Whisper to achieve nearly the same setup.
To access the code featured in this article and try your own Automatic Speech Transcription playlists, simply fill details in the “Download Source Code” banner.
Code Walkthrough of Whisper with Nemo Toolkit
Let us have a look at the model card from the OpenAI Whisper repo.

For Speech Transcription tasks without the need for Diarization, you can simply do,
!pip install git+https://github.com/openai/whisper.git
!whisper “audio.wav” –model large
To extend this, we will focus on Speech Transcription that involves 2 speakers with Speaker Diarization by WhisperX and Nemo Toolkit pipeline. The following inference was done with a Colab free tier T4 GPU and Intel Xeon 2.0 GHz CPU.
Install Dependencies
Install WhisperX from the repository.
!pip install git+https://github.com/m-bain/whisperx.git
Next, let’s install the Nvidia Nemo Toolkit for Automatic Speech Recognition task.
!pip install --no-build-isolation nemo_toolkit[asr]==1.22.0
And other dependencies like
- Demucs will separate music and vocals from audio sources.
- Dora search for grid search and optimization.
- Deepmultilingualpunctuation for cleaning and structuring transcription.
- Pydub for manipulating audio.
!pip install --no-deps git+https://github.com/facebookresearch/demucs
!pip install dora-search "lameenc>=1.2" openunmix
!pip install -q deepmultilingualpunctuation
!pip install -q wget pydub
Import Dependencies
import os
import wget
from omegaconf import OmegaConf
import json
import shutil
import whisperx
import torch
from pydub import AudioSegment
from nemo.collections.asr.models.msdd_models import NeuralDiarizer
from deepmultilingualpunctuation import PunctuationModel
import re
import logging
import nltk
from whisperx.alignment import DEFAULT_ALIGN_MODELS_HF, DEFAULT_ALIGN_MODELS_TORCH
from whisperx.utils import LANGUAGES, TO_LANGUAGE_CODE
Download Files
# Ensure the directory exists
if not os.path.exists('whisper_examples'):
    os.mkdir('whisper_examples')

def download_file(url, save_name):
    if not os.path.exists(save_name):
        # Handling potential redirection in requests
        with requests.get(url, allow_redirects=True) as r:
            if r.status_code == 200:
                with open(save_name, 'wb') as f:
                    f.write(r.content)
            else:
                print("Failed to download the file, status code:", r.status_code)

def unzip(zip_file=None, target_dir='./whisper_examples'):
    try:
        with zipfile.ZipFile(zip_file, 'r') as z:
            z.extractall(target_dir)
            print("Extracted all to:", target_dir)
    except zipfile.BadZipFile:
        print("Invalid file or error during extraction: Bad Zip File")
    except Exception as e:
        print("An error occurred:", e)

# Correct Dropbox link (Ensure this is the direct download link or properly redirects)
download_url = 'https://www.dropbox.com/scl/fi/gaxpaq6d8aqnbz9mpzlr6/whisper_examples.zip?rlkey=x69vv03tu657bbxbmbe7z322m&st=iabgc5et&dl=1'
save_path = 'whisper_examples/whisper_examples.zip'

download_file(download_url, save_path)
unzip(zip_file=save_path)
Automatic Speech Recognition Pipeline
Configurations
As our goal is to obtain a highly accurate and reliable transcription, we will use a Whisper large-v3 multilingual model with 1550M parameters and a WER of 4.1 on the Google Fleurs dataset.
The enable_stemming flag determines to preprocess the audio with Demucs to remove music. Setting batch_size=8 indicates that 8 chunks will be processed simultaneously to make transcription coherent, so increasing batch size may produce better results.
Additionally the suppress_numeral=True flag helps to increase the accuracy by reducing WER. In this Automatic Speech Recognition pipeline, Whisper automatically identifies the language using the first 30 sec of the input audio sample, which is set as language=None.
# Name of the audio file
audio_path = "whisper_examples/Old_Farmer.mp3"

# Whether to enable music removal from speech, helps increase diarization quality but uses alot of ram
enable_stemming = True

# (choose from 'tiny.en', 'tiny', 'base.en', 'base', 'small.en', 'small', 'medium.en', 'medium', 'large-v1', 'large-v2', 'large-v3', 'large')
whisper_model_name = "large-v3"

# replaces numerical digits with their pronounciation, increases diarization accuracy
suppress_numerals = True

batch_size = 8

language = None  # autodetect language

device = "cuda" if torch.cuda.is_available() else "cpu"
Preprocessing: Vocal Separation with Demucs
This preprocessing step conditionally isolates vocals from an audio file using the Meta Demucs model, which increases the diarization quality. Otherwise, it defaults to using the original audio file.
if enable_stemming:
    # Isolate vocals from the rest of the audio

    return_code = os.system(
        f'python3 -m demucs.separate -n htdemucs --two-stems=vocals "{audio_path}" -o "temp_outputs"'
    )

    if return_code != 0:
        logging.warning("Source splitting failed, using original audio file.")
        vocal_target = audio_path
    else:
        vocal_target = os.path.join(
            "temp_outputs",
            "htdemucs",
            os.path.splitext(os.path.basename(audio_path))[0],
            "vocals.wav",
        )
else:
    vocal_target = audio_path
Next, the find_numeral_symbol_tokens function identifies and returns a list of token IDs inherited from Whisper’s pretrained tokenizer’s vocabulary that contains numeral symbols or characters such as digits and currency symbols. The vocab size of Whisper is 51865.
Eg: $100, suppressing numeral tokens will result in one hundred dollars.
def find_numeral_symbol_tokens(tokenizer):
    numeral_symbol_tokens = [
        -1,
    ]
    for token, token_id in tokenizer.get_vocab().items():
        has_numeral_symbol = any(c in "0123456789%$£" for c in token)
        if has_numeral_symbol:
            numeral_symbol_tokens.append(token_id)
    return numeral_symbol_tokens
This section is responsible for performing Automatic Speech Recognition our input audio file. The transcribe_batched function handles batched audio transcription using the Whisper model, configured for a specific language, numeral and symbol suppression, and computation settings. This streamlined approach optimizes resource utilization during batch processing.
The input to the Whisper is a float tensor of shape (batch_size, feature_size, sequence_length).
def transcribe_batched(
    audio_file: str,
    language: str,
    batch_size: int,
    model_name: str,
    compute_dtype: str,
    suppress_numerals: bool,
    device: str,
):


    # Faster Whisper batched
    whisper_model = whisperx.load_model(
        model_name,
        device,
        compute_type=compute_dtype,
        asr_options={"suppress_numerals": suppress_numerals},
    )
    audio = whisperx.load_audio(audio_file)
    result = whisper_model.transcribe(audio, language=language, batch_size=batch_size)
    del whisper_model
    torch.cuda.empty_cache()
    return result["segments"], result["language"]
Transcription with WhisperX
This snippet results in the transcription using batch processing on input audio with the WhisperX inference pipeline based on the specified batch_size, applying settings for computation type, numeral suppression, and device with an fp16 compute precision.
compute_type = "float16"
# or run on GPU with INT8
# compute_type = "int8_float16"
# or run on CPU with INT8
# compute_type = "int8"

if batch_size != 0:
    whisper_results, language = transcribe_batched(
        vocal_target,
        language,
        batch_size,
        whisper_model_name,
        compute_type,
        suppress_numerals,
        device,
    )
else:
    whisper_results, language = transcribe(
        vocal_target,
        language,
        whisper_model_name,
        compute_type,
        suppress_numerals,
        device,
    )
Forced Alignment with Wav2Vec2.0: WhisperX
Forced alignment refers to the process by which orthographic transcriptions are aligned to audio recordings to generate phone-level segmentation automatically.
From default alignment models, wav2vec2_langs the list combines all languages offered by PyTorch and HuggingFace. Meanwhile, whisper_langs brings together languages supported by the Whisper model, including a wide array of global languages and additional language codes, ensuring extensive multilingual capabilities for Automatic Speech Recognition (ASR).
wav2vec2_langs = list(DEFAULT_ALIGN_MODELS_TORCH.keys()) + list(
    DEFAULT_ALIGN_MODELS_HF.keys()
)

whisper_langs = sorted(LANGUAGES.keys()) + sorted(
    [k.title() for k in TO_LANGUAGE_CODE.keys()]
)
Here, the _get_next_start_timestamp function is responsible for figuring out when the next word in a list of word timestamps should start. If we’re looking at the last word in the list, it simply returns the start time of that word. However, if the next word doesn’t have a timestamp defined, things get trickier. In that case, the function merges the current word with the word lacking a timestamp, essentially extending the current word’s duration until it encounters a word with a defined start time or reaches the end of the list. If it’s the latter scenario, the function returns a predefined final timestamp value.
def _get_next_start_timestamp(word_timestamps, current_word_index, final_timestamp):
    # if current word is the last word
    if current_word_index == len(word_timestamps) - 1:
        return word_timestamps[current_word_index]["start"]

    next_word_index = current_word_index + 1
    while current_word_index < len(word_timestamps) - 1:
        if word_timestamps[next_word_index].get("start") is None:
            # if next word doesn't have a start timestamp
            # merge it with the current word and delete it
            word_timestamps[current_word_index]["word"] += (
                " " + word_timestamps[next_word_index]["word"]
            )

            word_timestamps[next_word_index]["word"] = None
            next_word_index += 1
            if next_word_index == len(word_timestamps):
                return final_timestamp

        else:
            return word_timestamps[next_word_index]["start"]
This filter_missing_timestamps utility processes a list of word timestamps, ensuring each word has a start and end time by filling missing values based on adjacent timestamps or specified default boundaries and compiling the cleaned list into result.
def filter_missing_timestamps(
    word_timestamps, initial_timestamp=0, final_timestamp=None
):
    # handle the first and last word
    if word_timestamps[0].get("start") is None:
        word_timestamps[0]["start"] = (
            initial_timestamp if initial_timestamp is not None else 0
        )
        word_timestamps[0]["end"] = _get_next_start_timestamp(
            word_timestamps, 0, final_timestamp
        )

    result = [
        word_timestamps[0],
    ]

    for i, ws in enumerate(word_timestamps[1:], start=1):
        # if ws doesn't have a start and end
        # use the previous end as start and next start as end
        if ws.get("start") is None and ws.get("word") is not None:
            ws["start"] = word_timestamps[i - 1]["end"]
            ws["end"] = _get_next_start_timestamp(word_timestamps, i, final_timestamp)

        if ws["word"] is not None:
            result.append(ws)
    return result

After Whisper generates the transcription, the next step in the WhisperX pipeline utilizes Wav2Vec 2.0 for forced alignment if the language is supported. If the language is unsupported and batch processing is not being used, WhisperX extracts the timestamps directly from Whisper’s output instead. As we know, this method is not as accurate as Wav2Vec’s forced alignment, but it ensures that each word in the transcription has an associated start and end time. Once the timestamping process is complete, the GPU memory is freed up to save resources.
if language in wav2vec2_langs:
    device = "cuda"
    alignment_model, metadata = whisperx.load_align_model(
        language_code=language, device=device
    )
    result_aligned = whisperx.align(
        whisper_results, alignment_model, metadata, vocal_target, device
    )
    word_timestamps = filter_missing_timestamps(
        result_aligned["word_segments"],
        initial_timestamp=whisper_results[0].get("start"),
        final_timestamp=whisper_results[-1].get("end"),
    )

    # clear gpu vram
    del alignment_model
    torch.cuda.empty_cache()
else:
    assert batch_size == 0, (  # TODO: add a better check for word timestamps existence
        f"Unsupported language: {language}, use --batch_size to 0"
        " to generate word timestamps using whisper directly and fix this error."
    )
    word_timestamps = []
    for segment in whisper_results:
        for word in segment["words"]:
            word_timestamps.append({"word": word[2], "start": word[0], "end": word[1]})
The output after forced alignment will look like,
{'word': 'Thank', 'start': 0.711, 'end': 0.851, 'score': 0.852},
{'word': 'you', 'start': 0.891, 'end': 0.971, 'score': 0.977},
....
 {'word': 'calling', 'start': 1.131, 'end': 1.391, 'score': 0.889},
{'word': 'Nissan.', 'start': 1.471, 'end': 1.991, 'score': 0.761},
Diarization Pipeline: Nvidia Nemo
Now, let’s understand the Nemo inference pipeline and configuration. The input audio is passed to a MarbleNet VAD model, which helps to find the occurrence of voice as timestamps. Following this, it’s passed to a TitatNet model, which does speaker extraction as embeddings. Finally, an MSDD model adeptly does speaker diarization with exact timestamps with millisecond precision. Now, let’s describe these one by one in code implementation.

Nemo Models Configuration
Now it’s time to configure Nemo, so we’ll use the create_config utility function to set up used to set up the environment for speaker diarization. As we are processing a support call in our experiment, this fetches a YAML configuration file, and it downloads a pre-configured model from NVIDIA’s NeMo project that is optimized for telephonic or phone call audio. Finally, it generates a JSON manifest file. This manifest file contains metadata about the audio file that needs to be processed, like the file path and name.
If you want to try other audio samples, such as online meetings or general conversations, feel free to change the domain type in the configuration accordingly.
def create_config(output_dir):
    DOMAIN_TYPE = "telephonic"  # Can be meeting, telephonic, or general based on domain type of the audio file
    CONFIG_FILE_NAME = f"diar_infer_{DOMAIN_TYPE}.yaml"
    CONFIG_URL = f"https://raw.githubusercontent.com/NVIDIA/NeMo/main/examples/speaker_tasks/diarization/conf/inference/{CONFIG_FILE_NAME}"
    MODEL_CONFIG = os.path.join(output_dir, CONFIG_FILE_NAME)
    if not os.path.exists(MODEL_CONFIG):
        MODEL_CONFIG = wget.download(CONFIG_URL, output_dir)

    config = OmegaConf.load(MODEL_CONFIG)

    data_dir = os.path.join(output_dir, "data")
    os.makedirs(data_dir, exist_ok=True)

    meta = {
        "audio_filepath": os.path.join(output_dir, "mono_file.wav"),
        "offset": 0,
        "duration": None,
        "label": "infer",
        "text": "-",
        "rttm_filepath": None,
        "uem_filepath": None,
    }
    with open(os.path.join(data_dir, "input_manifest.json"), "w") as fp:
        json.dump(meta, fp)
        fp.write("\n")
VAD Configuration: Nemo
Voice Activity Detection (VAD) detects the presence or absence of human speech at a particular timestamp, which is helpful in diarization.
As discussed initially, we will use a lightweight vad_multilingual_marblenet, having trained on the Google Speech Command v2 dataset offering robust and real-time VAD.For our tasks, which require speaker verification and capturing the essence of the speaker’s voice, the TitaNet-Large model is used. It uses 1D depth-wise separable convolutions enhanced with Squeeze-and-Excitation (SE) layers and a channel attention-based statistics pooling layer. This architecture efficiently converts variable-length speech utterances into fixed-length speaker embeddings.
    pretrained_vad = "vad_multilingual_marblenet"
    pretrained_speaker_model = "titanet_large"
    config.num_workers = 0  # Workaround for multiprocessing hanging with ipython issue
    config.diarizer.manifest_filepath = os.path.join(data_dir, "input_manifest.json")
    config.diarizer.out_dir = (
        output_dir  # Directory to store intermediate files and prediction outputs
    )

    config.diarizer.speaker_embeddings.model_path = pretrained_speaker_model
    config.diarizer.oracle_vad = (
        False  # compute VAD provided with model_path to vad config
    )
    config.diarizer.clustering.parameters.oracle_num_speakers = False
Additionally, we will configure our system not to assume a fixed number of speakers (config.diarizer.clustering.parameters.oracle_num_speakers = False), allowing it to dynamically adapt to the actual number of speakers in each audio session.
Then, we will specify the config.diarizer.vad.model_path, a pretrained model that optimizes voice activity detection with onset sensitivity set at 0.8, and an offset at 0.6. These settings enhance the VAD’s responsiveness while a pad_offset of -0.05 fine-tune segment endpoints for cleaner and more precise speech boundaries.
 # Here, we use our in-house pretrained NeMo VAD model
    config.diarizer.vad.model_path = pretrained_vad
    config.diarizer.vad.parameters.onset = 0.8
    config.diarizer.vad.parameters.offset = 0.6
    config.diarizer.vad.parameters.pad_offset = -0.05
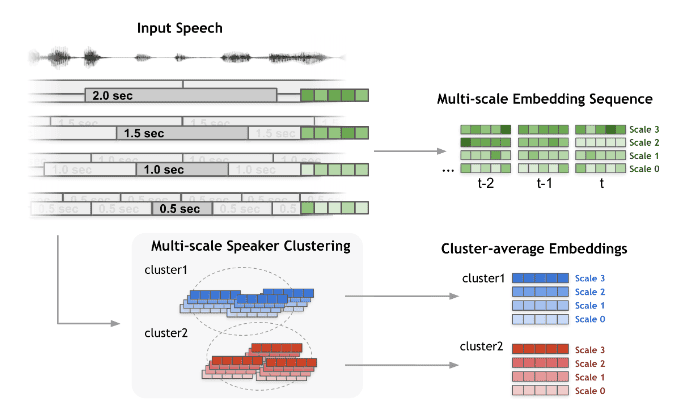
This output is passed to the Titanet model for speaker embedding extraction on multiple scales. The model is then clustered to average the multi-speaker clusters and passes through the next stages in the Nemo pipeline.
MSDD Configuration
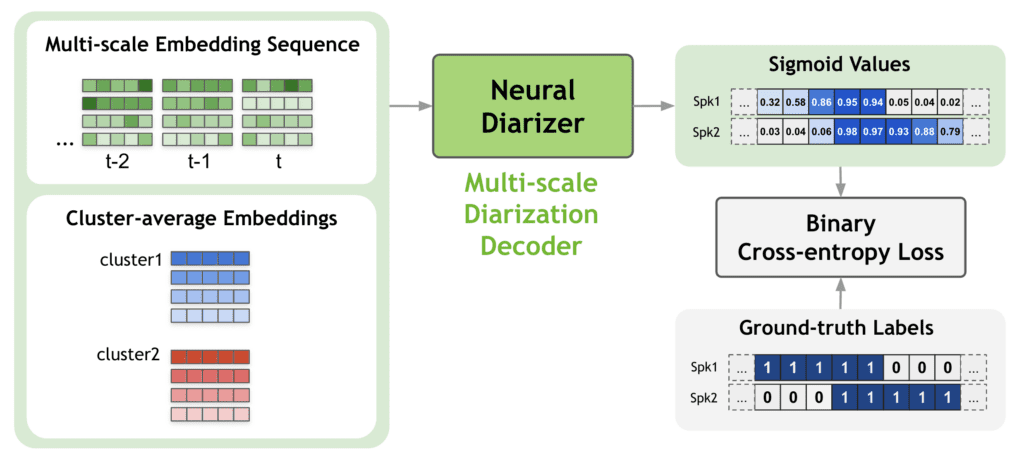
The MSDD (Multiscale Diarization Decoder) model is a sequence model optimized for diarization. It uses a diligent technique that selectively weighs speaker embeddings at multiple scales. This enhances performance, particularly in transcribing telephonic speech and handling overlapping speech. It operates on five scales with varying hop lengths to provide flexible temporal resolution, with the default being 0.25 seconds, adjustable for finer detail.
config.diarizer.msdd_model.model_path = (
        "diar_msdd_telephonic"  # Telephonic speaker diarization model
    )
    return config
The neural Diarizer(MSDD) uses a binary cross-entropy loss function to identify the time-corresponding speaker labels.
Convert Audio to Mono for Nemo Compatibility
Further, we need to convert our audio file to the mono channel for Nemo’s audio processing compatible format using Pydub as a .wav file to a designated temporary directory,
sound = AudioSegment.from_file(vocal_target).set_channels(1)
ROOT = os.getcwd()
temp_path = os.path.join(ROOT, "temp_outputs")
os.makedirs(temp_path, exist_ok=True)
sound.export(os.path.join(temp_path, "mono_file.wav"), format="wav")
The exported sound will be like this:
Speaker Diarization with Nvidia Nemo Toolkit
Next, we will initialize the MSDD model using the NeuralDiarizer pipeline.
# Initialize NeMo MSDD diarization model
msdd_model = NeuralDiarizer(cfg=create_config(temp_path)).to("cuda")
msdd_model.diarize()

del msdd_model
torch.cuda.empty_cache()
The VAD output is saved as vad_out.json and it contains:
{"audio_filepath": "/content/temp_outputs/mono_file.wav", "offset": 1.18, "duration": 2.46, "label": "UNK", "uniq_id": "mono_file"}
{"audio_filepath": "/content/temp_outputs/mono_file.wav", "offset": 4.54, "duration": 2.22, "label": "UNK", "uniq_id": "mono_file"}
Then, the embeddings from TitaNet-L are stored in temp_outputs/speaker_outputs/embeddings
At the end of this operation, a temp_outputs/pred_rtmms/mono_file.rtmm file is saved, which contains diarized timestamps as follows:
SPEAKER mono_file 1   39.660   0.140 <NA> <NA> speaker_0 <NA> <NA>
SPEAKER mono_file 1   40.460   1.420 <NA> <NA> speaker_0 <NA> <NA>
SPEAKER mono_file 1   42.140   0.140 <NA> <NA> speaker_1 <NA> <NA>
SPEAKER mono_file 1   43.180   0.540 <NA> <NA> speaker_1 <NA> <NA>
SPEAKER mono_file 1   43.980   0.940 <NA> <NA> speaker_1 <NA> <NA>
Mapping Speakers to Sentences According to Timestamps
As transcribing a customer support conversation involves multiple speakers, we will define a function get_sentences_speaker_mapping that constructs a list of sentences from word-level mappings, each tagged with speaker information and timestamps. We will use an NLTK sentence tokenizer to determine when a new sentence starts, either due to a speaker change or because the current sentence(snt) has reached a natural break. As it processes each word, the function updates the current sentence or starts a new one, ensuring that each sentence in the output list(snts) captures coherent spoken segments, accurately labeled with the correct speaker and timing details.
def get_sentences_speaker_mapping(word_speaker_mapping, spk_ts):
    sentence_checker = nltk.tokenize.PunktSentenceTokenizer().text_contains_sentbreak
    s, e, spk = spk_ts[0]
    prev_spk = spk

    snts = [ ]
    snt = {"speaker": f"Speaker {spk}", "start_time": s, "end_time": e, "text": ""}

    for wrd_dict in word_speaker_mapping:
        wrd, spk = wrd_dict["word"], wrd_dict["speaker"]
        s, e = wrd_dict["start_time"], wrd_dict["end_time"]
        if spk != prev_spk or sentence_checker(snt["text"] + " " + wrd):
            snts.append(snt)
            snt = {
                "speaker": f"Speaker {spk}",
                "start_time": s,
                "end_time": e,
                "text": "",
            }
        else:
            snt["end_time"] = e
        snt["text"] += wrd + " "
        prev_spk = spk

    snts.append(snt)
    return snts
Next, the get_word_ts_anchors function is defined which returns a word’s timestamp: the end (e) if option is “end”, the midpoint if “mid”, or the start (s) by default.
def get_word_ts_anchor(s, e, option="start"):
    if option == "end":
        return e
    elif option == "mid":
        return (s + e) / 2
    return s
Then, the get_words_speaker_mapping function maps words to their corresponding speakers based on timing information. At first, we will iterate through word timestamps, adjust their anchor points depending on the chosen word_anchor_option, and match them to the closest speaker’s time span. Following that, we handle speaker turns by updating the speaker indices and ensuring words at the list’s end are correctly assigned to the last speaker. Thus, our result is a list of dictionaries, each containing a word, its start and end times, and the assigned speaker.
def get_words_speaker_mapping(wrd_ts, spk_ts, word_anchor_option="start"):
    s, e, sp = spk_ts[0]
    wrd_pos, turn_idx = 0, 0
    wrd_spk_mapping = []
    for wrd_dict in wrd_ts:
        ws, we, wrd = (
            int(wrd_dict["start"] * 1000),
            int(wrd_dict["end"] * 1000),
            wrd_dict["word"],
        )
        wrd_pos = get_word_ts_anchor(ws, we, word_anchor_option)
        while wrd_pos > float(e):
            turn_idx += 1
            turn_idx = min(turn_idx, len(spk_ts) - 1)
            s, e, sp = spk_ts[turn_idx]
            if turn_idx == len(spk_ts) - 1:
                e = get_word_ts_anchor(ws, we, option="end")
        wrd_spk_mapping.append(
            {"word": wrd, "start_time": ws, "end_time": we, "speaker": sp}
        )
    return wrd_spk_mapping
Then, we will read the RTMM file, which is the output from the MSDD Neural Diarizer, to map speaker labels to timestamps and use these mappings to associate speakers with sentences (wsm) based on their start times.
# Reading timestamps <> Speaker Labels mapping

speaker_ts = []
with open(os.path.join(temp_path, "pred_rttms", "mono_file.rttm"), "r") as f:
    lines = f.readlines()
    for line in lines:
        line_list = line.split(" ")
        s = int(float(line_list[5]) * 1000)
        e = s + int(float(line_list[8]) * 1000)
        speaker_ts.append([s, e, int(line_list[11].split("_")[-1])])

wsm = get_words_speaker_mapping(word_timestamps, speaker_ts, "start")
ssm = get_sentences_speaker_mapping(wsm, speaker_ts)
Utility Functions
The format_timestamp function converts the WhisperX output timestamps, which are in milliseconds, into an hourly formatted string (hh:mm:ss.sss), ensuring the result is always non-negative.
def format_timestamp(
    milliseconds: float, always_include_hours: bool = False, decimal_marker: str = "."
):
    assert milliseconds >= 0, "non-negative timestamp expected"

    hours = milliseconds // 3_600_000
    milliseconds -= hours * 3_600_000

    minutes = milliseconds // 60_000
    milliseconds -= minutes * 60_000

    seconds = milliseconds // 1_000
    milliseconds -= seconds * 1_000

    hours_marker = f"{hours:02d}:" if always_include_hours or hours > 0 else ""
    return (
        f"{hours_marker}{minutes:02d}:{seconds:02d}{decimal_marker}{milliseconds:03d}" )
To save outputs of a transcript to a file in SRT format, the write_srt utility formats timestamps and text content for each segment and appropriately handles special characters in dialogue.
def write_srt(transcript, file):
    """
    Write a transcript to a file in SRT format.

    """
    for i, segment in enumerate(transcript, start=1):
        # write srt lines
        print(
            f"{i}\n"
            f"{format_timestamp(segment['start_time'], always_include_hours=True, decimal_marker=',')} --> "
            f"{format_timestamp(segment['end_time'], always_include_hours=True, decimal_marker=',')}\n"
            f"{segment['speaker']}: {segment['text'].strip().replace('-->', '->')}\n",
            file=file,
            flush=True,
        )
After processing the speaker information, finally this generates an SRT-formatted transcript with speaker labels.
with open(f"{os.path.splitext(audio_path)[0]}.srt", "w", encoding="utf-8-sig") as srt:
    write_srt(ssm, srt)
Results: Whisper v3 Large Output Transcription
00:00:00,860 --> 00:00:01,991
Speaker 1: Thank you for calling Nissan.
00:00:02,031 --> 00:00:02,832
Speaker 1: My name is Lauren.
00:00:03,052 --> 00:00:03,732
Speaker 1: Can I have your name?
00:00:04,252 --> 00:00:05,472
Speaker 0: Yeah, my name is John Smith.
00:00:06,732 --> 00:00:07,333
Speaker 1: Thank you, John.
00:00:07,393 --> 00:00:08,032
Speaker 1: How can I help you?
00:00:08,053 --> 00:00:12,814
Speaker 0: I was just calling about to see how much it would cost to update the map in my car.
00:00:13,354 --> 00:00:15,034
…..
Speaker 1: I would definitely recommend taking advantage of the extra fifty dollars off before it expires.
00:01:35,215 --> 00:01:36,656
Speaker 0: Yeah, that does sound pretty good.
00:01:36,676 --> 00:01:42,118
Speaker 1: If I set this order up for you now, it'll ship out today and for fifty dollars less.
00:01:42,978 --> 00:01:44,198
Speaker 1: Do you have your credit card handy?
00:01:44,278 --> 00:01:45,779
Speaker 1: And I can place this order for you now.
00:01:46,479 --> 00:01:49,140
Speaker 0: Yeah, let's go ahead and use a Visa.
00:01:50,343 --> 00:01:50,999
Speaker 1: My number is...
For the above customer support audio, we generated the transcription and diarization results as almost perfect with very minimal WER and DER by using the Whisper and Nemo pipeline. This might be due to the accent and the clarity of the audio sample.
Nevertheless, this is not always true in real-life situations or circumstances. Thus, let’s examine another audio sample that is slightly unclear or that has stuttering for the comparison section to decide which model performs the best.
Comparison of Open Source Whisper v/s Commercial Speech2Text API Providers
Some of the best proprietary Speech2Text API Providers we will consider here are Assembly AI, Deepgram, Gladia, etc.
We will be using YouTube transcripts of the video as Ground Truth ( Turn on captions )
!pip install -qq assemblyai deepgram-sdk python-dotenv jiwer pyannote.audio
Assembly AI calling via API
import time
import assemblyai as aai


# Replace with your API key
aai.settings.api_key = "Assembly AI API KEY HERE"

# URL of the file to transcribe
FILE_URL = "whisper_examples/Old_Farmer.mp3"

config = aai.TranscriptionConfig(
 speaker_labels=True,
 speakers_expected=2
)

transcript = aai.Transcriber().transcribe(FILE_URL, config)

for utterance in transcript.utterances:

   speaker_name = "\033[1m" + ("B" if utterance.speaker == "B" else "A") + "\033[0m"

    # Convert start and end times from milliseconds to seconds
   start_time_seconds = utterance.start / 1000
   end_time_seconds = utterance.end / 1000

   # Convert seconds to MM:SS format
   start_time_mmss = divmod(start_time_seconds, 60)  # divmod returns (minutes, seconds)
   end_time_mmss = divmod(end_time_seconds, 60)

   # Format the MM:SS timestamp
   start_timestamp = f"{int(start_time_mmss[0]):02d}:{int(start_time_mmss[1]):02d}"
   end_timestamp = f"{int(end_time_mmss[0]):02d}:{int(end_time_mmss[1]):02d}"

   print(f"TimeStamp: {start_timestamp}")
   print('\033[1m' + f"SPEAKER  -> {speaker_name}: {utterance.text}")
Deepgram Calling via API
import os
from dotenv import load_dotenv

from deepgram import (
    DeepgramClient,
    PrerecordedOptions,
    FileSource,
)

load_dotenv()

# Path to the audio file
AUDIO_FILE = "whisper_examples/Old_Farmer.mp3"

API_KEY = "DeepGram API Key here"


def main():
    try:
        # STEP 1 Create a Deepgram client using the API key
        deepgram = DeepgramClient(API_KEY)

        with open(AUDIO_FILE, "rb") as file:
            buffer_data = file.read()

        payload: FileSource = {
            "buffer": buffer_data,
        }

        #STEP 2: Configure Deepgram options for audio analysis
        options = PrerecordedOptions(
            model="nova-2",
            smart_format=True,
            diarize=True,
            language="en",
        )

        # STEP 3: Call the transcribe_file method with the text payload and options
        response = deepgram.listen.prerecorded.v("1").transcribe_file(payload, options)
       # print(response.to_json["results"]["channels"]["alternatives"]["paragraphs"]["transcript"])

        # STEP 4: Print the response
        print(response.to_json(indent=4))

    except Exception as e:
        print(f"Exception: {e}")


if __name__ == "__main__":
    main()
Gladia Calling via API
import requests
import pprint
HEADERS = {"x-gladia-key": "YOUR GLADIA KEY HERE"}

#Upload data
data_upload_url = "https://api.gladia.io/v2/upload"

file_path = "/path/to/test/audio"

# Open the file in binary mode and send it
with open(file_path, "rb") as f:
    files = {
             "audio": ("test_audio.mp3", f, "audio/mpeg")
            }
    response = requests.post(url=data_upload_url, headers=HEADERS, files=files)
print(pprint.pformat(response.json(),sort_dicts=False))

audio_id = response.json()['items'][0]['file']['id']
audio_id  #Get the audio id of the test upload

#Perform Transcription
transcribe_URL = "https://api.gladia.io/v2/transcription"

HEADERS_TRANSCRIBE = {
    "x-gladia-key": "SAME GALDIA API KEY HERE",
    "Content-Type": "application/json"}

data = {
    "audio_url": f"https://api.gladia.io/file/{audio_id}",
    "diarization": True,
    "diarization_config": {
      "number_of_speakers": 2,
      "min_speakers": 1,
      "max_speakers": 5
        },
    "translation": True,
    "translation_config": {
      "model": "base",
      "target_languages": ["en"]
        },
    "subtitles": True,
    "subtitles_config": {
      "formats": ["srt"]
        },
    "detect_language": True,
    "enable_code_switching": False
    }
response = requests.post(url=transcribe_URL, headers=HEADERS_TRANSCRIBE, json=data)

print(pprint.pformat(response.json(),sort_dicts=False))
get_transcription_url = "https://api.gladia.io/v2/transcription"

response = requests.get(url=get_transcription_url, headers=HEADERS)

data = response.json()
print(pprint.pformat(data,sort_dicts=False))

#Show Transcription
TRANSCRIPTION_ID = data['items'][0]['id']

URL = f"https://api.gladia.io/v2/transcription/{TRANSCRIPTION_ID}"

response_results = requests.get(url=URL, headers=HEADERS)

results_data = response_results.json()

transcript = results_data.get("result",{}).get("transcription", {}).get("subtitles",[])[0].get("subtitles","")

print(transcript)
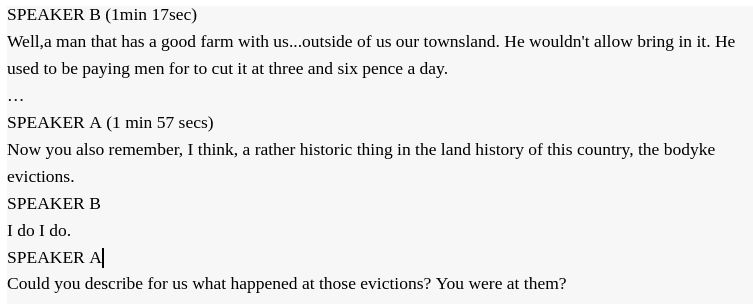
Below are the Instances where models failed to identify with respect to the ground truth(marked in red).
Ground Truth
AssemblyAI
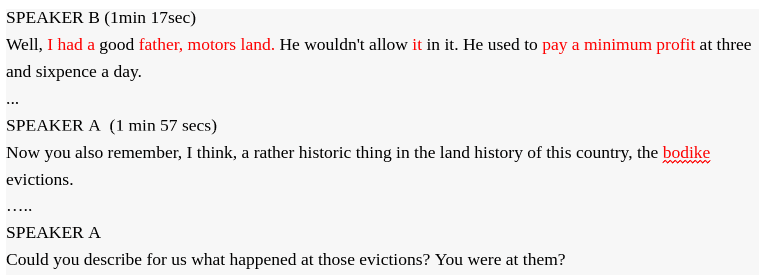
Whisper with Nemo Output

Deepgram Output

To calculate WER simply, do text normalization to the transcript with the jiwer library and compare it against the ground truth.
import jiwer
import re

def preprocess_text(text):
    # Normalize the case and strip whitespace
    text = text.lower().strip()
    # Remove punctuation
    text = re.sub(r'[^\w\s]', '', text)
    # Replace multiple spaces with a single space
    text = re.sub(r'\s+', ' ', text)
    return text

# Preprocess both ground truth and AI output
ground_truth_clean = preprocess_text(ground_truth)
assembly_ai_output_clean = preprocess_text(assembly_ai_output)
whisper_output_clean = preprocess_text(whisper_output)
deepgram_output_clean = preprocess_text(deepgram_output)
gladia_whisper_zero_output_clean = preprocess_text(gladia_whisper_zero_output)

print(f"Ground Truth Normalised:",ground_truth_clean)

print("********")

print(f"Assembly AI Output Normalised:", assembly_ai_output_clean)


print("********")

print(f" Gladia Whisper Zero Output Normalised:", gladia_whisper_zero_output_clean)

print("********")


print(f"Deepgram Output Normalised:", deepgram_output_clean)


print("********")

print(f"Whisper Output Normalised:", whisper_output_clean)

print("********")

aai_wer = jiwer.wer(
    ground_truth_clean,
    assembly_ai_output_clean,
)

gladia_wer = jiwer.wer(
    ground_truth_clean,
    gladia_whisper_zero_output_clean,)


dgram_wer = jiwer.wer(
    ground_truth_clean,
    deepgram_output_clean
)

whisper_wer = jiwer.wer(
    ground_truth_clean,
    whisper_output_clean
)

print(f"Assembly AI Word Error Rate: {aai_wer:.2f}")
print("********")
print(f"Gladia Whisper Zero Word Error Rate: {gladia_wer:.2f}")
print("********")
print(f"Deepgram Word Error Rate: {dgram_wer:.2f}")
print("********")
print(f"Whisper Word Error Rate: {whisper_wer:.2f}")
print("********")
Ground Truth Normalised: im going to introduce you to a rather remarkable man hes mister michael fitzpatrick from .....
********
Assembly AI Output Normalised: im going to introduce you to a rather remarkable man hes mister michael fitzpatrick ...
********
 Gladia Whisper Zero Output Normalised: im going to introduce you to a rather remarkable man hes mr michael fitzpatrick from killenie maynooth now he started to draw the old age pension in 1927 and seven years ago he got the.....
********
Deepgram Output Normalised: im going to introduce you to a rather remarkable man hes mister michael fitzpatrick ....
********
Whisper Output Normalised: im going to introduce you to a rather remarkable man hes mr michael fitzpatrick from killeney....
Lower WER is better.
| MODEL | Word Error Rate (WER) |
| Assembly AI | 0.24 |
| Gladia Whisper Zero | 0.26 |
| OpenAI Whisper | 0.27 |
| Deepgram | 0.35 |
For calculating DER we will use the pyannote diarization library.
DIARIZATION ERROR RATE
from pyannote.core import Annotation, Segment
from pyannote.metrics.diarization import DiarizationErrorRate

# Create annotations for ground truth and hypothesis
ground_truth = Annotation()
assembly_ai_output = Annotation()
whisper_output = Annotation()

# Assuming we have start times and durations (in seconds)
# Ground Truth (you would fill in actual start times and durations)
# Ground Truth (you would fill in actual start times and durations)
ground_truth = {
    Segment(0,   35)  : 'A',
    Segment(36,  37)  : 'B',
    Segment(37,  41)  : 'A',
    Segment(42,  50)  : 'B',
    Segment(51,  56)  : 'A',
    Segment(57,  61)  : 'B',
    Segment(62,  67)  : 'A',
    Segment(67,  72)  : 'B',
    Segment(73,  77)  : 'A',
    Segment(77,  87)  : 'B',
    Segment(88,  92)  : 'A',
    Segment(93,  99)  : 'B',
    Segment(99,  103) : 'A',
    Segment(104, 116) : 'B',
    Segment(116, 124) : 'A',
    Segment(124, 126) : 'B',
    Segment(126, 129) : 'A',
    Segment(130, 135) : 'B',
    Segment(136, 136) : 'A',
    Segment(137, 155) : 'B',
    Segment(156, 163) : 'A',
    Segment(164, 169) : 'B'
}

# Assembly AI Output (assuming some errors)
assembly_ai_output = {
    Segment(0,   35)  : 'A',
    Segment(36,  37)  : 'B',  # Overlap error, different end times
    Segment(37,  41)  : 'A',  # Shift in time
    Segment(42,  50)  : 'B',
    Segment(51,  56)  : 'A',
    Segment(57,  61)  : 'B',
    Segment(62,  67)  : 'A',
    Segment(67,  72)  : 'B',
    Segment(73,  77)  : 'A',
    Segment(77,  87)  : 'B',
    Segment(88,  92)  : 'A',
    Segment(93,  99)  : 'B',
    Segment(99,  103) : 'A',
    Segment(104, 116) : 'B',
    Segment(116, 129) : 'A',  # Extended duration
    Segment(130, 133) : 'B',  # Shortened duration
    Segment(136, 136) : 'A',
    Segment(137, 155) : 'B',
    Segment(156, 163) : 'A',
    Segment(164, 169) : 'B'
}

# Whisper Output (assuming some errors)
whisper_output = {
    Segment(0,   35)  : 'A',
    Segment(36,  37)  : 'B',  # Overlap error, different end times
    Segment(37,  41)  : 'A',  # Shift in time
    Segment(42,  50)  : 'B',
    Segment(51,  56)  : 'A',
    Segment(57,  61)  : 'B',
    Segment(62,  67)  : 'A',
    Segment(67,  72)  : 'B',
    Segment(73,  77)  : 'A',
    Segment(84,  87)  : 'B',  # Incorrect start time
    Segment(88,  92)  : 'A',
    Segment(93,  99)  : 'B',
    Segment(99,  103) : 'A',
    Segment(104, 116) : 'B',
    Segment(116, 124) : 'A',
    Segment(124, 126) : 'B',
    Segment(126, 129) : 'A',
    Segment(130, 133) : 'B',  # Shortened duration
    Segment(136, 136) : 'A',
    Segment(137, 155) : 'B',
    Segment(156, 163) : 'A',
    Segment(164, 169) : 'B'
}

# Initialize metric
metric = DiarizationErrorRate()

# Calculate DER
aai_der = metric(ground_truth, assembly_ai_output)
print(f"Assembly AI Diarization Error Rate: {aai_der:.2%}")

print("********")

whisper_der = metric(ground_truth, whisper_output)
print(f"Whisper Diarization Error Rate: {whisper_der:.2%}")
Lower DER is better.
For our Old Farmer interview audio we got,
- Assembly AI Diarization Error Rate: 2.58%
- OpenAI Whisper with Nemo Diarization Error Rate: 5.81%
From Automatic Speech Recognition evaluation metrics, it’s evident that proprietary AssemblyAI’s Conformer-2 model has less WER and DER, particularly for this audio, than Opensource Whisper. We can see that the provided interview is very challenging to transcribe with good accuracy. Even though the old man being interviewed has speech difficulties, both Whisper and AssemblyAI models manage to capture the speech, which is truly amazing.
The results look great, isn’t it? SCROLL UP to learn more about the practical code implementation.
PRICING via API
| Proprietary API Provider | Pricing |
| Assembly AI (Conformer – 2) | $0.37/hour |
| Gladia (Whisper Zero) | $0.612/hour |
| Deepgram (Nova-2) | $0.25/hour |
The above code implementation is inspired by this repository. Kudos to the authors. ⚡
Key Takeaways
- Open Source models like Whisper being on par proper with commercial Speech-to-Text providers drives the community to build upon interesting applications.
- Enterprises looking into integrate AI into their vertical can host Whisper models in their own internal networks and work on their personal audio files for Automatic Speech Recognition without worrying about data privacy.
Future Advancements
As we look at OpenAI’s announcement on May 13, 2024, integrating Automatic Speech Recognition with on-device multimodal like GPT4-o (omni) assistants capabilities signifies a giant leap forward. They have given a demo where a system that not only converts speech to text but also understands and generates speech, recognizes objects and faces, and even interprets emotions from voice and facial expressions. This convergence of speech recognition, computer vision, and natural language understanding would revolutionize human-machine interaction, making digital assistants more intuitive and responsive than ever. So, the next time you interact with your virtual assistant or use voice-to-text on your phone, consider the remarkable synergy of technologies at work—seamlessly performing multimodal interaction with your digital world.
References
- Whisper Diarization – Mahmoud Ashraf
- OpenAI Whisper: https://github.com/openai/whisper/tree/main/whisper
- Nvidia Nemo Toolkit: https://github.com/NVIDIA/NeMo/tree/main/tutorials/speaker_tasks
- WhisperX – Automatic Speech Recognition: https://github.com/m-bain/whisperX
- Google Conformer: https://arxiv.org/abs/2005.08100
- Pyannote: https://arxiv.org/abs/1911.01255
- PyTorch – Automatic Speech Transcription: https://pytorch.org/audio/main/tutorials/ctc_forced_alignment_api_tutorial.html
- Wav2Vec2.0 – Automatic Speech Transcription: https://arxiv.org/abs/2006.11477
- HuggingFace Diarizers : https://github.com/huggingface/diarizers
- Transformers: Attention is All You Need: https://arxiv.org/abs/1706.03762
Automatic Speech Recognition (ASR) Datasets
- Minds-14 by PolyAI (https://huggingface.co/datasets/PolyAI/minds14)
- Fleurs Dataset by Google (https://huggingface.co/datasets/google/fleurs)
- Voxpopuli by Meta (https://huggingface.co/datasets/facebook/voxpopuli)
- Librespeech-asr (https://huggingface.co/datasets/librispeech_asr)
- Common Voice by Mozilla (https://huggingface.co/datasets/mozilla-foundation/common_voice_11_0)
- GigaSpeech by Speechcolab (https://huggingface.co/datasets/speechcolab/gigaspeech)


100K+ Learners
Join Free OpenCV Bootcamp3 Hours of Learning