This is the third part of the Robotics Blog Series, focusing on a comprehensive ROS 2 and Carla setup guide for Ubuntu 22.04. We’ll begin by installing the Terminator terminal, followed by the installation of ROS 2 dependencies, and then proceed with installing ROS 2 Humble. Next, we’ll cover how to install Carla on Ubuntu 22.04 and finally integrate ROS 2 with Carla by setting up the Carla ROS Bridge. Furthermore, we will be exploring how to install Carla on Docker with NVIDIA Container Toolkit support, and finally, covering how to remove ROS 2 and Carla from Ubuntu.

ROS 2, or Robot Operating System 2, is an open-source robotics middleware framework. It is a decade-old project maintained by Open Robotics and is widely used in many robotics companies, as there are very few open-source middleware frameworks available.
CARLA is an open-source simulator for autonomous driving research. Built using Unreal Engine, it offers a range of capabilities such as running imitation learning models, reinforcement learning models, and integrating with the AutoWare AV stack, ROS etc.
- Install Terminator
- How to Install ROS 2 Humble on Ubuntu 22.04
- Carla Simulator Installation Ubuntu 22.04
- Carla ROS 2 Bridge Setup
- Setup Carla using Docker
- Uninstall ROS 2 Humble
- Uninstall Carla and ros-bridge
- Remove Docker Image and Uninstall Docker from Ubuntu 22.04
- Conclusion
- References
Every year on World Turtle Day, a new ROS version is released. However, the development of integrating ROS with Carla has been slow-paced. As a result, even though ROS 2 has advanced to Jazzy Jalisco (as of May 23rd, 2024), Carla does not support this version. Furthermore, there is no support for ROS 2 Humble or Galactic. Currently, Carla only supports ROS 2 Foxy on Ubuntu 20.04.
In the previous posts, we covered an introduction to robotics and Monocular SLAM using Python OpenCV. As you will see in this blog post, we are entering the world of ROS and robotics development. We will provide detailed articles on ROS 2 and Carla, leading toward the final project: Building a 6DoF Autonomous Vehicle for Static Obstacle Avoidance.
NB:
- Before proceeding with the installation process, I’m assuming you have a system with Nvidia RTX series GPU with >= 6GB of GPU RAM, Ubuntu 22.04 as your operating system and you have already installed the Nvidia-driver and cuda-toolkit.
- If you run into any unexpected issues while following this ROS 2 and Carla setup guide, just check out the official documentation at the bottom of this article.
Install Terminator
Terminator Terminal Emulator or simply Terminator is a open-source GNOME terminal written in python, with a lot more functionality than a simple Ubuntu Terminal. This has been extensively used by the robotics community, because of its simple to use key-binding, and the ability to Arrange terminals in a grid-like structure. To install it run below command,
$ sudo apt install terminator
Done installing terminator? Let, install the big guns!
How to Install ROS 2 Humble on Ubuntu 22.04
Below are the instructions for installing ROS 2 Humble on Ubuntu 22.04. The code cells below contain all the commands that need to be executed. If you have any doubts about any command, make sure to read the explanation below the cell.

1. Install ROS 2 Humble
1.1 Check for utf-8:
Check for UTF-8 encoding using the command locale; if it’s not there, execute the command locale. You can run all the commands below irrespective of having UTF-8.
# if locale shows below output, no need to execute
# below commands

# Expected output from command `locale`
# LANG=en_US.UTF-8
# LANGUAGE=en_IN:en
# LC_CTYPE="en_US.UTF-8"
# LC_NUMERIC="en_US.UTF-8"
# LC_TIME="en_US.UTF-8"
# LC_COLLATE="en_US.UTF-8"
# LC_MONETARY="en_US.UTF-8"
# LC_MESSAGES="en_US.UTF-8"
# LC_PAPER="en_US.UTF-8"
# LC_NAME="en_US.UTF-8"
# LC_ADDRESS="en_US.UTF-8"
# LC_TELEPHONE="en_US.UTF-8"
# LC_MEASUREMENT="en_US.UTF-8"
# LC_IDENTIFICATION="en_US.UTF-8"
# LC_ALL=en_US.UTF-8


$ locale  # check for UTF-8

$ sudo apt update && sudo apt install locales
$ sudo locale-gen en_US en_US.UTF-8
$ sudo update-locale LC_ALL=en_US.UTF-8 LANG=en_US.UTF-8
$ export LANG=en_US.UTF-8
$ locale  # verify settings
1.2 Add the ROS 2 apt Repository
You will need to add the ROS 2 apt repository to your system. First, ensure that the Ubuntu Universe repository is enabled.
$ sudo apt install software-properties-common
$ sudo add-apt-repository universe
Now add the ROS 2 GPG key with apt.
$ sudo apt update && sudo apt install curl -y

$ sudo curl -sSL https://raw.githubusercontent.com/ros/rosdistro/master/ros.key -o /usr/share/keyrings/ros-archive-keyring.gpg
Then add the repository to your sources list.
$ echo "deb [arch=$(dpkg --print-architecture) signed-by=/usr/share/keyrings/ros-archive-keyring.gpg] http://packages.ros.org/ros2/ubuntu $(. /etc/os-release && echo $UBUNTU_CODENAME) main" | sudo tee /etc/apt/sources.list.d/ros2.list > /dev/null
1.3. apt Package Updation:
Do apt package update and upgrade,
$ sudo apt update
$ sudo apt upgrade
On Ubuntu 22.04, for humble to work properly you need systemd and udev to be updated. To see if these packages are in their latest version or not, use below command,
$ sudo apt-get install --only-upgrade udev systemd
1.4 Install ROS 2 Humble:
Now, let’s install ROS 2 using the apt package manager. The official documentation recommends installing the ros-humble-desktop-full package, as it includes ROS 2, RViz, demos, Gazebo, tutorials, and more, all bundled together. However, if you prefer to install Gazebo separately, you can use the ros-humble-desktop package instead.
$ sudo apt install ros-humble-desktop-full

# OR

$ sudo apt install ros-humble-desktop
1.5 Sourcing .bashrc file:
Add below command in .bashrc to automatically load humble when opening a terminal,
# open ~/.bashrc and add this line
echo "source /opt/ros/humble/setup.bash" >> ~/.bashrc

# close gedit and source `.bashrc`
$ source ~/.bashrc
Run $ ros2, to verify if the installation was done correctly or not.
2. Additional Installations:
2.1 ROS 2 Build tool:
In ROS1, the preferred build tool was catkin, but in ROS 2 it is colcon. Install that using the command,
$ sudo apt install python3-colcon-common-extensions
Above command, install colcon_argcomplete as well. add below in the .bashrc,
$ echo "source /usr/share/colcon_argcomplete/hook/colcon-argcomplete.bash" >> ~/.bashrc

# close gedit and source `.bashrc`
$ source ~/.bashrc
colcon supports multiple build types. The recommended build types are ament_cmake and ament_python. Also supported are pure cmake packages.
2.2 Setup colcon_cd:
Run below command to enable colcon_cd,
$ echo "source /usr/share/colcon_cd/function/colcon_cd.sh" >> ~/.bashrc

$ echo "export _colcon_cd_root=/opt/ros/humble/" >> ~/.bashrc

# close gedit and source `.bashrc`
$ source ~/.bashrc
2.3 Understanding rosdep Understanding rosdep
Understanding rosdep is crucial. This tool identifies and installs dependencies, acting as a meta-package manager. It uses its system knowledge and the package.xml file to find and install the appropriate packages, referred to as rosdep keys. These keys are cross-referenced against a central index to locate the exact package name for installation. rosdep retrieves this central index to your local machine to avoid network access each time it runs. Here are the instructions to install rosdep,
$ sudo apt-get install python3-rosdep
Note 💡
On Debian and Ubuntu, there is another, similarly named package called python3-rosdep2. If that package is installed, make sure to remove it before installing python3-rosdep.
First time using rosdep, it must be initialized via,
$ sudo rosdep init # creates a source list file

$ rosdep update
Finally, we can run rosdep install to install dependencies. Run the following command from the root of the workspace,
$ rosdep install --from-paths src -y --ignore-src
3. Test ROS 2
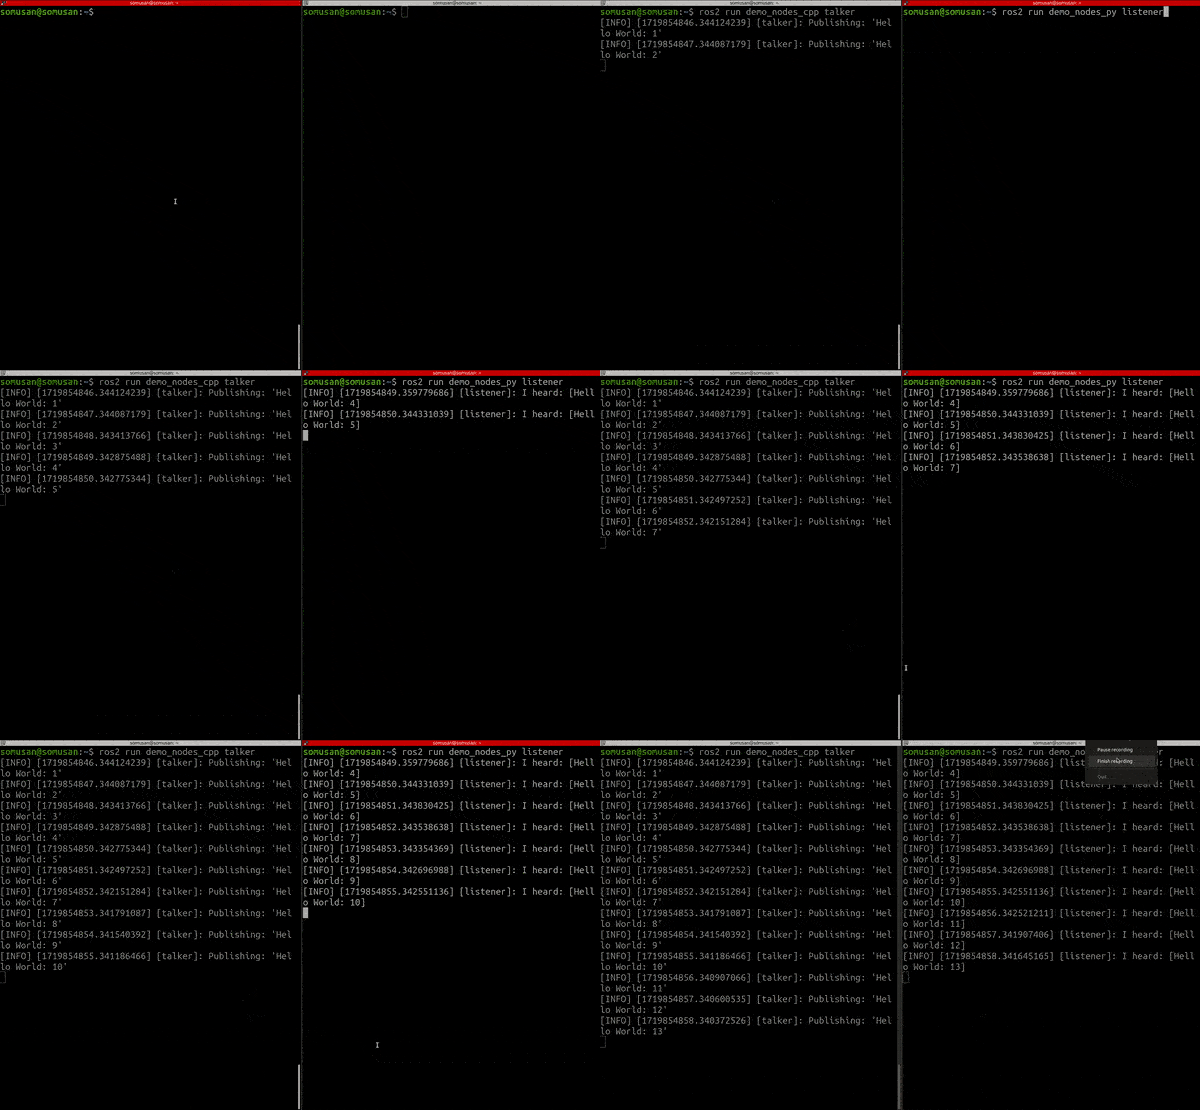
Let’s check if ROS 2 is working properly. To check that we will be using an in-built publisher and subscriber. Run the below commands to check,
# in a new terminal
$ source /opt/ros/humble/setup.bash

$ ros2 run demo_nodes_cpp talker
# in a new terminal (in terminator, Ctrl + Shift + E)
$ source /opt/ros/humble/setup.bash

$ ros2 run demo_nodes_py listener
Below is the expected output of the above commands.

Man, it was a total no-brainer, wasn’t it!
Carla Simulator Installation Ubuntu 22.04

Done installing ROS 2! Let’s move to the Carla installation for Ubuntu 22.04. We will be installing the Carla version 0.9.14. Make sure you install this version because the Carla ROS Bridge is compatible with this only. Below are the steps,
You can try to install all the dependencies and compile everything from scratch by following the official guide. But, we are just going to download the pre-compiled file and use it. To do so,
- Download the CARLA_0.9.14.tar.gz from this link under your
/home/<username>. - Make a folder named
carla_simulatorinside/home/<username>and unzip that tar file inside.
$ mkdir ~/carla_simulator
$ tar -xvzf CARLA_0.9.14.tar.gz -C ~/carla_simulator
- Download the carla-0.9.14-py3.10-linux-x86_64.egg file from the mentioned link and place it under
~/carla_simulator/PythonAPI/carla/dist/. - Install the Carla package in python 3.10, and finally check by importing Carla.
$ pip install ~/carla_simulator/PythonAPI/carla/dist/carla-0.9.14-cp310-cp310-linux_x86_64.whl

$ python
>>> import carla
- Let’s update the paths for Carla in
.bashrc.
$ echo "export CARLA_ROOT=/home/$(whoami)/carla_simulator" >> ~/.bashrc

$ echo "export PYTHONPATH=$PYTHONPATH:${CARLA_ROOT}/PythonAPI/carla/dist/carla-0.9.14-py3.10-linux-x86_64.egg" >> ~/.bashrc


# close gedit and source bashrc
$ source ~/.bashrc
- Finally, check by running below command as well,
$ cd ~/carla_simulator

# for CPU
$ ./CarlaUE4.sh

# OR,

# for GPU
$ ./CarlaUE4.sh -prefernvidia
NB:
- Replace
<username>with your ubuntu username. - Make sure you have an NVIDIA driver and cuda-toolkit installed in your system, unless Carla won’t be able to use your GPU.
Carla ROS 2 Bridge Setup

The Carla ROS-Bridge officially supports ROS 2 Foxy on Ubuntu 20.04. To make it work with ROS 2 Humble on Ubuntu 22.04, we will use a modified fork of the ROS-Bridge. You can find the updated Carla ROS-Bridge here.
Requirements are,
- OS: ubuntu 22.04 (Done)
- ROS 2: Humble (Done)
- Carla Simulator: 0.9.14 (Done)
As we have all the requirements fulfilled. Let’s run below commands to install carla ros-bridge.
#required for running `ros-bridge`
$ sudo apt install ros-humble-derived-object-msgs

$ mkdir -p ~/carla-ros-bridge/catkin_ws/src

$ cd ~/carla-ros-bridge/catkin_ws/src

$ git clone --recurse-submodules https://github.com/gezp/carla_ros.git -b humble-carla-0.9.14

$ cd .. # after cd make sure you are inside ~/carla-ros-bridge/catkin_ws/

$ rosdep install --from-paths src --ignore-src -r
$ pip install pygame
$ colcon build --symlink-install
$ source install/setup.bash
- Run below commands to start
ros-bridge. Please download theobjects.jsonandcarla_ros.rvizthese two files will be used in future.
# in a new terminal, run carla first
$ cd ~/carla_simulator
$ ./CarlaUE4.sh  # or ./CarlaUE4.sh -prefernvidia

# in a new terminal, get inside the `carla-ros-bridge/colcon_ws` folder
$ cd ~/carla-ros-bridge/colcon_ws
$ source install/setup.bash # source the workspace
# launch the `carla ros-bridge`
$ ros2 launch carla_ros_bridge carla_ros_bridge.launch.py synchronous_mode:=True town:=Town03 # <town number, eg: 03>

# in a new terminal, launch the objects.json
$ cd ~/carla-ros-bridge/colcon_ws
$ source install/setup.bash # source the workspace
$ ros2 launch carla_spawn_objects carla_example_ego_vehicle.launch.py spawn_sensors_only:=False objects_definition_file:=/absolute/path/to/objects.json

# in new terminal, launch the rviz2
$ rviz2 -d /path/to/carla_ros.rviz
- After running the
carla_ros_bridgecommand,ros2 launch carla_ros_bridge carla_ros_bridge.launch.py, if you are getting timeout error, try using./CarlaUE4.sh -vulkan, if this doesn’t work out try using-openglflag.
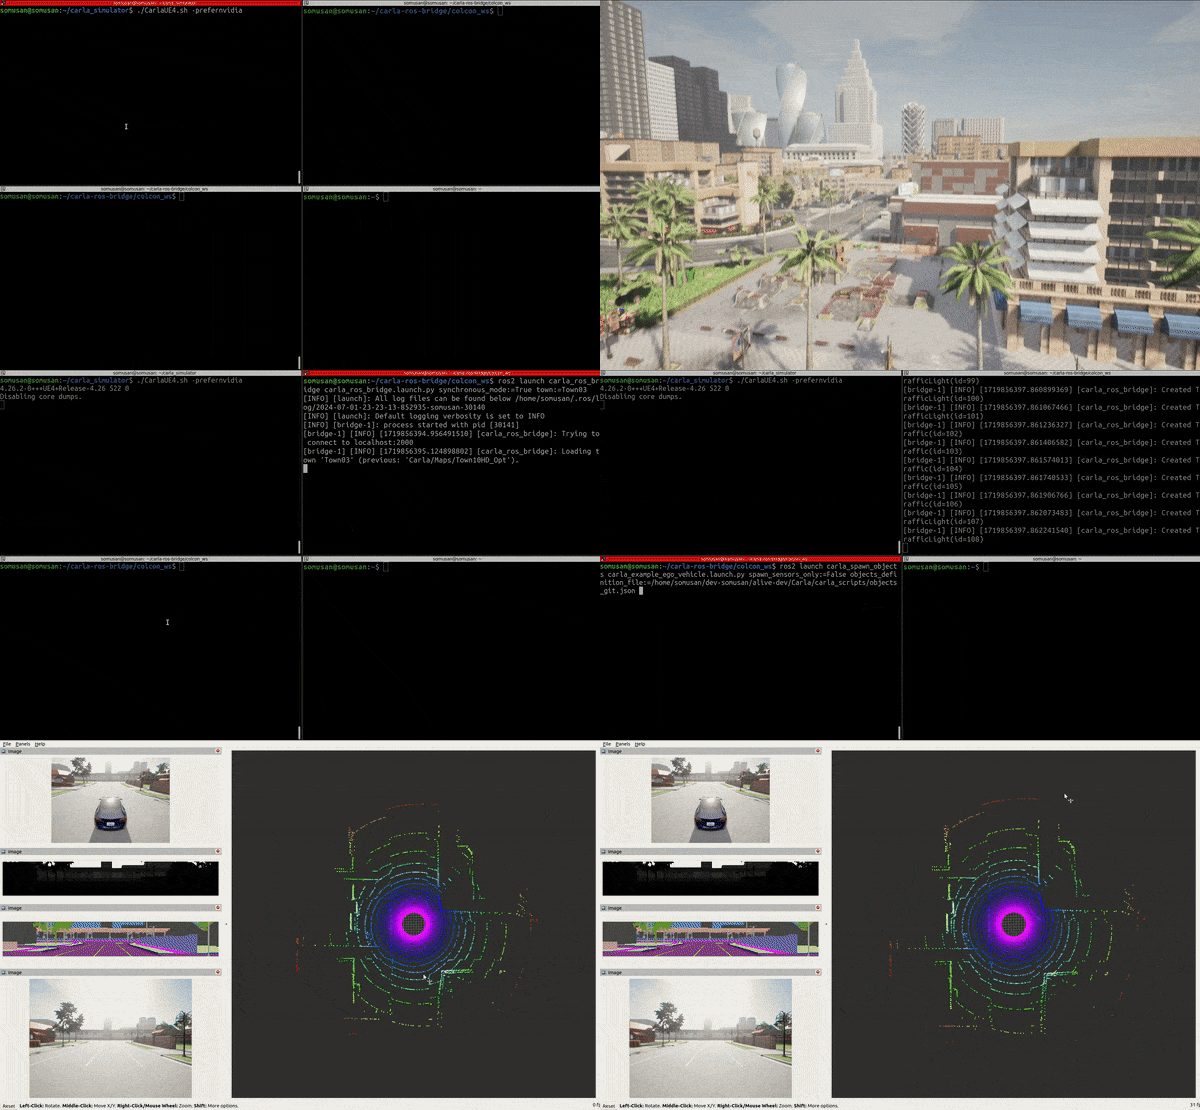
- Below is the expected output from the above commands.

- If you face any issue with
transforms3dthen reinstall it and the it should be fine.
And voila! Setup is complete!
Setup Carla using Docker

Because of the compatibility issue with other OS or for some system related issue there might be some problems that might hold you back from installing Carla. For this we are providing a detailed guide on how to setup Docker for robotics and how to install Carla in Docker.
Let’s start by installing docker, then we will proceed to installing Carla one-by-one. This tutorial assumes that you are using Ubuntu 22.04.
1. Install Docker on ubuntu 22.04
$ curl -fsSL https://get.docker.com -o get-docker.sh

$ sudo sh get-docker.sh
The default docker installation makes docker a root user. Docker needs to have this root access because it uses Unix Socket for inter-process communication. And a unix socket needs to have root access.
To keep the docker environment separate from the local environment we create a separate user docker and give it root access, so that it doesn’t need to use sudo all the time at the beginning of the command.
# Create the `docker` group.
$ sudo groupadd docker

# Add your user to the `docker` group.
$ sudo usermod -aG docker $USER

# to check if docker service is enabled on boot
$ systemctl is-enabled docker

$ sudo reboot
2. Run hello-world Container
Let’s, test the docker installation by running below commands,
$ docker # expected is a long output, if it says docker command not found then there is an issue in installing.

$ docker run hello-world
Installing NVIDIA Container Toolkit for Docker
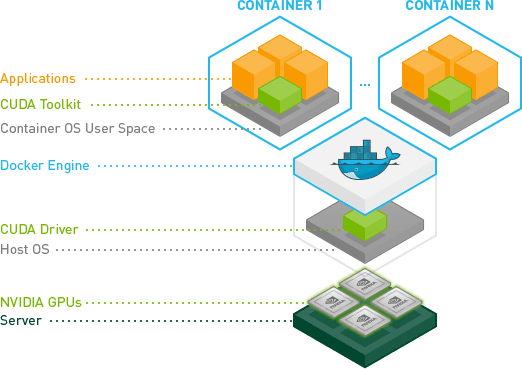
Even if you have cuda-toolkit installed in your system, docker can’t access it. So, when you run any GPU intensive image it will crash. Here comes the NVIDIA Container Toolkit. This toolkit creates a by-pass for the already installed cuda, making it easier for the Container OS to use the system CUDA seamlessly. See the below diagram.

To install this in apt, follow these commands,
# Download the NVIDIA GPG key and save it
$ curl -fsSL https://nvidia.github.io/libnvidia-container/gpgkey | sudo gpg --dearmor -o /usr/share/keyrings/nvidia-container-toolkit-keyring.gpg

# Download the NVIDIA container toolkit list and modify it
$ curl -s -L https://nvidia.github.io/libnvidia-container/stable/deb/nvidia-container-toolkit.list | \
  sed 's#deb https://#deb [signed-by=/usr/share/keyrings/nvidia-container-toolkit-keyring.gpg] https://#g' | \
  sudo tee /etc/apt/sources.list.d/nvidia-container-toolkit.list
Optionally, configure the repository to use experimental packages:
$ sed -i -e '/experimental/ s/^#//g' /etc/apt/sources.list.d/nvidia-container-toolkit.list
Update the packages list from the repository,
$ sudo apt-get update
Install the NVIDIA Container Toolkit packages
$ sudo apt-get install -y nvidia-container-toolkit
Now that we are done with all the docker setup, let’s install Carla.
Install Carla in Docker
Let’s install Carla in docker.
# Pull a specific version
docker pull carlasim/carla:0.9.14
Now, run the docker image. The below command should open up the Carla town window.
$ sudo docker run --name carlasim --privileged --gpus all --net=host \
-e DISPLAY=$DISPLAY -e  SDL_VIDEODRIVER=x11 \
-v /tmp/.X11-unix:/tmp/.X11-unix:rw \
carlasim/carla:0.9.11 /bin/bash ./CarlaUE4.sh -vulkan
Let’s break down the above command.
sudo docker run: this runs the docker image with admin privileges.--name carlasim: provide the name of the docker image that we want to run.--privileged: Grants extended privileges to the container. This is often used to give the container access to devices or to perform actions that are typically restricted.--gpus all: Allocates all available GPUs to the container. This is necessary for running GPU-accelerated applications.--net=host: Uses the host’s network stack for the container. This means that the container will share the host’s IP address and network interfaces, simplifying network configuration and allowing the container to use network services directly.-e DISPLAY=$DISPLAY: Sets theDISPLAYenvironment variable inside the container to the same value as on the host. This allows graphical applications inside the container to be displayed on the host’s screen.-v /tmp/.X11-unix:/tmp/.X11-unix:rw: Mounts the/tmp/.X11-unixdirectory from the host into the container with read-write permissions. This directory is used for X11 display server communication, allowing the container to display graphics on the host’s screen.carlasim/carla:0.9.11: Specifies the Docker image to use for the container. In this case, it uses version `0.9.11` of thecarlasim/carlaimage./bin/bash ./CarlaUE4.sh -vulkan: Specifies the command to run inside the container once it starts. Here, it runs a Bash shell to execute theCarlaUE4.shscript with the-vulkanoption, which tells CARLA to use the Vulkan graphics API.
If you face any issue setting up Carla in Docker, follow this official documentation.
Uninstall ROS 2 Humble
Below are the instructions on how to completely remove ROS 2 from your system. Run the below commands one-by-one.
$ sudo apt remove ~nros-humble-* && sudo apt autoremove
$ sudo rm /etc/apt/sources.list.d/ros2.list
$ sudo apt update
$ sudo apt autoremove

# Consider upgrading for packages previously shadowed.
$ sudo apt upgrade
Let’s remove the ROS 2 commands from .bashrc. Open the .bashrc using the command below and remove the following lines,
$ gedit ~/.bashrc

# remove below lines from the `.bashrc`
1. source /opt/ros/humble/setup.bash
2. source /usr/share/colcon_argcomplete/hook/colcon-argcomplete.bash
3. source /usr/share/colcon_cd/function/colcon_cd.sh
4. export _colcon_cd_root=/opt/ros/humble/
Uninstall Carla and ros-bridge
We have downloaded the pre-compiled files, so we just need to delete the folder where the compiled files are stored.
First we will remove Carla and then proceed to remove carla ros-bridge. Run the below commands to remove Carla,
$ rm -rf /home/<username>/carla_simulator
Open .bashrc and remove all the Carla related lines,
# Open ~/.bashrc
$ gedit ~/.bashrc

# remove this line
export CARLA_ROOT=/home/somusan/CARLA_0.9.14/

# remove this line
export PYTHONPATH=$PYTHONPATH:${CARLA_ROOT}/PythonAPI/carla/dist/carla-0.9.14-py3.10-linux-x86_64.egg

# close gedit and source .bashrc
source ~/.bashrc
Let’s remove Carla Ros-bridge. We will simply delete the carla-ros-bridge folder created in your home directory.
$ rm -rf ~/carla-ros-bridge
Remove Docker Image and Uninstall Docker from Ubuntu 22.04
1. Remove Docker Image
Purging a docker image is pretty easy, it can be done in different ways, but in this guide, we will show how to do this using the docker image id. First, the docker ls command is used to get the docker image id of the specified image that you want to delete, then using the remove command to purge it. Follow the commands below,
# to see what images we have,
$ docker image ls

# copy the `IMAGE ID` from the previous command output
$ docker image rm -f 95ae4b17d967
2. Uninstall Docker
Now, let’s uninstall docker,
$ sudo apt-get remove docker docker-engine docker.io containerd runc
Delete Docker Data (optional, if you want to remove all Docker data),
$ sudo rm -rf /var/lib/docker

$ sudo rm -rf /var/lib/containerd
Well, that’s the end of this tutorial! Hope you learned to install ROS 2 and Carla.
Conclusion
In this ROS 2 and Carla setup guide, we’ve navigated the complexities of setting up ROS 2 and Carla on Ubuntu 22.04, ensuring you have the right tools to develop and test your robotics projects efficiently. We’ve covered everything from installing the Terminator terminal for a more productive workflow to setting up ROS 2 Humble and integrating it with the Carla simulator. By exploring Docker installation, we provided a robust alternative for environments where direct installation might face compatibility issues.
Through this guide, you’ve set up your development environment and learned how to install dependencies, configure your system for optimal performance, and even remove these tools when they’re no longer needed. This comprehensive approach ensures that you’re well-equipped to handle various scenarios in your robotics journey.
As you continue with your robotics projects, remember that the knowledge gained from this guide is foundational. The ability to set up and configure advanced tools like ROS 2 and Carla is crucial for developing sophisticated autonomous systems. Stay curious and keep experimenting with different configurations and integrations. The field of robotics is ever-evolving, and your ability to adapt and learn will be your greatest asset.
Thank you for following this ROS 2 and Carla setup guide. We hope it has been informative and helpful, paving the way for your future innovations in robotics. Stay tuned for more articles in our Robotics Blog Series, where we’ll continue to explore exciting technologies and projects in the world of robotics. Happy coding!
References
- Carla 0.9.14 Setup Documentations
- ROS 2 Humble Setup Documentations for Ubuntu 22.04
- Carla ros-bridge Documentation
- Docker Installation Documentations


