The training of neural network architectures is what drives most of us who are involved in the field of Deep Learning. We fixate endlessly over the amount of data, its quality, and what neural network architectures we should use. But is it really the right way to go? Isn’t optimizing the model for deployment equally important for it will speed up inference. Well, the Intel OpenVINO Toolkit lets you do just that. It’s one of the best tools for neural network model optimization, when the target device is: Intel hardware like the Intel CPU and integrated GPU, or edge device like the OAK-D.
So, in this post, let’s get to know the Intel OpenVINO Toolkit fully, starting from installation to running a pre-trained model, optimized with OpenVino, on an Intel CPU, in near real-time.

This post is the first in the OpenVINO series, which consists of the following posts:
- Introduction to OpenVINO Toolkit
- Post Training Quantization with OpenVino Toolkit
- Running OpenVino Models on Intel Integrated GPU
- Introduction to OpenVino Deep Learning Workbench
- Overview of Intel OpenVINO Toolkit
- The OpenVINO Toolkit workflow
- OpenVINO Intermediate Representation
- Installing Intel OpenVINO Toolkit
- Getting familiar with OpenVINO Directory Structure
- Model Conversion to OpenVINO Format
- Tiny YOLOv4 Model Conversion
- Driver-Action Recognition Demo
- Conclusion
After going through this post, you will get a good understanding of the OpenVINO toolkit.
Overview of OpenVINO Toolkit
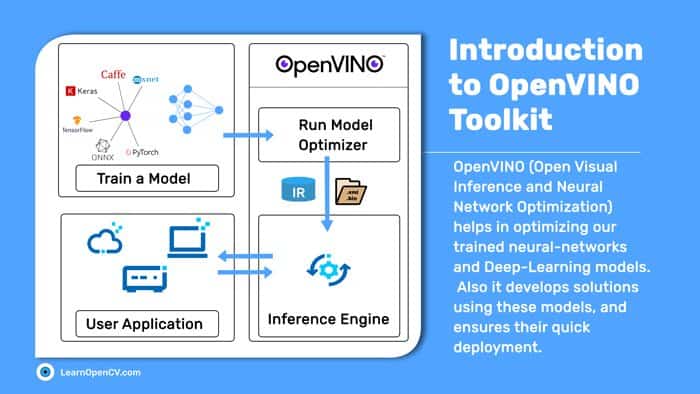
Firstly, what is OpenVINO? OpenVINO stands for Open Visual Inference and Neural Network Optimization, and it does exactly what the name suggests. It optimizes our trained neural network models, so that we can very efficiently use them for inference.
The Intel OpenVINO Toolkit is an open-source tool that not only helps optimize Deep Learning models, but also develops solutions using these models, and ensures their quick deployment. That’s not all. Coupled with the optimized image and video-processing pipeline, the OpenVINO toolkit goes on to provide fast inference on the edge as well.
Okay, there’s one thing it does not do, that is support training of neural networks. But then, don’t we already have numerous good frameworks for deep neural network training? Also, it’s important to emphasize everything that OpenVINO Toolkit does, i.e., optimization and Deep Learning inference at scale, it does it the best.
Why Choose the OpenVINO Toolkit?
The answer shall slowly unfold as we move through the post. For now, let’s list out a few important points that make the OpenVINO Toolkit stand out.
- It supports neural network architectures for computer vision, speech and natural language processing.
- OpenVINO Toolkit supports a wide range of Intel hardware, including CPUs, Integrated GPUs and VPUs.
- It also has an official Model Zoo, which provides many state-of-the-art, pre-trained models. All these models are already optimized for the OpenVINO toolkit, and provide fast inference straight out of the box.
- Contains many optimizations tools that speed up the scalability of neural-network deployment.
- OpenVINO Toolkit also provides an optimized OpenCV library for faster processing of images and videos.
Deep Learning Tasks Supported by Intel OpenVINO
It’s a huge list.
- The OpenVINO Toolkit provides solutions for numerous computer vision tasks like image classification, human-activity recognition and object detection etc.
- It also supports natural language processing tasks like question answering, machine translation and text to speech.
- Perhaps, the OpenVINO toolkit is best known for supporting famous neural network architectures in computer vision that include Faster RCNN, SSD, different versions of YOLO, among others. But it supports non-vision-based architectures as well. These include models like BERT (for question answering) and SentencePieceBPETokenizer (for machine translation).
Let’s now get familiar with the Intel OpenVINO toolkit and focus on vision-based tasks.
Devices That Are Best Suited for Intel OpenVINO Optimization and Inference Workloads
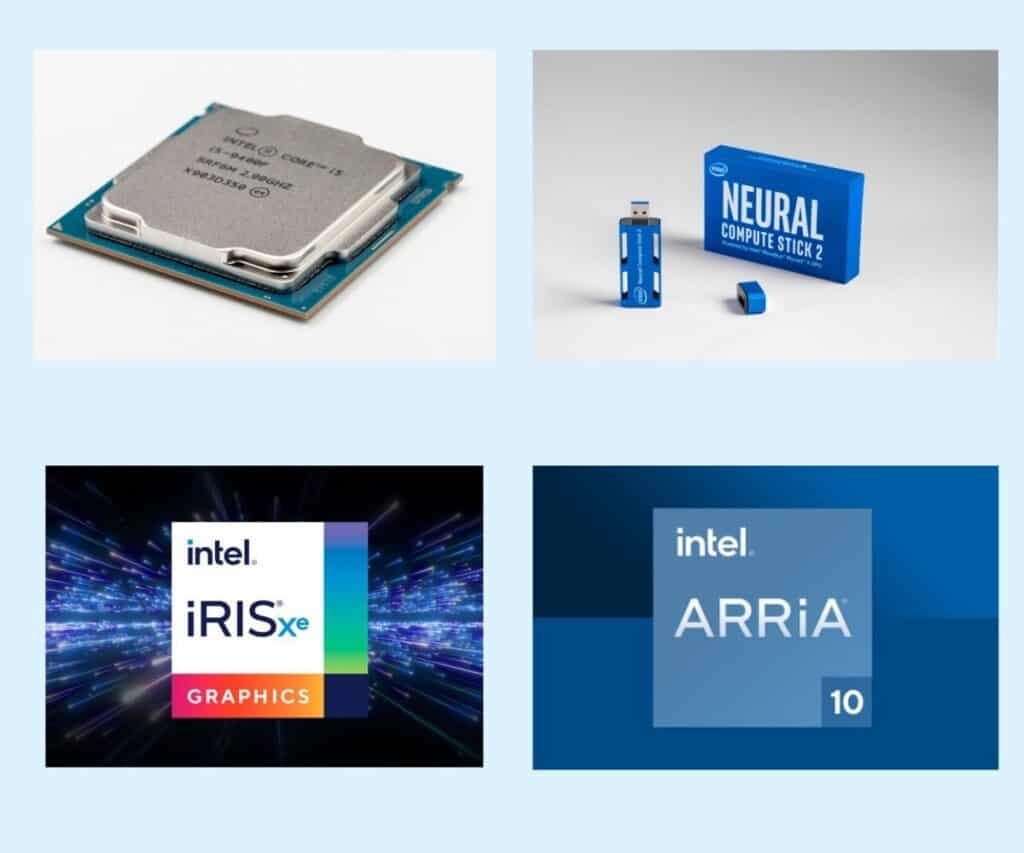
The Intel OpenVINO-optimized models obviously will run best on Intel hardware. These include:
- A wide range of Intel Xeon Scalable and Intel Core processors. Also, Intel Pentium processors, equipped with an Intel HD graphics card. Even the Intel Atom processors.
- Intel iGPUs (Integrated GPUs) like Intel Iris, Intel HD graphics, and Intel UHD cards as well.
- FPGAs like the Intel Arria 10 FPGA GX.
- Intel Neural Compute Stick 2 powered by the Myriad X VPU.
Besides Intel Neural Compute Stick 2, OAK 1 and OAK-D are two other devices powered by the Myriad X VPU that use OpenVINO’s optimized model.
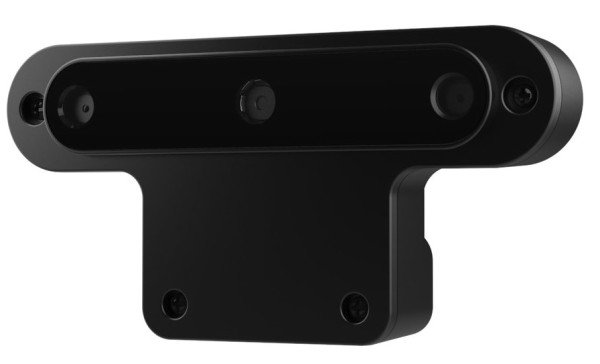
Both OAK-1 and OAK-D use OpenVINO’s Intermediate Representation (IR) files to get to the final model file (a .blob file) that they support.
One toolkit servicing so many devices! No wonder the Intel OpenVINO Toolkit is today considered one of the best options out there for delivering deep neural network solutions. You can not only scale the deployed computer-vision application to a number of cameras very easily. But also access every toolkit requirement and supported hardware just by visiting this official link.
Optimized Hardware for FP32 and INT8 Models
Both FP32 and INT8 models, whether from the official Intel Model zoo or the public repository, run best on CPU. Though FP16 models too are supported on CPU, they perform best on a GPU. Our third post in this series will tell you more about running FP16 models on the GPU.
Want to know which plugin supports which precision formats? Check out the table below:
| Plugin | FP32 | FP16 | I8 |
| CPU plugin | Supported and preferred | Supported | Supported |
| GPU plugin | Supported | Supported and preferred | Supported* |
| VPU plugins | Not supported | Supported | Not supported |
| GNA plugin | Supported | Supported | Not supported |
*currently, only limited set of topologies might benefit from enabling I8 model on GPU (Source)
For a more extensive look into the supported devices for models with different precision, please visit this site.
The OpenVINO Toolkit Workflow
Before you deep dive into the working of the OpenVINO Toolkit, take a look at the typical workflow of OpenVINO Toolkit.
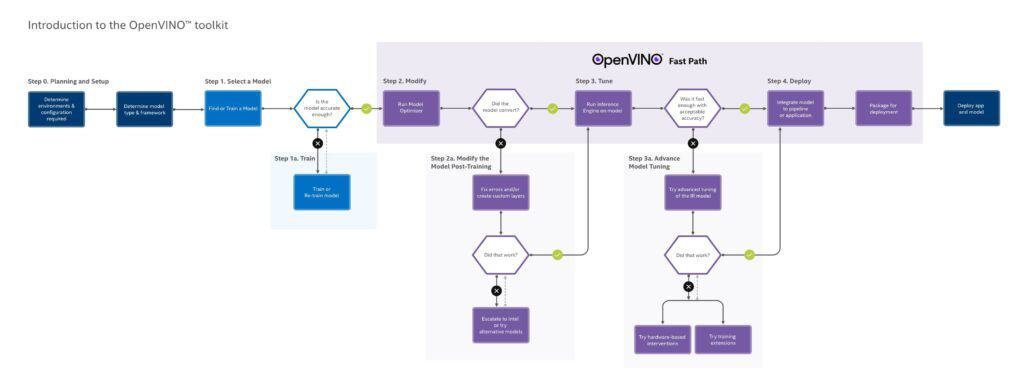
The above figure shows all the processes that take place when OpenVINO is used, as intended, i.e., starting from choosing the:
- target platform (local or remote)
- the model
- till the deployment of the neural network model
One thing that stands out in the workflow diagram is the model training step. But we know for a fact that Intel OpenVINO does not support training of deep neural networks. Look carefully again. You’ll find that
- All the components Intel OpenVINO supports start only from Step 2.
- All the processes before that i.e., till Step 1a relate to training, and are thus outside the OpenVINO workflow.
- Till Step 1a, we therefore need to choose the environment and configuration, the neural network model and framework. Then train the model as well.
All of this happens independent of Intel OpenVINO Toolkit.
To understand the workflow even more clearly, let’s combine the sub-steps and make the illustration compact and easy to follow.
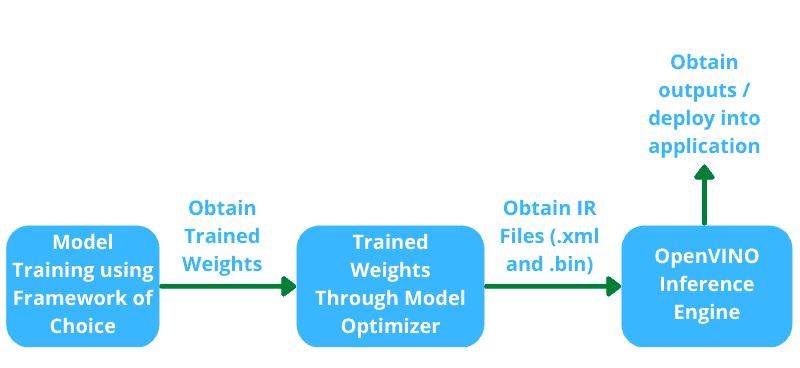
In the above figure, all the steps and their respective substeps have been condensed in order to highlight these 4 most important steps in the OpenVINO Toolkit workflow:
- We start by training a Deep-Learning model with the framework of our choice.
- Next, run the model optimizer to obtain the optimized IR (Intermediate Representation), in the form of a
.xmland.binfile. - After that, employ OpenVINO’s Inference Engine to carry out inference.
- Finally, we deploy our neural network model, after packaging it into a user application.
A Brief About OpenVINO Intermediate Representation
The OpenVINO Toolkit represents neural network models with the help of two files:
- An XML (
.xml) file—this file contains the neural network topology, more commonly known as the architecture. - A binary (
.bin) file—it contains the weights of the neural network model.
This representation is called the OpenVINO Intermediate Representation (IR).
Okay, so what’s there in an XML file?
- The XML file has different tags to represent the neural network operations and the data flow between them. For example, the
<layer>tag is meant for operations like convolution or max-pooling.
Here’s a short snippet of one such XML file.
<net name="yolo-v2-tiny-ava-0001" version="10">
<layers>
<layer id="0" name="data" type="Parameter" version="opset1">
<data element_type="f32" shape="1,3,416,416"/>
<output>
<port id="0" names="data:0" precision="FP32">
<dim>1</dim>
<dim>3</dim>
<dim>416</dim>
<dim>416</dim>
</port>
</output>
</layer>
...
<layer id="5" name="yolov2/darknet_model/conv1/Conv2D/Transpose2101_const" type="Const" version="opset1">
    <data element_type="f32" offset="24" shape="16,3,3,3" size="1728"/>
    <output>
    <port id="0" names="yolov2/darknet_model/conv1/W/read:0" precision="FP32">
    <dim>16</dim>
    <dim>3</dim>
    <dim>3</dim>
    <dim>3</dim>
   </port>
   </output>
</layer>
…
</meta_data>
</net>
The above block shows a small part of the Tiny YOLOv2 XML file. One of the <layer> tags, as you can see, contains the convolution operation. Similarly, in the rest of the topology, the other <layer> tags may contain pooling or activation operations. The different sub-tags represent the data type, as well as the input and output dimensions.
- The XML file does not contain any model weights. It only has the topology for the corresponding binary (
.bin) file that contains the model weights.
Installing Intel OpenVINO Toolkit
In this post, we will cover the installation steps for the Ubuntu 20.04 OS, 2021.3 version (the latest version available currently) of the Intel OpenVINO Toolkit. The same steps also apply, if you are on Ubuntu 18.04.
Look at the following video, it shows all the steps in the GUI installation process.
If you are more comfortable following the steps in written format, no problem. We’ve listed each step to install Intel OpenVINO Toolkit in detail here. Let’s go over it together now.
Step 1: Download the Correct Version of OpenVINO Toolkit
Head over to the official download page to get the correct version of OpenVINO, after choosing all the prerequisites according to your needs and OS.
For example, the following image shows us selecting to download the local installer of OpenVINO 2021.3 version for the Linux operating system.
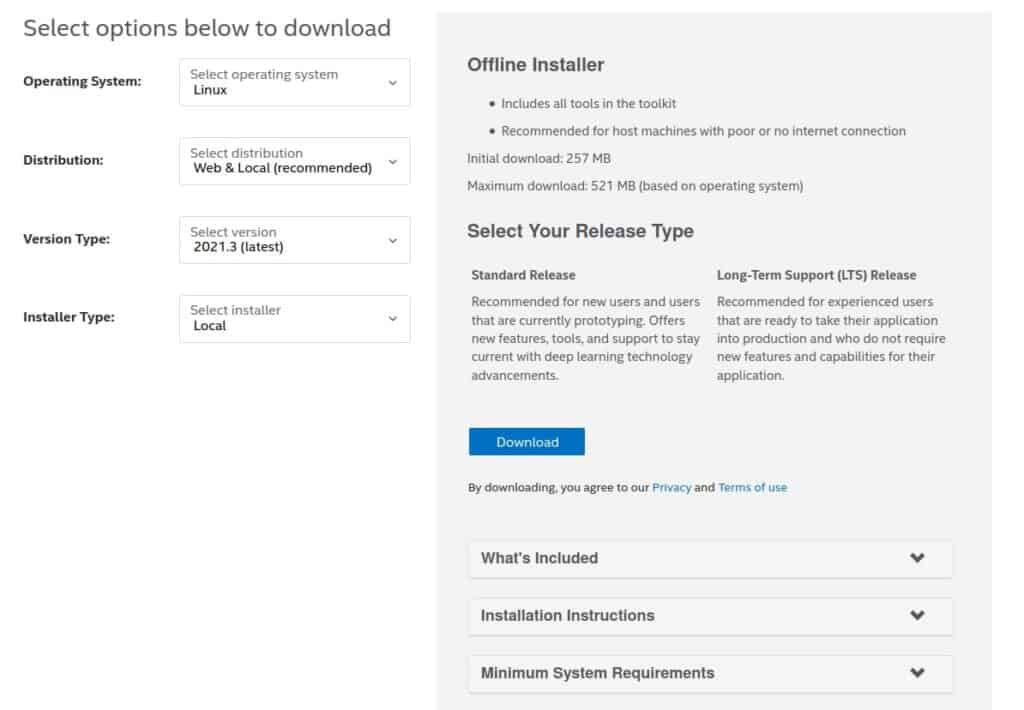
Which version should you download? Any of the older, available versions will work too. But better to go with the latest version for it provides the most updated functionalities of the toolkit. Choose any version, starting from OpenVINO 2018 R50.1. Just keep in mind that all these versions are fully supported only on Ubuntu 18.04 LTS and 20.04 LTS.
Click the download button. It will download a file named l_openvino_toolkit_p_<version>.tgz, where <version> is the version number you have chosen to download.
Step 2. Unpack the Installer File
Open your terminal and cd into the directory where you kept the OpenVINO installer file. Then unpack the file, using the following command:
tar -xvzf l_openvino_toolkit_p_<version>.tgz
After unpacking, you will see a l_openvino_toolkit_p_<version> folder in your current working directory. This contains the OpenVINO installer and other required files.
Step 3. Install OpenVINO Toolkit
Now, cd into the l_openvino_toolkit_p_<version>. You get three options to install OpenVINO on your system.
- The graphical user interface (GUI) installation wizard
- The command line installer
- The command line installer, with silent instructions.
We will use the GUI installation wizard, that is the install_GUI.sh file, as it is the easiest and most intuitive to follow.
To start the installation, type the following command in your terminal.
sudo ./install_GUI.sh
Note: You can also continue with the installation processes, without the sudo access.
Step 4: Following the Installation Instruction on Screen
First, comes the welcome screen, and then the license agreement. Next, you will see the prerequisites screen, similar to the image below.
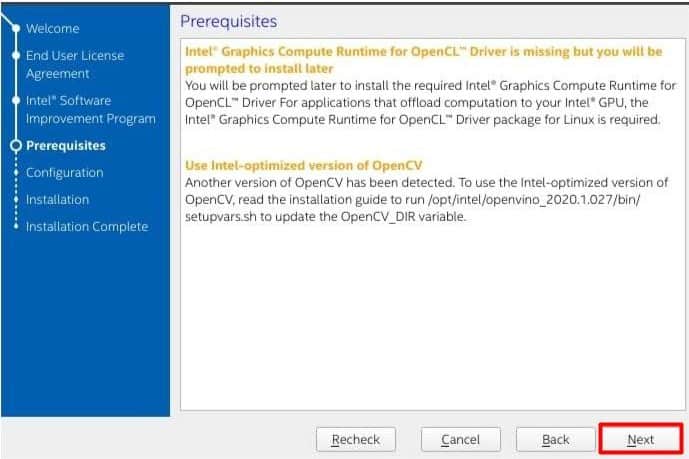
Even if you get warnings for not meeting the prerequisites, you can still proceed with the installation. These can be installed later, when you are installing the dependencies.
After this comes the installation-configuration summary screen.
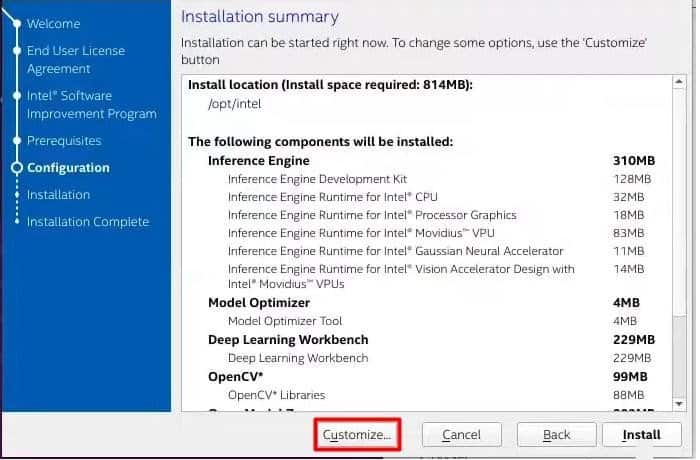
If you wish, you can also customize the configurations, and choose what you want to install.

First, choose the components, then move forward with the installation. It takes some time to complete the installation, and you will see a screen, as in the image below:
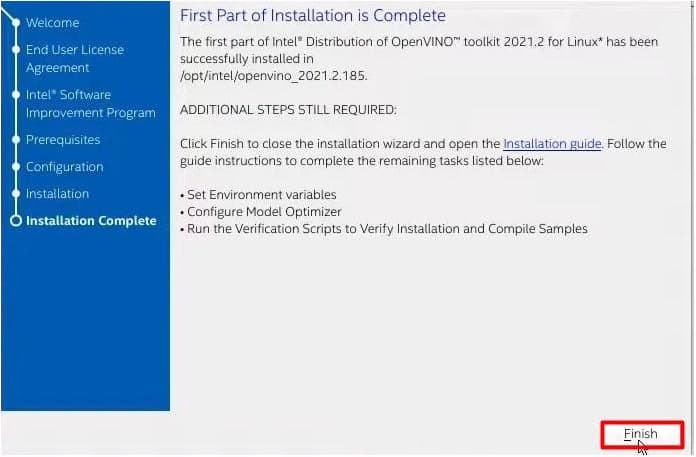
If you installed OpenVINO Toolkit with administrator privileges, in line with the steps listed above, then it will be installed in the /opt/intel/openvino_<version>/ directory.
The next few steps ensure you face no issues while using this toolkit. These steps are necessary irrespective of you wanting to use any advanced functionality of OpenVINO or not. They are also needed to properly run the models available in the Intel Model Zoo.
Step 5: Installing Software Dependencies
These include software dependencies for:
- Intel-optimized build of OpenCV library
- Deep Learning Inference Engine
- Deep Learning Model-Optimizer tools
Change your current working directory to the install_dependencies folder.
cd /opt/intel/openvino_2021/install_dependencies
Run the following script to install the dependencies.
sudo -E ./install_openvino_dependencies.sh
Step 6: Set Up the Environment Variables
To set the environment variables, open a new terminal and type:
vi ~/.bashrc
Go to the end of the file, and add the following line:
source /opt/intel/openvino_2021/bin/setupvars.sh
Note: If you have installed the OpenVINO Toolkit in any other directory of your choice, then please provide that path. In such cases, it should be <path_to_your_directory>/openvino_2021/bin/setupvars.sh.
Now, save and close the file. Shut down your current terminal and open a new one so that system-wide changes can take place.
We’re only one step away from completing installation now. Just configure the Model Optimizer and you’re done.
Step 7: Installing Model Optimizer Prerequisites
The Model Optimizer is a command-line tool in the OpenVINO Toolkit. Use this Model Optimizer to convert models, trained with different frameworks, into a format accepted by the OpenVINO Toolkit for inference.
For your information, the OpenVINO Toolkit does not support inference directly. None of the models trained with Deep-Learning frameworks like TensorFlow, Caffe, MXNet, ONNX, or even Kaldi can help you infer. First, you’ll need to convert these trained models into an Intermediate Representation (IR), which consists of:
- A
.xmlfile, which describes the network architecture - A
.binfile that holds the weights and biases of the trained model
To convert, run the models through the Model Optimizer, after installing the necessary prerequisites.
To configure the Model Optimizer, open your terminal and go to the Model Optimizer prerequisites directory.
cd /opt/intel/openvino_2021/deployment_tools/model_optimizer/install_prerequisites
Execute the following command to run the script that will configure the Model Optimizer for Caffe, TensorFlow, MXNet, ONNX and even Kaldi, at one go.
sudo ./install_prerequisites.sh
This completes the installation process for the OpenVINO Toolkit. Now, you are all set to use any model from the Intel Model Zoo, or to convert the models for inference.
Getting Familiar with the OpenVINO Toolkit Directory Structure
Navigating through the freshly installed OpenVINO Toolkit can be a bit overwhelming for newcomers. It contains a lot of directories, with each directory having numerous sub-directories.
Look at the image below. You will see a similar structure inside your installed directory.

This tree structure can help you visualize how OpenVINO structures its directories.
├── demo
│   ├── car_1.bmp
│   ├── car.png
│   ├── demo_benchmark_app.sh
│   ├── demo_security_barrier_camera.conf
│   …
├── open_model_zoo
│   ├── CONTRIBUTING.md
│   ├── demos
│   │   ├── 3d_segmentation_demo
│   │   │   └── python
│   │   │       ├── 3d_segmentation_demo.py
│   │   │       ├── models.lst
│   │   │       ├── README.md
│   │   │       └── requirements.txt
│   │   ├── action_recognition_demo
│   │   │   └── python
│   │   │   …
├── model_optimizer
│   ├── mo_caffe.py
│   ├── mo_kaldi.py
│   ├── mo_mxnet.py
│   ├── mo_onnx.py
│   ├── mo.py
│   ├── mo_tf.py
│   ├── requirements_caffe.txt
│   ├── requirements_kaldi.txt
│   ├── requirements_mxnet.txt
│   ├── requirements_onnx.txt
│   ├── requirements_tf2.txt
│   ├── requirements_tf.txt
│   ├── requirements.txt
│   └── version.txt
...

1266 directories, 6032 files
This tree structure displays all the directories we shall discuss now. As you can see, in total the OpenVINO directory contains 1266 sub directories and 6032 files. Let’s go through the important ones now..
While using the OpenVINO Toolkit, for most of our work, we’ll be referring to the deployment_tools directory. So, let’s explore the sub directories in this directory first.
- The
demoDirectory
The demo directory contains some demos that you can run directly, using off-the-shelf optimized models. These models will download automatically when you execute their respective scripts.Your directory structure should look, as shown below:

- The
open_model_zooDirectory
This is one of the most important directories, so you better get comfortable with it. You’ll find here a list of all the official and public models available for use with the OpenVINO Toolkit. Along with that, there are utility scripts to download these models.
The following image shows the sub directories and files inside the open_model_zoo directory.

Look below, here’s the truncated tree structure of the open_model_zoo directory:
├── data
│   ├── dataset_classes
│   └── palettes
├── demos
│   ├── 3d_segmentation_demo
│   │   └── python
│   ├── action_recognition_demo
│   │   └── python
...
    	├── public
    	│   ├── yolo-v3-tiny-tf
    	│   │   └── yolo-v3-tiny-tf
    	│   └── yolo-v4-tf
    	│   	└── keras-YOLOv3-model-set
    	│       	├── cfg
    	│       	├── common
    	│       	├── tools
    	│       	│   └── model_converter
    	│       	└── yolo4
    	│           	└── models
    	└── __pycache__

716 directories
Going over some of its subdirectories:
- The
demosdirectory contains a lot of demo codes that we can execute using the OpenVINO Toolkit, after downloading the models from the Model Zoo. These range from classification to action recognition to object detection, and many more. This is one directory you must definitely explore.
- Coming to the
modelsdirectory, it contains two subdirectories:-
intel– Theintelfolder contains a list of all the official pre-models provided by Intel. These models get downloaded directly in the FP32, FP16, and INT8 precision format, and need no further conversion. public– The models from this folder however are downloaded in the format of the Deep Learning framework they were trained on. For example, TensorFlow models will have.pbformat, Caffe models will have.caffemodel, and so on.
-
Another thing to note here is that these model folders do not contain the actual model weight files. They only have the model documentation and some .yml configuration files. The documentation is a Markdown file containing the model benchmark results, the original framework, parameters, along with information on the input and output format.
- To download one of the
intelorpublicmodels, you need thedownloader.pyscript, which is present in thetools/downloadersubdirectory. While executing the script, you will have to provide the name of the model you want to download. Either give the exact folder name from the models directory, or get the model name from the Markdown documentation file. More on this, when we execute one of the demos.
- Another important subdirectory is the
accuracy_checkerinside tools. For now, just know that we can check the accuracy of different models, using the scripts in this directory.
- The
model_optimizerDirectory
The model_optimizer also happens to be a very important directory, so understand it well. It contains the scripts that convert the trained neural network models to the Intermediate Representation (.xml and .bin files) that OpenVINO accepts. This is mainly for the public models which are not downloaded in the IR format by default.

There are separate Python scripts to convert models from different frameworks like TensorFlow, Caffe, ONNX and MXNet to the OpenVINO IR format. These scripts are named as follows:
mo_tf.pyfor TensorFlow modelsmo_caffe.pyfor Caffe modelsmo_onnx.pyfor ONNX modelsmo_mxnet.pyfor MXNet models
Along with these, there is also one mo.py which acts like a universal model converter script. You can just use this to convert any trained model into the OpenVINO IR format.
Further down, we will also show you how to use the Model Optimizer, and the way models are converted from Caffe and TensorFlow frameworks to the OpenVINO IR format.
By now you know most of the important directories, along with the files they contain. These are the ones we will use on a regular basis with the OpenVINO Toolkit.
Converting Trained Models from Different Frameworks to OpenVINO-IR Format
Let’s now focus on the model-conversion process. Here, you will basically learn to convert pre-trained Deep Learning models from supporting frameworks to the OpenVINO IR format. Well, these are the frameworks that OpenVINO toolkit supports: Caffe, TensorFlow, MXNet, Kaldi, PyTorch and ONNX.
Specifically, we will cover the conversion of models from:
- Caffe to OpenVINO IR format
- TensorFlow to OpenVINO IR format
The basic conversion workflow of a pre-trained model from a specific framework to the OpenVINO Toolkit format looks like this:
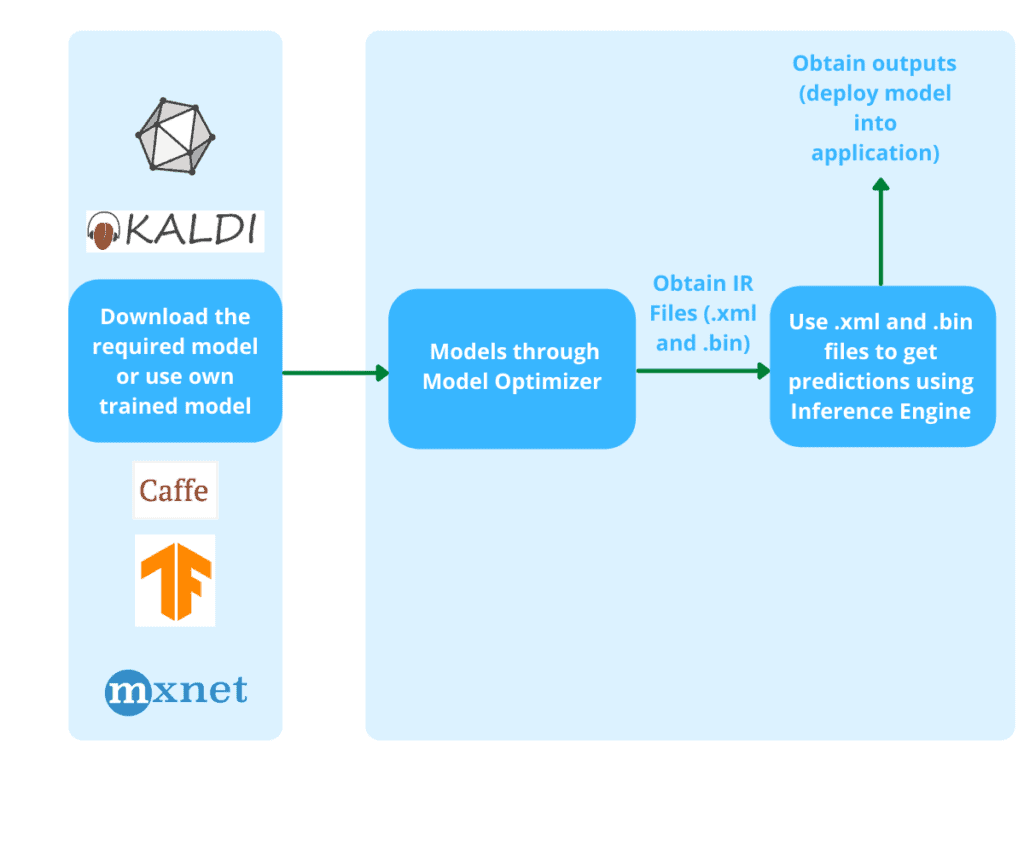
Obviously, there is more to the conversion process. We will cover those details while converting the Caffe and TensorFlow models to the .bin and .xml files.
Converting a SqueezeNet Caffe Model to OpenVINO-IR Format
We start with an image classification model, that is the SqueezeNet Caffe model. It is one of the publicly available models from Model Zoo.
Start the process by following these simple steps:
- Download the SqueezeNet Caffe model from the public Model Zoo.
- Run the model optimizer to convert the Caffe model to IR format.
Begin by downloading the SqueezeNet-Caffe model. Our model is named squeezenet1.1 in the public subdirectory, inside the open_model_zoo directory. Just provide the model name, while executing the downloader.py script to ensure the correct model is downloaded.
Now head over to the tools/downloader directory, inside the deployment_tools. Go there directly by using this specific command:
cd /opt/intel/openvino_2021/deployment_tools/open_model_zoo/tools/downloader
Here, we execute the downloader.py script, with the following command:
python3 downloader.py --name squeezenet1.1
Note: The --name flag accepts the exact name of the model we want to download. Giving a model name that is neither in intel nor in the public model directory will surely result in an error.
Post execution, you will see a public folder in the current working directory, containing the squeezenet1.1 sub directory. It will consist of three files:
squeezenet1.1.caffemodelsqueezenet1.1.prototxtsqueezenet1.1.prototxt.orig
Out of these, the ones that interest us the most are the squeezenet1.1.caffemodel and squeezenet1.1.prototxt files. We need these to run the Model Optimizer and obtain the .xml and .bin files.
- The
.caffemodelfile contains the model weights. - And the
.prototxtfile contains the model architecture required by the Model Optimizer.
Next, we run the model optimizer and convert the Caffe model into IR format. So, head over to the model_optimizer directory.
cd /opt/intel/openvino_2021_3_latest/openvino_2021/deployment_tools/model_optimizer
Next, execute the following command:
python mo.py --input_model squeezenet1.1.caffemodel --batch 1 --output_dir squeezenet_ir
Let us go over the flags we have used:
--input_model: This is the path to the Caffe model that we want to convert into IR format. In the above example, we assume the Caffe model is present in the same directory as themo.pyscript. Please note that even thesqueezenet1.1.prototxtfile should be present in the same directory, so that the script can infer the path to the file on its own. Else you will have to provide the path to the.prototxtfile, using the--input_protoflag.--batch: This flag specifies the batch size for building the OpenVINO models. It comes into play during inference. By default, the batch size is 1. It is the batch size that determines the number of images/frames the model will infer on, when executing the inference scripts.--output_dir: This is the output directory in which the resulting.xmland.binfiles will be stored. In the above example, we have provided it assqueezenet_ir. If absent, the directory will be automatically created.
If everything runs successfully, you should see an output similar to the one below:
Note that install_prerequisites scripts may install additional components.
[ SUCCESS ] Generated IR version 10 model.
[ SUCCESS ] XML file: /home/sovit/my_data/Data_Science/Projects/openvino_experiments/squeezenet1.1_caffemodel/squeezenet_ir/squeezenet1.1.xml
[ SUCCESS ] BIN file: /home/sovit/my_data/Data_Science/Projects/openvino_experiments/squeezenet1.1_caffemodel/squeezenet_ir/squeezenet1.1.bin
[ SUCCESS ] Total execution time: 6.39 seconds.
[ SUCCESS ] Memory consumed: 344 MB.
Inside the squeezenet_ir directory, you will find the two files we need:
squeezenet1.1.bin: This contains the model weights.squeezenet1.1.xml: It has the model topology/architecture.
Voila! We have successfully converted our first image classification Caffe model to the appropriate IR format, which we can now leverage to run inference on Intel hardware.
Converting A TensorFlow Model to OpenVINO-IR Format
Next, we will convert a TensorFlow object detection model into the OpenVINO IR format. For this, we will use the YOLOV3 Tiny TF model from the public models.
We follow the same steps as in the Caffe model conversion. Only we will be dealing with some extra configuration files and flags, while running the Model Optimizer.
Start by downloading the model.
python3 downloader.py --name yolo-v3-tiny-tf
Once the download completes, you will find a yolo-v3-tiny-tf folder, inside the downloader/public directory. This contains
- The
yolo-v3-tiny-tf.jsonfile, which is the model configuration file - The
yolo-v3-tiny-tf.pbfile—this one holds the model weights.
Next, we execute the Model Optimizer to get the .xml and .bin files.
python mo.py --input_model yolo-v3-tiny-tf.pb --transformations_config yolo-v3-tiny-tf.json --batch 1 --output_dir yolo_v3_tiny_ir
Here, we see one extra --transformations_config flag. This accepts the path to the .json file, like we provided in the above code block. The resulting OpenVINO model weight and topology files will be saved in the yolo_v3_tiny_ir folder. In this directory, you will find both:
yolo-v3-tiny-tf.binyolo-v3-tiny-tf.xml
Converting Tiny YOLOv4 Darknet-Weight File to OpenVINO-IR
Now, let’s learn to convert the Tiny YOLOv4 weight files into the OpenVINO-IR format. Later posts in this series will even show you how to obtain the IR files through this process and use them effectively for object detection inference on videos, and also INT8 quantization.
Right now, let’s get on with the conversion. Do observe how the neural network layers change, when converting from the original FP32 model to the OpenVINO optimized FP32 model.
Obtain the Tiny YOLOv4 Darknet Weight File
Start by downloading yolov4-tiny.weights, the original Tiny YOLOv4 Darknet weight file, from the official Darknet repository.
Convert the .weights File to .pb File
You cannot use the Darknet weight file directly to obtain the OpenVINO IR files, with the Model Optimizer. First, convert the weights file to TensorFlow .pb. This file is a frozen graph that contains both the graph definition and the weights. Conversion to .pb has many more benefits. Check them out.
- Besides weights, the file has all the Variable operations, converted into Const (constants) that store the weight values.
- Freezing a model also aids its deployment over web servers and edge devices, for it gets easier to optimize now. Fusing of layers is one such example—a number of operations can be computed together.
- Also, the
.pbformat contains only the saved model weights, discarding all the gradients, meta data and training variables. This reduces the final file size, making it easier to export and serve the model.
Convert the Darknet weights to TensorFlow .pb file now, by following the steps given in this repository. The steps are quite straightforward, and after running the conversion commands, you should obtain a frozen_darknet_yolov4_model.pb file.
Use the Model Optimizer to Obtain the OpenVINO IR Files
Finally, use the Model Optimizer to obtain the optimized FP32 model, which is in the required OpenVINO IR format. Before running the command, ensure you have the following files in the same directory:
- The
frozen_darknet_yolov4_model.pbfile, obtained from the above step. - The
yolo_v4_tiny.jsonfile, provided by the repository.
Next, just give this single command, like you did when converting the Tiny YOLOv3 model:
python mo.py --input_model frozen_darknet_yolov4_model.pb --transformations_config yolo_v4_tiny.json --batch 1
Once the conversion is complete, you should get the frozen_darknet_yolov4_model.bin and frozen_darknet_yolov4_model.xml file in the same directory.
General Steps for Converting Models from Different Frameworks to OpenVINO IR Format
You just learned to convert Darknet weights to the OpenVINO IR format. But what if the trained models are from other frameworks like TensorFlow, Darknet, PyTorch, MXNet, ONNX or even Caffe?
The following image presents some general steps to convert models from different frameworks into the OpenVINO IR format.

The OpenVINO Optimized FP32 Model
When a model trained with a different framework converts to the OpenVINO IR format, it gets optimized.
- These optimizations include fusion of different layers like convolutional, activation layers, and batch-normalization layers.
- Also, the optimization is hardware agnostic. This means you can run the Model Optimizer for a specific model on any supported Intel hardware, and later use it for inference on other supported Intel hardware as well.
- The best part is that these optimizations not only save a lot of memory, but also require less computation when running the model.
The following image shows the few initial layers of the default FP32 (TensorFlow frozen-inference graph) and the OpeVINO Optimized FP32 model.
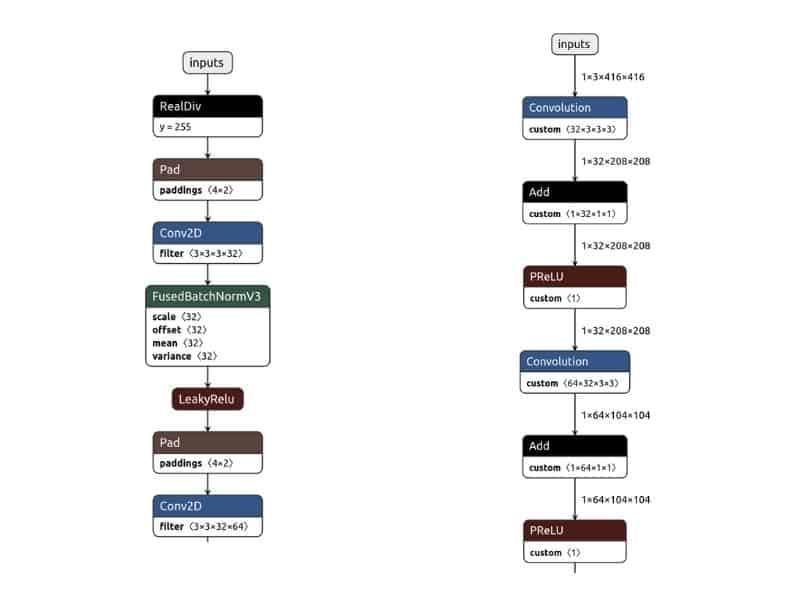
While the image on the left shows the TensorFlow-frozen graph, the one on the right depicts the OpenVINO optimized FP32 model. Instantly, some changes are obvious in the graph:
- The LeakyReLU activation is converted to PReLU.
- Also, the way the input is fed into the Convolutional layer, in both the models, has changed.
To visualize the entire graph interactively, use the Netron web app. Just upload the respective .pb and .xml files to visualize the graphs and explore them in depth.
Comparing Tiny YOLOv4 Darknet Weight with OpenVINO Optimized FP32 Model
The OpenVINO Toolkit, as you’ve seen carries out some optimizations when converting the raw FP32 models to the IR files. Though these optimizations help the model do faster inference on images and video streams, it tends to decrease the accuracy of the model to some extent.
So, let’s now check the accuracy of the Tiny YOLOv4 Darknet weight and the OpenVINO optimized FP32 model, with the COCO mAP (Mean Average Precision) evaluator.
Prerequisites to Calculate the mAP for Tiny YOLOv4 Models
- First, install the COCO API for mAP evaluation. For that, you need to clone this repository. Go inside the
coco/PythonAPIdirectory, open your terminal and run make.cd coco/PythonAPImake
- You also need the MS COCO 2017 validation set (images and annotations), so download the dataset from their official website.
Note: The MS COCO validation set contains 5000 images. All the results shown here have been obtained after running the evaluation on the entire validation dataset.
All the evaluations were done on a machine, with 8th generation i7 8670H CPU and 16 GB of RAM.
mAP for Tiny YOLOv4 Darknet Weight and OpenVINO FP32 Optimized Model
After running the evaluation with the COCO API on the validation images, using Tiny YOLOv4 Darknet weight, we get the following result:
Average Precision  (AP) @[ IoU=0.50:0.95 | area=   all | maxDets=100 ] = 0.185
Average Precision  (AP) @[ IoU=0.50      | area=   all | maxDets=100 ] = 0.334
Average Precision  (AP) @[ IoU=0.75      | area=   all | maxDets=100 ] = 0.185
We have an average precision of 0.185 at 0.50:0.95 IoU (Intersection Over Union).
Now, let’s see how the OpenVINO optimizations affect the Tiny YOLOv4 model. To compare, here are the results, when running the evaluation on the Tiny YOLOv4 FP32 model.
 Average Precision  (AP) @[ IoU=0.50:0.95 | area=   all | maxDets=100 ] = 0.152
 Average Precision  (AP) @[ IoU=0.50  	| area=   all | maxDets=100 ] = 0.275
 Average Precision  (AP) @[ IoU=0.75  	| area=   all | maxDets=100 ] = 0.151
The OpenVINO optimized model, we find, is giving lower average precision for IoU=0.50:0.95, i.e., average precision of 0.152.
The average precision has reduced because of the optimizations. But what about the FPS, when carrying out inference on videos? We know that the OpenVINO FP32 optimized models should be giving higher FPS than the original Darknet model. So, let’s check that out.
FPS Comparison
For a fair comparison, we build the Darknet framework for CPU, using only AVX and OpenMP, keeping in mind that the OpenVINO FP32 model computes on the CPU.
When running inference on the same video:
- While we get an average of 9 FPS, with the original Tiny YOLOv4 Darknet model
- The OpenVINO optimized model gives an average of 24 FPS.
Here are the inference results from both the models:
As you can see, using the original Darknet model leads to slightly better predictions, which also confirms the higher average precision for evaluation done on the COCO validation set.
Enough of theory! Let’s go use the OpenVINO Toolkit and execute a Driver Action Recognition Demo now.
Driver Action Recognition Demo
The Introduction to OpenVINO is incomplete without executing at least one demo code. So here you go! Download the Driver Action Recognition Model from the Intel Model Zoo, and execute its respective demo.
Download the Driver Action Recognition Encoder and Decoder Models
The Driver Action Recognition Models can recognize actions of drivers inside vehicles, such as cars. It can detect actions like:
- Drinking water
- Talking on phone
- Texting
- Safe driving
- Reaching to the back
- Doing hair and makeup

All in all, this can be a very useful driver-monitoring application for safe driving.
The driver action recognition consists of two models:
- The encoder—this model accepts video frames, then produces embeddings of these frames.
- The decoder—after accepting the frame embeddings produced by the encoder, the decoder performs action predictions.
You need to download both the models separately, so run the downloader.py script twice.
To download the Driver Action Recognition encoder and decoder models, head over the downloader directory inside open_model_zoo/tools.
cd /opt/intel/openvino_2021/deployment_tools/open_model_zoo/tools/downloader
Let us download the encoder model first.
python3 downloader.py --name driver-action-recognition-adas-0002-encoder
The model will take some time to download successfully.
Next, download the decoder model.
python3 downloader.py --name driver-action-recognition-adas-0002-decoder
Once the download completes, head over to the /opt/intel/openvino_2021/deployment_tools/open_model_zoo/tools/downloader/intel directory and you will find the driver-action-recognition-adas-0002 folder. This contains the driver-action-recognition-adas-0002-encoder and driver-action-recognition-adas-0002-decoder models that we just downloaded. You will also find three different precision models, namely, FP32, FP16-INT8, and INT8. In this post, we will focus on the FP32 precision models only.
Note: You will learn about different precision models and their respective performance differences in future posts in this series.
Copy the Driver Action Recognition Models to the Code Execution Directory
For simplicity, let’s copy the whole driver action recognition model directory to the directory which contains our driver action recognition script, i.e., opt/intel/openvino_2021/deployment_tools/open_model_zoo/demos/action_recognition_demo/python
To do so, just type the following command in the terminal, while being within the downloader/intel directory.
cp -r driver-action-recognition-adas-0002 opt/intel/openvino_2021/deployment_tools/open_model_zoo/demos/action_recognition_demo/python
This completes most of the preliminary steps needed for executing the script.
Executing the Demo Script
Now, head over to the directory that contains the action-recognition script.
cd opt/intel/openvino_2021/deployment_tools/open_model_zoo/demos/action_recognition_demo/python
Here’s the tree structure of the directory:
├── action_recognition_demo.py
├── action_recognition.gif
├── driver-action-recognition-adas-0002
│   ├── driver-action-recognition-adas-0002-decoder
│   │   ...
│   └── driver-action-recognition-adas-0002-encoder
│   	  ...
├── driver_actions.txt
├── models.lst
├── README.md
└── weld_defects.txt
- The
action_recognition_demo.pyis the Python script we will be executing. - We will provide the
action_recognition.gifas input to the demo script. - You can also see the
driver-action-recognition-adas-0002folder that we just copied. This contains the driver action recognition models. - We then have a
driver_actions.txtfile, which contains labels (names) of actions that the model can recognize and map the output predictions to.
Look below, this is the action recognition GIF file that we will use as input.

Now, let us run the demo script without more delay, and visualize the outputs.
python action_recognition_demo.py -i action_recognition.gif -at en-de -m_en driver-action-recognition-adas-0002/driver-action-recognition-adas-0002-encoder/FP32/driver-action-recognition-adas-0002-encoder.xml -m_de driver-action-recognition-adas-0002/driver-action-recognition-adas-0002-decoder/FP32/driver-action-recognition-adas-0002-decoder.xml --loop --labels driver_actions.txt --output result.mp4
It’s important you understand the flags we provided while running the script:
-i: This is the input file on which we want to run the driver action recognition. As discussed, we are using theaction_recognition.giffile.-at: This specifies the type of neural network architecture we want to use. Because we are using the driver action recognition model, which has both encoder and decoder, we have provided the value asen-de. This stands for encoder-decoder.-m_en: This is the path to the encoder model. Just provide the path to the.xmlfile, and the script will automatically infer the path to the.binfile that lies in the same directory.-m-de: Similar to the encoder-model path, we specify the decoder-model path, using-m_de.--loop: This tells the video predictions will keep running in a loop, until the user quits the program manually.--labels: This is the path to the text file, which contains the labels for driver-action recognition.--output: Finally, provide the value for the--outputflag, which is the name of the output file saved to disk.
Your terminal should display output similar to that below:
Encoder total: 6.43ms (+/-: 6.30) 155.41fps
Encoder   own: 6.42ms (+/-: 6.30) 155.85fps
Decoder total: 8.30ms (+/-: 11.41) 120.44fps
Decoder   own: 8.29ms (+/-: 11.41) 120.64fps
Render total: 100.31ms (+/-: 32.87) 9.97fps
Render   own: 99.49ms (+/-: 25.52) 10.05fps
From the above, we can say that the final-average FPS of the entire application pipeline is 9.97 FPS, which is the Render-total FPS. The Encoder total and Decoder total show the FPS, as the frames get processed through the Encoder and Decoder models respectively.
After running the script, you get the following output. Check it out!
See how the model is predicting the action as Talking phone right, with more than 99% confidence. Amazing, isn’t it!
Conclusion
This was a long journey, but you learned a lot. Let us summarize key topics covered in this post.
- We started with a basic introduction to the Intel OpenVINO toolkit and evaluated why we should opt for this particular toolkit.
- Next, you understood the workflow of the OpenVINO toolkit.
- Went through the installation process in detail, both for video, and the written format.
- After installing, you learned to convert trained Caffe and TensorFlow models to OpenVINO
.xmland.binformats. - And finally, we executed a Driver Action Recognition demo, using the OpenVINO toolkit, and visualized the outputs.
Just how useful this learning experience was for you, do let us know in the comment section below.
References
- Darknet
- OpenVINO
- OpenVINO Model Zoo
- Intel Distribution of OpenVINO Toolkit System Requirements
- OpenCV AI Kit



100K+ Learners
Join Free OpenCV Bootcamp3 Hours of Learning