This exciting post comes to you from Bibin Sebastian, who took our Deep Learning with Pytorch course by OpenCV, and then applied all the learning to create a Human Action Recognition application using PyTorch.
Isn’t that amazing?
Let’s read on to find out, how he build that. And be inspired to build one more.
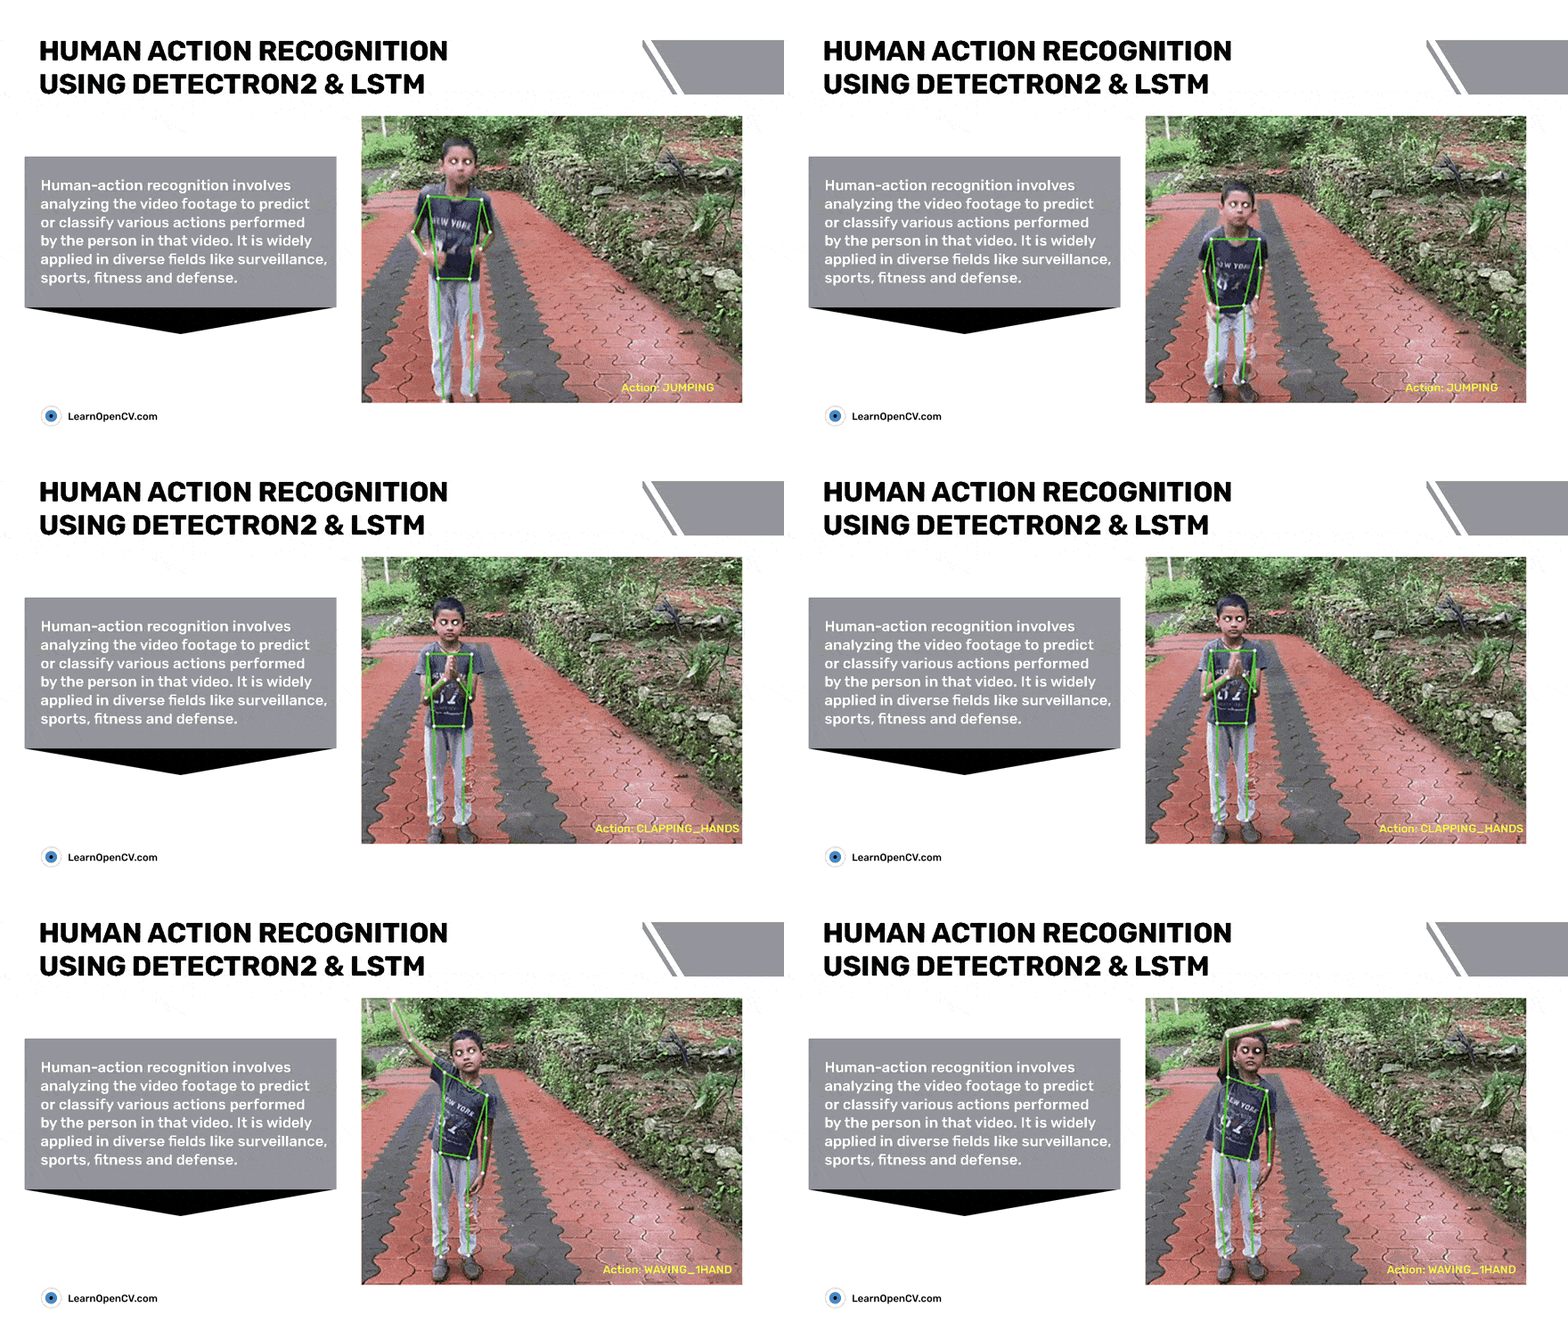
Human action recognition involves analyzing the video footage to predict or classify various actions performed by the person in that video. It is widely applied in diverse fields like surveillance, sports, fitness, and defense.
Let’s say you want to build an application for teaching Yoga online. It should offer a list of pre-recorded yoga session videos for users to watch. After watching a video on the app, users can upload the videos of their personal practice sessions. The app then evaluates their performance and gives feedback based on how well the user has performed the various yoga asanas (or poses). Wouldn’t it be great to use action recognition to automate the evaluation of the video? Well, there’s more you can do with it. Check out the video below.
The yoga application shown below uses human pose estimation to identify each yoga pose and identifies it is as one of the following asanas – Natarajasana, Trikonasana, or Virabhadrasana.

In this post, we will explain how to create such an application for human-action recognition (or classification), using pose estimation and LSTM (Long Short-Term Memory). We will create a web application that takes in a video and produces an output video annotated with identified action classes. We will be using the Flask framework for the web application and PyTorch lightning for model training and validation.
- Detectron2
- LSTM
- Dataset
- Flask
- High-level Approach to the Solution
- Training ML Models
- Inferencing
- Code Walkthrough
- See the application in action
- Conclusion
Beyond Flask, we will be deploying several other important toolsets like Detectron2, LSTM, Dataset etc. to reach our goal. Each is discussed in detail here.
Detectron2
Detectron2 is Facebook AI Research’s open source platform for object detection, dense pose, segmentation and other visual recognition tasks. The platform is now implemented in PyTorch, unlike its previous version, Detectron, which was implemented in Caffe2.
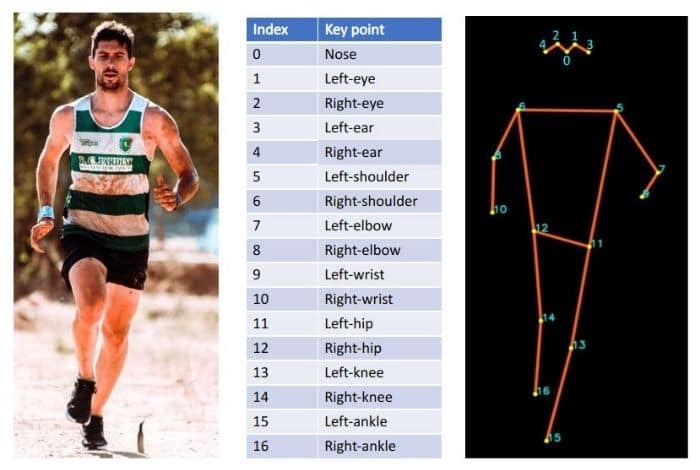
Here, we use a pre-trained ‘R50-FPN’ model from the Detectron2 model zoo for pose estimation. This model is already trained on the COCO dataset containing more than 200,000 images and 250,000 person instances, labelled with keypoints. The model outputs 17 keypoints for every human present in the input image frame, as shown in the image below.
Want to know more about Pose Estimation algorithm internals? checkout this blog post.
LSTM
A type of Recurrent Neural Network (RNN), LSTM networks are capable of learning-order dependence in sequence-prediction problems. An RNN, as you can see below, has a chain of repeating neural-network modules.
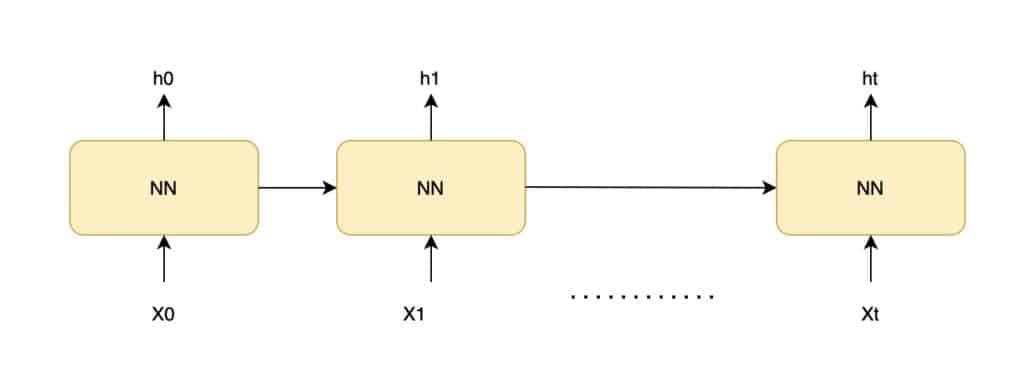
In the NN (neural network):
- X0, X1, … Xt are the inputs, and h0, h1, … ht are the predictions.
- Every prediction at time t (ht) depends on the previous prediction and current input Xt.
RNN remembers the previous information and uses it optimally to process the current input. But the shortcoming of RNN is that it cannot remember long-term dependencies.
LSTM also has a similar chain structure, but its neural-network module can easily handle long-term dependencies.
We use LSTM to do action classification on a sequence of keypoint detections from a video.
Dataset
To train the LSTM model we use this dataset.
What’s so special about this dataset? It consists of keypoint detections, made using OpenPose deep-learning model, on a subset of the Berkeley Multimodal Human Action Database (MHAD) dataset.
OpenPose is the first, real-time, multi-person system to jointly detect human body, hand, facial, and foot key-points (in total 135 key-points) on single images. Keypoint detections are made over videos of 12 subjects (filmed from 4 angles), doing the following 6 actions for 5 repetitions:
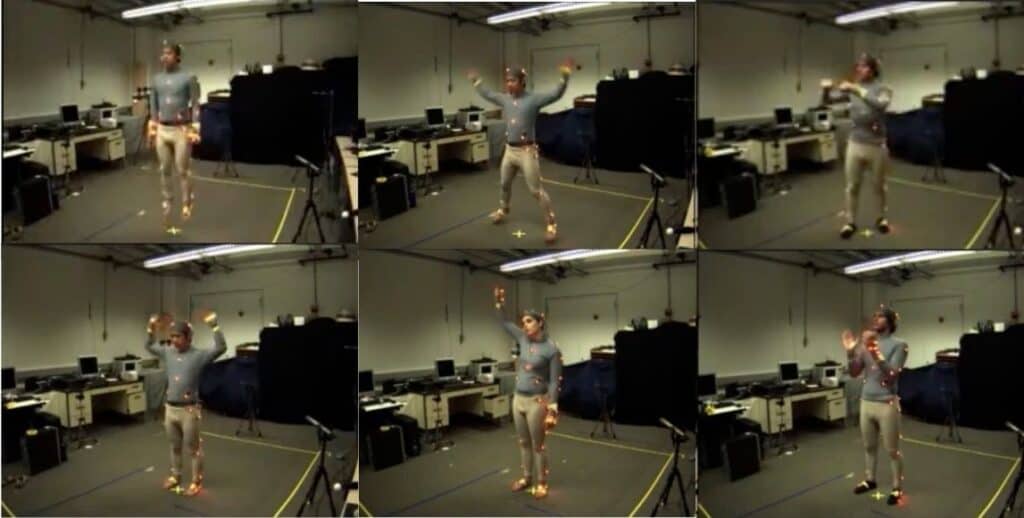
- JUMPING
- JUMPING_JACKS
- BOXING
- WAVING_2HANDS
- WAVING_1HAND
- CLAPPING_HANDS
Flask
Flask is a popular Python web framework used for developing several web applications. This application internally uses Detectron2 and LSTM model to identify the actions.
High-level Approach to Activity Recognition
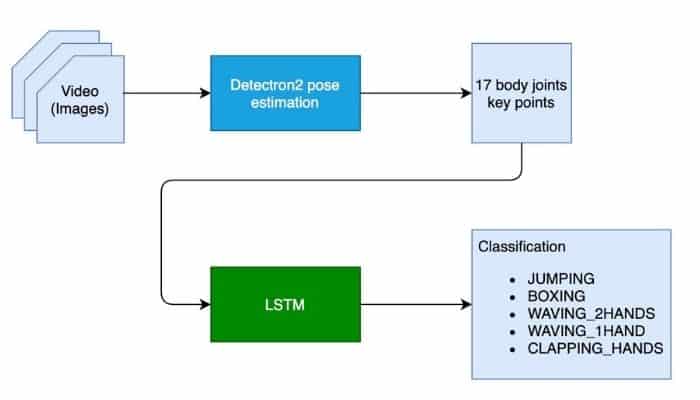
To classify an action, we first need locate various body parts in every frame, and then analyze the movement of the body parts over time.
The first step is achieved using Detectron2 which outputs the body posture (17 key points) after observing a single frame in a video.
The second step of analyzing the motion of the body over time and making a prediction is done using the LSTM network. So, keypoints from a sequence of frames are sent to LSTM for action classification, as shown below.
Training ML Models for Action Recognition
- As we had mentioned before, for keypoint detection, we are using the pre-trained ‘R50-FPN’ model from Detectron2 model zoo. So no further training is required.
- The LSTM model which is used for action classification based on keypoints is trained with pytorch lightning.
Training input data contains a sequence of keypoints (17 keypoints per frame) and associated action labels. A continuous sequence of 32 frames are used to identify a particular action. A sample sequence of 32 frames will be a multidimensional array of size 32×34 as follows:
![\[ \begin{bmatrix} \begin{bmatrix} x0, y0, x1, y1, \ldots x16, y16 \end{bmatrix}\\ \begin{bmatrix} x0, y0, x1, y1, \ldots x16, y16 \end{bmatrix}\\ \ldots\\ \begin{bmatrix} x0, y0, x1, y1, \ldots x16, y16 \end{bmatrix} \end{bmatrix} \]](https://learnopencv.com/wp-content/ql-cache/quicklatex.com-03e64c7a975c61e3f419ad675e3c51ca_l3.png)
Every row contains 17 keypoint values. Every keypoint is represented as (x,y) values, hence a total of 34 values per row.
Note: Unlike the 18 keypoints of a human body detected by the OpenPose model in the original dataset, our application has just 17 keypoints detected by Detectron2. So, we convert to a 17 keypoints format before training our LSTM model.
We trained our model for 400 epochs and got a validation accuracy of 0.913. Validation accuracy and loss curves are shown below. The trained model is checked into the codebase, and the same is used during inferencing.
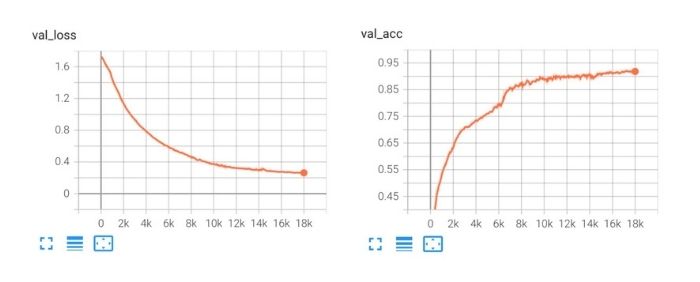
You can obtain the LSTM model training by clicking on the button below.
Inferencing
The inference pipeline consists of both the Detectron2 model and a custom LSTM model.
- Our application accepts a video input, iterates through the frames and then uses Detectron2 to do keypoint detection on every frame.
- Keypoint results are next appended to a buffer of size 32, which operates in a sliding window fashion.
- Contents of the buffer are finally sent to our trained LSTM model for action identification.
- Also, the Flask-based web application has a UI to accept video input from the user.
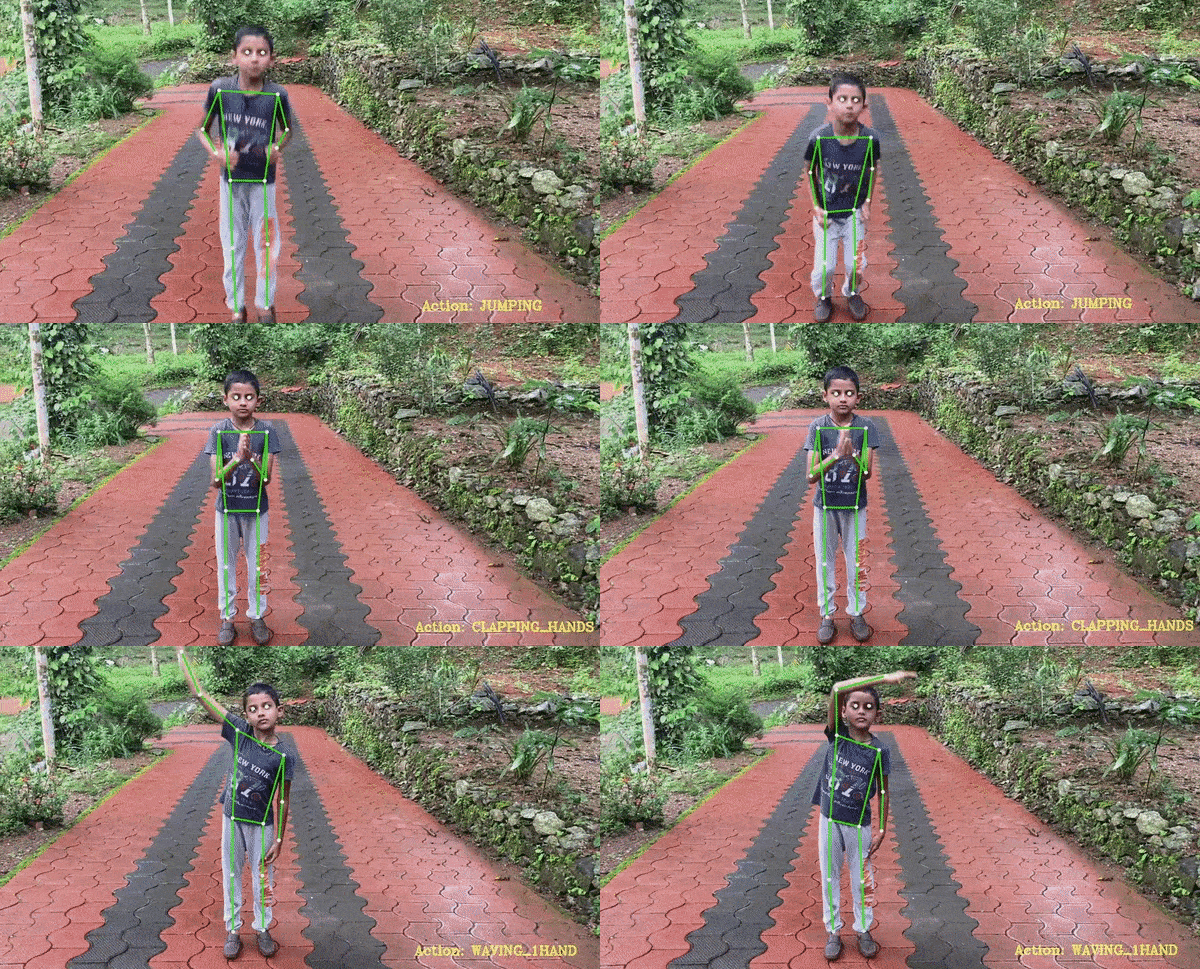
- Actions detected by our inference pipeline are annotated on the video and displayed as the result.
Testing on ‘Tesla T4’ GPU shows that Detectron2 takes about 0.14 seconds, and LSTM 0.002 seconds respectively for inferencing. Hence, the combined FPS (frames per second) of our inference pipeline execution comes to about 6 frames per second, i.e., if we process every frame in the video.
The above FPS rate might work for an application doing video analysis offline. But what if you are inferencing on a real-time video stream? In general, real-time video streams have a frame rate of 30 FPS or more (depending on the camera). In such cases, the FPS of the inference pipeline has to be higher than or at least equal to the video stream FPS to process the frames without any lag. Though few, you do have options to improve the FPS of the inference pipeline.
- Pruning and Quantization of the model can accelerate the speed of execution.
- Skipping frames and inferencing at intervals: You can even skip a couple of frames and opt to infer only at intervals. For example, our testing shows that when inferencing only on every 5th frame in the sequence, FPS increases to 27 frames per second. But we saw that the accuracy dropped. So choose an interval accordingly.
- Multi threading: Have separate threads for receiving video and inferencing.
- Receiver thread can focus on reading the video frames from the stream, and adding them to a queue.
- A separate child thread can read frames from the queue to do inferencing. A child thread may lag behind while processing the frames, but it won’t block the receiver thread from reading the video streams.
Coding Detectron2, LSTM Models For Video Analysis on Web Application
Let’s now understand how the important components of the application are coded.
1. Detectron2 Pose Estimation Model
We are using the pre-trained Detectron2 model, as shown below.
# obtain detectron2's default config
cfg = get_cfg()
# load the pre trained model from Detectron2 model zoo
cfg.merge_from_file(model_zoo.get_config_file("COCO-Keypoints/keypoint_rcnn_R_50_FPN_3x.yaml"))
# set confidence threshold for this model
cfg.MODEL.ROI_HEADS.SCORE_THRESH_TEST = 0.5
# load model weights
cfg.MODEL.WEIGHTS = model_zoo.get_checkpoint_url("COCO-Keypoints/keypoint_rcnn_R_50_FPN_3x.yaml")
# create the predictor for pose estimation using the config
pose_detector = DefaultPredictor(cfg)
2. LSTM model definition
Our LSTM model is initialised with a hidden dimension (hidden_dim) of 50 and is trained with PyTorch Lightning. We have used the Adam optimiser and also configured the ReduceLROnPlateau scheduler to reduce the learning rate, based on the value of val_loss.
# We have 6 output action classes.
TOT_ACTION_CLASSES = 6

#lstm classifier definition
class ActionClassificationLSTM(pl.LightningModule):

	# initialise method
	def __init__(self, input_features, hidden_dim, learning_rate=0.001):
	    super().__init__()
	    # save hyperparameters
	    self.save_hyperparameters()
	    # The LSTM takes word embeddings as inputs, and outputs hidden states
	    # with dimensionality hidden_dim.
	    self.lstm = nn.LSTM(input_features, hidden_dim, batch_first=True)
	    # The linear layer that maps from hidden state space to classes
	    self.linear = nn.Linear(hidden_dim, TOT_ACTION_CLASSES)

	def forward(self, x):
	    # invoke lstm layer
	    lstm_out, (ht, ct) = self.lstm(x)
	    # invoke linear layer
	    return self.linear(ht[-1])

def training_step(self, batch, batch_idx):
	    # get data and labels from batch
	    x, y = batch
	    # reduce dimension
	    y = torch.squeeze(y)
	    # convert to long
	    y = y.long()
	    # get prediction
	    y_pred = self(x)
	    # calculate loss
	    loss = F.cross_entropy(y_pred, y)
	    # get probability score using softmax
	    prob = F.softmax(y_pred, dim=1)
	    # get the index of the max probability
	    pred = prob.data.max(dim=1)[1]
	    # calculate accuracy
	    acc = torchmetrics.functional.accuracy(pred, y)
	    dic = {
	        'batch_train_loss': loss,
	        'batch_train_acc': acc
	    }
	    # log the metrics for pytorch lightning progress bar or any other operations
	    self.log('batch_train_loss', loss, prog_bar=True)
	    self.log('batch_train_acc', acc, prog_bar=True)
	    #return loss and dict
	    return {'loss': loss, 'result': dic}

	def training_epoch_end(self, training_step_outputs):
	    # calculate average training loss end of the epoch
	    avg_train_loss = torch.tensor([x['result']['batch_train_loss'] for x in training_step_outputs]).mean()
	    # calculate average training accuracy end of the epoch
	    avg_train_acc = torch.tensor([x['result']['batch_train_acc'] for x in training_step_outputs]).mean()
	    # log the metrics for pytorch lightning progress bar and any further processing
	    self.log('train_loss', avg_train_loss, prog_bar=True)
	    self.log('train_acc', avg_train_acc, prog_bar=True)

	def validation_step(self, batch, batch_idx):
	    # get data and labels from batch
	    x, y = batch
	    # reduce dimension
	    y = torch.squeeze(y)
	    # convert to long
	    y = y.long()
	    # get prediction
	    y_pred = self(x)
	    # calculate loss
	    loss = F.cross_entropy(y_pred, y)
	    # get probability score using softmax
	    prob = F.softmax(y_pred, dim=1)
	    # get the index of the max probability
	    pred = prob.data.max(dim=1)[1]
	    # calculate accuracy
	    acc = torchmetrics.functional.accuracy(pred, y)
	    dic = {
	        'batch_val_loss': loss,
	        'batch_val_acc': acc
	    }
	    # log the metrics for pytorch lightning progress bar and any further processing
	    self.log('batch_val_loss', loss, prog_bar=True)
	    self.log('batch_val_acc', acc, prog_bar=True)
	    #return dict
	    return dic

	def validation_epoch_end(self, validation_step_outputs):
	    # calculate average validation loss end of the epoch
	    avg_val_loss = torch.tensor([x['batch_val_loss']
	                                for x in validation_step_outputs]).mean()
	    # calculate average validation accuracy end of the epoch
	    avg_val_acc = torch.tensor([x['batch_val_acc']
	                               for x in validation_step_outputs]).mean()
	    # log the metrics for pytorch lightning progress bar and any further processing
	    self.log('val_loss', avg_val_loss, prog_bar=True)
	    self.log('val_acc', avg_val_acc, prog_bar=True)

	def configure_optimizers(self):
	    # adam optimiser
	    optimizer = optim.Adam(self.parameters(), lr=self.hparams.learning_rate)
	    # learning rate reducer scheduler
	    scheduler = optim.lr_scheduler.ReduceLROnPlateau(optimizer, mode='min', factor=0.5, patience=10, min_lr=1e-15, verbose=True)
	    # scheduler reduces learning rate based on the value of val_loss metric
	    return {"optimizer": optimizer,
	            "lr_scheduler": {"scheduler": scheduler, "interval": "epoch", "frequency": 1, "monitor": "val_loss"}}
3. Web Application
Our web application has several defined routes. The one below processes the input video. This route gets called when the user submits a video from the webpage for analysis.
# route definition for video upload for analysis
@app.route('/analyze/<filename>')
def analyze(filename):
   # invokes method analyse_video
   return Response(analyse_video(pose_detector, lstm_classifier, filename), mimetype='text/event-stream')
4. Video Analysis
Once our web application receives a video from the user,
- The below function parses through the video, and invokes: Dectron2 for keypoint detection, and LSTM for action classification. You can see that we have used the ‘buffer_window’ to store 32 consecutive keypoint results from frames, and the same is used for inferencing action classes.
- Next, we use OpenCV to read the input video, and also to create the output video with classification results and pose-estimation results.
If you want a higher FPS rate for video analysis, you can configure a higher value for SKIP_FRAME_COUNT.
# how many frames to skip while inferencing
# configuring a higher value will result in better FPS (frames per rate), but accuracy might get impacted
SKIP_FRAME_COUNT = 0

# analyse the video
def analyse_video(pose_detector, lstm_classifier, video_path):
    # open the video
    cap = cv2.VideoCapture(video_path)
    # width of image frame
    width = int(cap.get(cv2.CAP_PROP_FRAME_WIDTH))
    # height of image frame
    height = int(cap.get(cv2.CAP_PROP_FRAME_HEIGHT))
    # frames per second of the input video
    fps = int(cap.get(cv2.CAP_PROP_FPS))
    # total number of frames in the video
    tot_frames = int(cap.get(cv2.CAP_PROP_FRAME_COUNT))
    # video output codec
    fourcc = cv2.VideoWriter_fourcc(*'mp4v')
    # extract the file name from video path
    file_name = ntpath.basename(video_path)
    # video writer
    vid_writer = cv2.VideoWriter('res_{}'.format(
        file_name), fourcc, 30, (width, height))
    # counter
    counter = 0
    # buffer to keep the output of detectron2 pose estimation
    buffer_window = []
    # start time
    start = time.time()
    label = None
    # iterate through the video
    while True:
        # read the frame
        ret, frame = cap.read()
        # return if end of the video
        if ret == False:
            break
        # make a copy of the frame
        img = frame.copy()
        if(counter % (SKIP_FRAME_COUNT+1) == 0):
          # predict pose estimation on the frame
          outputs = pose_detector(frame)
          # filter the outputs with a good confidence score
          persons, pIndicies = filter_persons(outputs)
          if len(persons) >= 1:
              # pick only pose estimation results of the first person.
              # actually, we expect only one person to be present in the video.
              p = persons[0]
              # draw the body joints on the person body
              draw_keypoints(p, img)
              # input feature array for lstm
              features = []
              # add pose estimate results to the feature array
              for i, row in enumerate(p):
                  features.append(row[0])
                  features.append(row[1])

              # append the feature array into the buffer
              # not that max buffer size is 32 and buffer_window operates in a sliding window fashion
              if len(buffer_window) < WINDOW_SIZE:
                  buffer_window.append(features)
              else:
                  # convert input to tensor
                  model_input = torch.Tensor(np.array(buffer_window, dtype=np.float32))
                  # add extra dimension
                  model_input = torch.unsqueeze(model_input, dim=0)
                  # predict the action class using lstm
                  y_pred = lstm_classifier(model_input)
                  prob = F.softmax(y_pred, dim=1)
                  # get the index of the max probability
                  pred_index = prob.data.max(dim=1)[1]
                  # pop the first value from buffer_window and add the new entry in FIFO fashion, to have a sliding window of size 32.
                  buffer_window.pop(0)
                  buffer_window.append(features)
                  label = LABELS[pred_index.numpy()[0]]
                  #print("Label detected ", label)

        # add predicted label into the frame
        If label is not None:
cv2.putText(img, 'Action: {}'.format(label),
 (int(width-400), height-50), cv2.FONT_HERSHEY_COMPLEX, 0.9, (102, 255, 255), 2)
        # increment counter
        counter += 1
        # write the frame into the result video
        vid_writer.write(img)
        # compute the completion percentage
        percentage = int(counter*100/tot_frames)
        # return the completion percentage
        yield "data:" + str(percentage) + "\n\n"
    analyze_done = time.time()
    print("Video processing finished in ", analyze_done - start)
See the Application in Action
You need a GPU to run these ML models. To make it easy for you to see the application in action, we have provided a google colab notebook in the codebase. Just upload the notebook in Google Colab, enable the GPU and run the notebook.
Conclusion
Let’s summarise what we have learned so far.
- You learned all that is involved in human-action recognition and also about their diverse applications
- Next, we discussed how to create an application for action recognition.
- You clearly understood why we chose Detectron2 and LSTM for our solution as we went over the capabilities of each.
- Then you learned to train the LSTM model for action classification, based on keypoints, using PyTorch Lightning. You saw how a continuous sequence of 32 frames helps identify a particular action.
- We then used a combination of Detectron2 and LSTM for inferencing. You learned that the displayed results were actually actions detected by our inference pipeline that were annotated on the input video.
- Understood why the FPS must be optimised for real-time video stream inferencing. For this you explored various approaches like pruning and quantization of the model, skipping frames and inferencing at intervals, and also, multi threading.
- Next you examined in detail the given code for all the important components in the application.
- Finally, you went ahead and built a sample Flask-based web application to do inferencing on any video input.
Hope the contents were useful and you were able to learn something new from this blog post.



100K+ Learners
Join Free OpenCV Bootcamp3 Hours of Learning