In this article, we will learn how to create a TensorFlow Lite model using the TF Lite Model Maker Library. We will fine-tune a pre-trained image classification model on the custom dataset, further explore different model optimization techniques currently supported by the library, and export them to the TF Lite model. Detailed performance comparison of the created TF Lite models and the converted ones is made, followed by deploying the model on the web app.

This blog is the second in the TensorFlow Lite series with the following posts:
- TensorFlow Lite: Model Optimization for On-Device Machine Learning
- TensorFlow Lite Model Maker: Create Models for On-Device Machine Learning
- Deep Dive into TensorFlow Model Optimization Toolkit
- TensorFlow Lite Model Maker
- Installation
- Dataset Preparation
- Model Training
- Model Optimization
- Comparison of Created and Converted TF Lite Models
- Streamlit Deployment
1. TensorFlow Lite Model Maker
The TensorFlow Lite Model Maker Library enables us to train a pre-trained or a custom TensorFlow Lite model on a custom dataset. When deploying a TensorFlow neural-network model for on-device ML applications, it streamlines the process of adapting and converting the model to specific input data. Currently, it supports ML tasks such as
- Image Classification
- Object Detection
- Text Classification
- BERT Question Answers
- Audio Classification
- Recommendation System
2. Installation
There are two ways to install the Model Maker Library.
- Using pip:
pip install tflite-model-maker
- Cloning the source code from GitHub:
git clone https://github.com/tensorflow/examples
cd examples/tensorflow_examples/lite/model_maker/pip_package
pip install -e .
3. Dataset Preparation
Similar to the previous blog, we will use Microsoft’s Cats and Dogs Dataset. We will download the dataset using the wget command. We will save the downloaded file using the zipfile library and extract it to the dataset folder.
#Importing zipfile
import zipfile
#Downloading the Cats and Dogs Dataset from Microsoft Download
!wget --no-check-certificate \
    "https://download.microsoft.com/download/3/E/1/3E1C3F21-ECDB-4869-8368-6DEBA77B919F/kagglecatsanddogs_3367a.zip" \
    -O "/content/cats-and-dogs.zip"

#Saving zip file
local_zip = '/content/cats-and-dogs.zip'
zip_ref   = zipfile.ZipFile(local_zip, 'r')

#Extracting zip file
zip_ref.extractall('/content/')
zip_ref.close()
We will use the DataLoader() function in the image_classifier() module for loading our image classification data. As the data is stored in the directories with the name of the folder being the label for the image data, we will load data using DataLoader.from_folder(). But before that, we have to convert all the images into .png format as the Dataloader() currently supports images in the png & jpeg format only. We will first remove the two corrupted image files from our dataset.
#Removing corrupted images in the dataset
rm /content/PetImages/Cat/666.jpg
rm /content/PetImages/Dog/11702.jpg
#Importing libraries
from PIL import Image
import glob
import os
from pathlib import Path

#Converting images in cat folder to png format
current_dir = Path('/content/PetImages/Cat').resolve()
outputdir = Path('/content/Dataset').resolve()
out_dir = outputdir / "Cat"
os.mkdir(out_dir)
cnt = 0

for img in glob.glob(str(current_dir / "*.jpg")):
    filename = Path(img).stem
    Image.open(img).save(str(out_dir / f'{filename}.png'))
    cnt = cnt + 1
    print(cnt)

#Converting images in dog folder to png format
current_dir = Path('/content/PetImages/Dog/').resolve()
outputdir = Path('/content/Dataset/').resolve()
out_dir = outputdir / "Dog"
os.mkdir(out_dir)
cnt = 0

for img in glob.glob(str(current_dir / "*.jpg")):
    filename = Path(img).stem
    Image.open(img).convert('RGB').save(str(out_dir / f'{filename}.png'))
    cnt = cnt + 1
    print(cnt)
Now let’s load the Dataset using the Dataloder.from_folder() function.
#Loading dataset using the Dataloader
data = DataLoader.from_folder('/content/Dataset')
INFO:tensorflow:Load image with size: 24998, num_label: 2, labels: Cat, Dog.
We will now split the dataset into training, validation, and testing sets in the ratio of 7:2:1, respectively.
#Splitting dataset into training, validation and testing data
train_data, rest_data = data.split(0.7)
validation_data, test_data = rest_data.split(0.67)
Let’s now take a peek at a few images in the dataset.
#Visualizing images in the dataset
plt.figure(figsize=(10,10))
for i, (image, label) in enumerate(data.gen_dataset().unbatch().take(25)):
  plt.subplot(5,5,i+1)
  plt.xticks([])
  plt.yticks([])
  plt.grid(False)
  plt.imshow(image.numpy(), cmap=plt.cm.gray)
  plt.xlabel(data.index_to_label[label.numpy()])
plt.show()

4. Model Training
We will be retraining the EfficientNet Lite 0 model. It ia trained on Imagenet (ILSVRC-2012-CLS), optimized for TFLite, and designed for performance on mobile CPU, GPU, and EdgeTPU. Due to the requirements from edge devices, the following changes are made to the original EfficientNets :
- Removed the squeeze-and-excite blocks(SE) as SE is not well supported for some mobile accelerators.
- Replaced all the swish with RELU6 for easier post-quantization.
- Fixed the stem and head while scaling models up in order to keep the models small and fast.
We will create the model using image_classifier.create() function. The model_spec() helps us to specify the image model we will be using model_spec.get() function to import the pre-trained model. We will pass train_data and validation_data as training and validation datasets, respectively. Also, we have set train_whole_model as true to re-train the entire model. Various other parameters in image_classifier.create() as per the requirements. We have let the rest of the parameters to be at their default value.
#Training the model
model = image_classifier.create(train_data, model_spec=model_spec.get('efficientnet_lite0'), validation_data=validation_data, train_whole_model=True,)
INFO:tensorflow:Retraining the models...
INFO:tensorflow:Retraining the models...
Model: "sequential_1"
_________________________________________________________________
Layer (type)                Output Shape              Param #
=================================================================
hub_keras_layer_v1v2_1 (Hub  (None, 1280)             3413024
KerasLayerV1V2)

dropout_1 (Dropout)         (None, 1280)              0

dense_1 (Dense)             (None, 2)                 2562

=================================================================
Total params: 3,415,586
Trainable params: 2,562
Non-trainable params: 3,413,024
_________________________________________________________________
None
Epoch 1/5
/usr/local/lib/python3.7/dist-packages/keras/optimizer_v2/gradient_descent.py:102: UserWarning: The `lr` argument is deprecated, use `learning_rate` instead.
  super(SGD, self).__init__(name, **kwargs)
546/546 [==============================] - 2586s 5s/step - loss: 0.2463 - accuracy: 0.9812 - val_loss: 0.2281 - val_accuracy: 0.9899
Epoch 2/5
546/546 [==============================] - 151s 277ms/step - loss: 0.2299 - accuracy: 0.9898 - val_loss: 0.2266 - val_accuracy: 0.9900
Epoch 3/5
546/546 [==============================] - 151s 276ms/step - loss: 0.2271 - accuracy: 0.9908 - val_loss: 0.2258 - val_accuracy: 0.9906
Epoch 4/5
546/546 [==============================] - 153s 281ms/step - loss: 0.2264 - accuracy: 0.9916 - val_loss: 0.2243 - val_accuracy: 0.9902
Epoch 5/5
546/546 [==============================] - 153s 280ms/step - loss: 0.2258 - accuracy: 0.9909 - val_loss: 0.2259 - val_accuracy: 0.9904
Let us now evaluate the model on a test dataset using the model.evaluate() function.
loss, accuracy = model.evaluate(test_data)
78/78 [==============================] - 341s 4s/step - loss: 0.2246 - accuracy: 0.9911
5. Model Optimization
5.1 FP 16 Quantization
The model can be exported to the Float-16 TF Lite model using the model.export() function. Here we will define config for quantization to Float 16. We will then evaluate the exported quantized model on the test dataset.
#Defining Config
config = QuantizationConfig.for_float16()

#Exporting Model
model.export(export_dir='/content/Models/', tflite_filename='model_fp16.tflite', quantization_config=config)

#Evaluating Exported Model
model.evaluate_tflite('/content//Models/model_fp16.tflite', test_data)
{'accuracy': 0.9911111111111112}
5.2 Dynamic Quantization
We will set the Quantization config to the dynamic format for dynamic quantization. The rest of the process remains the same as that of FP 16 Quantization.
#Defining Config
config = QuantizationConfig.for_dynamic()
#Exporting Model
model.export(export_dir='/content/Models/', tflite_filename='model_dynamic.tflite', quantization_config=config)
#Evaluating Exported Model
model.evaluate_tflite('/content/Models/model_dynamic.tflite', test_data)
{'accuracy': 0.9919191919191919}
5.3 Integer Quantization
Similar to previous quantizations, we change the quantization config to Integer format for Integer Quantization. We will then export the model and evaluate it on the test dataset.
#Defining Config
config = QuantizationConfig.for_int8(test_data)
#Exporting Model
model.export(export_dir='/content/Models/', tflite_filename='model_int8.tflite', quantization_config=config)
#Evaluating Exported Model
model.evaluate_tflite('/content/model_int8.tflite', test_data)
{'accuracy': 0.9915151515151515}
6. Comparison of Created and Converted TF Lite Models
In the previous blog, we converted the fine-tuned model to the TF Lite. Here we will compare the performance of the converted TF Lite models to that of the models created in this blog.
6.1 Test Accuracy
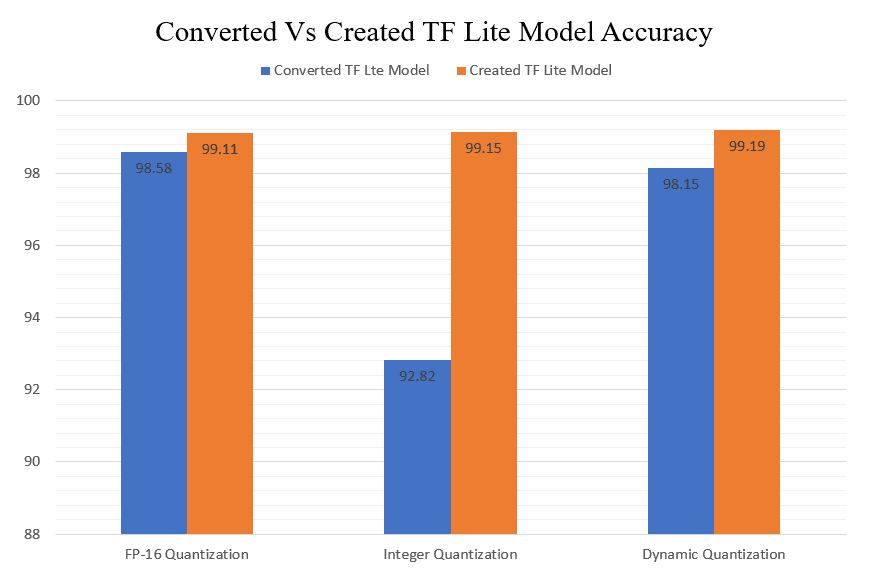
A slight increase in the accuracy of the FP-16 Quantized model can be seen in the created model. But a dramatic increase of accuracy in the case of the Integer Quantized model can be seen.
6.2 Model Size
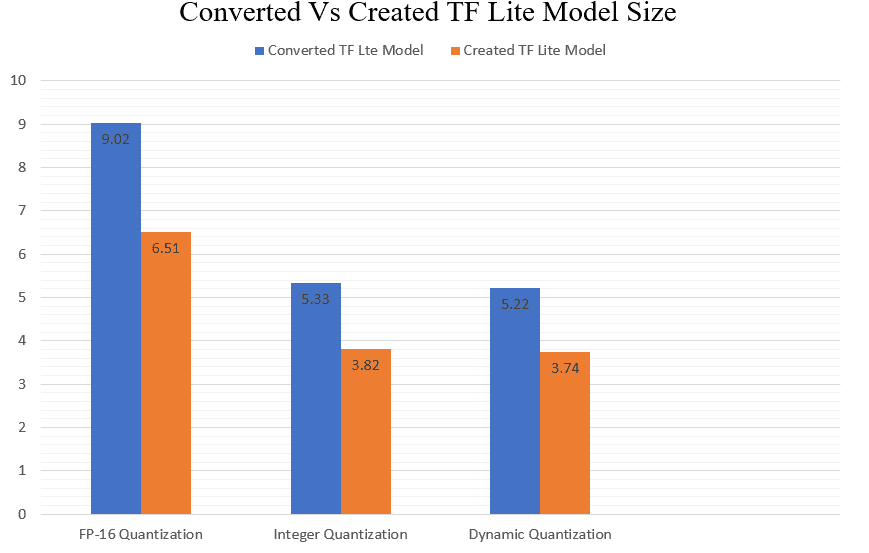
We can clearly see that the created TF Lite models are lighter than the converted ones. The most significant difference in model size can be seen in the case of FP-16 quantized models. Also, the created integer quantized and dynamic quantized models are lighter than the converted ones.
6.3 Inference Time
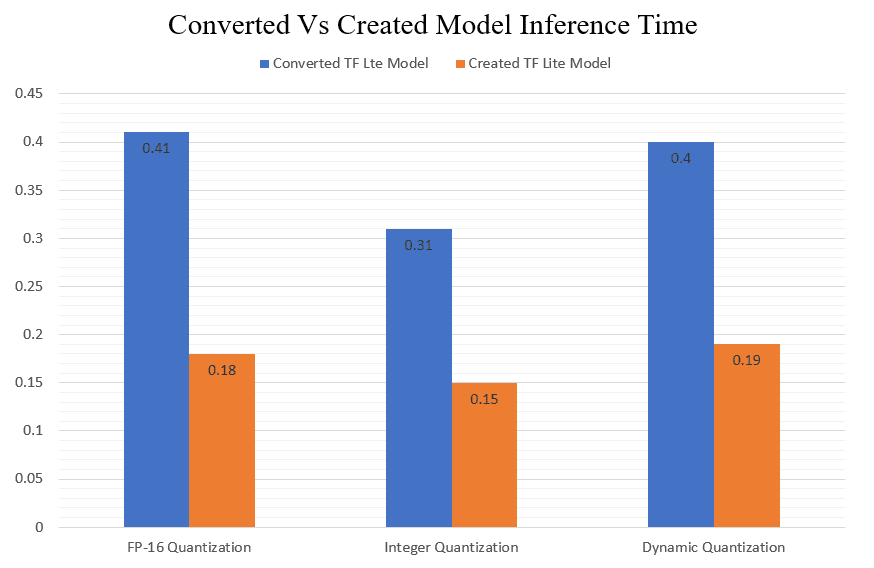
7. Streamlit Deployment
In an earlier blog, we deployed the TF lite models to the Edge device. The small size and fast inference speed of TF Lite also make them favorable for deployment on the cloud. Let us now create a Cat vs. Dog Image Classifier Web App where we will upload an image, and our model will infer whether the image is that of a cat or a dog. Streamlit is an open-source app framework that allows us to develop and deploy web apps in python.
We will start by importing the required libraries and packages.
# Importing Libraries and Packages
from PIL import Image
import streamlit as st
import tensorflow as tf
import time
import os
Let us now define the class labels that would be returned as predicted outputs.
class_names = ["Cat", "Dog"]
Let’s define a function to set the input tensor for the interpreter.
def set_input_tensor(interpreter, image):
  """Sets the input tensor."""
  tensor_index = interpreter.get_input_details()[0]['index']
  input_tensor = interpreter.tensor(tensor_index)()[0]
  input_tensor[:, :] = image
We will now define functions get_predictions() that will take an image as input and return the predicted class of the image.
def get_predictions(input_image):
    output_details = tflite_interpreter.get_output_details()
    set_input_tensor(tflite_interpreter, input_image)
    tflite_interpreter.invoke()
    tflite_model_prediction = tflite_interpreter.get_tensor(output_details[0]["index"])
    tflite_model_prediction = tflite_model_prediction.squeeze().argmax(axis = 0)
    pred_class = class_names[tflite_model_prediction]
    return pred_class
    tflite_model_prediction = tflite_interpreter.get_tensor(output_details[0]["index"])
    tflite_model_prediction = tflite_model_prediction.squeeze().argmax(axis = 0)
    pred_class = class_names[tflite_model_prediction]
    print(tflite_model_prediction)
    print(pred_class)
    return pred_class
We will now define some elements of our web app, such as the title, header, and sidebar.
## Page Title
st.set_page_config(page_title = "Cats vs Dogs Image Classification")
st.title(" Cat vs Dogs Image Classification")
st.markdown("---")
Now we will create a sidebar so that the user can choose between any of the created and converted TF Lite models.
## Sidebar
st.sidebar.header("TF Lite Models")
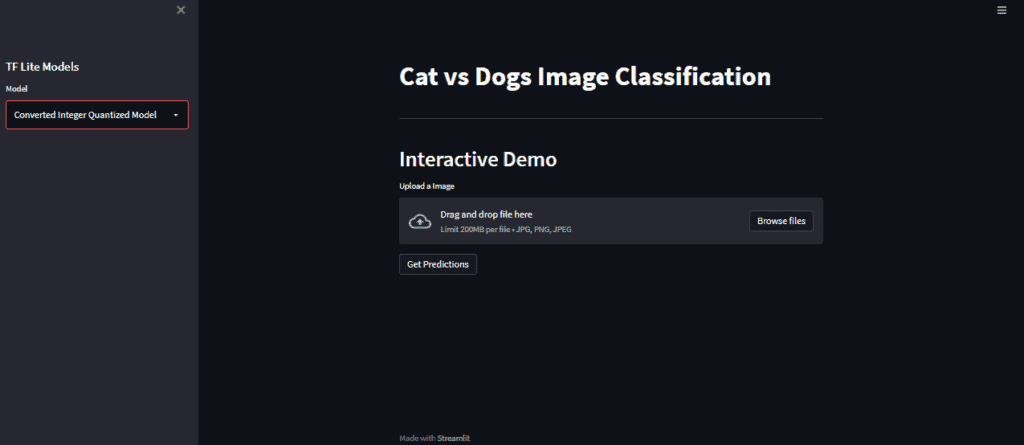
display = ("Select a Model","Converted FP-16 Quantized Model", "Converted Integer Quantized Model", "Converted Dynamic Range Quantized Model","Created FP-16 Quantized Model", "Created Quantized Model", "Created Dynamic Range Quantized Model")
options = list(range(len(display)))
value = st.sidebar.selectbox("Model", options, format_func=lambda x: display[x])
print(value)
Depending on the model chosen, we will have to set the path to the model accordingly.
if value == 1:
    tflite_interpreter = tf.lite.Interpreter(model_path='models\converted_fp_16_model.tflite')
if value == 2:
    tflite_interpreter = tf.lite.Interpreter(model_path='models\converted_int_quant_model.tflite')
if value == 3:
    tflite_interpreter = tf.lite.Interpreter(model_path='models\converted_dynamic_quant_model.tflite')
if value == 4:
    tflite_interpreter = tf.lite.Interpreter(model_path='models\created_model_fp16.tflite')

if value == 5:
    tflite_interpreter = tf.lite.Interpreter(model_path='models\created_model_int8.tflite')

if value == 6:
    tflite_interpreter = tf.lite.Interpreter(model_path='models\created_model_dynamic.tflite')
Let’s now define a function that will allow us to upload our image file and save it to the temporary directory for the model to take inference. Here we will have to ensure that the uploaded image is converted into uint8 format if the model chosen is an integer quantized.
## Input Fields
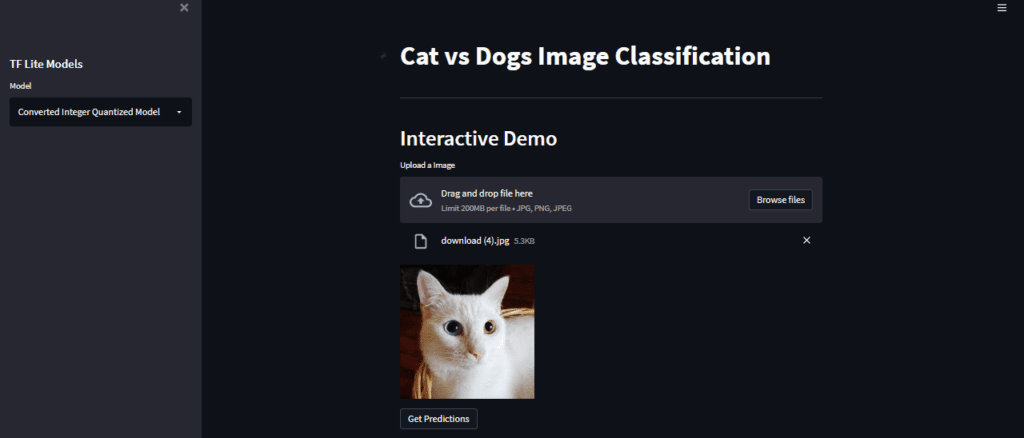
uploaded_file = st.file_uploader("Upload a Image", type=["jpg","png", 'jpeg'])
if uploaded_file is not None:
    with open(os.path.join("tempDir",uploaded_file.name),"wb") as f:
         f.write(uploaded_file.getbuffer())
    path = os.path.join("tempDir",uploaded_file.name)
    img = tf.keras.preprocessing.image.load_img(path , grayscale=False, color_mode='rgb', target_size=(224,224,3), interpolation='nearest')
    st.image(img)
    print(value)
    if value == 2 or value == 5:
        img = tf.image.convert_image_dtype(img, tf.uint8)
    img_array = tf.keras.preprocessing.image.img_to_array(img)
    img_array = tf.expand_dims(img_array, 0)
We will now define a predict button that will enables us to get predictions from the model.
if st.button("Get Predictions"):
    suggestion = get_predictions(input_image =img_array)
    st.success(suggestion)
The entire app.py looks something like this :
# Imports
import streamlit as st
import tensorflow as tf
import os
import numpy as np
class_names = ["Cat", "Dog"]

## Page Title
st.set_page_config(page_title = "Cats vs Dogs Image Classification")
st.title(" Cat vs Dogs Image Classification")
st.markdown("---")

## Sidebar
st.sidebar.header("TF Lite Models")
display = ("Select a Model","Converted FP-16 Quantized Model", "Converted Integer Quantized Model", "Converted Dynamic Range Quantized Model","Created FP-16 Quantized Model", "Created Quantized Model", "Created Dynamic Range Quantized Model")
options = list(range(len(display)))
value = st.sidebar.selectbox("Model", options, format_func=lambda x: display[x])
print(value)

if value == 1:
    tflite_interpreter = tf.lite.Interpreter(model_path='models\converted_fp_16_model.tflite')
    tflite_interpreter.allocate_tensors()
if value == 2:
    tflite_interpreter = tf.lite.Interpreter(model_path='models\converted_int_quant_model.tflite')
    tflite_interpreter.allocate_tensors()
if value == 3:
    tflite_interpreter = tf.lite.Interpreter(model_path='models\converted_dynamic_quant_model.tflite')
    tflite_interpreter.allocate_tensors()
if value == 4:
    tflite_interpreter = tf.lite.Interpreter(model_path='models\created_model_fp16.tflite')
    tflite_interpreter.allocate_tensors()
if value == 5:
    tflite_interpreter = tf.lite.Interpreter(model_path='models\created_model_int8.tflite')
    tflite_interpreter.allocate_tensors()
if value == 6:
    tflite_interpreter = tf.lite.Interpreter(model_path='models\created_model_dynamic.tflite')
    tflite_interpreter.allocate_tensors()

def set_input_tensor(interpreter, image):
  """Sets the input tensor."""
  tensor_index = interpreter.get_input_details()[0]['index']
  input_tensor = interpreter.tensor(tensor_index)()[0]
  input_tensor[:, :] = image

def get_predictions(input_image):
    output_details = tflite_interpreter.get_output_details()
    set_input_tensor(tflite_interpreter, input_image)
    tflite_interpreter.invoke()
    tflite_model_prediction = tflite_interpreter.get_tensor(output_details[0]["index"])
    tflite_model_prediction = tflite_model_prediction.squeeze().argmax(axis = 0)
    pred_class = class_names[tflite_model_prediction]
    return pred_class


## Input Fields
uploaded_file = st.file_uploader("Upload a Image", type=["jpg","png", 'jpeg'])
if uploaded_file is not None:
    with open(os.path.join("tempDir",uploaded_file.name),"wb") as f:
        f.write(uploaded_file.getbuffer())
    path = os.path.join("tempDir",uploaded_file.name)
    img = tf.keras.preprocessing.image.load_img(path , grayscale=False, color_mode='rgb', target_size=(224,224,3), interpolation='nearest')
    st.image(img)
    print(value)
    if value == 2 or value == 5:
        img = tf.image.convert_image_dtype(img, tf.uint8)
    img_array = tf.keras.preprocessing.image.img_to_array(img)
    img_array = tf.expand_dims(img_array, 0)


if st.button("Get Predictions"):
    suggestion = get_predictions(input_image =img_array)
    st.success(suggestion)
We will also require a requirements.txt file that will contain names of necessary packages needed to be installed for the app to run
streamlit
tensorflow-cpu
opencv-python
We will now upload these files and the TF Lite model to a GitHub repository.
Now we are ready to deploy our app on streamlit share . We simply have to specify the url of app.py in our github repository.
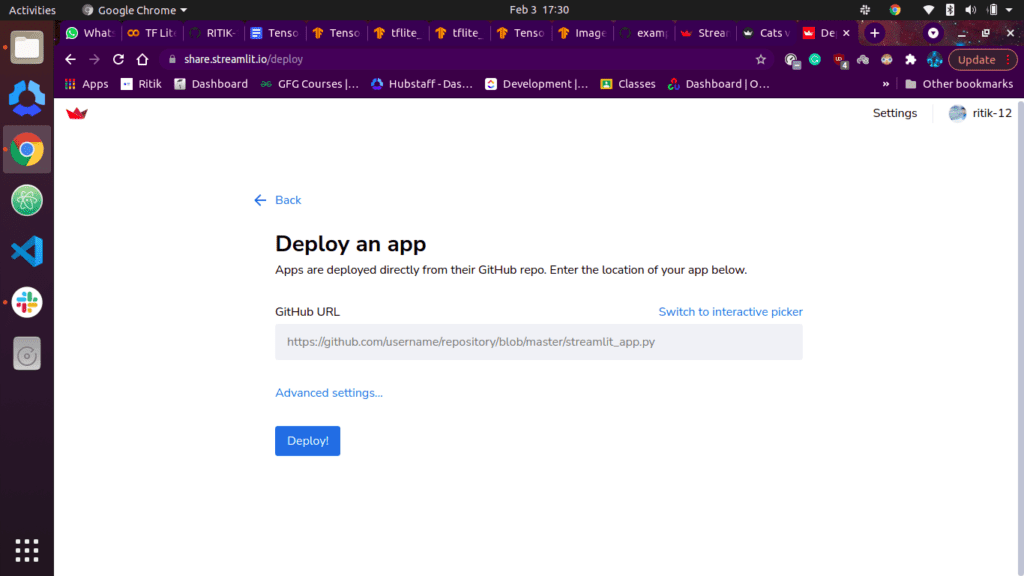
And we simply click on deploy and tada! The app is deployed!
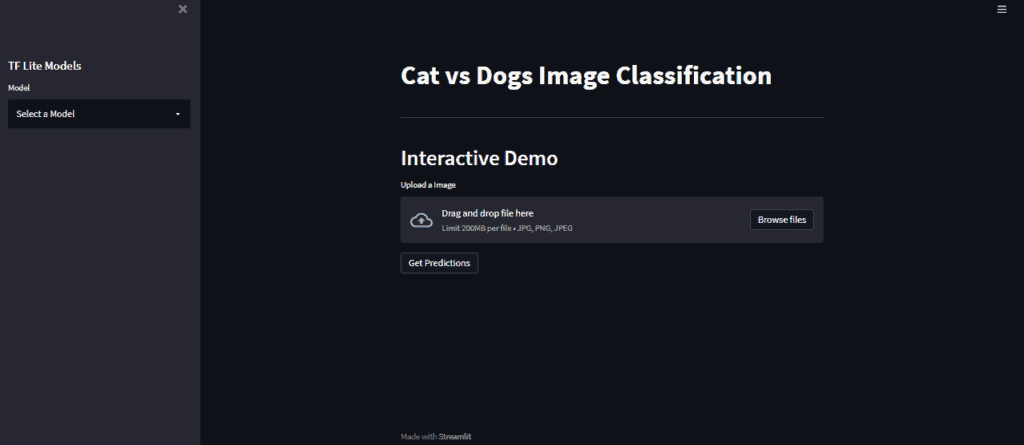
We will now select a model, let’s say Converted Integer quantized model.
Now we will upload an image.
Let’s get the model prediction now by clicking on the Get Predictions button.
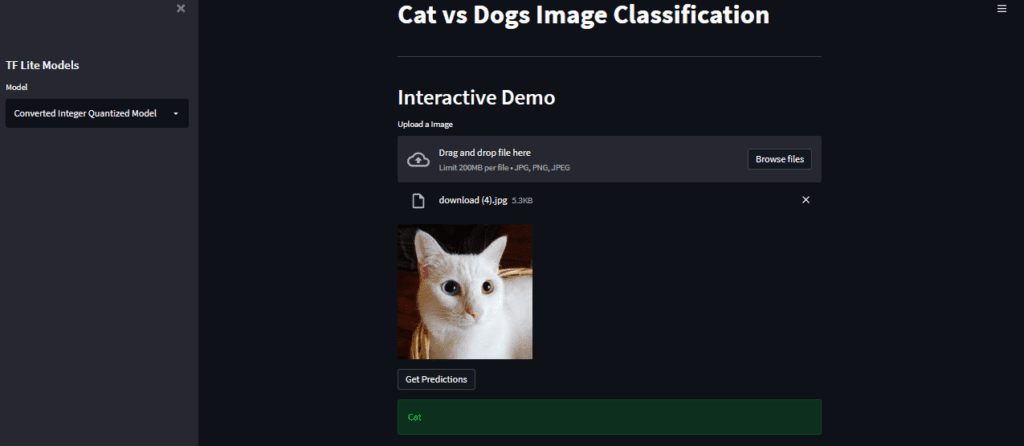
As we can see here, we have successfully deployed the app and were able to get inferences from the model.




100K+ Learners
Join Free OpenCV Bootcamp3 Hours of Learning