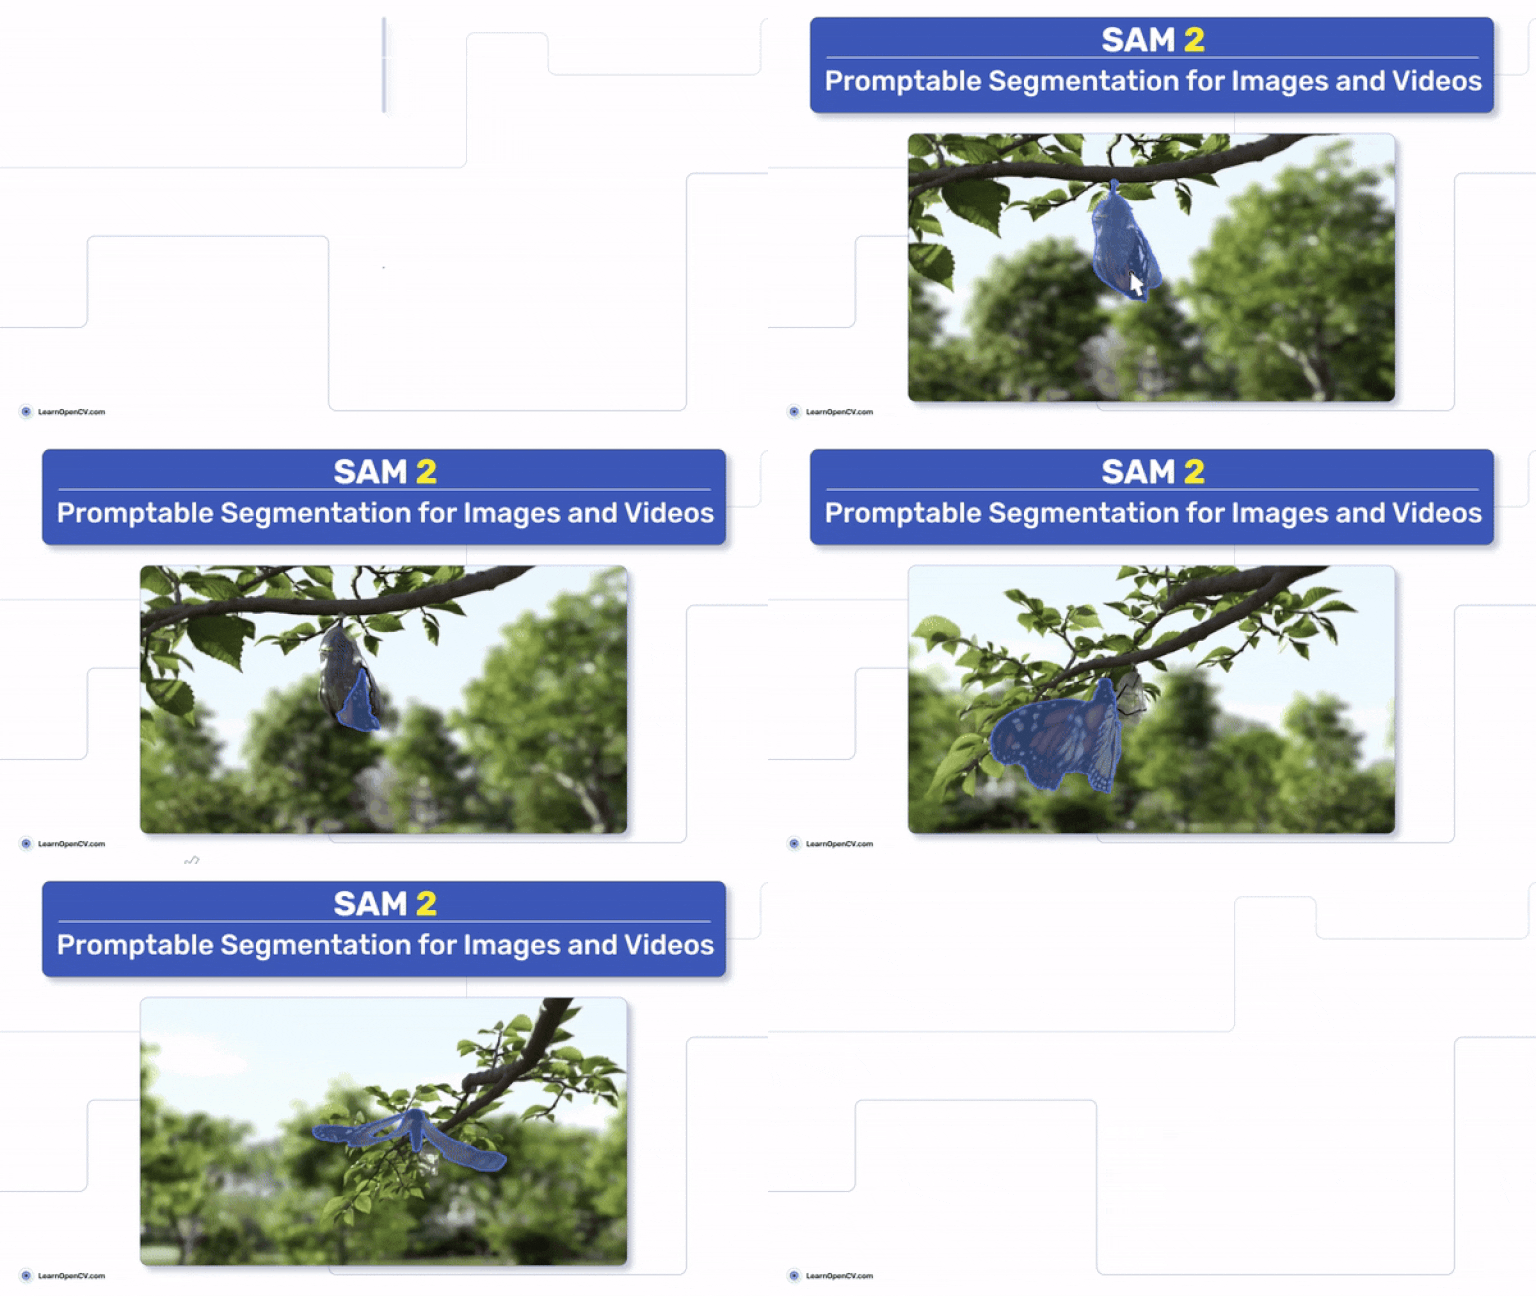
Image segmentation is one of the most fundamental tasks in Computer Vision. With their Segment Anything Model (SAM), last year, Meta AI put forth the world’s first foundation model for image segmentation. Today, we have SAM 2 (Segmentation Anything Model 2), a promptable foundation model for image and video segmentation.
We will cover the following topics in detail in this article:
- The primary contributions of the SAM 2 project.
- What were the limitations of the SAM?
- The SAM 2 architecture and new components.
- The SA-V dataset.
- Benchmark results.
- Running inference using the SAM 2 weights.
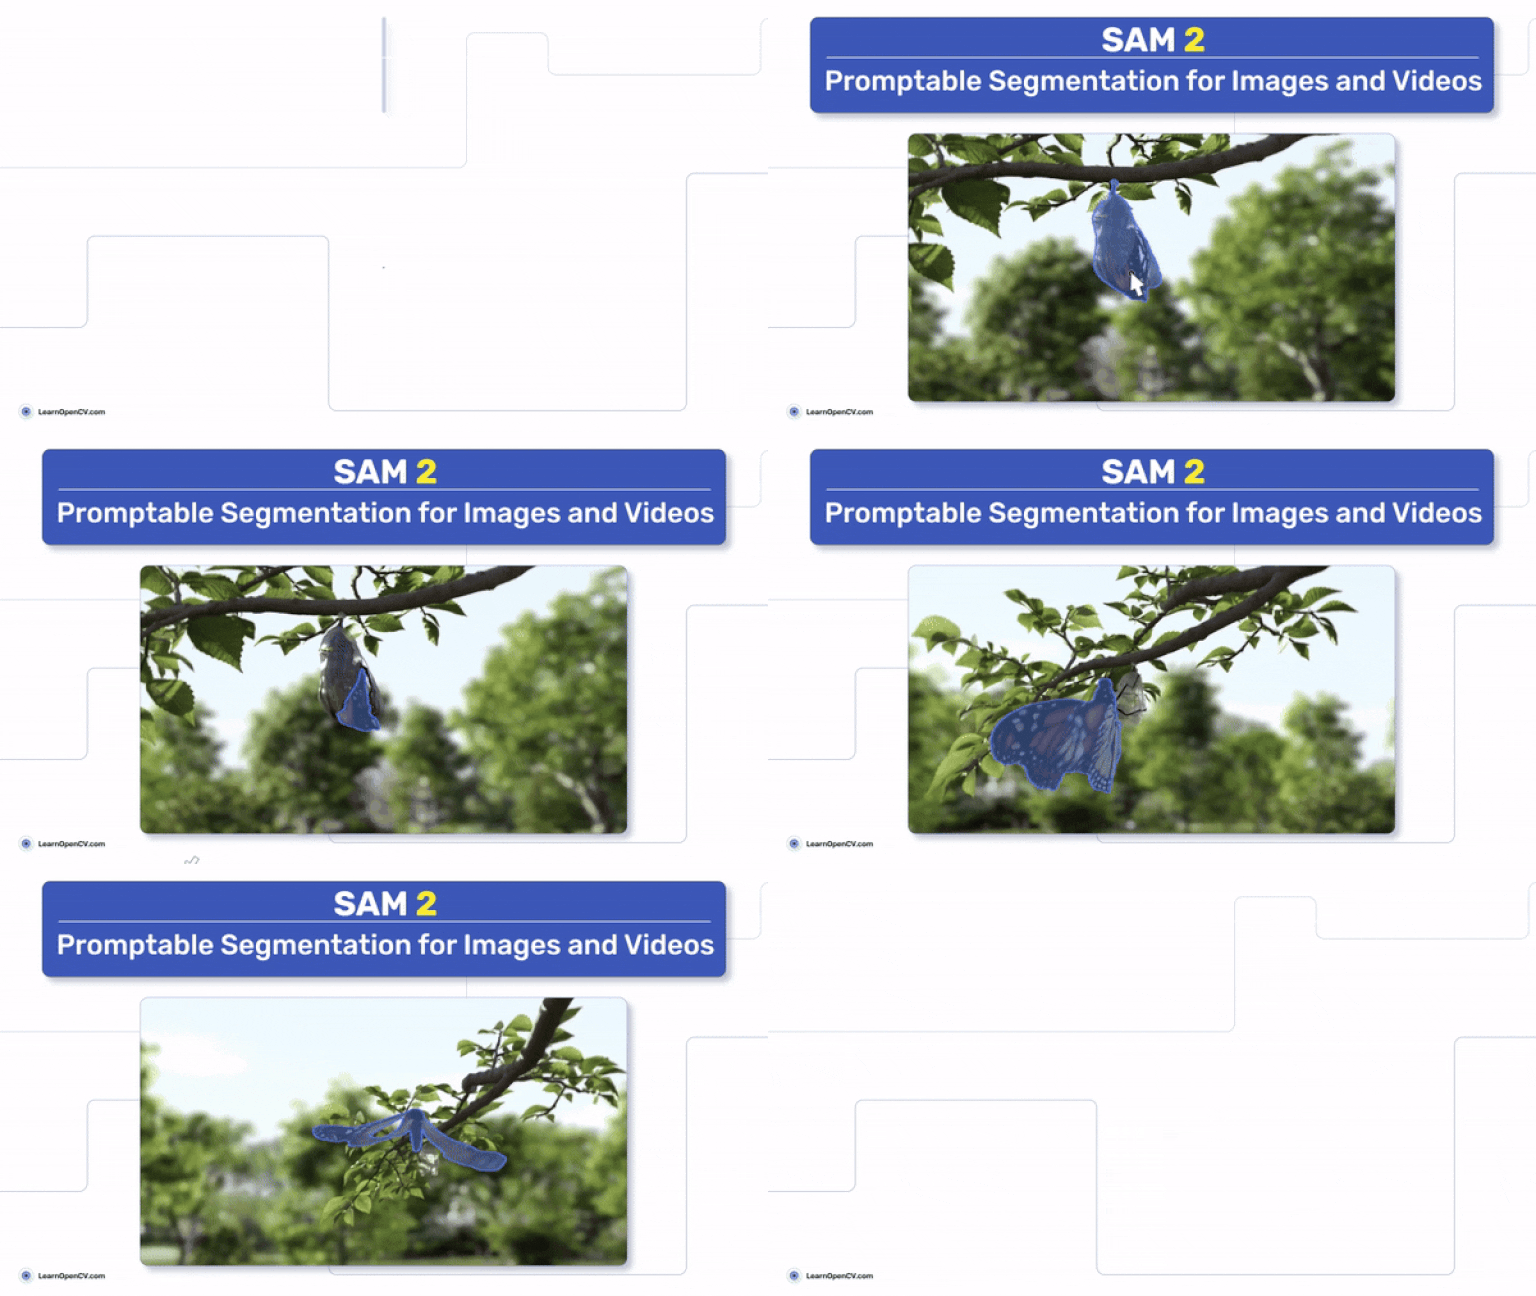
Check the interactive segmentation results by SAM at the end of the article.
Table of Contents
- What are the Primary Contributions of the SAM 2 Project?
- What Were the Limitations of SAM and What Task Does SAM 2 Solve?
- SAM 2 Architecture
- Data Engine
- SA-V Dataset
- Comparison of SAM 2 with SOTA VOS Models
- Real World Use Case of SAM 2
- Different SAM 2 Architectures
- Running Inference on Videos using SAM 2
- Interactive Image Segmentation using SAM 2
- Summary and Conclusion
- References
What are the Primary Contributions of the SAM 2 Project?
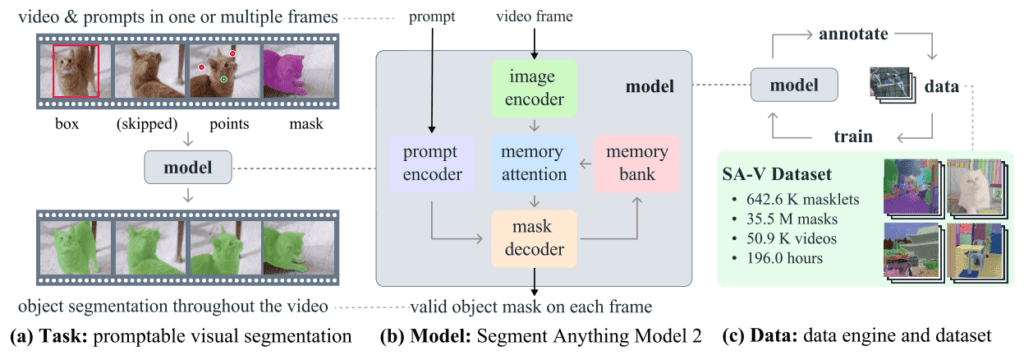
There are three primary contributions of the SAM 2 project.
- The first one is of course the Segment Anything Model 2.
- A new data engine for dataset preparation for training and evaluation.
- The SA-V (Segment Anything – Video) dataset.
We will go through each of the components in detail in the following sections.
What Were the Limitations of SAM and What Task Does SAM 2 Solve?
The first iteration of the model, SAM (Segment Anything), was a foundation model for promptable image segmentation. It could be used out of the box for segmenting almost anything in natural scenes.
However, it is not able to handle temporal data well, e.g. videos. To segment objects in videos, it has to be coupled with other deep learning based computer vision models. One such method is object detection, where the bounding box of objects in each frame is provided as a prompt to SAM. This often is not an optimal solution as it can lead to substantial latency where real-time inference is necessary.
This brings us to SAM 2, a unified architecture for both image and video segmentation.
With SAM 2, the authors extend the task of Promptable Visual Segmentation (PVS) to the video domain. We can prompt SAM 2 with a point, a box, or even a mask for any object on any frame of a video, and the model predicts the objects in subsequent frames. Of course, this requires a new training regime that we will discover further.
SAM 2 Architecture
The SAM 2 model architecture generalizes the SAM architecture to the video domain. Just like the first iteration of the mode, SAM 2 supports prompts in three formats:
- Points
- Bounding boxes
- Masks
The new architecture introduced several new components:
- A new image encoder
- Memory attention for spatio-temporal data
- Prompt encoder for handling prompts
- A new method for mask decoder
- A memory encoder
- And a memory bank

Let’s take a look at each of the components in more detail.
Image Encoder
The image encoder is a hierarchical masked autoencoder (Hiera). This allows the use of multiscale features during decoding. Furthermore, the image encoder encodes the video frames in a streaming manner, encoding one frame at a time.
Memory Attention
Memory attention serves as cross-attention mechanism conditioning the features from the current frames on the past frame features, past predictions, and the prompts as well. This is a stacking of transformer blocks and the first block extracts the current frame features.
Prompt Encoder
The prompt encoder handles different types of prompts and is identical to SAM’s. Point and bounding box prompts are considered sparse prompts and are represented by positional encodings along with the learned embeddings. Dense prompts like masks is handled by convolutional layers.
Mask Decoder
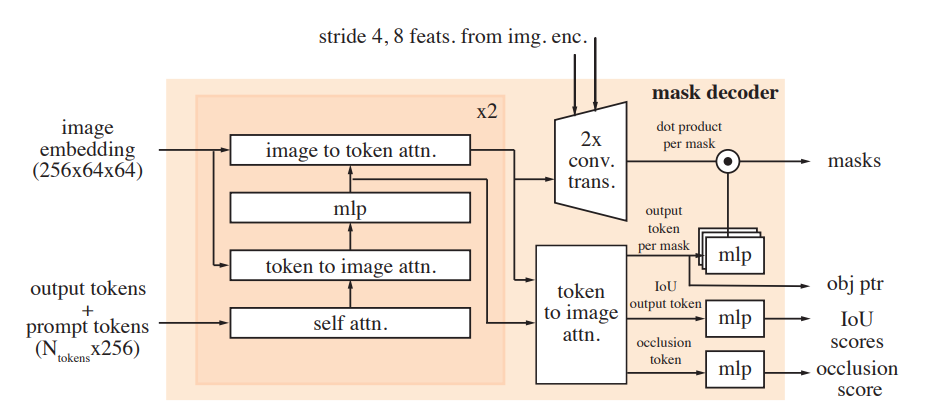
The mask decoder takes two inputs, the encoded prompts from the prompt encoder (if any) and the encoded and conditioned frames from the memory attention module. It generates the mask for the current frame. Additionally, there is a skip connection present from the image encoder which bypasses the memory attention. This helps in incorporating high-resolution information for decoding.
Memory Encoder
The memory encoder encodes the current frame’s predictions and the embeddings from the image encoder as well to be used in the future.
Memory Bank
The memory bank stores information about the past predictions. However, it is worthwhile to note that it only stores information for the target object in the video. Not only that, it also maintains the history of the prompts from the prompt encoder for whichever frames were prompted.
This covers a conceptual view of the SAM 2 model. It is highly recommended that you go through the section covering the model architecture in the paper as well for a detailed read.
Data Engine
Creating a model as capable as SAM 2 requires extremely high quality, diverse, and large dataset. For this, the authors create a data engine with model in the loop.
The data engine follows three phases.
Phase 1
In phase 1, SAM was used to generate masks and assist humans with annotations. After the initial annotation by SAM, human annotators corrected and refined the annotations on frames of videos (extracted at 6 FPS) with pixel-precise editing tools.
Phase 2
In phase 2, both SAM 1 and SAM2 were involved in the loop along with the human annotators. First, the mask from SAM 1 and manual masks were used as prompts for the SAM 2 model. As these are video frames, the subsequent masks were generated by SAM 2 by temporally propagating the prompted masks from the first frame. This generates the spatio-temporal masklets for an entire video.
Note: The SAM 2 Mask model used here was trained using the annotations generated in Phase 1.
In this phase, the SAM 2 Mask model is retrained with 63.5K masklets. This process also reduces the annotation time by 5.1x compared to phase 1.
Phase 3
In the last phase, only SAM 2 is used which accepts all types of prompts. As it is a more capable SAM 2 model, human intervention is minimal and is needed when extreme refinement of the masks is necessary.
Phase 3 generated 197K masklets.
SA-V Dataset
The above data engine gave rise to the SA-V (Segment Anything-Video) dataset. The dataset comprises of:
- 50.9K videos
- 642.6K masklets
Following is a comparison of the SA-V dataset with other Video Object Segmentation (VOS) datasets.

As we can see, the SA-V dataset is substantially larger than any other VOS dataset out there. To be precise, with auto annotations, the SA-V dataset is 53x larger than the largest VOS dataset. Here are some interesting details about the SA-V dataset:
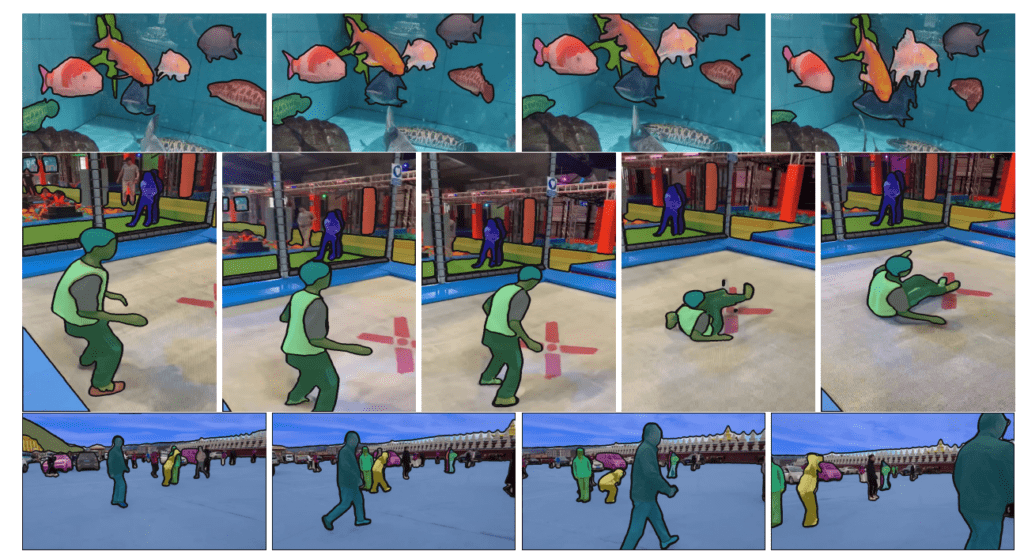
- Comprises of 54% indoor and 46% outdoor scenes.
- Each video is around 14 seconds in duration.
- Contains more varied frames, spanning over 47 countries.
- Frames include in the wild scenes with everyday scenarios.
Following are some of the video frames of the dataset showcasing the above points.
Comparison of SAM 2 with SOTA VOS Models
Although the primary aim of SAM 2 is PVS, the authors also compare it with other SOTA semi-supervised VOS models. These models, accept the ground truth mask as a prompt in the first frame.
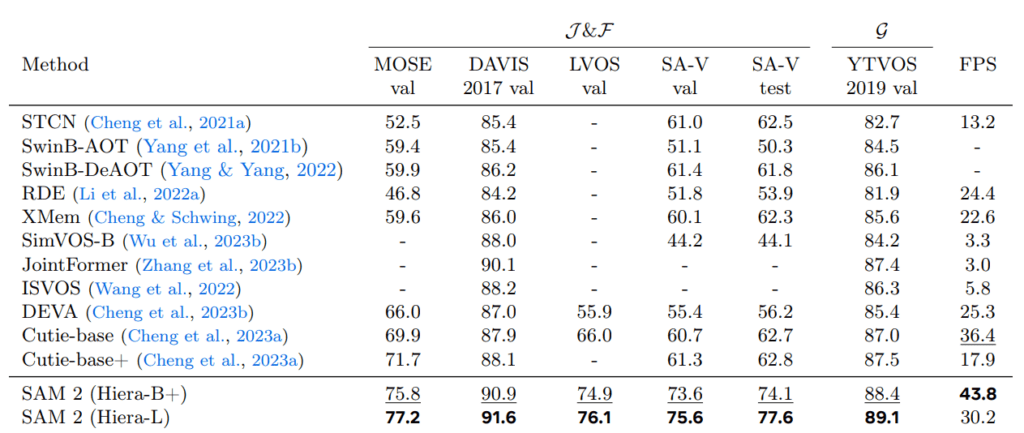
The above figure shows a benchmark table from the paper. Two SAM models, based on Hiera B+ and L are compared with other VOS models against different datasets. It is extremely clear that both of the SAM 2 models beat all other models in IoU and F1 scores. SAM 2 Hiera-L surpasses all other models in accuracy while still maintaining 30 FPS on an A100 GPU.
Real World Use Case of SAM 2
Let’s take a look at some of the more practical and real-world use cases of SAM 2 as described in the official article.
Object Tracking
Object tracking is an extremely useful concept. Not only for autonomous vehicles and robotics, we can track object for creating special effects as well.
Segmenting Cells from Microscopic Videos
SAM 2 can also play an invaluable role in scientific research. It can used to segment and track moving cells in videos captured from a microscope.
Different SAM 2 Architectures
Moving to a bit more practical aspect. Based on different Hiera backbones, there are 4 different SAM 2 models. SAM 2 Tiny, Small, Base Plus, and Large; Tiny being the smallest and fastest with 38.9 million parameters, and running at 47.2 FPS on an A100 GPU.
| Model | Size (M) | Speed (FPS) | SA-V test (J&F) | MOSE val (J&F) | LVOS v2 (J&F) |
|---|---|---|---|---|---|
| sam2_hiera_tiny | 38.9 | 47.2 | 75.0 | 70.9 | 75.3 |
| sam2_hiera_small | 46 | 43.3 (53.0 compiled*) | 74.9 | 71.5 | 76.4 |
| sam2_hiera_base_plus | 80.8 | 34.8 (43.8 compiled*) | 74.7 | 72.8 | 75.8 |
| sam2_hiera_large | 224.4 | 24.2 (30.2 compiled*) | 76.0 | 74.6 | 79.8 |
Running Inference on Videos using SAM 2
From this section onward, we will use the official GitHub repository and run SAM 2 on new videos to check its capability in real world videos.
Setup SAM 2
The first step is to set up SAM 2.
Let’s clone the repository and run the setup file.
git clone https://github.com/facebookresearch/segment-anything-2.git
Enter the cloned directory and install SAM 2.
cd segment-anything-2
pip install -e .
Install the dependencies for the demo as well.
pip install -e ".[demo]"
The next step is downloading all the checkpoints.
cd checkpoints
./download_ckpts.sh
The official GitHub repository already comes with notebooks for running SAM 2 on images and videos. Here, we will go through the code to run inference on some new images other than the official ones.
In the segment-anything-2 directory, we create a new custom_code directory where we can store our custom notebooks and scripts.
The first step is the same as what is provided in the official code, we import all the necessary modules and set CUDA.
import numpy as np
import torch
import matplotlib.pyplot as plt
from PIL import Image

# use bfloat16 for the entire notebook
torch.autocast(device_type="cuda", dtype=torch.bfloat16).__enter__()

if torch.cuda.get_device_properties(0).major >= 8:
    # turn on tfloat32 for Ampere GPUs (https://pytorch.org/docs/stable/notes/cuda.html#tensorfloat-32-tf32-on-ampere-devices)
    torch.backends.cuda.matmul.allow_tf32 = True
    torch.backends.cudnn.allow_tf32 = True
Next, we have the show_anns function that accepts the mask annotations generated from the SAM 2 model and overlays them on top of the original image.
def show_anns(anns, borders=True):
    if len(anns) == 0:
        return
    sorted_anns = sorted(anns, key=(lambda x: x['area']), reverse=True)
    ax = plt.gca()
    ax.set_autoscale_on(False)

    img = np.ones((sorted_anns[0]['segmentation'].shape[0], sorted_anns[0]['segmentation'].shape[1], 4))
    img[:,:,3] = 0
    for ann in sorted_anns:
        m = ann['segmentation']
        color_mask = np.concatenate([np.random.random(3), [0.5]])
        img[m] = color_mask
        if borders:
            import cv2
            contours, _ = cv2.findContours(m.astype(np.uint8),cv2.RETR_EXTERNAL, cv2.CHAIN_APPROX_NONE)
            # Try to smooth contours
            contours = [cv2.approxPolyDP(contour, epsilon=0.01, closed=True) for contour in contours]
            cv2.drawContours(img, contours, -1, (0,0,1,0.4), thickness=1)

    ax.imshow(img)
The next block reads an image from the images directory. You can provide the path to your own image here.
image = Image.open('images/image_1.jpg')
image = np.array(image.convert("RGB"))
The next step involved loading the SAM 2 model from the checkpoints that we downloaded earlier and building the model using the configuration file.
from sam2.build_sam import build_sam2
from sam2.automatic_mask_generator import SAM2AutomaticMaskGenerator

sam2_checkpoint = "../checkpoints/sam2_hiera_large.pt"
model_cfg = "sam2_hiera_l.yaml"

sam2 = build_sam2(model_cfg, sam2_checkpoint, device ='cuda', apply_postprocessing=False)

mask_generator = SAM2AutomaticMaskGenerator(sam2)
Here, we load the SAM 2 Large model and initialize the SAM2AutomaticMaskGenerator which generates masks on an entire image.
Note: If you have less than 10GB of VRAM, it is recommended to load one of the smaller models.
Now, let’s call the generate method by passing the image to generate the mask predictions.
masks = mask_generator.generate(image)
Finally, we can create a Matplotlib object, pass the generated predictions to the show_anns function and display the results.
plt.figure(figsize=(20,20))
plt.imshow(image)
show_anns(masks)
plt.axis('off')
plt.show()
Following is the result that we get.
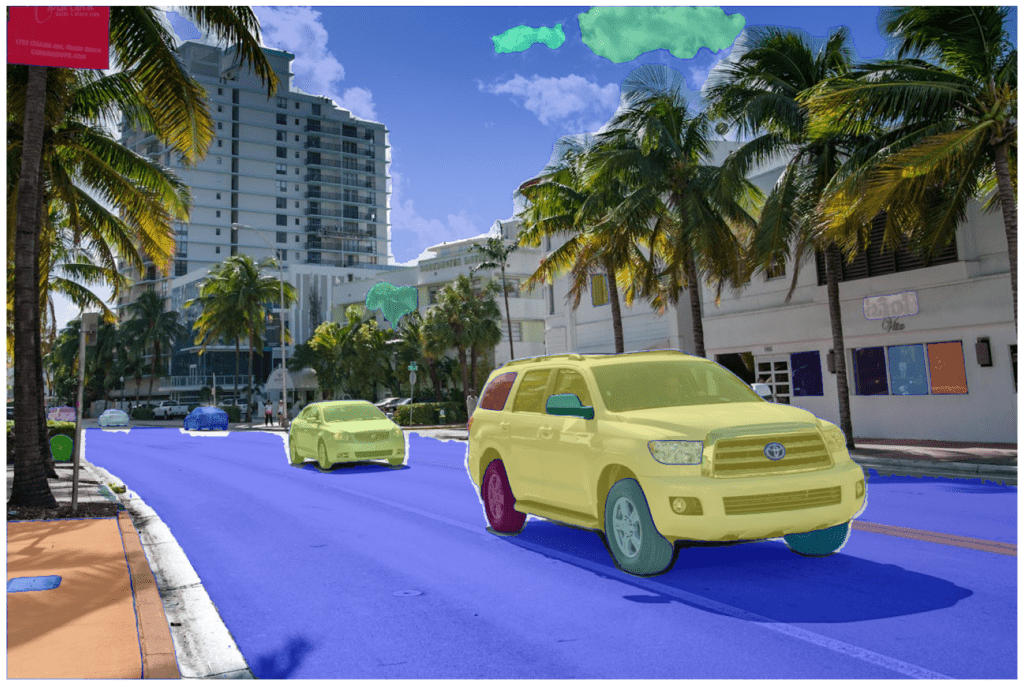
We can see that the model segments each object precisely. In fact, wherever possible it is segmenting different parts of the car as different objects which is a type of instance segmentation. As we are not providing any prompts here, so mask for the entire image is generated.
Let’s try creating segmentation masks for another image.
plt.figure(figsize=(20,20))
plt.imshow(image)
show_anns(masks)
plt.axis('off')
plt.show()
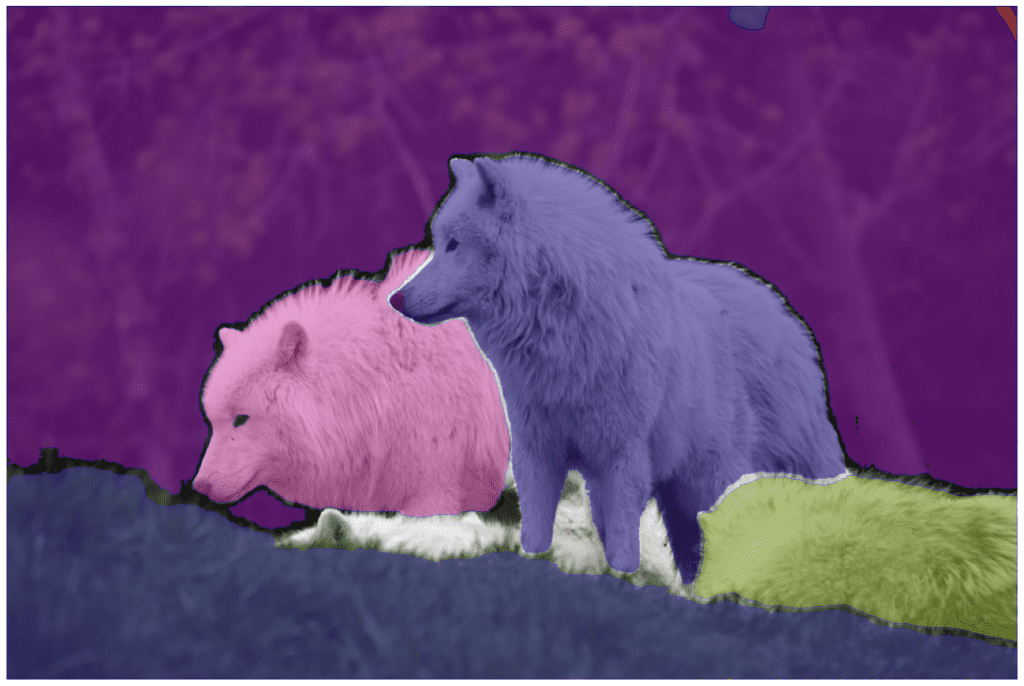
This time also, the model is able to predict all the wolves separately. Along with that, the SAM 2 Large model also segmented the grass and the background precisely.
Interactive Image Segmentation using SAM 2
Now that we have seen SAM 2 in action, let’s take its inference capabilities to the next step with an interactive image segmentation script.
We will combine OpenCV mouse click events and SAM 2’s promptable segmentation techniques to segment the areas of our choice in the images.
The code shown here is present in the interactive_image_segmentation.py script.
Following are the import statements that we need.
import numpy as np
import torch
import argparse
import os
import cv2
import time

from PIL import Image
from sam2.build_sam import build_sam2
from sam2.sam2_image_predictor import SAM2ImagePredictor
This time, instead of SAM2AutomaticMaskGenerator, we will use the SAM2ImagePredictor.
Next, we define the argument parsers and create an output directory to store the results.
parser = argparse.ArgumentParser()
parser.add_argument(
    '--ckpt',
    help='path to the model checkpoints',
    required=True
)
parser.add_argument(
    '--input',
    help='path to the input image',
    required=True
)
args = parser.parse_args()

out_dir = 'outputs'
os.makedirs(out_dir, exist_ok=True)

torch.autocast(device_type="cuda", dtype=torch.bfloat16).__enter__()
We have command line arguments to specify the model path and the input image.
Helper Functions
Now, lets’s define three helper functions.
def image_overlay(image, segmented_image):
    alpha = 0.6 # transparency for the original image
    beta = 0.4 # transparency for the segmentation map
    gamma = 0 # scalar added to each sum

    segmented_image = np.array(segmented_image, dtype=np.float32)
    segmented_image = cv2.cvtColor(segmented_image, cv2.COLOR_RGB2BGR)

    image = np.array(image, dtype=np.float32) / 255.
    image = cv2.cvtColor(image, cv2.COLOR_RGB2BGR)

    cv2.addWeighted(image, alpha, segmented_image, beta, gamma, image)
    return image

def load_model(ckpt):
    model_name = ckpt.split(os.path.sep)[-1]

    if 'large' in model_name:
        model_cfg = 'sam2_hiera_l.yaml'
    elif 'base_plus' in model_name:
        model_cfg = 'sam2_hiera_b+.yaml'
    elif 'small' in model_name:
        model_cfg = 'sam2_hiera_s.yaml'
    elif 'tiny' in model_name:
        model_cfg = 'sam2_hiera_t.yaml'

    model = build_sam2(
        model_cfg, ckpt, device='cuda', apply_postprocessing=False
    )
    predictor = SAM2ImagePredictor(model)

    return predictor

def get_mask(masks, random_color=False, borders=True):
    for i, mask in enumerate(masks):
        if random_color:
            color = np.concatenate([np.random.random(3), np.array([0.6])], axis=0)
        else:
            color = np.array([30/255, 144/255, 255/255, 0.6])
        h, w = mask.shape[-2:]

        mask = mask.astype(np.float32)

        if i > 0:
            mask_image +=  mask.reshape(h, w, 1) * color.reshape(1, 1, -1)
        else:
            mask_image =  mask.reshape(h, w, 1) * color.reshape(1, 1, -1)

        if borders:
            contours, _ = cv2.findContours(mask,cv2.RETR_EXTERNAL, cv2.CHAIN_APPROX_NONE)
            # Try to smooth contours
            contours = [cv2.approxPolyDP(contour, epsilon=0.01, closed=True) for contour in contours]
            mask_image = cv2.drawContours(mask_image, contours, -1, (1, 1, 1, 0.5), thickness=2)

    return mask_image
The image_overlay is a simple function that we will use to overlay the segmentation map on top of the original image.
The load_model function maps the provided model checkpoint with the configuration file.
As SAM 2 may return multiple masks for a single prompt, the get_mask function helps dealing with that. We iterate over each of the generated predictions create and append the colored segmentation map to the mask_image array and return it at the end.
OpenCV Code to Create an Interactive Window
SAM 2 can accept prompts in the form of points, bounding boxes, and masks. However, here, we will only deal with points and bounding boxes. To achieve this, we will create an interactive OpenCV window where we can draw points for positive & negative labels, and draw bounding boxes as well.
The following code block achieves that.
# Initialize global variables
clicked = []
labels = []
rectangles = []
mode = 'point'  # Default mode
ix, iy = -1, -1
drawing = False
last_point_time = 0  # To keep track of the last point creation time
delay = 0.2  # Time delay in seconds

# Mouse callback function
def draw(event, x, y, flags, param):
    global ix, iy, drawing, rectangles, clicked, labels, mode, last_point_time

    current_time = time.time()

    if mode == 'point':
        if event == cv2.EVENT_LBUTTONDOWN:
            clicked.append([x, y])
            labels.append(1)
            cv2.circle(show_image, (x, y), 5, (0, 255, 0), -1)
            cv2.imshow('image', show_image)
        elif event == cv2.EVENT_MBUTTONDOWN:
            clicked.append([x, y])
            labels.append(0)
            cv2.circle(show_image, (x, y), 5, (0, 0, 255), -1)
            cv2.imshow('image', show_image)
        elif event == cv2.EVENT_MOUSEMOVE:
            if flags & cv2.EVENT_FLAG_LBUTTON:
                if current_time - last_point_time >= delay:
                    clicked.append([x, y])
                    labels.append(1)
                    cv2.circle(show_image, (x, y), 5, (0, 255, 0), -1)
                    cv2.imshow('image', show_image)
                    last_point_time = current_time
    elif mode == 'rectangle':
        if event == cv2.EVENT_LBUTTONDOWN:
            drawing = True
            ix, iy = x, y
        elif event == cv2.EVENT_MOUSEMOVE:
            if drawing:
                img = show_image.copy()
                cv2.rectangle(img, (ix, iy), (x, y), (0, 255, 0), 2)
                cv2.imshow('image', img)
        elif event == cv2.EVENT_LBUTTONUP:
            drawing = False
            cv2.rectangle(show_image, (ix, iy), (x, y), (0, 255, 0), 2)
            cv2.imshow('image', show_image)
            rectangles.append([ix, iy, x, y])

# Load an image
cv2.namedWindow('image')
cv2.setMouseCallback('image', draw)

# Press 'p' to switch to point mode, 'r' to switch to rectangle mode, 'q' to quit
while True:
    cv2.imshow('image', show_image)
    key = cv2.waitKey(1) & 0xFF
    if key == ord('p'):
        mode = 'point'
        print("Switched to point mode")
    elif key == ord('r'):
        mode = 'rectangle'
        print("Switched to rectangle mode")
    elif key == ord('q'):
        break

cv2.destroyAllWindows()
The code may look complex but it is quite straightforward. First, we initialize the necessary variables.
- For points, SAM 2 accepts arrays of
x, ycoordinates. For each positive point prompt, we need to store a value of1in thelabelsarray, and for each negative point prompt, we need to store0. - The rectangles list will store the coordinates of bounding boxes for the bounding box prompts.
- As we can either prompt the model with points or bounding boxes, we have a
modevariable to manage that. - The
ixandiymaintain the initial state of the bounding box points. - The
drawingvariable is to recognize the state when we are dragging the mouse for drawing bounding boxes. - We can also draw points continuously for which we maintain
last_point_timeanddelayvariables.
Once the image window appears, we can press p on the keyboard to draw points and r to draw rectangles.
Next, we need to convert each of the prompt variables to Numpy arrays.
input_point = np.array(clicked)
input_label = np.array(labels)
input_rectangles = np.array(rectangles)
Finally, we read the image using PIL, convert it to array format and forward pass it through the model.
image_input = np.array(Image.open(args.input).convert('RGB'))

# Load the model mask generator.
predictor = load_model(args.ckpt)
predictor.set_image(image_input)

# Inference.
masks, scores, _ = predictor.predict(
    point_coords=input_point if len(input_point) > 0 else None,
    point_labels=input_label if len(input_label) > 0 else None,
    box=rectangles if len(rectangles) > 0 else None,
    multimask_output=False,
)

rgb_mask = get_mask(
    masks,
    borders=False
)

cv2.imshow('Image', rgb_mask)
cv2.waitKey(0)

final_image = image_overlay(image_input, rgb_mask)
cv2.imshow('Image', final_image)
cv2.waitKey(0)

cv2.imwrite(
    os.path.join(out_dir, args.input.split(os.path.sep)[-1]),
    final_image.astype(np.float32) * 255.
)
This is all the code that we need for promptable image segmentation using SAM 2. In the next subsection, we will carry out inference using different prompting techniques.
SAM 2 Segmentation using Point Prompts
Execute the following command on the terminal within the custom_code directory to start the script.
python interactive_image_segmentation.py --input input/image_1.jpg --ckpt ../checkpoints/sam2_hiera_large.pt
We use the large model here and try to segment the car. Press q on the keyboard to start the inference after choosing the point.
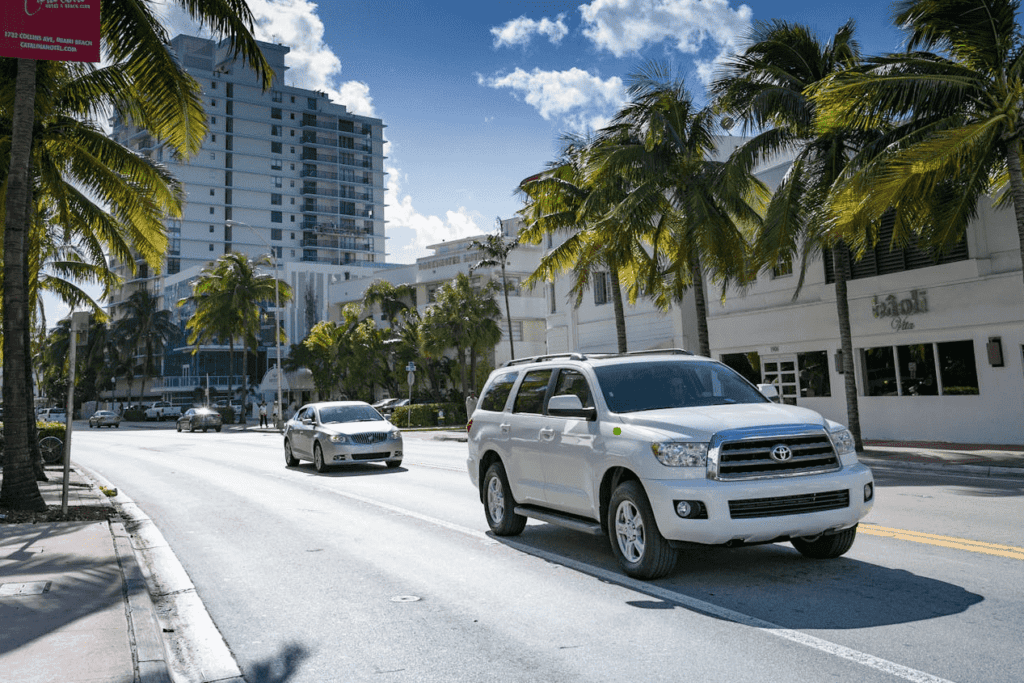
Following is the output that we get.
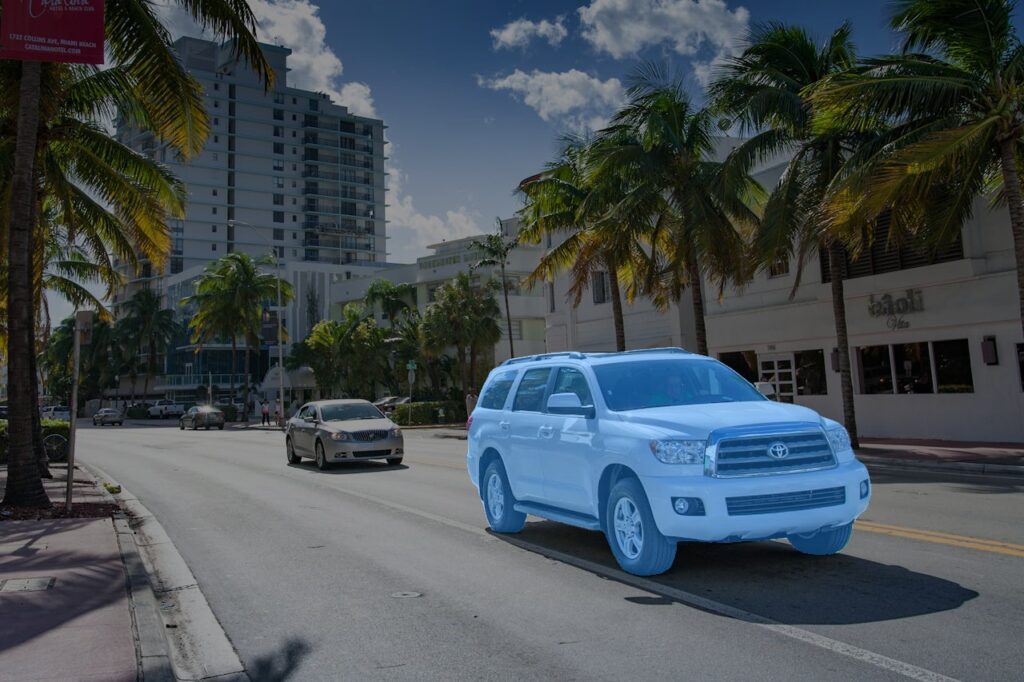
The result is quite good. The segmentation map is almost perfect.
Now, let’s try to segment both cars with point prompts. For that you can execute the script again and click approximately at the mid-point of both cars. This is the result that we get.
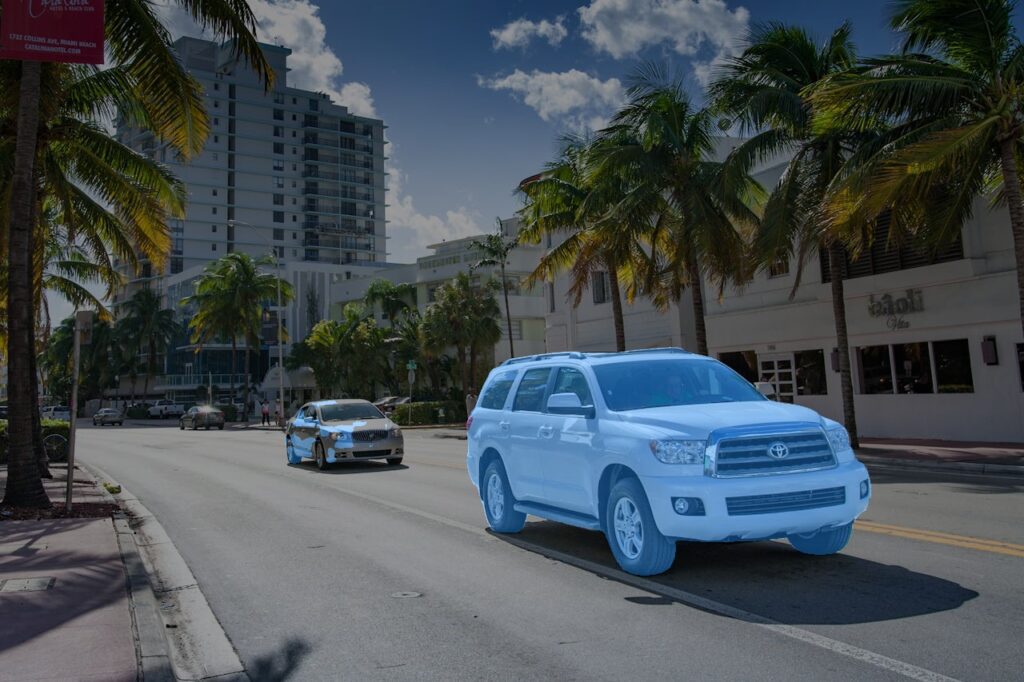
This time, however, the segmentation map of the smaller car is not precise. This can happen when SAM 2 does not get enough prompt context. For this, we can use bounding box prompts. Execute the script, press the r key to switch to drawing boxes when the image window appears on the screen. Finally, press q to start the inference.
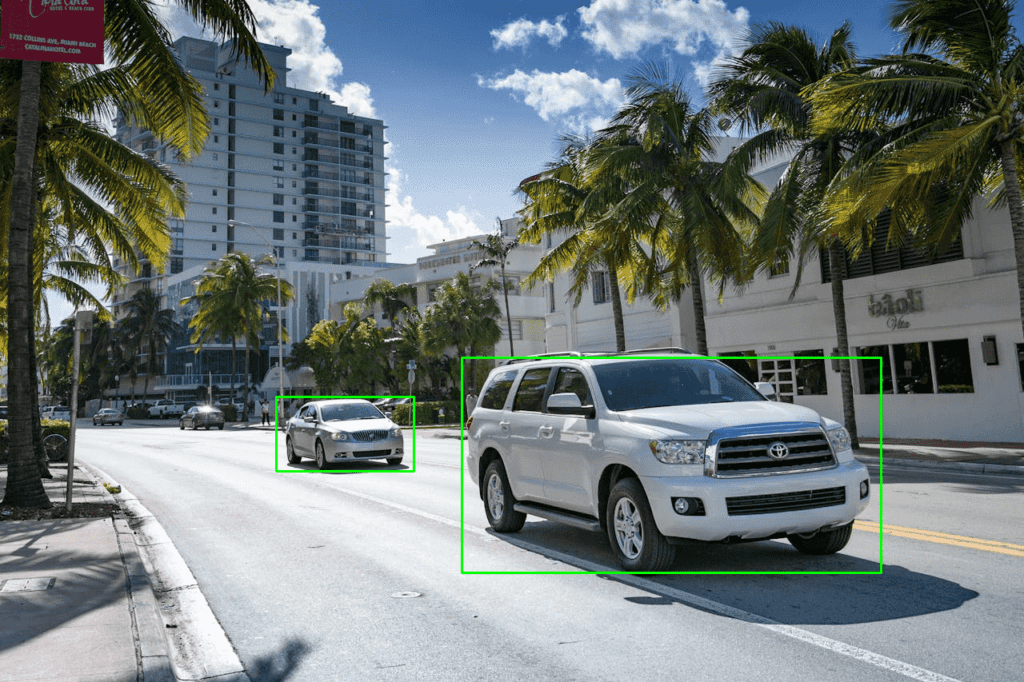
Following is the result.
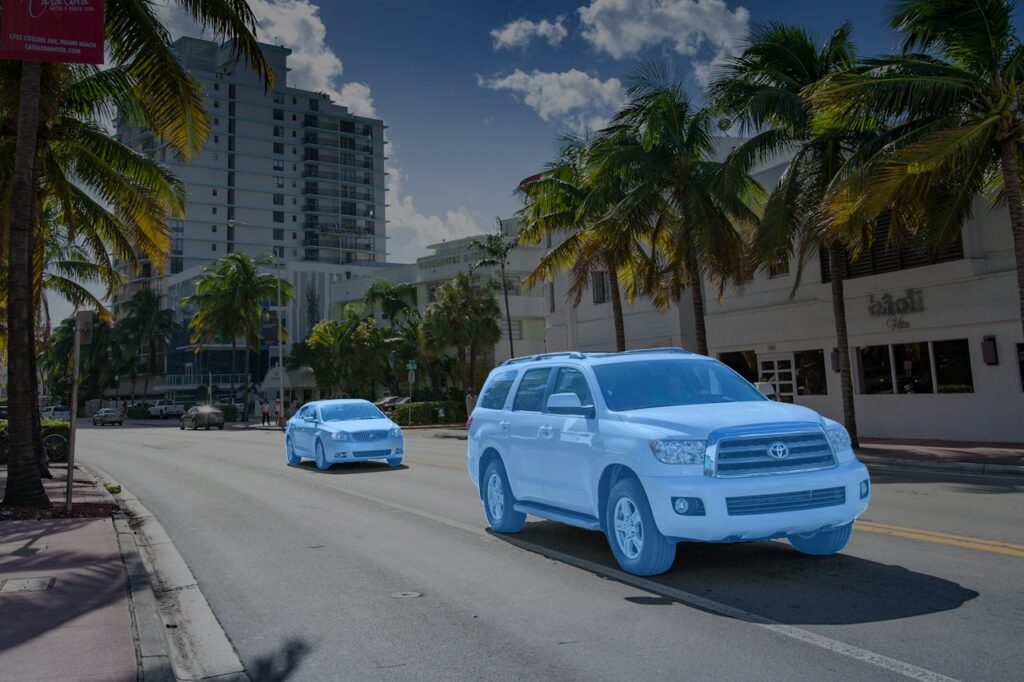
The segmentation map of the smaller car is much better in this case. This shows the flexibility and capability of SAM 2 to literally segment anything.
You can play around with negative prompts by clicking the Middle Mouse Button to exclude the areas that you do not need the model to segment. Also, try mixing things up with negative prompts and bounding boxes and check the results.
Summary and Conclusion
In this article, we covered SAM 2 model. We started with the limitations of SAM, moved to the Segment Anything Model 2 architecture, discussed the data engine and the SA-V dataset, and finally carried out inference on images.
The release of SAM 2 opens the opportunities of creating high impact real-world applications in Computer Vision. Starting from medical applications to sports analysis, the possibilities are endless. What are you going to create with SAM 2? Let us know in the comments.



100K+ Learners
Join Free OpenCV Bootcamp3 Hours of Learning