In this blog post, we will be training YOLOv4 object detection model on a pothole detection dataset using the Darknet framework.

Before we move further, let’s have an overview of the models that we will cover here:
- We will mainly focus on the two well-known models in the Darknet YOLOv4 repository. They are YOLOv4 and YOLOv4-Tiny.
- We will use a pothole detection dataset, a combination of two open-source datasets.
- There will be four experiments in total, and we will discuss all the details further in the post.
We will get into the details of the models, the experiments that we will carry out, and the dataset later on in the article.
Pothole Detection using YOLOv4 and Darknet
As we will be carrying out 4 experiments in this blog post, the entire process can be lengthy. The following points condense the entire training procedure into a few simple steps.
- Download and prepare the pothole detection dataset in the required YOLOv4 format.
- Download the YOLOv4-Tiny pre-trained weights.
- Modify the configuration file for the YOLOv4-Tiny model to carry out fixed-resolution training.
- Training YOLOv4-Tiny model with fixed-resolution images.
- Modify the YOLOv4-Tiny configuration file to carry out multi-resolution training.
- Training YOLOv4-Tiny model with multi-resolution images.
- Download the YOLO4 pre-trained weights.
- Modify the configuration file for the YOLOv4 model for multi-resolution training and train the model.
- Carry out one final training experiment by modifying the configuration file and training with fixed-resolution images.
- Run inference on real-world pothole detection videos and analyze the results.
- A Brief Introduction to Darknet and YOLOv4
- The Pothole Dataset
- Training Experiments to Carry Out
- Training YOLOv4 Models on Custom Pothole Dataset
- Training YOLOv4 Tiny Models on the Pothole Detection Dataset with Fixed Resolution Images
- Training YOLOv4 Tiny Models on the Pothole Detection Dataset with Multi-Resolution Images
- Training YOLOv4 Model on the Pothole Detection Dataset with Multi-Resolution Images
- Training YOLOv4 Model on the Pothole Dataset with Fixed Resolution Images
- Visual Comparison of mAP
- Running Inference for Pothole Detection using YOLOv4
- Conclusion
YOLO Master Post – Every Model Explained
Don’t miss out on this comprehensive resource — Mastering All Yolo Models for a richer, more informed perspective on the YOLO series.
1. A Brief Introduction to Darknet and YOLOv4
The Darknet project is an open-source object detection framework well known for providing training and inference support for YOLO models. The library is written in C.
The Darknet logo (source – Darknet Repository)
The Darknet project was started by Joseph Redmon in 2014 with the release of the very first YOLO paper. Shortly after the publication of YOLOv3, it was taken over by Alexey Bochkovskiy who now maintains an active fork of the original repository. He also added support for YOLOv4 models, some of the best object detection models out there.
YOLOv4, YOLOv4-Tiny, and YOLOv4-CSP are some of the well-known and widely used object detection models in the repository. Along with these, Alexey also added some really nice features to the codebase:
- The code now supports mixed-precision training for GPUs with Tensor cores. It can increase the training speed by around 3 times on GPUs which support it.
- Mosaic augmentation was also added during training which greatly improves model accuracy as it learns to detect objects in more difficult images (see section 3.3. Additional Improvements of the YOLOv4 paper for details).
- The code now also supports multi-resolution training. This changes the resolution of the images by +-50% of the base resolution every 10 batches while training the model. This helps the model learn to detect objects in both smaller and larger images. But it also requires a substantial amount of GPU memory to train for the same batch size as compared to single-resolution training. The reason for this is that every few batches when the resolution changes to +50% of the base resolution, it will require more GPU memory.
2. The Pothole Dataset
Potholes on the road can become fatally dangerous when driving at high speed. This is more so when the driver of a car or vehicle cannot see the pothole from far away and applies sudden brakes or maneuvers the car away at high speed. The latter action can be equally dangerous for other drivers as well.
But what if we use deep learning and object detection to detect potholes much farther away than humans? Such a system is bound to help us. This is exactly what we will do in this blog post. We will use the YOLOv4 object detection model and the Darknet framework to create a pothole detection system.
In this post, we will combine two open-source datasets to obtain a moderately large and varied set of images for training the YOLOv4 models.
We obtain one of the datasets from Roboflow. This dataset contains 665 images in total, and it has already been split into 465 training, 133 validation, and 67 test images.
The other dataset that we use is mentioned in the ResearchGate article – Dataset of images used for pothole detection. Although the authors provide the link to a large dataset, we use a subset of it for our purpose.
We combine the two datasets in a random manner and create a training, validation, and test set. The dataset contains only one class, that is, Pothole.
You don’t need to worry about this phase of dataset processing, as you will get access to the final dataset directly.
The following are a few annotated images from the final dataset.
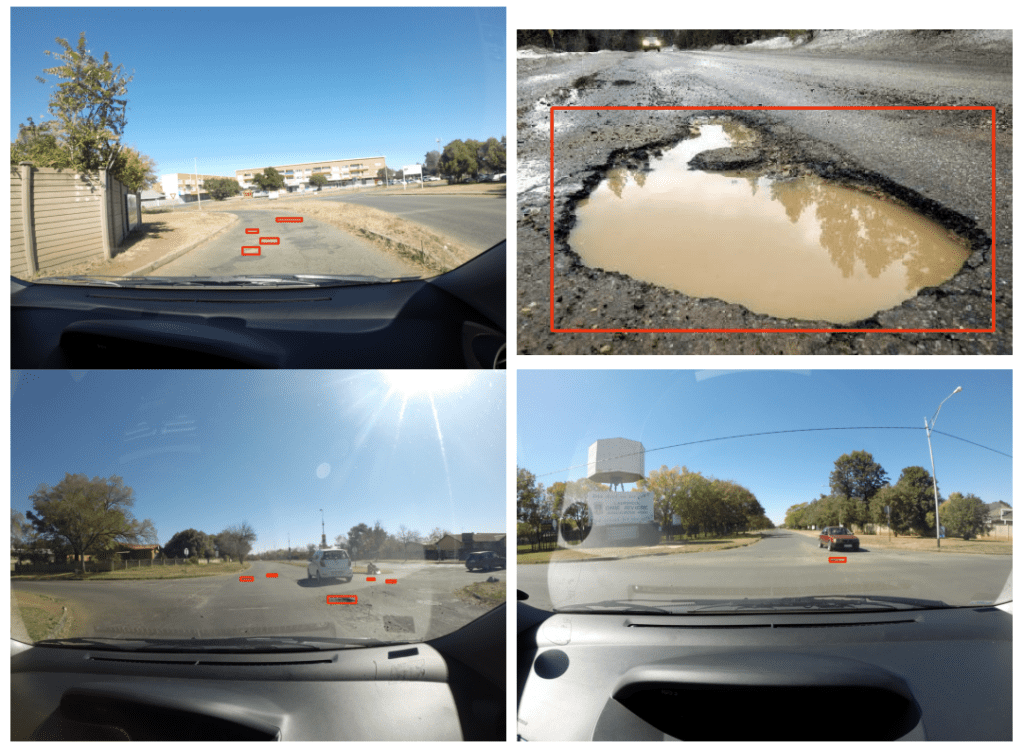
Ground truth images with annotations from the pothole detection dataset
We will carry out a minor preprocessing of the dataset, the details of which we will discuss in the coding section.
The dataset that we will use here has the following split: 1265 training images, 401 validation images, and 118 validation images.
3. Training Experiments To Carry Out
As discussed before, we will carry out a total of 4 experiments using the YOLOv4 and YOLOv4-Tiny models. The following is the briefing of those experiments:
- We will train the YOLOv4-Tiny model with a fixed resolution of 416×416.
- Then we will carry out dynamic resolution training using the YOLOv4-Tiny model with a base resolution of 416×416. This experiment should give us a higher mAP on the test set than the fixed-resolution training. We will confirm so when analyzing the results.
- Next, we will train a dynamic resolution model using the YOLOv4 model with a base resolution of 608×608. This, again, should give us a higher mAP on the test set compared to the tiny models.
- Finally, we will carry out fixed-resolution training for the YOLOv4 model with an image resolution of 608×608.
All the details about the training parameters & hyperparameters and setting up the configuration file for each experiment will be discussed in their respective sections.
4. Training YOLOv4 Models on the Custom Pothole Dataset
From here onward, we will discuss the coding details of this post. This includes the preprocessing steps to generate the text files for the image paths, the preparation of the configuration files, the creation of the data files, training, and evaluation on the test set.
There are two ways to proceed here. We can either proceed with steps that one should carry out on a local system’s terminal and IDE, or the steps one should carry out in a Jupyter notebook (maybe local, Colab, or any other cloud-based Jupyter environment). A Jupyter notebook, along with all the implementation details, is already available for download. Here, we follow the steps for developing code in IDE and executing commands in the terminal. That way, we will gain experience in both. If you are on Windows OS, it is recommended that you use the provided Jupyter notebook and run it on Colab. The following steps for local execution were carried out on a Ubuntu system. Although please note that if you proceed on your local system, training will require more than 10 GB of GPU memory for some experiments.
Download the Dataset
To download the dataset, execute the following command in your terminal inside the directory of your choice.
wget https://learnopencv.s3.us-west-2.amazonaws.com/pothole-dataset.zip
And extract the dataset using the following command.
unzip pothole-dataset.zip
Inside the dataset directory, you should find the following directory structure.
├── test
│   ├── G0010124.JPG
│   ├── G0010124.txt
│   ...
│   ├── img-98_jpg.rf.667209472947ff4d519f65c6e206a7c3.jpg
│   └── img-98_jpg.rf.667209472947ff4d519f65c6e206a7c3.txt
├── train
│   ├── G0010033.JPG
│   ├── G0010033.txt
│   ...
│   ├── img-9_jpg.rf.de0e0920eee97f99bfa4d5a2ed29d82e.jpg
│   └── img-9_jpg.rf.de0e0920eee97f99bfa4d5a2ed29d82e.txt
├── valid
│   ├── G0028267.JPG
│   ├── G0028267.txt
│   ...
│   ├── img-94_jpg.rf.26ce6c0878886e2b49b0191cf4f952bb.jpg
│   └── img-94_jpg.rf.26ce6c0878886e2b49b0191cf4f952bb.txt
├── PotholeDataset.pdf
├── README.dataset.txt
└── README.roboflow.txt
The train, valid, and test directories contain the images and the text files holding the labels. For YOLOv4, the bounding box coordinates need to be in [x_center, y_center, width, height] format, which is relative to the image size. Other than that, the label in each case is 0, as we have only one class. The next block shows an example of one such text file.
0 0.5497282608695652 0.5119565217391304 0.017934782608695653 0.005072463768115942
0 0.41032608695652173 0.5253623188405797 0.025 0.005797101449275362
0 0.30842391304347827 0.5282608695652173 0.014673913043478261 0.005797101449275362
0 0.1654891304347826 0.5224637681159421 0.027717391304347826 0.005797101449275362
Each line in the text files represents one object in the dataset. The first number, which is 0, represents the class. The remaining four floating-point numbers represent the coordinates in the above-mentioned format.
Cloning and Building Darknet
Next, we need to clone and build Darknet. Execute the following command in the terminal.
git clone https://github.com/AlexeyAB/darknet.git
Enter into the darknet directory using:
cd darknet
Note that all the remaining commands will be executed from the darknet directory. So, all paths will be relative to this directory, and the dataset directory should be one folder back relative to the darknet directory.
Now, we need to build Darknet. The build process we follow here expects GPU to be available in the system and CUDA and cuDNN installed. Open the Makefile and make the following changes in the first 7 lines:
From this
GPU=0
CUDNN=0
CUDNN_HALF=0
OPENCV=0
AVX=0
OPENMP=0
LIBSO=0
To this
GPU=1
CUDNN=1
CUDNN_HALF=1
OPENCV=1
AVX=1
OPENMP=1
LIBSO=1
Basically, we are saying in the Makefile that we want to build Darknet with CUDA, cuDNN, and mixed-precision support for the GPU computation part. The AVX and OPENMP ensure optimized performance on the CPU as well if it is supported.
Now, save the file and run make in the terminal.
make
While building Darknet, if you face the following error:
opencv.hpp: No such file or directory
Then you need to install OpenCV using the following command and then run make again.
apt install libopencv-dev
It should be complete without issues this time.
With this, we are all set to use Darknet with CUDA (GPU) support now on our local systems.
Preparing the Text Files for Image Paths
For the Darknet YOLOv4 training and testing, we need all the image paths to be in a text file. These text files will then be used to map to the image path.
Note: The paths in the text files should be relative to the darknet directory.
Let’s take a look at the code which will make things clearer. The prepare_darknet_image_txt_paths.py contains the code for generating the train.txt, valid.txt, and test.txt files.
import os

DATA_ROOT_TRAIN = os.path.join(
    '..', 'dataset', 'train'
)
DATA_ROOT_VALID = os.path.join(
    '..', 'dataset', 'valid'
)

DATA_ROOT_TEST = os.path.join(
    '..', 'dataset', 'test'
)

train_image_files_names = os.listdir(os.path.join(DATA_ROOT_TRAIN))
with open('train.txt', 'w') as f:
    for file_name in train_image_files_names:
        if not '.txt' in file_name:
            write_name = os.path.join(DATA_ROOT_TRAIN, file_name)
            f.writelines(write_name+'\n')

valid_data_files__names = os.listdir(os.path.join(DATA_ROOT_VALID))
with open('valid.txt', 'w') as f:
    for file_name in valid_data_files__names:
        if not '.txt' in file_name:
            write_name = os.path.join(DATA_ROOT_VALID, file_name)
            f.writelines(write_name+'\n')

test_data_files__names = os.listdir(os.path.join(DATA_ROOT_TEST))
with open('test.txt', 'w') as f:
    for file_name in test_data_files__names:
        if not '.txt' in file_name:
            write_name = os.path.join(DATA_ROOT_TEST, file_name)
            f.writelines(write_name+'\n')
We iterate over the train, valid, and test directories containing the image files and create the text files. The text files will be created in the darknet directory.
Following are a few lines from the train.txt file.
../dataset/train/img-111_jpg.rf.d7e58630e249c45d8c1d564d847dc236.jpg
../dataset/train/G0027797.JPG
../dataset/train/img-52_jpg.rf.f95bed5b5d7b75aca48be59a17751be5.jpg
../dataset/train/img-384_jpg.rf.52f9bf925832084c3778e4d0de4dfb56.jpg
../dataset/train/img-108_jpg.rf.a35e86abc558a98f252bfc10e49fd6d9.jpg
../dataset/train/G0052399.JPG
../dataset/train/G0054293.JPG
../dataset/train/G0031367.JPG
There are two things to observe here:
- The order of the files is already randomized.
- And the image paths are relative to the current directory.
We are all set with the dataset preparation part and building Darknet also. Now, let’s move on to the core experimental part, that is, the training of YOLOv4 models using different parameters.
5. Training YOLOv4 Tiny Models on the Pothole Detection Dataset with Fixed Resolution Images
We will start with training the YOLOv4-Tiny model with fixed-resolution images.
We will create the configuration and data files for this. We will change the batch size and number of batches to train for for the configuration, but leave the other settings to their default values.
Setting Up Model Configuration and Data Files
Inside the cfg directory in the darknet folder, create a copy of the yolov4-tiny-custom.cfg file. Name it as yolov4-tiny-pothole.cfg. From here on, all the configuration settings that we discuss are based on a 16GB Tesla P100 GPU available on Colab. You may adjust the configurations according to your availability, but the experiments and results discussed here are based on the settings per the mentioned hardware.
In the new configuration file, change the batch from 64 to 32, set the max_batches to 8000, and the steps as 6400, 7200. Basically, we will be training the model for 8000 steps with a batch size of 32. The learning rates will be scheduled to reduce at steps 6400 and 7200. Next are the number of filters and classes. In the tiny model configuration file, we can find two [yolo] layers. Change the classes in those layers from 80 to 1 as we have only one class. Before each [yolo] layer, there will be [convolutional] layers containing the filters parameter. Change the number of filters to the value given by (num_classes+5)*3, which will be 18 in our case. And for the tiny YOLOv4 model, we need to change this in the two [convolutional] layers before the [yolo] layers.
Then we need to create a pothole.names file inside build/darknet/x64/data. This will contain the class names in each new line. As we have only one class, enter the word pothole in the first line.
Next, we need to create a .data file. We create a separate file for each experiment. Create a pothole_yolov4_tiny.data inside build/darknet/x64/data. This file will contain information about the classes, the dataset paths, and the location to store the trained models. Enter the following information in that file:
classes = 1
train  = train.txt
valid  = valid.txt
names = build/darknet/x64/data/pothole.names
backup = backup_yolov4_tiny
We specify the number of classes, the training, and validation text file paths, the path to class names, and the backup folder path. This is the folder where the trained model will be saved. Although we can use the same folder for all experiments, we will create a new folder for each experiment.
Before we move further, make sure to create the backup_yolov4_tiny folder in the darknet directory where the trained models will be saved. Else, the training process will throw an error as the directory is not automatically created.
This completes all the steps we need to complete before starting training. For further experiments, this will get easier as we have all configurations in place for the first experiment.
Train the YOLOv4-Tiny Model
To train the model, we will use the already available pretrained tiny model. Download it by executing the following command on the terminal.
wget https://github.com/AlexeyAB/darknet/releases/download/darknet_yolo_v4_pre/yolov4-tiny.conv.29
Then execute the following command in the terminal inside the darknet directory.
./darknet detector train build/darknet/x64/data/pothole_yolov4_tiny.data cfg/yolov4-tiny-pothole.cfg yolov4-tiny.conv.29
The training will take some time based on the hardware being used. When the training ends, you should get an output similar to the following.
Saving weights to backup_yolov4_tiny/yolov4-tiny-pothole_8000.weights
Saving weights to backup_yolov4_tiny/yolov4-tiny-pothole_last.weights
Saving weights to backup_yolov4_tiny/yolov4-tiny-pothole_final.weights
If you want to train from the beginning, then use flag in the end of training command: -clear
The following figure shows the loss plot throughout the training.
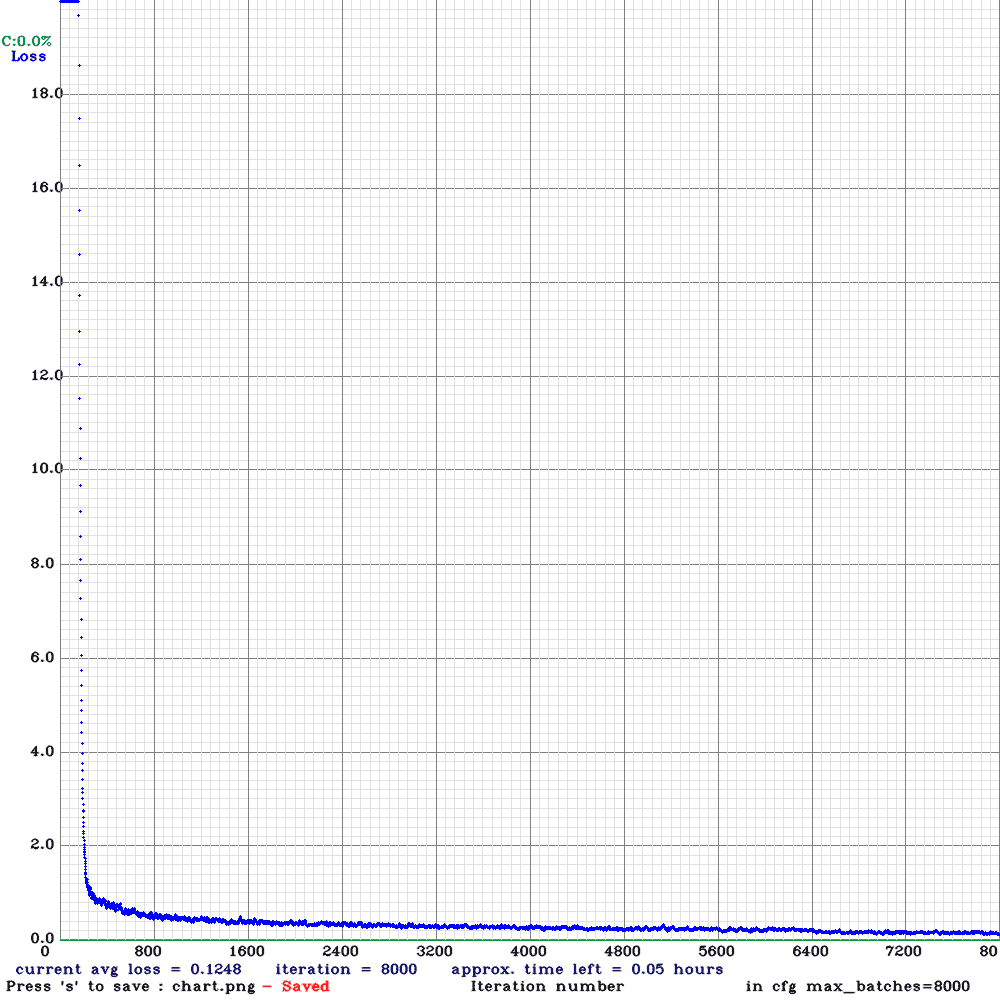
Loss plot for Tiny YOLOv4 fixed resolution training.
By the end of the training, YOLOv4-Tiny with 416×416 fixed resolution is giving around 0.12 loss. This looks low enough for object detection training. But we will get a real idea of its accuracy from the mAP (Mean Average Precision).
We will need another .data file to provide the path for the test image files. Create the pothole_test.data inside the build/darknet/x64/data directory with the following content.
classes = 1
train  = train.txt
valid  = test.txt
names = build/darknet/x64/data/pothole.names
backup = backup_test/
The only things changing here are the path to the valid text file and the backup folder name. We can use this same data file for further mAP tests as well.
As we have the trained model on the disk, we can execute the following command to calculate the mAP at 0.5 IoU.
./darknet detector map build/darknet/x64/data/pothole_test.data cfg/yolov4-tiny-pothole.cfg backup_yolov4_tiny/yolov4-tiny-pothole_final.weights
The output that we get here is:
IoU threshold = 50 %, used Area-Under-Curve for each unique Recall
mean average precision (mAP@0.50) = 0.400207, or 40.02 %
We get an mAP of 40.02%. This is not very bad, considering we trained a tiny model on 416×416 resolution images.
6. Training YOLOv4 Tiny Models on the Pothole Detection Dataset with Multi-Resolution Images
At the beginning of the post, we discussed that Darknet supports multi-resolution training. In this case, the resolution of the images is changed randomly between +50% and -50% every 10 batches from the base resolution that we provide.
How does this help?
During multi-resolution training, the model will see larger and smaller images. This will help it learn and detect objects in more difficult scenarios. Theoretically, we can say that this should provide us with a higher mAP if we keep every other training parameter the same.
Rather than speculating what would happen, let’s try this out.
Setting Up Model Configuration and Data Files for YOLOv4-Tiny Multi-Resolution Training for Pothole Detection
We must set up the configuration and data files for the multi-resolution training. Let’s tackle the configuration file first.
Create a yolov4-tiny-multi-res-pothole.cfg inside the cfg directory. Now, almost at the end of each model configuration file, Darknet provides a random parameter. In the tiny model configuration files, it is 0 by default, indicating that no random resolution (or multi-resolution) will be used during training. We need to make sure that random=1 is set in the configuration file.
All the other configurations and parameters will be the same as the previous training, that is, fixed resolution YOLOv4-Tiny model training.
Now, create a pothole_yolov4_tiny_multi_res.data file inside the build/darknet/x64/data directory with the following content:
classes = 1
train  = train.txt
valid  = valid.txt
names = build/darknet/x64/data/pothole.names
backup = backup_yolov4_tiny_multi_res
We change the backup directory name and be sure to create the backup_yolov4_tiny_multi_res folder in the darknet directory.
Train the Model
To start the training, we need to execute the following command from the darknet directory.
./darknet detector train build/darknet/x64/data/pothole_yolov4_tiny_multi_res.data cfg/yolov4-tiny-multi-res-pothole.cfg yolov4-tiny.conv.29
Note that this will take more time to train compared to the previous experiment, as the model will also train on larger images in some of the batches.
The following is the loss plot after the training finishes.
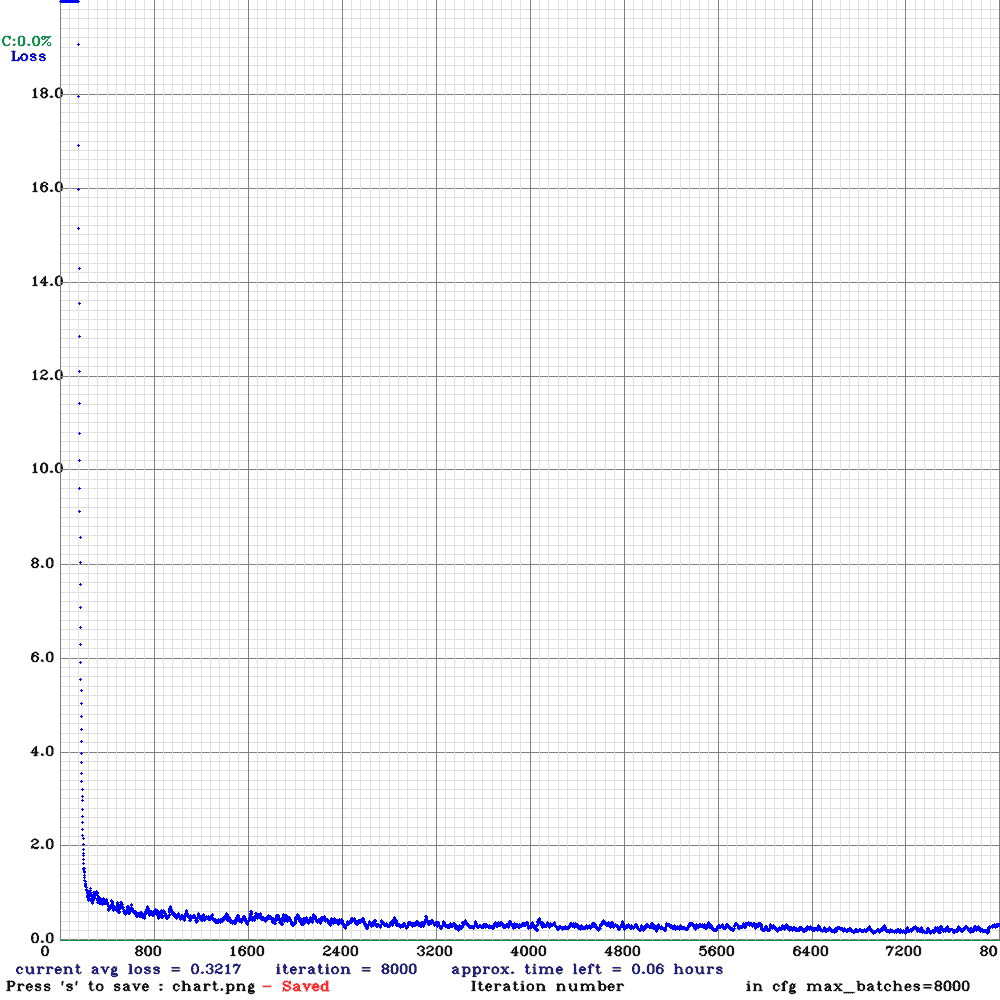
By the end of the training, the loss is 0.32, which is higher than the single-resolution training. Now, this is expected as the training data becomes difficult whenever training on smaller images. But at the same time, the model got to see many varied scenarios, which means that it may have learned better. Let’s check out mAP.
./darknet detector map build/darknet/x64/data/pothole_test.data cfg/yolov4-tiny-multi-res-pothole.cfg backup_yolov4_tiny_multi_res/yolov4-tiny-multi-res-pothole_final.weights
We get the following output this time.
IoU threshold = 50 %, used Area-Under-Curve for each unique Recall
mean average precision (mAP@0.50) = 0.415005, or 41.50 %
So, we have a slightly higher mAP in this case, which is what we also expected.
7. Training YOLOv4 Model on the Pothole Detection Dataset with Multi-Resolution Images
We are done with the YOLOv4-Tiny model training. Now, we will move forward with the YOLOv4 model training, which is the large model in the family of YOLOv4 models.
One thing to note here is that for the YOLOv4 model, the multi-resolution training takes place by default. So, the random parameter value is 1. Therefore, we will first carry out multi-resolution training and then move to fixed-resolution training.
Configuration and Data File Setup for YOLOv4 Multi-Resolution Training
For the configuration file, many things will stay similar to the YOLOv4-Tiny model. A few parameters will change, and let’s discuss them here.
First, we need to create a copy of the yolov4-custom.cfg file in the cfg directory and rename it as yolov4-pothole.cfg. Next, we need to ensure the following parameters:
- For the Colab P100 GPU, the batch and subdivision were both set to 32 (the batch size is divided into further mini-batches based on the sub-division parameter). We are using a higher subdivision to train with a batch size of 32. Training with a smaller batch size results in more unstable training.
- Make sure that the width and height are both set to 608. We will be setting the base resolution to 608×608.
- The max_batches is 8000, and the steps are 6400, 7200. These remain the same as in the case of tiny model training.
- There are three [yolo] layers in this configuration file. Make sure to set the classes=1 in all three.
- Also, before each [yolo] layer, there are three [convolutional] layers. Make the filters=18 in all these three layers.
The random parameter is already set to 1 by default, so we do not need to make any changes to that to carry out the multi-resolution training.
Next, coming to the data file. Create a pothole_yolov4.data file in the build/darknet/x64/data directory with the following contents:
classes = 1
train  = train.txt
valid  = valid.txt
names = build/darknet/x64/data/pothole.names
backup = backup_yolov4
Again, nothing changes here apart from the backup directory name.
Train the YOLOv4 Model with Multi-Resolution
Before starting the training, let’s download the pre-trained features using the following command to utilize them.
wget https://github.com/AlexeyAB/darknet/releases/download/darknet_yolo_v3_optimal/yolov4.conv.137
Next, execute the following command to start the training.
Note that the training may take a long time when using a mid-range GPU.
./darknet detector train build/darknet/x64/data/pothole_yolov4.data cfg/yolov4-pothole.cfg yolov4.conv.137
We get the following loss plot after the training.
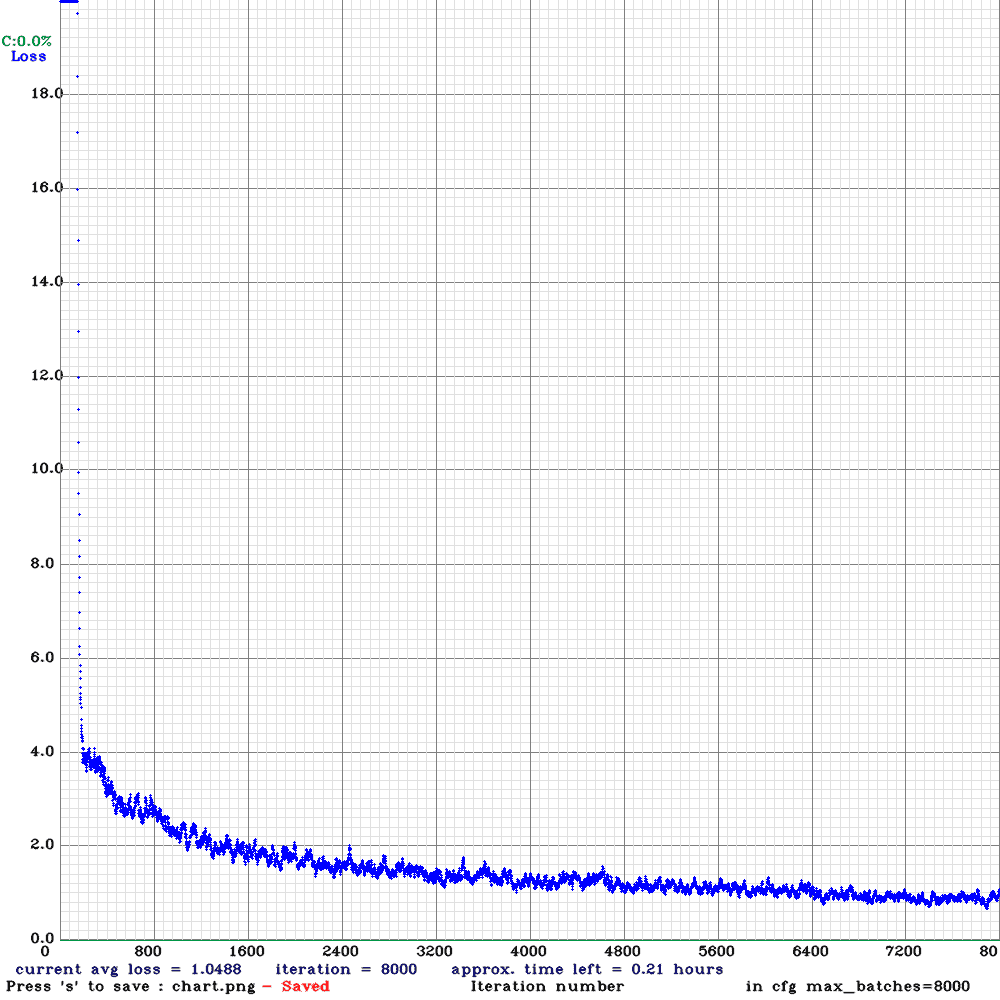
Loss plot after training the YOLOv4 multi-resolution model.
Interestingly, the loss here is much higher than the tiny model training. In fact, we can see more fluctuations in the loss graph compared to previous experiments. But looking at the mAP metric will give us a better idea.
./darknet detector map build/darknet/x64/data/pothole_test.data cfg/yolov4-pothole.cfg backup_yolov4/yolov4-pothole_final.weights
IoU threshold = 50 %, used Area-Under-Curve for each unique Recall
mean average precision (mAP@0.50) = 0.653199, or 65.32 %
The large model with multi-resolution training gives more than 65% mAP this time. We will see how this higher mAP affects the detections when running inference.
8. Training YOLOv4 Model on the Pothole Dataset with Fixed Resolution Images
We have reached the final experiment now. We will train the YOLOv4 model with a fixed resolution of 608×608.
This will actually give us a better understanding of how multi-resolution in cases can affect the learning process of the model.
Configuration and Data File Setup for YOLOv4 Fixed Resolution Training
Many parameters in the configuration file will remain similar to the above training process. Let’s check out the parameters that need some attention:
- This time, keep the batch as 32 but reduce the subdivision to 8. We don’t need a higher subdivision this time, as we will not be training on images larger than 608×608.
- In the final [yolo] layer, change the random from 1 to 0, that is, random=0. This will turn off multi-resolution training.
- All other parameters remain the same as in the previous training experiment.
Create the pothole_yolov4_fixed.data with the following content:
classes = 1
train  = train.txt
valid  = valid.txt
names = build/darknet/x64/data/pothole.names
backup = backup_yolov4_fixed
Train the YOLOv4 Fixed Resolution Model
Finally, we are all set to train the model.
./darknet detector train build/darknet/x64/data/pothole_yolov4_fixed.data cfg/yolov4-fixed-pothole.cfg yolov4.conv.137
The following figure shows the loss plot after training.
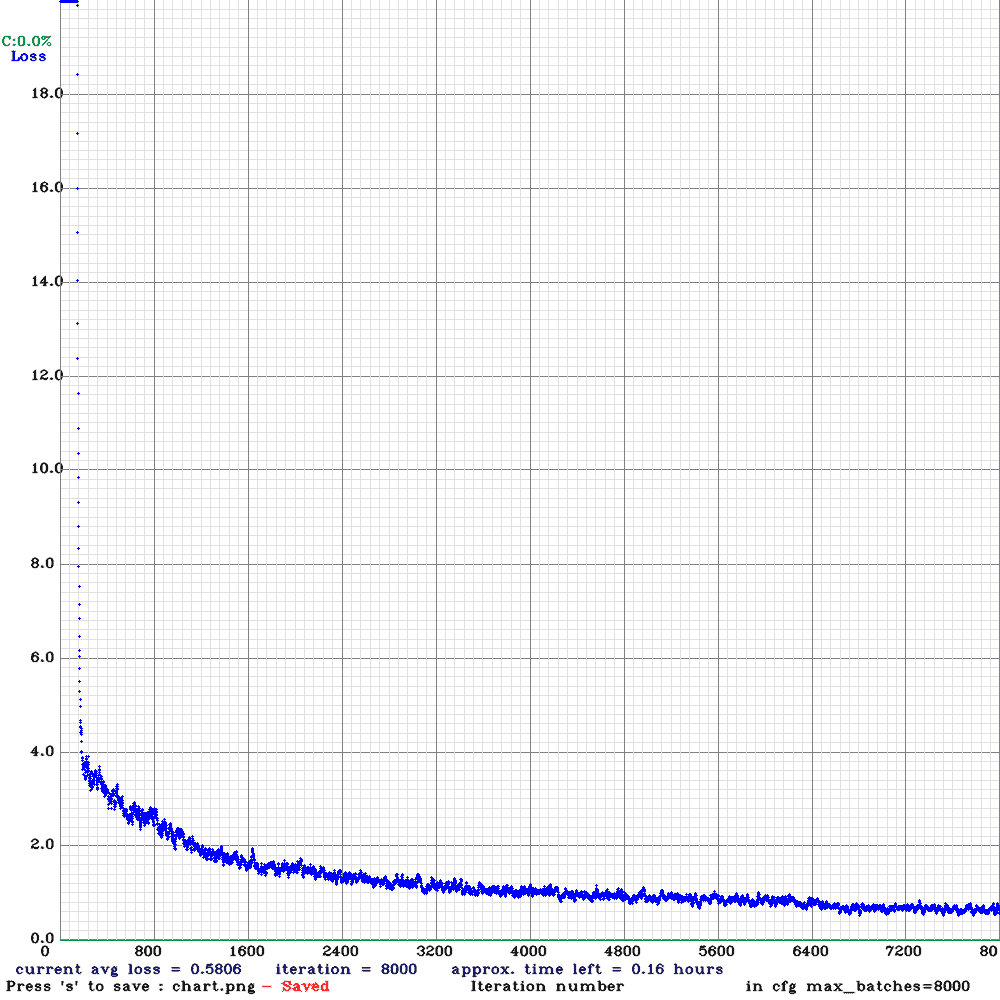
Loss plot after training the YOLOv4 fixed resolution model.
The loss is surely lower compared to the multi-resolution training experiment. One reason for this could be that the model got to see images of only one scale, and therefore, it was a bit easier for it to learn.
Let’s check out the mAP results.
./darknet detector map build/darknet/x64/data/pothole_test.data cfg/yolov4-fixed-pothole.cfg backup_yolov4_fixed/yolov4-fixed-pothole_final.weights
IoU threshold = 50 %, used Area-Under-Curve for each unique Recall
mean average precision (mAP@0.50) = 0.693369, or 69.34 %
This is quite surprising. This time, we are getting a more than 4% increase in the mAP. This means that this model can predict the bounding boxes much better than the multi-resolution model.
9. Visual Comparison of mAP for All Models
The following plot shows the mAP comparison at 0.50 IoU threshold for all the runs that we carried out above.
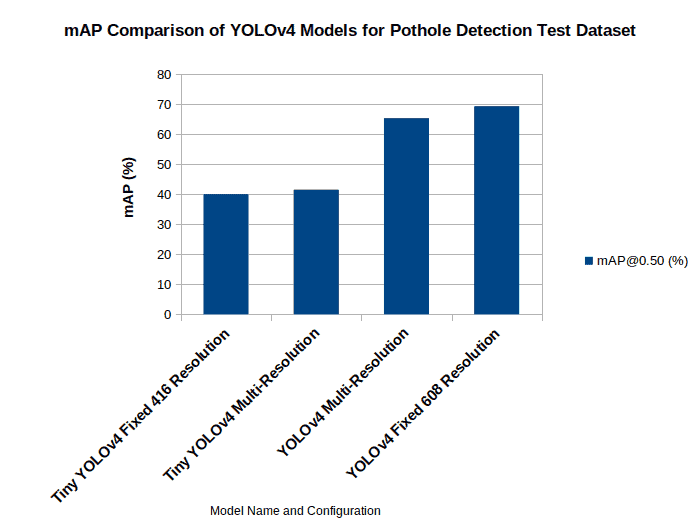
mAP comparison for different models for pothole detection using YOLOv4.
We can clearly see that for the larger model, the fixed resolution (with 608×608 images) model gives a much better mAP. This is odd given that the multi-resolution resolution model has been trained on a much-varied scale of images and is expected to give better results. But there is a possibility that the varying scale can make the dataset much harder to learn and, therefore may need more batches to get to a similar mAP. And we have trained all the models for 8000 batches with a batch size of 32. This is about 200 epochs for this dataset. Most probably, training the multi-resolution model for more epochs should give better results.
But as of now, as the multi-resolution model has seen more varied images, we can expect it to perform just as well as the fixed-resolution model in real-life cases when detecting potholes.
10. Running Inference on Real-Life Pothole Detection Scenarios
Let’s run inference using all 4 trained models. Before moving forward with the inference part, if you intend to run inference on your own videos as well, be sure to have all the folders containing the trained models (the backup directories) in the darknet directory.
We will use the Python (darknet_video.py) script to run the inference, which has been slightly modified to show the FPS on the video frame. The modified script is part of the downloadable code.
Let’s start with the inference using the YOLOv4 Tiny model with fixed resolution.
python darknet_video.py --data_file build/darknet/x64/data/pothole_yolov4_tiny.data --config_file cfg/yolov4-tiny-pothole.cfg --weights backup_yolov4_tiny/yolov4-tiny-pothole_final.weights --input inference_data/video_6.mp4 --out_filename tiny_singleres_vid6.avi --dont_show
For the inference script, we need to provide the following arguments:
--data_file: It is the same data file used during training containing the paths to the class name file and the number of classes.--config_file: The path to the model configuration file.--weights: This flag takes in the path to the model weights.--input: The input video file on which we want to run the inference.--out_filename: Resulting video file name.
It is pretty clear that the model is not performing very well here. It clearly misses a lot of the potholes. And whichever are detected, we can see a lot of fluctuations. The limitations of the fixed-resolution tiny model can be seen here.
Now, let’s run inference using the YOLOv4 Tiny model trained with multi-resolution images.
python darknet_video.py --data_file build/darknet/x64/data/pothole_yolov4_tiny_multi_res.data --config_file cfg/yolov4-tiny-multi-res-pothole.cfg --weights backup_yolov4_tiny_multi_res/yolov4-tiny-multi-res-pothole_final.weights --input inference_data/video_6.mp4 --out_filename tiny_multires_vid6.avi --dont_show
The results look almost exactly the same as the single-resolution tiny model. This is expected as the multi-resolution model has only a 1% increase in mAP on the test set.
Compared to YOLOv4, fine tuning YOLOv7 on the pothole detection dataset gives better results. Don’t forget to check out the post and do a comparative analysis.
The normal YOLOv4 models performed quite well on the test set. The following command executes the YOLOv4 multi-resolution model, which gives an mAP of around 65% on the test set.
python darknet_video.py --data_file build/darknet/x64/data/pothole_yolov4.data --config_file cfg/yolov4-pothole.cfg --weights backup_yolov4/yolov4-pothole_final.weights --input inference_data/video_6.mp4 --out_filename yolov4_vid6.avi --dont_show
The results are much better here. The model can detect potholes that are farther away and with more confidence as well. But we still see some fluctuations in the detections here as well.
The final model that we have is the YOLOv4 model trained with fixed 608×608 resolution images. Let’s try that out.
python darknet_video.py --data_file build/darknet/x64/data/pothole_yolov4_fixed.data --config_file cfg/yolov4-fixed-pothole.cfg --weights backup_yolov4_fixed/yolov4-fixed-pothole_final.weights --input inference_data/video_6.mp4 --out_filename yolov4_fixed_vid6.avi --dont_show
The results are really interesting. If you remember, the fixed resolution model gave the highest mAP of more than 69% on the test dataset. But here, it is detecting fewer potholes compared to the multi-resolution model. It is mostly failing when the potholes are small or farther away. This is mostly happening because the multi-resolution model had learned the features of both smaller and larger potholes during training. This is also a reminder that the metrics that we get on a specific dataset may not always be a direct representation of the results that we get in real-life use cases.
11. Conclusion
In this post, we covered a lot of ground regarding the YOLOv4 model and the Darknet framework. We started with setting up Darknet on the Ubuntu system with CUDA support. Then we trained multiple YOLOv4 models with different configurations on the Pothole detection dataset. After training, running the inference gave us a pretty good idea that sometimes solving real-world problems with deep learning can be more difficult than it seems. The varied results that we got from different models made it pretty clear.
To get even better results, we may need to try more powerful and better models or even add more real-life images to the training set. If you try out any of these, be sure to let us know in the comment section.
References
- YOLOv4: Optimal Speed and Accuracy of Object Detection
- Darknet GitHub repository
- Dataset of images used for pothole detection



100K+ Learners
Join Free OpenCV Bootcamp3 Hours of Learning