

Photo filters have always been one of the coolest image processing applications. What could be a better inspiration to design filters than taking ideas from Photoshop? Let’s begin the fun!
In this tutorial, we will be implementing filters available in applications just like Adobe Photoshop. One useful feature is that the filters will have track bars to control their intensity enabling the perfect effect required for images. The filters implemented in this article are:
1. Brightness
Brightness is the perceived intensity of light. It can be manipulated in images using the HSV color channel. Take a look at a summary of the second and third channels of HSV below.
The saturation dimension resembles various tints of brightly colored paint. The value dimension is similar to the mixture of those paints with varying amounts of black or white colors.
https://en.wikipedia.org/wiki/HSL_and_HSV
https://en.wikipedia.org/wiki/HSL_and_HSV
The above statement is self-explanatory, gives us the reason why using the HSV color channel is perfect for this task. The image below shows how the effects change when increasing the values of the Saturation and Value matrices from left to right.
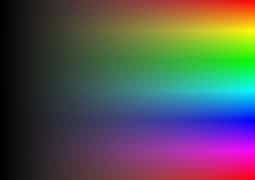
Observe the image above. As we increase the values of those matrices, the colors appear brighter. To edit the brightness and brighten the picture, increase the value of the Saturation and Value matrices.

Python Code:
def brightness(img):
    cv2.namedWindow('image')
    cv2.createTrackbar('val', 'image', 100, 150, nothing)
    while True:
        hsv = cv2.cvtColor(img, cv2.COLOR_BGR2HSV)
        hsv = np.array(hsv, dtype=np.float64)
        val = cv2.getTrackbarPos('val', 'image')
        val = val/100 # dividing by 100 to get in range 0-1.5
        # scale pixel values up or down for channel 1(Saturation)
        hsv[:, :, 1] = hsv[:, :, 1] * val
        hsv[:, :, 1][hsv[:, :, 1] > 255] = 255 # setting values > 255 to 255.
        # scale pixel values up or down for channel 2(Value)
        hsv[:, :, 2] = hsv[:, :, 2] * val
        hsv[:, :, 2][hsv[:, :, 2] > 255] = 255 # setting values > 255 to 255.
        hsv = np.array(hsv, dtype=np.uint8)
        res = cv2.cvtColor(hsv, cv2.COLOR_HSV2BGR)
        cv2.imshow("original", img)
        cv2.imshow('image', res)
        if cv2.waitKey(1) & 0xFF == ord('q'):
            break
    cv2.destroyAllWindows()
C++ Code:
#include <iostream>
#include <string>
#include <opencv2/highgui.hpp>
#include <opencv2/imgproc.hpp>
using namespace std;
using namespace cv;
void nothing(int x, void* data) {}
void brightness(Mat img) {
	namedWindow("image");
	int slider = 100;
	createTrackbar("val","image",&slider,150,nothing);
	Mat hsv;
	while (true) {
		cvtColor(img, hsv, COLOR_BGR2HSV);
		float val = getTrackbarPos("val","image");
		val=val/100.0;
		Mat channels[3];
		split(hsv,channels);
		Mat H = channels[0];
		H.convertTo(H,CV_32F);
		Mat S = channels[1];
		S.convertTo(S,CV_32F);
		Mat V = channels[2];
		V.convertTo(V,CV_32F);
		for (int i=0; i < H.size().height; i++){
			for (int j=0; j < H.size().width; j++){
	// scale pixel values up or down for channel 1(Saturation)
				S.at<float>(i,j) *= val;
				if (S.at<float>(i,j) > 255)
					S.at<float>(i,j) = 255;
	// scale pixel values up or down for channel 2(Value)
				V.at<float>(i,j) *= val;
				if (V.at<float>(i,j) > 255)
					V.at<float>(i,j) = 255;
			}
		}
		H.convertTo(H,CV_8U);
		S.convertTo(S,CV_8U);
		V.convertTo(V,CV_8U);
		vector<Mat> hsvChannels{H,S,V};
		Mat hsvNew;
    		merge(hsvChannels,hsvNew);
    		Mat res;
    		cvtColor(hsvNew,res,COLOR_HSV2BGR);
    		imshow("original",img);
    		imshow("image",res);
	    	if (waitKey(1) == 'q')
	    		break;
		}
	destroyAllWindows();
}
In the above code snippet, the image is converted to HSV color space with a datatype of float.64. This conversion is to ensure there is no loss when we perform float multiplication. The track bar is created using the cv2.createTrackbar function. The track bar helps us control the value of brightness levels. The track bar function does not allow decimal values. Hence, large values are used, which are divided by 100. Note: this procedure is similar and will be applicable for other filters too.
Thereafter the matrices are multiplied with the value. When multiplying, the ceiling is fixed at 255. The final step is to convert the matrices back to RGB and uint8.


’60s TV
Well, I haven’t watched any TV in the ’60s ( because I didn’t exist back then 😀 ). I can only guess. It may have been in grayscale, probably with a lot of noise like pixelation. It’s just not me saying so. The mobile application of Adobe Photoshop also tells me the same thing.
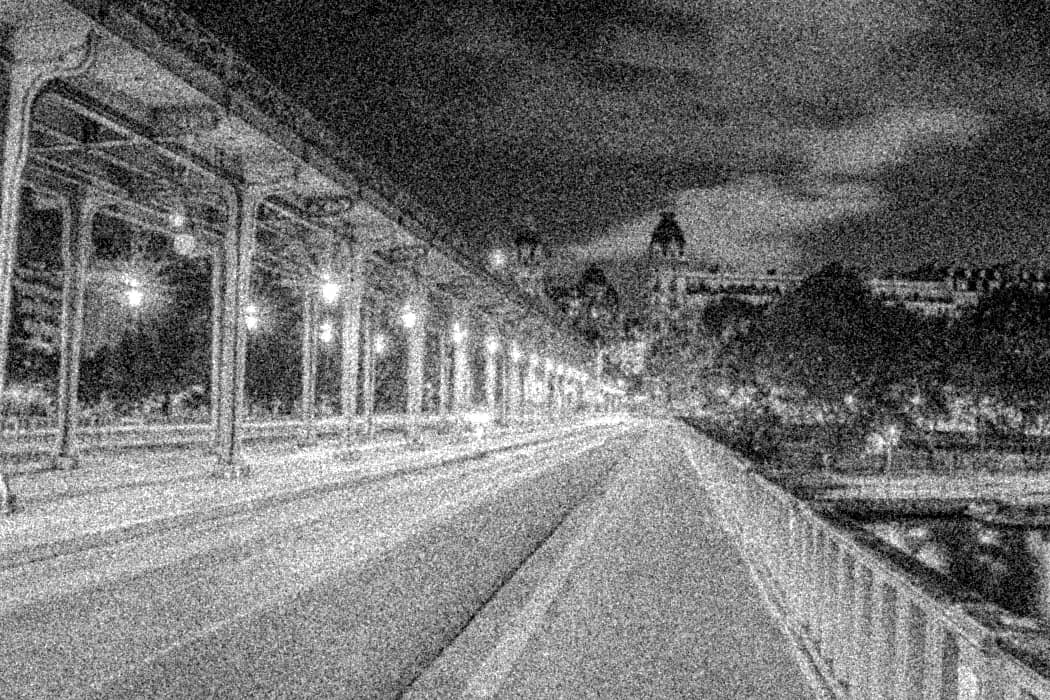
A simple idea would be to add salt and pepper noise. Then the pixels won’t have any resemblance to what they were previously. Thereafter, we can add or subtract a random value from the pixel, which can be limited to a certain value. This way it would be a derivative of its original value.
Python Code:
def tv_60(img):
    cv2.namedWindow('image')
    cv2.createTrackbar('val', 'image', 0, 255, nothing)
    cv2.createTrackbar('threshold', 'image', 0, 100, nothing)
    while True:
        height, width = img.shape[:2]
        gray = cv2.cvtColor(img, cv2.COLOR_BGR2GRAY)
        thresh = cv2.getTrackbarPos('threshold', 'image')
        val = cv2.getTrackbarPos('val', 'image')
        for i in range(height):
            for j in range(width):
                if np.random.randint(100) <= thresh:
                    if np.random.randint(2) == 0:
                        gray[i, j] = min(gray[i, j] + np.random.randint(0, val+1), 255) # adding noise to image and setting values > 255 to 255.
                    else:
                        gray[i, j] = max(gray[i, j] - np.random.randint(0, val+1), 0) # subtracting noise to image and setting values < 0 to 0.
        cv2.imshow('Original', img)
        cv2.imshow('image', gray)
        if cv2.waitKey(1) & 0xFF == ord('q'):
            break
    cv2.destroyAllWindows()
C++ Code:
void tv_60(Mat img) {
	namedWindow("image");
	int slider = 0;
	int slider2 = 0;
	createTrackbar("val","image",&slider,255,nothing);
	createTrackbar("threshold","image",&slider2,100,nothing);
	while (true) {
		int height = img.size().height;
		int width = img.size().width;
		Mat gray;
		cvtColor(img, gray, COLOR_BGR2GRAY);
		float thresh = getTrackbarPos("threshold","image");
		float val = getTrackbarPos("val","image");
		for (int i=0; i < height; i++){
			for (int j=0; j < width; j++){
				if (rand()%100 <= thresh){
					if (rand()%2 == 0)
						gray.at<uchar>(i,j) = std::min(gray.at<uchar>(i,j) + rand()%((int)val+1), 255);
					else
						gray.at<uchar>(i,j) = std::max(gray.at<uchar>(i,j) - rand()%((int)val+1), 0);
				}
			}
		}
    		imshow("original",img);
    		imshow("image",gray);
	    	if (waitKey(1) == 'q')
	    		break;
		}
	destroyAllWindows();
}
The image is first converted to grayscale. Two sliding track bars are used in this process. The first one stores the maximum amount of noise to add or subtract randomly from the image. The second track bar represents the percentage of pixels to be affected by noise. While adding or subtracting, if a pixel value becomes larger than 255 or smaller than 0, then it is set to 255 or 0, respectively.
3. Emboss
Embossing provides a molding effect such that it stands out from the rest of the object. Let’s take a look at the formal definition from Wikipedia.
Image embossing is a computer graphics technique in which each pixel of an image is replaced either by a highlight or a shadow, depending on light/dark boundaries on the original image. Low contrast areas are replaced by a gray background.
https://en.wikipedia.org/wiki/Image_embossing
Achieving this effect in OpenCV is simple. It is executed with the help of special kernels. The direction of embossing can also be changed depending on the size of the kernel.
Generating one kernel is enough. By rotating it, we can get the other kernels. Changing the kernel size affects the embossing intensity. The greater the kernel size, the bigger the embossing result achieved. Note that the minimum kernel size required is of 2 x 2.
Python Code:
def kernel_generator(size):
    kernel = np.zeros((size, size), dtype=np.int8)
    for i in range(size):
        for j in range(size):
            if i < j:
                kernel[i][j] = -1
            elif i > j:
                kernel[i][j] = 1
    return kernel
def emboss(img):
    cv2.namedWindow('image')
    cv2.createTrackbar('size', 'image', 0, 8, nothing)
    switch = '0 : BL n1 : BR n2 : TR n3 : BR'
    cv2.createTrackbar(switch, 'image', 0, 3, nothing)
    while True:
        size = cv2.getTrackbarPos('size', 'image')
        size += 2 # adding 2 to kernel as it a size of 2 is the minimum required.
        s = cv2.getTrackbarPos(switch, 'image')
        height, width = img.shape[:2]
        y = np.ones((height, width), np.uint8) * 128
        gray = cv2.cvtColor(img, cv2.COLOR_BGR2GRAY)
        kernel = kernel_generator(size) # generating kernel for bottom left kernel
        kernel = np.rot90(kernel, s) # switching kernel according to direction
        res = cv2.add(cv2.filter2D(gray, -1, kernel), y)
        cv2.imshow('Original', img)
        cv2.imshow('image', res)
        if cv2.waitKey(1) & 0xFF == ord('q'):
            break
    cv2.destroyAllWindows()
C++ Code:
Mat kernel_generator(int size){
	Mat kernel = Mat(size,size,CV_8S,Scalar(0));
	for (int i=0; i<size; i++){
		for (int j=0; j<size; j++){
			if (i < j){
				kernel.at<schar>(i,j) = -1;
			}
			else if (i > j){
				kernel.at<schar>(i,j) = 1;
			}
		}
	}
	return kernel;
}
void emboss(Mat img){
	namedWindow("image");
	int slider = 0;
	int slider2 = 0;
	createTrackbar("size","image",&slider,8,nothing);
	createTrackbar("0 : BL n1 : BR n2 : TR n3 : BR","image",&slider2,3,nothing);
	while (true){
		int size = getTrackbarPos("size","image");
		size += 2;
		int s = getTrackbarPos("0 : BL n1 : BR n2 : TR n3 : BR","image");
		int height = img.size().height;
		int width = img.size().width;
		Mat y = Mat(height,width,CV_8U,Scalar(128));
		Mat gray;
		cvtColor(img,gray,COLOR_BGR2GRAY);
		Mat kernel = kernel_generator(size);
		for (int i=0; i<s; i++)
			rotate(kernel,kernel,ROTATE_90_COUNTERCLOCKWISE);
		Mat dst;
		filter2D(gray,dst,-1,kernel);
		Mat res;
		add(dst,y,res);
		imshow("Original",img);
		imshow("image",res);
		if (waitKey(1) == 'q')
                        break;
                }
        destroyAllWindows();
}
As described earlier, two sliders are used. One slider controls the size of the kernel. The other one controls the direction from which the embossing is to be applied. An additional mask y is created with all values as 128 to get a background of a gray color.
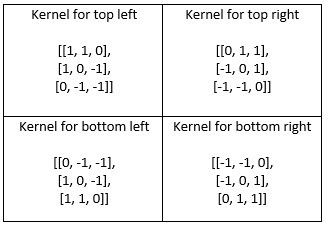
The kernel generator develops a bottom-left type kernel. Let’s assume i represents rows and j represents columns. Then, for all i > j we put a 1 and for all i < j we put a -1. When they are equal a 0 is used. To generate a bottom-right kernel, we need to rotate once in the anti-clockwise direction. For top-right and top-left, we rotate subsequently, twice and thrice respectively. The values of the switch controlling the type of kernel are set using np.rot90, such that it rotates a matrix in an anti-clockwise direction, giving us the required matrix.
Finally, using cv2.filter2D, the kernel is convoluted with the grayscale version of the input image. The middle argument represents the depth required of the output matrix. If a negative value is specified like a -1 in this case, the depth remains the same.
4. Duo-Tone
Like the ’60s TV filter, this filter is also inspired straight from Adobe Photoshop. What does this filter do?
As you can see in the gif above, the duo-tone puts a color shade over the image. For achieving this effect, the color channel required will have an option to help increase its values so we get a brighter shade. The values of the rest of the channels can be decreased or set to zero to achieve a complete or light shade across the image.
Python Code:
def exponential_function(channel, exp):
    table = np.array([min((i**exp), 255) for i in np.arange(0, 256)]).astype("uint8") # generating table for exponential function
    channel = cv2.LUT(channel, table)
    return channel
def duo_tone(img):
    cv2.namedWindow('image')
    cv2.createTrackbar('exponent', 'image', 0, 10, nothing)
    switch1 = '0 : BLUE n1 : GREEN n2 : RED'
    cv2.createTrackbar(switch1, 'image', 1, 2, nothing)
    switch2 = '0 : BLUE n1 : GREEN n2 : RED n3 : NONE'
    cv2.createTrackbar(switch2, 'image', 3, 3, nothing)
    switch3 = '0 : DARK n1 : LIGHT'
    cv2.createTrackbar(switch3, 'image', 0, 1, nothing)
    while True:
        exp = cv2.getTrackbarPos('exponent', 'image')
        exp = 1 + exp/100 # converting exponent to range 1-2
        s1 = cv2.getTrackbarPos(switch1, 'image')
        s2 = cv2.getTrackbarPos(switch2, 'image')
        s3 = cv2.getTrackbarPos(switch3, 'image')
        res = img.copy()
        for i in range(3):
            if i in (s1, s2): # if channel is present
                res[:, :, i] = exponential_function(res[:, :, i], exp) # increasing the values if channel selected
            else:
                if s3: # for light
                    res[:, :, i] = exponential_function(res[:, :, i], 2 - exp) # reducing value to make the channels light
                else: # for dark
                    res[:, :, i] = 0 # converting the whole channel to 0
        cv2.imshow('Original', img)
        cv2.imshow('image', res)
        if cv2.waitKey(1) & 0xFF == ord('q'):
            break
    cv2.destroyAllWindows()
C++ Code:
Mat exponential_function(Mat channel, float exp){
	Mat table(1, 256, CV_8U);
	for (int i = 0; i < 256; i++)
		table.at<uchar>(i) = min((int)pow(i,exp),255);
	LUT(channel,table,channel);
	return channel;
}
void duo_tone(Mat img){
	namedWindow("image");
	int slider1 = 0;
	int slider2 = 1;
	int slider3 = 3;
	int slider4 = 0;
	string switch1 = "0 : BLUE n1 : GREEN n2 : RED";
	string switch2 = "0 : BLUE n1 : GREEN n2 : RED n3 : NONE";
	string switch3 = "0 : DARK n1 : LIGHT";
	createTrackbar("exponent","image",&slider1,10,nothing);
	createTrackbar(switch1,"image",&slider2,2,nothing);
	createTrackbar(switch2,"image",&slider3,3,nothing);
	createTrackbar(switch3,"image",&slider4,1,nothing);
	while(true){
		int exp1 = getTrackbarPos("exponent","image");
		float exp = 1 + exp1/100.0;
		int s1 = getTrackbarPos(switch1,"image");
		int s2 = getTrackbarPos(switch2,"image");
		int s3 = getTrackbarPos(switch3,"image");
		Mat res = img.clone();
		Mat channels[3];
		split(img,channels);
		for (int i=0; i<3; i++){
			if ((i == s1)||(i==s2)){
				channels[i] = exponential_function(channels[i],exp);
			}
			else{
				if (s3){
					channels[i] = exponential_function(channels[i],2-exp);
				}
				else{
					channels[i] = Mat::zeros(channels[i].size(),CV_8UC1);
				}
			}
		}
		vector<Mat> newChannels{channels[0],channels[1],channels[2]};
		merge(newChannels,res);
		imshow("Original",img);
		imshow("image",res);
		if (waitKey(1) == 'q')
                        break;
                }
        destroyAllWindows();
}
The first slider used is to get a value in the range of 0 – 10. The values are then normalized to be between 0 and 0.1. 1 is added to act as the exponent value. The exponent function is applied to the image using cv2.LUT. It takes a channel and transforms it using a lookup table. Three switches are created and, they take the values of blue, green, or red. There is also an additional option: none for the second switch. The third switch controls whether a dark or light mode is to be used. All of these options put together allow us a choice of six different color palettes over the image.
Depending on the color selected by the user, its values are up-scaled according to the exponent function. Otherwise, it is set to zero or down-scaled.
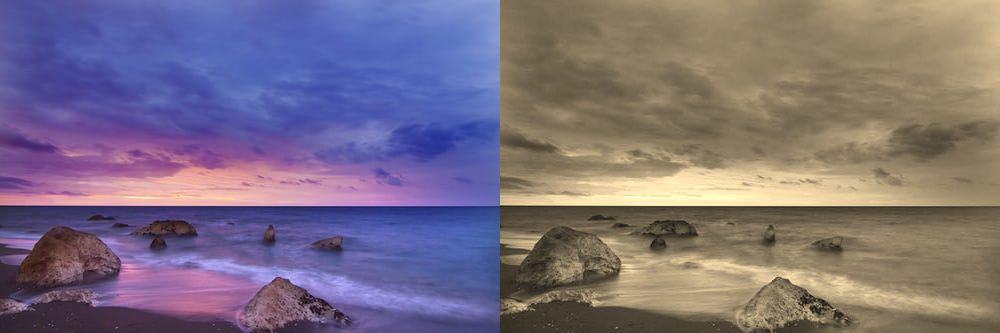
5. Sepia
The Sepia filter provides a warm reddish-brown color to an image. It helps improve the general look of an image. It is a conventional filter that is found in almost all types of image editing software.
Implementing it in OpenCV is easy. It is a fixed color. It has a standardized matrix that can be used as the default. Remember that OpenCV uses BGR color format, while the matrix you will find online is for RGB colorspace. So we will have to convert it to RGB, and after processing convert it back to BGR before displaying.
Python Code:
def sepia(img):
    res = img.copy()
    res = cv2.cvtColor(res, cv2.COLOR_BGR2RGB) # converting to RGB as sepia matrix is for RGB
    res = np.array(res, dtype=np.float64)
    res = cv2.transform(res, np.matrix([[0.393, 0.769, 0.189],
                                        [0.349, 0.686, 0.168],
                                        [0.272, 0.534, 0.131]]))
    res[np.where(res > 255)] = 255 # clipping values greater than 255 to 255
    res = np.array(res, dtype=np.uint8)
    res = cv2.cvtColor(res, cv2.COLOR_RGB2BGR)
    cv2.imshow("original", img)
    cv2.imshow("Sepia", res)
    cv2.waitKey(0)
    cv2.destroyAllWindows()
C++ Code:
void sepia(Mat img){
	Mat res = img.clone();
	cvtColor(res,res,COLOR_BGR2RGB);
	transform(res,res,Matx33f(0.393,0.769,0.189,
				0.349,0.686,0.168,
				0.272,0.534,0.131));
	cvtColor(res,res,COLOR_RGB2BGR);
	imshow("original",img);
	imshow("Sepia",res);
	waitKey(0);
	destroyAllWindows();
}
The image data type is converted to float before using cv2.transform to get the effect desired. Any value that goes above 255 is limited to 255. This is followed by converting the data type back to np.uint8 and the colorspace to BGR.
You may be wondering why we did not make a video for it and made its intensity controllable by track bar? It is because Sepia represents an exact tone, and is achieved with a fixed array.
In this article, we have seen how to create five different image filters using the functions in OpenCV. Track bars give the user an option to adjust the intensities according to their style or requirements. This blog was just a brief introduction to the endless possibilities you can develop using OpenCV. You can learn more about such filters and frames in our introductory course to OpenCV.
I hope you enjoyed playing around with these effects and filters!


100K+ Learners
Join Free OpenCV Bootcamp3 Hours of Learning