ComfyUI – a powerful, node-based graphical user interface (GUI) that offers flexibility and transparency when working with stable diffusion models. This article provides an introduction to ComfyUI, covering installation and basic workflow setup for modern checkpoints like Stable Diffusion 3, explaining its core concepts, basic node usage, and why it’s becoming a favorite among AI art enthusiasts and developers seeking profound control over their image-generation pipelines.
What is ComfyUI
ComfyUI is an open-source graphical user interface created by comfyanonymous specifically to facilitate workflows across various diffusion models like Stable Diffusion.
Its unique characteristic is that it is a node-based workflow system, unlike traditional scripting or command-line interfaces.
ComfyUI offers a visual environment where users can drag and drop functional “nodes”, connecting them to create custom AI generation pipelines without writing extensive code. This design provides both beginners and advanced users flexibility, speed, and clarity.
Why infer with ComfyUI?
Functional Nodes in comfyUI have inputs and outputs, which users connect with visual wires. Data flows from one node to the next, visually representing the entire generation process. This approach provides key advantages like:
- Flexibility: As this is a node-based application and offers a highly customizable workflow, complex techniques like image-to-image transformations, inpainting, outpainting, ControlNet integration, LoRA applications, and custom model mixing with relative ease once the basics are understood.
- Transparency: The entire generation pipeline is visually represented. Users can see exactly how data (models, prompts, latent images) flows through the system, making it easier to understand what’s happening under the hood and troubleshoot issues.
- Reproducibility: ComfyUI workflows can be saved as JSON files and then can be imported again anytime by just dragging and dropping the JSON file on the ComfyUI canvas, just as shown in the video below.
- Efficiency: ComfyUI is known for its optimized backend. It only re-executes nodes whose inputs have changed, which can lead to faster iterations, especially when tweaking specific parts of a complex workflow.
Various Nodes in ComfyUI
Understanding the nodes of ComfyUI is essential as each node represents a specific operation or data component in the workflow.
Here’s a breakdown of some fundamental nodes typically used in a basic text-to-image workflow:
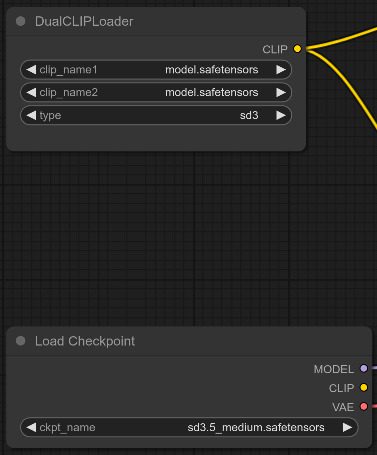
- Load Checkpoint: Loads the diffusion model ( in our case, the model is a Stable Diffusion 3.5 medium ), usually a .safetensors or .ckpt file. These model files contain core weights necessary for image generation. Users can find these weight files on Huggingface or CivitAI. This node initializes modules like U-Net/DiT, VAE, and CLIP ( if the .safetensors or .ckpt file of model weights contains text encoder weights also).
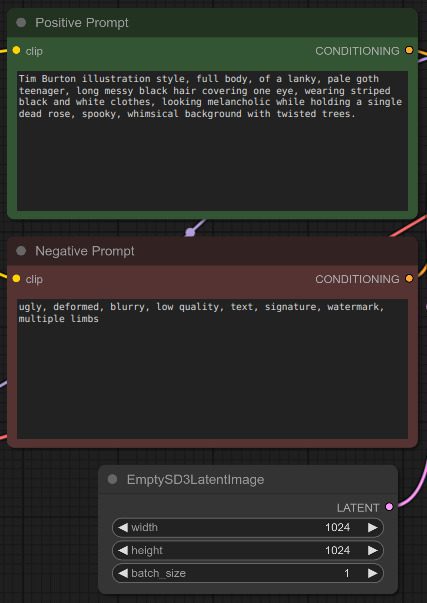
- CLIP Text Encode( Prompt ): Typically every workflow contains two of these nodes– one for the positive prompt and one for the negative prompt. The negative prompt guides the model from unwanted concepts ( e.g., “ugly”, “deformed” ). This node converts textual prompts into conditioning vectors used to guide image generation.
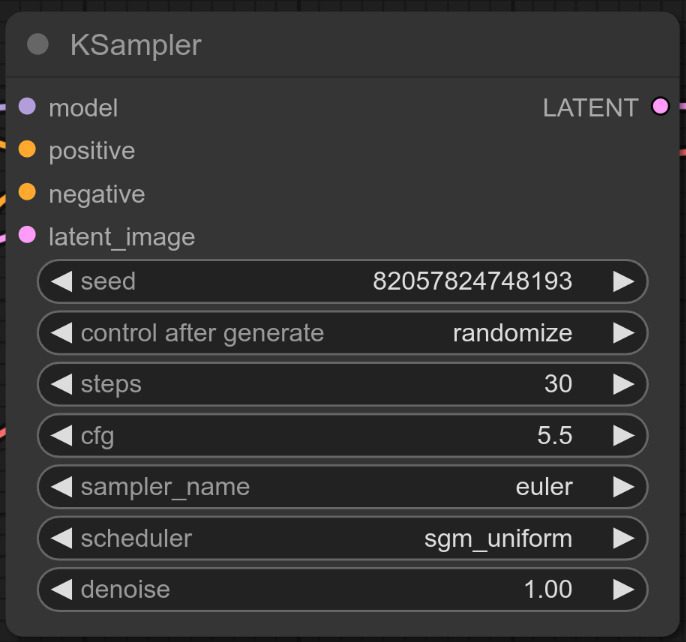
- KSampler: This is the heart of the diffusion process. It takes inputs such as model, prompts, and the initial latent image or a complete noise. Then, it iteratively refines this noise according to the prompts using a chosen sampling algorithm.
- Empty Latent Image: This node generates a tensor of random noise with specified dimensions, which the sampler will gradually denoise into a coherent image.
- VAE Decode: Converts latent diffusion outputs generated by the KSampler into actual images viewable by the user.
- Save Image/Preview Image: This node exports generated images to local storage for further use.
Connecting Nodes: All the nodes on the canvas are connected by dragging from an output circle of one node to an input circle of another compatible node ( e.g., Load Checkpoint’s model output connects to KSampler’s model input; CLIP Text Encode’s Conditioning vectors are connected to KSampler’s positive or negative input ). This chain creates a visual workflow.
Installation to Workflow of ComfyUI on Stable Diffusion 3.5 checkpoint
Getting started with ComfyUI involves installing the application and setting up a basic text-to-image generation workflow, which is particularly important for newer models like Stable Diffusion 3.5, which have different requirements than older versions.
Let’s look at the steps for generating an image using Stable Diffusion 3.5 on ComfyUI:
- Installation
git clone https://github.com/comfyanonymous/ComfyUI.git
cd ComfyUI
conda create -n "name_of_your_env" python=3.10 #in their official github repo they have mentioned to use python 3.10, although they provide support for 3.13 also.

conda activate env_name

pip install -r requirements.txt
Note for Windows users: There’s a standalone build available on the ComfyUI page, which bundles Python and dependencies for a more straightforward setup.
Highly Recommended: After the base installation, install the ComfyUI Manager extension (). This makes installing custom nodes, managing models, and updating ComfyUI much easier.
- Stable Diffusion 3.5 checkpoint setup
- Download Model and Encoder: Obtain the Stable Diffusion 3.5 medium model files from Huggingface or CivitAI. These files usually have .safetensors or .ckpt file extensions. In case of Stable Diffusion 3.5 multiple files need to be downloaded:
- The main model weights ( Diffusion Transformer – DiT ), sd3.5_medium.safetensors.
- Multiple text encoders ( CLIP-L, CLIP-G, T5XXL) weights.
- Place Model and Encoder files:
Main model weights inComfyUI/models/checkpoints
Add the path of the weights insideput_checkpoints_here
Text Encoder models( T5 and CLIP ) files are placed inComfyUI/models/clip
VAE files go intoComfyUI/models/vae.
- Starting ComfyUI
- Launch ComfyUI by running
python main.pyin terminal. - Access the interface through web browser at: http://localhost:8188
- Creating a basic workflow
- Load the checkpoint using
Load Checkpointnode. - Add a
CLIP LOADERnode capable of handling stable diffusion 3.5’s multi-encoder setup. - Add
CLIP TEXT ENCODE ( PROMPT )node and enter the desired textual prompt. Generally there are twoCLIP TEXT ENCODE ( PROMPT )nodes, one for positive prompt and other for negative prompt. - Connect these nodes output
CONDITIONINGtoKSamplernode’s positive and negative input. - Create a
EmptySD3LatentTImagenode and connect it’sLATENToutput point toKSampler'slatent_imageinput point. - Finally, decode the result with a
VAE Decodenode and save the output image usingImage Savenode. - Click
RUNbutton to run the generation.
We have also provided the JSON file of the workflow we used for image generations which can be seen in the section below. In order to download the workflow file just click on the download button below:
No-code inferencing Results using ComfyUI


Key Takeaways
- Node-Based Power: ComfyUI’s core strength is its visual, node-based interface, enabling unparalleled flexibility and customization of Stable Diffusion workflows.
- Transparency: It visualizes the image generation process by showing each step and data flow explicitly.
- Control: Users gain fine-grained control over every aspect of the pipeline, from model loading (including complex setups like SD3) to sampling parameters.
- Adaptability: Easily integrates new model architectures (like SD3), techniques (LoRAs, ControlNets), and custom nodes.
- Reproducibility: Workflows can be easily saved, shared, and reloaded, ensuring consistent results and facilitating collaboration.
- Efficiency: Optimized execution often leads to faster generation times, especially for iterative adjustments.
Conclusion
ComfyUI represents a significant step forward in user interfaces for generative AI models like Stable Diffusion. By embracing a node-based paradigm, it offers a powerful blend of flexibility, transparency, and control that caters exceptionally well to users who want to move beyond simple text prompts and delve into the intricacies of AI image generation. Its ability to adapt to new and complex model architectures like Stable Diffusion 3 further solidifies its position as a cutting-edge tool. While its visual complexity might seem daunting at first, the ability to build, modify, share, and understand intricate workflows makes it an invaluable tool for artists, researchers, and hobbyists pushing the boundaries of creative AI. If you’re looking to truly understand and manipulate the Stable Diffusion process, ComfyUI is an essential tool to explore.
References
- ComfyUI official Github Repository: https://github.com/comfyanonymous/ComfyUI
- ComfyUI Manager: https://github.com/ltdrdata/ComfyUI-Manager
- Stable Diffusion 3.5 medium weights at HuggingFace: https://huggingface.co/stabilityai/stable-diffusion-3.5-medium/tree/main


100K+ Learners
Join Free OpenCV Bootcamp3 Hours of Learning