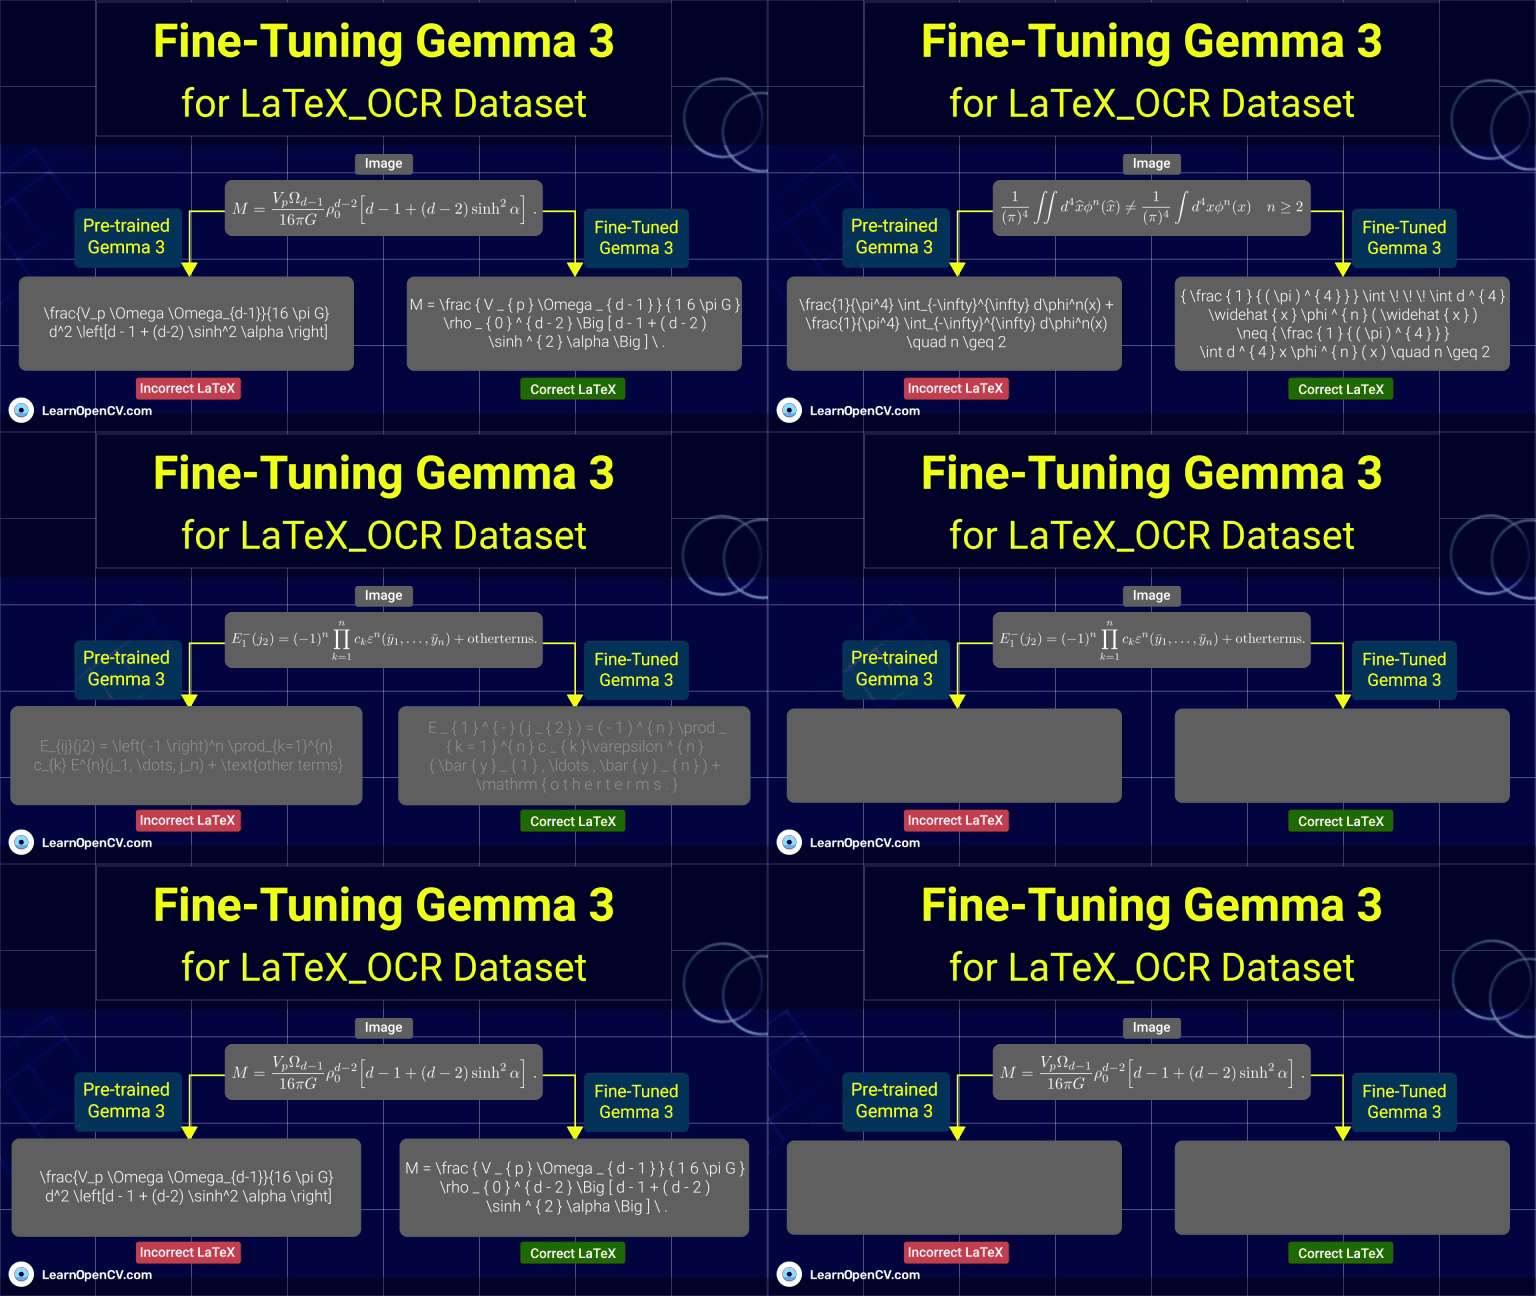
Fine-Tuning Gemma 3 allows us to adapt this advanced model to specific tasks, optimizing its performance for domain-specific applications. By leveraging QLoRA (Quantized Low-Rank Adaptation) and Transformers, we can efficiently fine-tune Gemma 3 while maintaining computational efficiency. QLoRA reduces the number of trainable parameters needing fine-tuning, making it possible to work with large models like Gemma 3 even on hardware with limited resources, all without compromising model accuracy.

In this post, we’ll show how to fine-tune Gemma 3 for Vision-Language Model (VLM) tasks, specifically generating LaTeX equations from images using the LaTeX_OCR dataset. We’ll cover dataset preparation, model configuration with QLoRA and PEFT (Parameter-Efficient-Fine-Tuning), and the fine-tuning process using TRL Library and SFTTrainer, giving you the tools to effectively fine-tune Gemma 3 for complex multimodal tasks.
- Architectural Overview of Gemma 3
- Understanding the LaTeX_OCR Dataset
- Efficient Techniques for Fine-Tuning Gemma 3
- Code Walkthrough for Fine-Tuning Gemma 3
- Gaining Access to Lightning AI Studio’s Free Tier
- Generate Hugging Face Access Token
- Setup Development Environment
- Log in to Hugging Face Hub
- Dataset Preprocessing and Conversion to Conversations
- Process the Images
- Load the LaTeX_OCR Dataset
- Data Inspection: Displaying LaTeX_OCR Images and Text
- Preparing the Dataset: Converting Samples to Conversation Format
- Model Initialization with Quantization and FlashAttention for Fine-Tuning
- Configuring LoRA Parameters for Fine-Tuning Gemma 3
- Fine-Tuning Configuration and Data Collation for Gemma 3
- Configuring SFTTrainer for Efficient Fine-Tuning Gemma 3
- Training the Model and Saving to Hugging Face Hub
- Cleaning Up GPU Memory After Fine-Tuning
- Code Walkthrough to Test Fine-Tuned Gemma 3 Model
- Visual Comparison of LaTeX Equations: Pre- and Post-Fine-Tuning
- Conclusion
- References
Architectural Overview of Gemma 3
For fine-tuning Gemma 3 for VLM tasks, the architectural features mentioned below are key because they enable the model to effectively work with both text and images. For more details, you can read about the full architecture of Gemma 3 and its insights here.
- SigLIP Vision Encoder: This encoder transforms images into token representations, making it possible for Gemma 3 to process both textual and visual information.
- Grouped-Query Attention (GQA): It optimizes memory and computation by grouping attention heads and making the model more scalable.
- Rotary Positional Embeddings (RoPE): RoPE helps the model handle variable-length sequences, ensuring the model processes both long texts and high-resolution images efficiently.
- Function-Calling Head: This allows for dynamic outputs and structured interaction with other systems (e.g., APIs or data).
Understanding the LaTeX_OCR Dataset
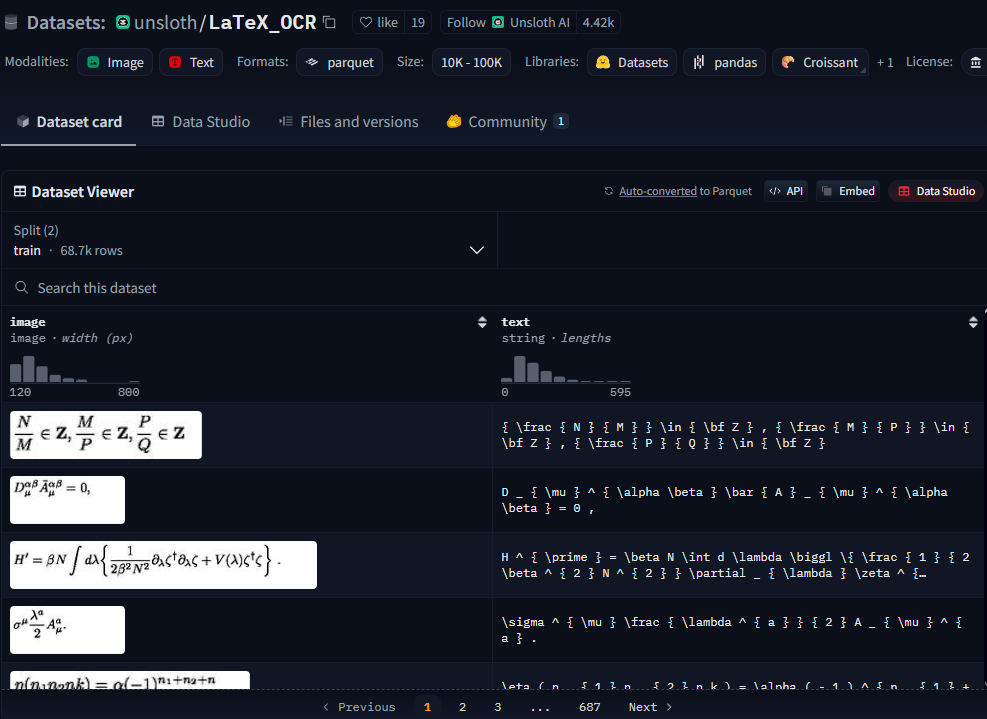
The LaTeX_OCR dataset is designed for optical character recognition (OCR) tasks, specifically aimed at processing LaTeX math expressions embedded in images. The dataset includes images of mathematical equations, and the task is to extract the LaTeX representation from the image.

Dataset Description:
The LaTeX_OCR dataset contains images with corresponding LaTeX expressions. The main goal is to train a model that can generate LaTeX expressions from images that have mathematical expressions.
Columns in the Dataset:
- image: The images of mathematical equations.
- text: The corresponding LaTeX code for the equation shown in the image.

Dataset Structure:
- The dataset is divided into two main subsets: train and test.
- Each sample contains an image (of the equation) and its corresponding LaTeX expression.
Why LaTeX_OCR Dataset?
We chose the LaTeX_OCR dataset because it provides a well-structured multimodal task that involves image-to-text translation, making it an ideal candidate for Gemma 3’s fine-tuning. This dataset allows us to experiment with fine-tuning Gemma 3 for image captioning, specifically generating LaTeX code from images.
Challenges with Fine-Tuning on LaTeX_OCR:
While fine-tuning on this dataset is promising, there are several challenges:
- Complexity of LaTeX Expressions: LaTeX expressions can be quite complex and involve different formatting styles and syntax, which can be difficult for the model to generate accurately.
- Image-Text Alignment: The challenge lies in correctly aligning the image content with the LaTeX expression. Since mathematical equations can vary widely in structure, ensuring that the model learns the correct mapping is critical.
Efficient Techniques for Fine-Tuning Gemma 3
The fine-tuning process for Gemma 3 involves several advanced techniques, particularly QLoRA and TRL (Transformer Reinforcement Learning), which allow us to adapt large models efficiently. Below, we’ll explain these techniques and show how to apply them to Gemma 3.
Quantized Low-Rank Adaptation (QLoRA)
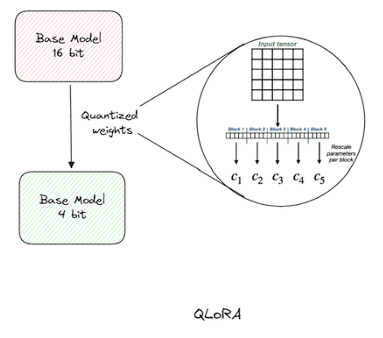
QLoRA is an extension of LoRA (Low-Rank Adaptation), which introduces quantization (e.g., 4-bit or 8-bit precision) to the low-rank matrices in the model. This helps in reducing memory usage even further while maintaining accuracy.

Source
- Benefits:
- Memory efficiency: By using lower precision (4-bit or 8-bit), we significantly reduce the memory footprint, allowing us to fine-tune large models on resource-constrained hardware.
- High accuracy: Despite using lower precision, QLoRA maintains a good balance between memory efficiency and model performance.
- Memory efficiency: By using lower precision (4-bit or 8-bit), we significantly reduce the memory footprint, allowing us to fine-tune large models on resource-constrained hardware.
Training with TRL (Transformer Reinforcement Learning)
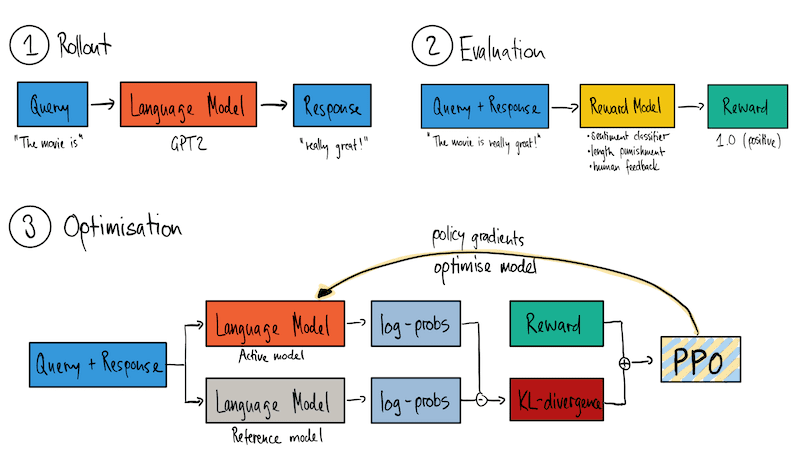
TRL (Transformer Reinforcement Learning) provides a framework for fine-tuning large models on specialized tasks. It’s particularly useful for tasks that involve multimodal data (e.g., images + text). TRL allows for effective training using techniques like Reward Modeling, Reinforcement Learning, and more.

SFTTrainer for Efficient Fine-Tuning
SFTTrainer is a tool designed to fine-tune models in a memory-efficient manner while supporting LoRA and QLoRA fine-tuning. It integrates seamlessly with Hugging Face Transformers and helps manage the training process for large models.
- Key features:
- Tokenization: Ensures input data is appropriately tokenized for both text and image inputs.
- Gradient Accumulation: Helps reduce memory usage during training.
- Dynamic Padding: Optimizes memory by padding sequences to the same length during training.
- Tokenization: Ensures input data is appropriately tokenized for both text and image inputs.
Code Walkthrough for Fine-Tuning Gemma 3
Before we dive into the fine-tuning process, here’s a quick overview of the resources and the notebooks we’ll be using:
Notebooks for Code Walkthrough
- Inference Notebook: The first notebook demonstrates how to use Gemma 3 for inference on a few samples from the LaTeX_OCR dataset without fine-tuning. This notebook is executable on Google Colab, allowing readers to quickly test the model on sample data with minimal setup.
- Fine-Tuning Notebook: The second notebook contains the fine-tuning code for training Gemma 3 on the LaTeX_OCR dataset. Due to the memory-intensive nature of fine-tuning such large models, this notebook should be run on Lightning AI Studio for optimal performance.
Both notebooks can be easily downloaded by clicking on the Download Code button located just above this section.
Gaining Access to Lightning AI Studio’s Free Tier
Since fine-tuning large models like Gemma 3 can be resource-intensive, we will be using Lightning AI Studio, which provides $15 in free credits per month upon signing up. The L4 GPU available in Lightning AI Studio will allow us to efficiently run our model training without memory limitations.
Steps to Use Lightning AI Studio’s Free Tier:
- Sign up for a free account at Lightning AI.
- Get started with $15 in free credits: Once signed up, you’ll receive $15 in credits that can be used for accessing Lightning AI Studio’s free tier.
- Choose an L4 GPU configuration: Lightning Studio provides powerful hardware configurations, including the NVIDIA L4 GPU, suitable for fine-tuning models like Gemma 3.
With access to Lightning AI Studio, we can run our fine-tuning tasks efficiently and effectively.
Generate Hugging Face Access Token
In order to interact with Hugging Face models and upload or download models from the Hugging Face Hub, we need to authenticate using an access token. Follow these steps to generate and use your Hugging Face token:
- Sign up or log in to your account on Hugging Face.
- Go to your profile settings and select Access Tokens.
- Create a New Token with the required permissions (read/write).

Once these two steps are completed, we’re ready to move forward with fine-tuning the model.
Setup Development Environment
Now that we have access to Lightning AI Studio and are authenticated with Hugging Face, let’s proceed by setting up the environment and installing the necessary libraries for the project.
# Install Pytorch & other libraries
%pip install "torch>=2.4.0" tensorboard torchvision
%pip install -U transformers

# Install Hugging Face libraries
%pip install  --upgrade \
  "datasets==3.3.2" \
  "accelerate==1.4.0" \
  "evaluate==0.4.3" \
  "bitsandbytes==0.45.3" \
  "trl==0.15.2" \
  "peft==0.14.0" \
  "pillow==11.1.0" \
  protobuf \
  sentencepiece

# Install WandB for experiment tracking
%pip install wandb==0.19.7
bitsandbytes allows quantization and memory optimization, peft library includes tools like LoRA for parameter-efficient fine-tuning and wandb for experiment tracking and visualization.
Log in to Hugging Face Hub
After generating the Hugging Face access token in the previous step, the next thing we need to do is log in using this token to interact with the Hugging Face Hub. This allows us to access pre-trained models, upload models, or download datasets. Here’s how you can do it:
import huggingface_hub

# Login to Hugging Face Hub using the generated token
huggingface_hub.login()
We simply need to paste the token in the dialog box that pops up, and then we are good to go.
Dataset Preprocessing and Conversion to Conversations
The LaTeX_OCR dataset contains images of mathematical equations and their corresponding LaTeX code. We convert each image into a structured conversation format, where the model is tasked with generating the LaTeX code from the image.
instruction = 'Convert the equation images to LaTeX equations.'
def convert_to_conversation(sample):
    conversation = [
        { 'role': 'user',
          'content' : [
            {'type' : 'text',  'text'  : instruction},
            {'type' : 'image', 'image' : sample['image']} ]
        },
        { 'role' : 'assistant',
          'content' : [
            {'type' : 'text',  'text'  : sample['text']} ]
        },
    ]
    return { 'messages' : conversation }
- User Prompt: The user asks the model to convert the equation image to its LaTeX representation.
- Assistant Response: The model should respond with the LaTeX code corresponding to the image.
Process the Images
We need to process the images in the dataset by converting them to the RGB format so that they are compatible with Gemma 3. Although this part is not useful for this particular dataset, as we will only be dealing with the equations, but still this part has been included just to give an idea about how to work with the images in the dataset.
def process_vision_info(messages: list[dict]) -> list[Image.Image]:
    image_inputs = []
    for msg in messages:
        content = msg.get("content", [])
        if not isinstance(content, list):
            content = [content]

        for element in content:
            if isinstance(element, dict) and ("image" in element or element.get("type") == "image"):
                image = element["image"]
                image_inputs.append(image.convert("RGB"))
    return image_inputs
Load the LaTeX_OCR Dataset
# Load dataset from the hub
dataset_train = load_dataset('unsloth/LaTeX_OCR', split='train[:3000]')
The code loads a subset of the LaTeX_OCR train dataset
Data Inspection: Displaying LaTeX_OCR Images and Text
import matplotlib.pyplot as plt

# Access the first sample in the dataset
train_image = dataset_train[0]['image']

# Print the corresponding LaTeX text for the first image
print(dataset_train[0]['text'])

# Display the image using matplotlib
plt.imshow(train_image)
The above code helps to visualize and inspect the data (both images and LaTeX text) before you begin the training process.
Preparing the Dataset: Converting Samples to Conversation Format
from tqdm import tqdm
converted_dataset_train = [
    convert_to_conversation(sample) \
    for sample in tqdm(dataset_train, total=len(dataset_train))
]
print(converted_dataset_train[0])
This step is part of data preprocessing before fine-tuning. It converts the dataset into a format that is compatible with the Gemma 3 model for training.
Model Initialization with Quantization and FlashAttention for Fine-Tuning
%pip install flash-attn --no-build-isolation
import torch
from transformers import AutoProcessor, AutoModelForImageTextToText, BitsAndBytesConfig

model_id = "google/gemma-3-4b-pt"  # or `google/gemma-3-12b-pt`, `google/gemma-3-27-pt`

# Define model init arguments
model_kwargs = dict(
    attn_implementation="flash_attention_2",
    torch_dtype=torch.bfloat16,
    device_map="auto",  # Let torch decide how to load the model
)

# BitsAndBytesConfig int-4 config
model_kwargs["quantization_config"] = BitsAndBytesConfig(
    load_in_4bit=True,
    bnb_4bit_use_double_quant=True,
    bnb_4bit_quant_type="nf4",
    bnb_4bit_compute_dtype=model_kwargs["torch_dtype"],
    bnb_4bit_quant_storage=model_kwargs["torch_dtype"],
)

# Load model and tokenizer
model = AutoModelForImageTextToText.from_pretrained(model_id, **model_kwargs)
processor = AutoProcessor.from_pretrained("google/gemma-3-4b-it")
The above code specifies the Hugging Face model ID for Gemma 3 with 4B parameters and the pre-trained model (pt suffix indicates a pre-trained version). It also specifies the use of FlashAttention 2, a more efficient attention mechanism for Ampere GPUs. It sets the model’s data type to bfloat16, which is often used for faster training with minimal loss in accuracy.
The quantization settings allow the model to use 4-bit weights, reducing memory consumption significantly, which is especially important when fine-tuning large models. The processor ensures that the images are correctly formatted and tokenized before being passed into the model.
Configuring LoRA Parameters for Fine-Tuning Gemma 3
from peft import LoraConfig

peft_config = LoraConfig(
    lora_alpha=16,
    lora_dropout=0,
    r=8,
    bias="none",
    target_modules=[
 'down_proj',
 'o_proj',
 'k_proj',
 'q_proj',
 'gate_proj',
 'up_proj',
 'v_proj'],
    task_type="CAUSAL_LM",
    modules_to_save=[
        "lm_head",
        "embed_tokens",
    ],
)
The above code imports the LoraConfig class from the peft library (Parameter-Efficient Fine-Tuning), which is used for configuring LoRA fine-tuning for large transformer models. LoRA introduces low-rank matrices into the model to efficiently fine-tune only a small subset of the model’s parameters while freezing the rest. Setting lora_alpha to 16 means the model will scale the learned low-rank parameters by a factor of 16.
We keep lora_dropout off (0) for more focused learning on the LoRA layers. r defines the rank of the low-rank adapters. A rank of 8 means that the low-rank matrices introduced in the LoRA layers will have 8 components. Setting bias to "none" means that no bias will be added. ist specifies which modules in the model will have LoRA applied to them. target_modules list specifies which modules in the model will have LoRA applied to them. Here, it includes several key components of the attention mechanism.
Saving modules_to_save list ensures that the fine-tuned parts of the model (specifically for language generation) are preserved during training.
Fine-Tuning Configuration and Data Collation for Gemma 3
from trl import SFTConfig

args=SFTConfig(
        per_device_train_batch_size=1,
        gradient_accumulation_steps=4,
        warmup_steps=10,
        num_train_epochs=1, # For full training runs over the dataset.
        learning_rate=2e-4,
        bf16=True,
        logging_steps=200,
        save_strategy='steps',
        save_steps=200,
        save_total_limit=2,
        optim='adamw_8bit',
        weight_decay=0.01,
        lr_scheduler_type='linear',
        seed=3407,
        output_dir='outputs',
        report_to='none',
        remove_unused_columns=False,
        dataset_text_field='',
        dataset_kwargs={'skip_prepare_dataset': True},
        max_seq_length=1024,
)

# Create a data collator to encode text and image pairs
def collate_fn(examples):
    texts = []
    images = []
    for example in examples:
        image_inputs = process_vision_info(example["messages"])
        text = processor.apply_chat_template(
            example["messages"], add_generation_prompt=False, tokenize=False
        )
        texts.append(text.strip())
        images.append(image_inputs)

    # Tokenize the texts and process the images
    batch = processor(text=texts, images=images, return_tensors="pt", padding=True)

    # The labels are the input_ids, and we mask the padding tokens and image tokens in the loss computation
    labels = batch["input_ids"].clone()

    # Mask image tokens
    image_token_id = [
        processor.tokenizer.convert_tokens_to_ids(
            processor.tokenizer.special_tokens_map["boi_token"]
        )
    ]
    # Mask tokens for not being used in the loss computation
    labels[labels == processor.tokenizer.pad_token_id] = -100
    labels[labels == image_token_id] = -100
    labels[labels == 262144] = -100

    batch["labels"] = labels
    return batch
SFTConfig is used to set up the fine-tuning configuration for Gemma 3. This configuration controls various training parameters like batch size, learning rate, optimizer, saving strategy, and precision. collate_fn is a custom function used to process a batch of input data. It handles image and text pairs, ensuring they are prepared and tokenized correctly for training.
After processing the text and images, the labels are cloned from the tokenized input (input_ids), and padding/image tokens are masked to prevent them from affecting the loss calculation.
Configuring SFTTrainer for Efficient Fine-Tuning Gemma 3
from trl import SFTTrainer

trainer = SFTTrainer(
    model=model,
    args=args,
    train_dataset=converted_dataset_train,
    peft_config=peft_config,
    processing_class=processor,
    data_collator=collate_fn,
)
The SFTTrainer is a key component for the fine-tuning process. It manages the training loop, handles data batching, and ensures that the model gets updated during training. It simplifies the entire process by abstracting away some of the more complex parts of fine-tuning, such as handling the gradient updates and data preparation.
Training the Model and Saving to Hugging Face Hub
# Start training, the model will be automatically saved to the Hub and the output directory
trainer.train()

# Save the final model again to the Hugging Face Hub
trainer.save_model()
The above code initiates the training process. After training is complete, the final fine-tuned model is saved to the Hugging Face Hub. Saving the model ensures that it is available for later use or sharing.
Cleaning Up GPU Memory After Fine-Tuning
del model
del trainer
torch.cuda.empty_cache()
After fine-tuning the model, it’s crucial to manage GPU memory effectively. Large models, like Gemma 3, can consume a lot of memory during training, and this step ensures that the system is ready for the next task by clearing up unnecessary memory.
When saving the model during training, we only save the adapter weights and not the full model.
Code Walkthrough to Test Fine-Tuned Gemma 3 Model
Loading the Fine-Tuned Model and Processor for Inference
import torch

# Load Model with PEFT adapter
model = AutoModelForImageTextToText.from_pretrained(
  args.output_dir,
  device_map="auto",
  torch_dtype=torch.bfloat16,
  attn_implementation="flash_attention_2",
)
processor = AutoProcessor.from_pretrained(args.output_dir)
The above code loads the fine-tuned model from the directory where it was saved (args.output_dir). The processor is loaded to handle the image and text inputs. Using bfloat16 and flash_attention_2 ensures that the model performs efficiently, especially for large models like Gemma 3 that require significant memory resources during inference.
Image-to-LaTeX Conversion: Processing and Generating Equations
import requests
from PIL import Image

# Load the image from a local path and convert it to RGB
image = Image.open("/tpath/to/the/image/file").convert("RGB")
instruction = 'Convert the equation images to LaTeX equations.'

def generate_equation(model, processor):
    # Convert sample into messages and then apply the chat template
    messages = [
        { 'role': 'user',
          'content' : [
            {'type' : 'text',  'text'  : instruction},
            {'type' : 'image', 'image' : image} ]
        },
    ]

    # Apply the chat template to the messages
    text = processor.apply_chat_template(
        messages, tokenize=False, add_generation_prompt=True
    )

    # Process the image and text
    image_inputs = process_vision_info(messages)

    # Tokenize the text and process the images
    inputs = processor(
        text=[text],
        images=image_inputs,
        padding=True,
        return_tensors="pt",
    )

    # Move the inputs to the device (GPU or CPU)
    inputs = inputs.to(model.device)

    # Generate the output (LaTeX code)
    stop_token_ids = [processor.tokenizer.eos_token_id, processor.tokenizer.convert_tokens_to_ids("<end_of_turn>")]
    generated_ids = model.generate(**inputs, max_new_tokens=256, top_p=1.0, do_sample=True, temperature=0.8, eos_token_id=stop_token_ids, disable_compile=True)

    # Trim the generation and decode the output to text
    generated_ids_trimmed = [out_ids[len(in_ids):] for in_ids, out_ids in zip(inputs.input_ids, generated_ids)]
    output_text = processor.batch_decode(
        generated_ids_trimmed, skip_special_tokens=True, clean_up_tokenization_spaces=False
    )
    return output_text[0]

# generate the description
equation = generate_equation(model, processor)
print(equation)
The above code loads an image from the local Lightning AI Studios directory and converts it to RGB format. It also generates the LaTeX equation from the image using the model. It uses sampling with parameters like temperature=0.8 and top_p=1.0 to control the randomness of the output. The code shows how the image and instruction are formatted and passed to the model to generate LaTeX code from the equation image. The model inference process involves using the processor to handle both text and image inputs, generating the output, and decoding it back into LaTeX.
Visual Comparison of LaTeX Equations: Pre- and Post-Fine-Tuning
After fine-tuning Gemma 3 on the LaTeX_OCR dataset, it’s important to assess the model’s ability to generate accurate LaTeX equations. In this section, we compare the original equation images with the LaTeX equations generated by the model before and after fine-tuning. We will show the original image, the generated LaTeX equation by the model (before and after fine-tuning), and the converted LaTeX equation into a general mathematical equation (before and after fine-tuning) to visually evaluate the improvement.
Let’s have a look at the first example –
Original Image

Generated Raw LaTeX Equation Gemma 3 (without fine-tuning)
H' = \beta N \int \lambda d\lambda \{ \frac{1}{2B^2 N^2} \alpha_s^* \alpha_s + V(\lambda) \alpha_s^{*2} \}
Rendered LaTeX Equation Generated by Gemma 3 (without fine-tuning)

Generated LaTeX Equation by Fine-tuned Gemma 3
H ^ { \prime } = \beta N \int d \lambda \biggl \{ \frac { 1 } { 2 \beta ^ { 2 } N ^ { 2 } } \partial _ { \lambda } \zeta ^ { \dagger } \partial _ { \lambda } \zeta + V ( \lambda ) \zeta ^ { \dagger } \zeta \biggr \} .
Rendered LaTeX Equation Generated by Fine-tuned Gemma 3

Second Example
Original Image

Generated Raw LaTeX Equation by Gemma 3 (without fine-tuning) and Rendered Equation
M = \frac{V_p \Omega \Omega_{d-1}}{16 \pi G} d^2 \left[d - 1 + (d-2) \sinh^2 \alpha \right]

Generated Raw LaTeX Equation and Rendered Equation by Fine-tuned Gemma 3
M = \frac { V _ { p } \Omega _ { d - 1 } } { 1 6 \pi G } \rho _ { 0 } ^ { d - 2 } \Big [ d - 1 + ( d - 2 ) \sinh ^ { 2 } \alpha \Big ] \ .

Third Example
Original Image

Generated Raw LaTeX Equation by Gemma 3 (without fine-tuning) and Rendered Equation
\frac{1}{\pi^4} \int_{-\infty}^{\infty} d\phi^n(x) + \frac{1}{\pi^4} \int_{-\infty}^{\infty} d\phi^n(x) \quad n \geq 2

Generated Raw LaTeX Equation and Rendered Equation by Fine-tuned Gemma 3
{ \frac { 1 } { ( \pi ) ^ { 4 } } } \int \! \! \! \int d ^ { 4 } \widehat { x } \phi ^ { n } ( \widehat { x } ) \neq { \frac { 1 } { ( \pi ) ^ { 4 } } } \int d ^ { 4 } x \phi ^ { n } ( x ) \quad n \geq 2

This comparison helps us understand the improvement achieved after fine-tuning Gemma 3 and provides insight into how effectively the model has learned to generate LaTeX equations from images.
Conclusion
The results from fine-tuning on the LaTeX_OCR dataset show how Gemma 3 can be effectively adapted to Vision-Language Model (VLM) tasks, showcasing its flexibility and scalability. The comparison between pre- and post-fine-tuning LaTeX generation further highlights the model’s improvement in handling complex tasks.
Fine-tuning large models like Gemma 3 requires careful attention to both hardware requirements and training strategies. Utilizing platforms like Lightning Studio and leveraging QLoRA for memory-efficient fine-tuning ensures that you can work with state-of-the-art models without overwhelming your resources. With these tools, you can take Gemma 3 to new heights, improving its ability to process both text and images effectively.
References
- Gemma 3 Introduction
- Gemma 3 Image-to-Text Inference
- Fine-Tune Gemma for Vision Tasks using QLoRA and HuggingFace Transformers
- Fine-Tune Llama 3.2 Vision


100K+ Learners
Join Free OpenCV Bootcamp3 Hours of Learning