In this tutorial we will learn how to morph one face into another using OpenCV.
I have chosen to use the photos of the top three American Presidential candidates, but this is not a political post and I have no political agenda. And yes, that is the prettiest picture of Donald Trump I could find!
In my previous posts I have covered Facial Landmark Detection and Delaunay Triangulation. It is a good idea to review those posts to better understand this one.
Image Morphing
Image morphing was first used extensively in the movie Willow using a technique developed at Industrial Light and Magic. A scene from the movie is shown below.
The idea behind Image Morphing is rather simple. Given two images and
we want to create an in-between image
by blending images
and
. The blending of images
and
is controlled by a parameter
that is between 0 and 1 (
). When
is 0, the morph
looks like
, and when
is 1,
looks exactly like
. Naively, you can blend the images using the following equation at every pixel
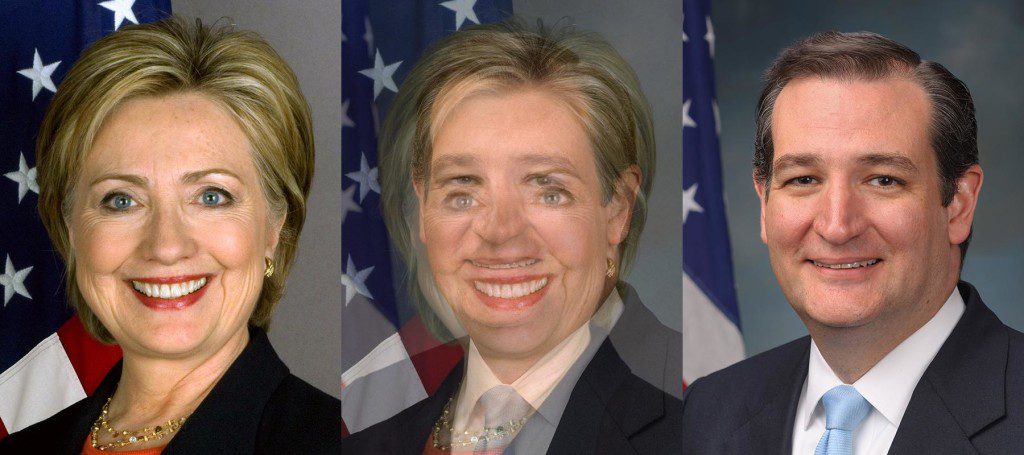
However, using the above equation to generate a blend between the image of Secretary Hillary Clinton and Senator Ted Cruz with set to 0.5, you will get the following terrible results.
The resulting image is disturbing, but it also screams a solution at you. It begs you to somehow align the eyes and the mouth before blending the images. You get similar disturbing results when you try to blend two different political ideologies without first aligning the minds, but I digress.
So, to morph image into image
we need to first establish pixel correspondence between the two images. In other words, for every pixel
in image
, we need to find it’s corresponding pixel
in image
. Suppose we have magically found these correspondences, we can blend the images in two steps. First, we need to calculate the location
of the pixel in the morphed image. It is given by the following equation
(1)
Second, we need to find the intensity of the pixel at using the following equation
(2)
That’s it. We are done. Now, Let’s go and vote for Trump. Kidding! Just like Trump, I left out some important details. Finding a corresponding point in image J for every pixel in image I is about as difficult as building a 10 ft wall between the United States and Mexico. It can be done, but it is expensive and not really necessary.
But it is very easy to find a few point correspondences. For morphing two dissimilar objects, like a cat’s face and a human’s face, we can click on a few points on the two images to establish correspondences and interpolate the results for the rest of the pixels. We will next see how Face Morphing is done in detail, but the same technique can be applied to any two objects.
Face Morphing : Step by Step
Morphing two faces can be done using the following steps. For simplicity, we will assume the images are of the same size, but it is not a necessity.
1. Find Point Correspondences using Facial Feature Detection
Let’s start by obtaining corresponding points. First, we can get a lot of points by automatically ( or manually ) by detecting facial feature points. I used dlib to detect 68 corresponding points. Next, I added four more points ( one on the right hand side ear, one on the neck, and two on the shoulders ). Finally, I added the corners of the image and half way points between those corners as corresponding points as well. Needless to say, one can add a few more points around the head and neck to get even better results, or remove the manually clicked points to get slightly worse ( but fully automatic ) results.
2. Delaunay Triangulation
From the previous step we have two sets of 80 points — one set per image. We can calculate the average of corresponding points in the two sets and obtain a single set of 80 points. On this set of average points we perform Delaunay Triangulation. The result of Delaunay triangulation is a list of triangles represented by the indices of points in the 80 points array. In this particular case the triangulation produces 149 triangles connecting the 80 points. The triangulation is stored as an array of three columns. The first few rows of the triangulation is shown below.
Triangulation Points |
38 40 37 |
35 30 29 |
38 37 20 |
18 37 36 |
33 32 30 |
… |
It shows that points 38, 40 and 37 form a triangle and so on. The triangulation is shown on the two images below.
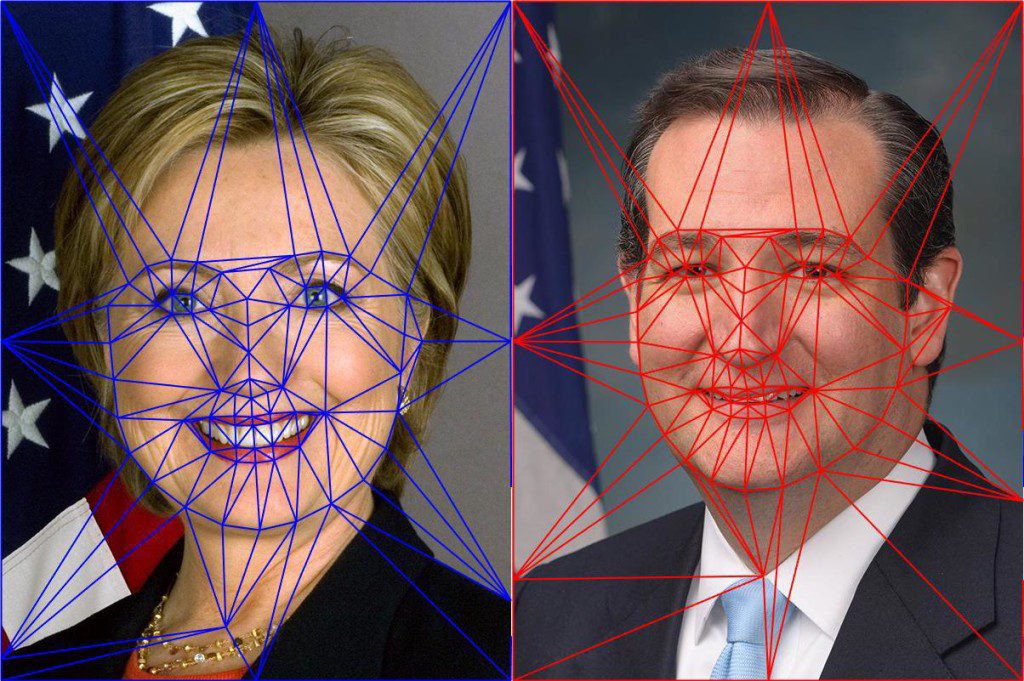
Notice the triangles in the two images capture approximately similar regions. We had started with point correspondences and now, because of triangulation, we have triangle ( or region ) correspondences.
3. Warping images and alpha blending
We are now in a position to intelligently blend the two images. As mentioned before, the amount of blending will be controlled by a parameter . Create a morph using the following steps.
- Find location of feature points in morphed image : In the morphed image
, we can find the locations of all 80 points
using equation (1).
- Calculate affine transforms : So we have a set of 80 points in image 1, another set of 80 points in image 2 and a third set of 80 points in the morphed image. We also know the triangulation defined over these points. Pick a triangle in image 1 and the corresponding triangle in the morphed image and calculate the affine transform that maps the three corners of the triangle in image 1 to the three corners of the corresponding triangle in the morphed image. In OpenCV, this can be done using getAffineTransform . Calculate an affine transform for every pair of 149 triangles. Finally, repeat the process of image 2 and the morphed image.
- Warp triangles : For each triangle in image 1, use the affine transform calculated in the previous step to transform all pixels inside the triangle to the morphed image. Repeat this for all triangles in image 1 to obtain a warped version of image 1. Similarly, obtain a warped version for image 2. In OpenCV this is achieved by using the function warpAffine. However, warpAffine takes in an image and not a triangle. The trick is to calculate a bounding box for the triangle, warp all pixels inside the bounding box using warpAffine, and then mask the pixels outside the triangle. The triangular mask is created using fillConvexPoly. Be sure to use blendMode BORDER_REFLECT_101 while using warpAffine. It hides the seams better than Secretary Clinton hides her emails.
- Alpha blend warped images : In the previous step we obtained warped version of image 1 and image 2. These two images can be alpha blended using equation (2), and this is your final morphed image. In the code I have provided warping triangles and alpha blending them is combined in a single step.
Face Morphing Results
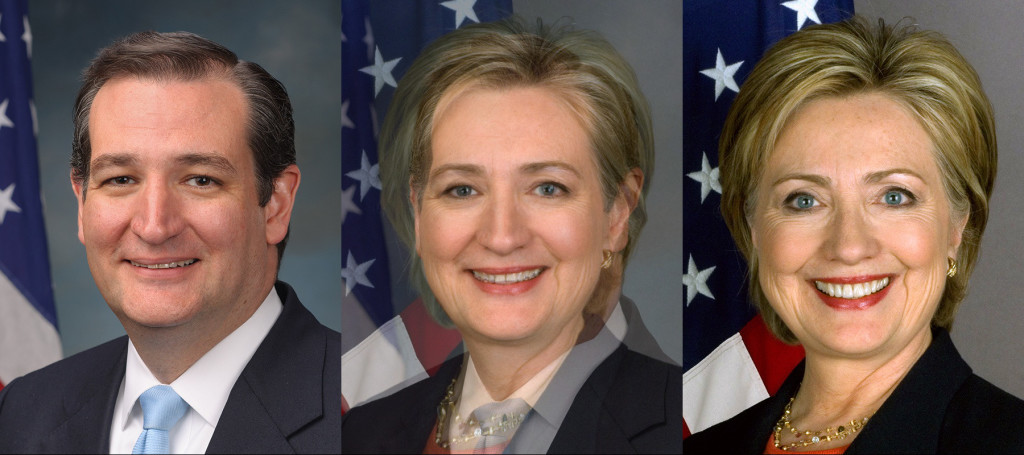
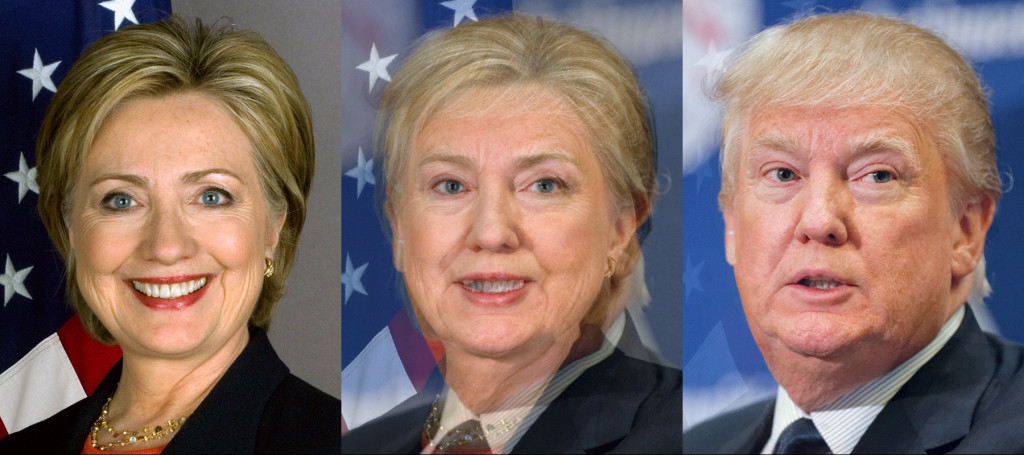
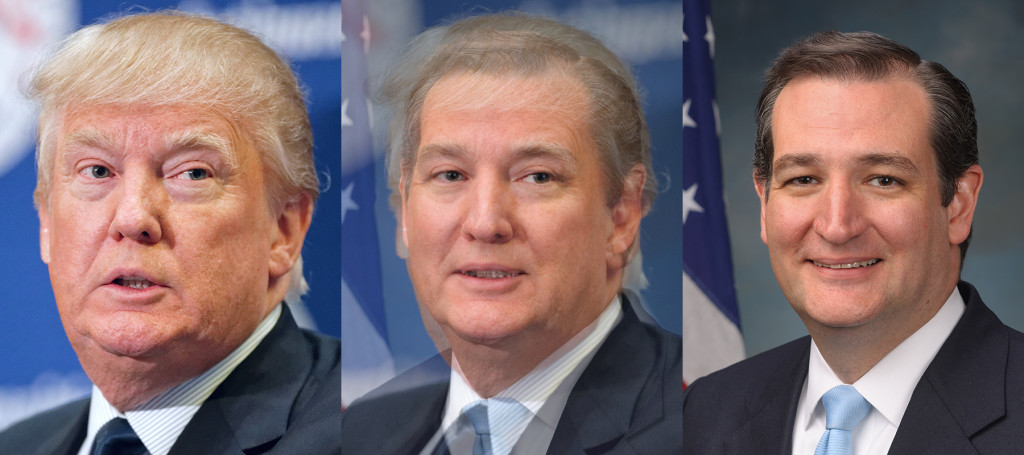
The results of applying the above technique are shown below. The image in the center is a 50% blend of the image on the left and the right. The video on the top of this page shows an animation with different alpha values. Animation is a cheap trick that hides a lot of flaws in a morph; Senator Ted Cruz would love it.
Most facial features are very well aligned. The part of the image outside the face is not so well aligned because we have fewer corresponding points in that region. One can manually add additional points to fix mis-alignments and get better results.
Subscribe & Download Code
If you liked this article and would like to download code (C++ and Python) and example images used in this post, please click here. Alternately, sign up to receive a free Computer Vision Resource Guide. In our newsletter, we share OpenCV tutorials and examples written in C++/Python, and Computer Vision and Machine Learning algorithms and news.Image Credits
The images of Secretary Hillary Clinton and Senator Ted Cruz are in the Public Domain, while the image of Donald Trump is licensed under Creative Commons Attribution-Share Alike 2.0 Generic license.
Oh man, LOL! It might appear more real if the hair near the top of the forehead use some segmentation and selection, instead of using the mixture, but anyway, it turns out so good!
Thanks. Hair is obviously a problem, especially Donald Trump’s hair :).
I have to count faces in video. Can you provide mi any resources…it will be helpful..
I don’t have any ready made code for doing that. However, you can do simple face detection followed by some tracking ( Kalman Filtering ) to track faces.
I tried running “python faceMorph.py”, and got the following error:
Traceback (most recent call last):
File “faceMorph.py”, line 115, in
morphTriangle(img1, img2, imgMorph, t1, t2, t, alpha)
File “faceMorph.py”, line 59, in morphTriangle
img2Rect = img2[r2[1]:r2[1] + r2[3], r2[0]:r2[0] + r2[2]]
IndexError: invalid index to scalar variable.
I also noticed that the file hillary_clinton.jpg isn’t in the corresponding folder FaceMorph, whereas donald_trump.jpg is in there.
Thank you so much Nicholas. I have checked in the files. Please take an update. It would be really helpful if you confirm if this solves your problem.
Could you tell, how to get this corresponding points?
We use dlib. In my fork of dlib, I have added an additional cpp file that saves the results to file
https://github.com/spmallick/dlib/blob/master/examples/face_landmark_detection_to_file.cpp
Thanks!
But I’m not familiar with C++. Could you tell me, how get triangled corresponding points if I already have face points (80 points for each image) for 2 images. Any formula or something?
Hi Satya, Thank you for your interesting post.
Sorry for my silly question, but I tried several times and still don’t know how:
How to download the code? Whenever I click to ‘download’ button, it directs me to the ‘Subscribe now’ button; I subscribe it but nothing happens afterwards. Could you please point me how? Thank you so much.
Hi Tiep,
The welcome email contains link to the code. If you had subscribed earlier, you may not receive the welcome email again. It is also possible that the email accidentally went to the spam folder.
Please send your email address to [email protected] and I will send the link to you.
Thanks.
Satya
I just found it right before your reply. Thank you anw, your blog is very interesting.
🙂 Thanks for the kind words. Hope you enjoy tinkering with the code.
Kill it with fire, and if that doesn’t work, kill it with ice. And if that doesn’t work, duct tape it down so it doesn’t contaminate the rest of the world.
Hi Satya, thank you very much for sharing knowledge! 🙂
I am looking forward to reading an article on your website about recognising de facial expression of a person, from an image or a video. It would be really helpful because i am currently trying to figure out the steps that i have to follow in order to develop this certain type of application.
Thank you in advance!!
Hi Anda-Delia,
If you have data for those expressions, you can do face detection and crop all the faces to some fixed size. You can then use deep learning based image classification. Here is an image classification example you can quickly try out ( https://learnopencv.com/deep-learning-example-using-nvidia-digits-3-on-ec2/ )
Hello, i’m trying to use morphing on custom images. get the landmarks by dlib and build the triangles by delaunay.
BUT i have some issues, then trying to fund an accordance of triangles form first image and triangles from second.
How to match or sort triangles, to have an perfect accordance?
morph result below=(
Hi Antonio,
dlib returns the 68 points in a specific order. So you have two arrays of points pts1 and pts2. You can calculate the average of the two sets ptsAvg = 0.5 * ( pts1 + pts2 ). Do the Delaunay triangulation on ptsAvg and save tringulation as indices and not values. So now you have the same triangulation for pts1 and pts2. Check out the code for faceSwap I shared with everybody on the email list, and you will see how we do it.
Alternatively, you can simply use the tri.txt file I have shared along with the FaceMorph code. It shows the triangulation for the 68 points dlib returns.
Please let me know if this helped.
A lot of thanks mr. Mallick. It helps!
Later, i will share my code on github and add it in comments, after deleting unused code.
Looking forward to it.
https://github.com/anybkarnak/facemorpher trying to wrap functions by classes for my own project.
🙂 Cool
Hi Satya,
i ran into a problem where triangle table of the 2 faces are not pairing up.
exp: faceA, the first triangle index is on the cheek while faceB is on an eyebrow.
how did this happens?
They both generated from Dlib with matched index table of 68 points
That can happen because even though the points are generated using dlib they are not the exact same points and Delaunay triangulation will favor one triangulation for one set of points and a different one for other set of points.
To circumvent this problem, you can either create triangulation on just one image and use it for the other as well ( see which points are forming the triangle). Or you can take the mean of the two face points and do the triangulation once.
How to use tri.txt to generate the text file?
How to save intermediate frames for animation like effect ?
You can write the frames to a video using VideoWriter in OpenCV.
Hey
Could you give me an example c++ code of this image morphing using openCV . I subscribed so that i could get an example CODE.
Thanks and please remember THE CODE.
I am very sorry that you did not get the email with links to the code and other resources. Please send me an email at [email protected] using the same email you used to subscribe and I will send you the code.
Again, sorry about this.
Hi, After subscription & confirming the email link , i don’t see any link to download the code. please help.
I sent you an email 🙂
I have the same problem. Can you also share the source code with me?
Hi Firat,
Did you receive the welcome email ? If not, can you please send an email to [email protected] and I will respond to it with the material.
Sorry for the inconvenience.
Satya
I have the same problem. Could you share the source code with me?
Hi Thiago,
Did you receive the welcome email ? If not, can you please send an email to [email protected] and I will respond to it with the material.
Sorry for the inconvenience.
Satya
Hi Satya,
Thank you!
Thiago
Hi Satya,This period of time has been studying this problem, know see you share, thank you very much!
As shown in the figure below, how can I get these files, how to get Facial feature points.
Hi Adam,
You need to use dllib for getting the landmark points. See this post
https://learnopencv.com/facial-landmark-detection/
The tri.txt file is produced by post processing the output of Delaunay Triangulation
https://www.learnopencv.com/delaunay-triangulation-and-voronoi-diagram-using-opencv-c-python/
An example for getting the indices ( tri.txt ) is shown in the code for FaceSwap and FaceAverage. Checkout the function called calculateDelaunayTriangles inside faceSwap.cpp / faceSwap.py or faceAverage.cpp / faceAverage.py
Hope that helps.
Satya
Hi @spmallick:disqus. These tutorial are awesome and well explained (I’m an Italian student and I can understand all your explanations!). I have a question about dlib. What is the name of the example for making a file with landmark points? I also read https://learnopencv.com/facial-landmark-detection/ but I didn’t find how to make it. Thanks a lot!
Thanks. Checkout dlib/examples/webcam_face_pose_ex.cpp and dlib/examples/face_landmark_detection_ex.cpp
Thanks a lot. I was thinking that there is a project that automatically generate it. I’ll study the code. Thanks again !
You can build all the examples using CMake
http://dlib.net/compile.html
Yes, I did it. 🙂
Hello Satya,
combining the code from http://dlib.net/face_landmark_detection.py.html for getting the landmark points and the FaceMorph, I end up getting this result:
https://uploads.disquscdn.com/images/f2522fd174e99609701f6aebfc8bc59bc52f0464a6708597104cdca372899b46.png
I assume I need to add some points to define the outer boundaries the image? Your example file in FaceMorph has 80 points, the output of the example code only has 68.
Hi David,
Yes, you can add the four corners of the image and the centers of the boundary of the image ( 8 points in all ). For the demo I had added a few more points to get slightly better results, but you can try with just 8 extra points. It will at least show the entire image and not just the face.
Hope that helps.
Satya
Great, that makes sense. How do I determine the centers of the boundary of the image?
First you need to find the width and height of the image using the size method in C++ and shape method in Python. The centers of the boundary are simply ( w/2,0) , (0, h/2), ( w, h/2) and ( h, w/2).
Gotcha, thanks for helping, Satya!
HI @spmallick:disqus
I am newbie to Comupter vision I am unable to generate the tri.txt file. Even though I have looked into the face swap/face average code as you mentioned above,I could not make it up.Please kindly do help me.I am struct at the 90% of my class project
I think explaining properly how you get the tri.txt is really important in order to make this tutorial useful. I’ve spent quite some time trying to understand how you got tri.txt – as your explanation is not clear i.e. “…The result of Delaunay triangulation is a list of triangles represented by the indices of points in the 80 points array. In this particular case the triangulation produces 149 triangles connecting the 80 points. The triangulation is stored as an array of three columns.” The result of the Delaunay trianglulation in code is actually an array of triangle vertices which bear no resemblance to your screen shot of the tri.txt file.
> It hides the seams better than Secretary Clinton hides her emails.
Shots fired!
🙂
hi~
how can I get the four more points ( one on the right hand side ear, one on the neck, and two on the shoulders )?
Hi CTrump,
I had manually added those points.
Satya
Hi Satya~
I also want to know how to filtrate 149 indices? I used Delaunay Triangulation and get 5072 indices. I just don’t know how to drop the indices in process.
Hello Satya, is it possible to morph two images of objects (for example cars) using your program?
Hi Sathya,
I am interested in creating a 3-D face model from a 2-D face input. My idea is as follows:
1) Create average 3-D face shape from a 3-D face data base
2) Use dlib Face landmark detector to identify the landmark points for 2-D input face and 3-D average face created in step # 1
3) Identify the shape for 2-D input face and 3-D face (i.e.) use the face boundary points and regress the 3-D face shape to 2-D face shape.
3) Apply Delaunay Triangulation on 2-D input face and 3-D average face after modifying the face shape
4) Then warp images using alpha blending.
Could you please let me know if this works or if you have any other suggestion?
Subscribed but not sure how to get the code …
Hello Satya,
Please help me , how to generate this hillary_clinton.jpg.txt or ted_cruz.jpg.txt
You can use Dlib to do that. https://learnopencv.com/facial-landmark-detection/
https://github.com/spmallick/dlib/blob/master/python_examples/face_landmark_detection_to_file.py
Hi Satya,when i run the faceMorph it tips that “OpenCV Error: Sizes of input arguments do not match (The operation is neither ‘array op array’ (where arrays have the same size and the same number of channels), nor ‘array op scalar’, nor ‘scalar op array’) in arithm_op, file /Volumes/build-storage/build/master_iOS-mac/opencv/modules/core/src/arithm.cpp, line 659” when run to multiply(imgRect, mask, imgRect); Could you help me how to reslove this issue?
I love your digressions! Awesome explanation of the principle. Thank you very much, Satya.
Thanks, Faruk. Appreciate the kind words
I thought it was interesting how you created a gif out of the result images in this example:
https://www.filepicker.io/api/file/gKkffK5MTZ24p3DmVtHv
Did you do that in Python? if so, could you share the method you used?
have you done this?
Satya, For some reason I am unable to access the code or the Computer Vision Resource. The click-to-email-to confirm circular reference has gone on. Can you e-mail me the code and the resource. It certainly looks powerful
Looks like you have already registered. I will fix this problem, but for now please send me an email at [email protected] and will respond with link to all code.
This is Cool , Everything is alright. I got the morphed output. But i have a doubt how can I animate from image 1 to morphed image.
You can change the value of alpha to animate.
Hi, After subscription & confirming the email link , i don’t see any link to download the code. please help
Wait for 10 minutes and if you still do not receive the welcome email, please send me an email at [email protected]
Hello Satya, thanks for the good tutorial, your script is working pretty well, but i have a problem with some images the result seems to have some artifcats especially in the mouth , here is a simple : https://uploads.disquscdn.com/images/776d82a722befaaf775bc85e31cec5dcdd62fcb1b8992aa63d73efa06b9ac006.jpg https://uploads.disquscdn.com/images/6a758bd4983b8a842e3aaf666d80e0e825716a7e1c072c9330ac24930d55db77.jpg https://uploads.disquscdn.com/images/d0582961a1475cce41162861455aad81befcc2a9d16f8a4c9683b120944ba822.png
it’s the black pixel in the mouth, it works great with other simple nut here i get this problem
I suspect the order of points is messed up somehow?
Hello, I am having this same issue!
Not sure how the order of the points could be messed up, as I don’t believe I have tampered with them…could you please elaborate?
Thanks for all your help!
EDIT: I just put bad corners points which cause my errors!
Same issue here! With most of the images, everything is right, but for some images, one or few triangles is missing. So getting the indexes of the triangle for one image and using them for the second image, might not always get a perfect mapping. Does anyone have a solution for that? That would be very appreciated! thanks! 🙂
https://uploads.disquscdn.com/images/dc15894ca707cd6838c26ecda26e2e7f37a3a6e4362a3e29d27c7b3e654de350.png Hi Satya,I running your code,and the bug is cannot resolve on the oher symbol tell me is that
“public: __cdecl cv::_InputArray::_InputArray<class cv::Point_ >(class std::vector<class cv::Point_,class std::allocator<class cv::Point_ > > const &)” ([email protected]@[email protected]@@[email protected]@@[email protected][email protected][email protected]@[email protected]@[email protected][email protected]@[email protected]@@[email protected]@@[email protected]@@Z) please help me。thank you very much
Hello, what I need to do if I want to morph a scene? Can I find correspondent points by Stereo Correspondence? And then Morphing?
Hello, nice work! I have one question… I would like to know if “Feature Matching Algorithm” is the best way to produce in-between image with morph? This example: http://vision.middlebury.edu/stereo/data/scenes2001/data/anigif/orig/sawtooth_o_a.gif (Scharstein and Szeliski) create new images based two stereo images with ground truth. I’m searching so much about and I did realize that they used Morphing. So, can “Feature Matching Algorithm” return a point (x,y), save it on (file.txt), and to use this point to morphing as your algorithm does?
Hi Satya, Is it possible to morph different size of images.. Because sometimes I got out of range error/exception when image1 is bigger than image2..
Yes. You should look at the code for face averaging shared on this blog. It takes different sized images and transforms them into one output size before performing the averaging. The same can be applied to morphing.
Thank you, I will check the code..
Hi Satya, I am developing a similar code with the same goal for a class project. Looking at your code, the second thing your morphTriangle function does is offsetting the triangle points by the top left corner of the rectangle. I feel like I am missing something. Why is this necessary? Thank you 😀
We are cropping out the triangle and in the cropped region, the coordinates change. The cropping does not involve a memory copy so it has no overhead. You can write the code slightly differently so you don’t have subtract the offset.
Okay! Thank you!
Hello Satya, i tried to subscribe, but i cant to get email message for download. How i can download this project for my education?
Hi Satya, Thank you for this post
I use calculateDelaunayTriangles() in FaceSwap to get the triangles, I get 148 triangles, not 149. the triangle points are slightly different with tri.txt , after generate the output image by 148 triangle, the effect is not good as the tri.txt
I want to know what made this different
thanks for this tutorial
Hi Satya,
How to add the shoulder points to the facial landmark points
Hi Satya,
I was working on an iOS application.I have implemented the opencv for morphing two images. I have used the vision frame work to retrieve the facial land mark points.After morphing the image look like this.What will be reason for this ?
https://uploads.disquscdn.com/images/6b218f1a741c7ea47b4f4644b27be7f6bbd57d30b5bfb0c3891502cd86966d29.png
Hi Satya, You mentioned that the same technique can be applied to any two objects. Well I wanted to ask if there is a way to find point correspondences automatically between two objects other than faces. Thank You.
Hi, your work is great I am new in this field and I need help.
for f in glob.glob(os.path.join(faces_folder_path, “*.JPG”)):
fh = open(f + “.txt”,”w”)
print(“Processing file: {}”.format(f))
img = io.imread(f)
What does f mean when I run program that gathered points to .txt file I get error unable to open f what I should do
can you please guide me how to create the video while changing the alpha values, i have set of images with different incremented alpha values but how to create that animation?
I’m testing this code on iOS, but the triangles have white borders after mask, why does this happen?
// MY CODE
//LOOP TRIANGLES
cv::Mat warpMat = getAffineTransform(tri1Cropped, tri2Cropped);
cv::Mat img2Cropped = cv::Mat::zeros(rectOut.height, rectOut.width, img1Cropped.type());
warpAffine(img1Cropped, img2Cropped, warpMat, img2Cropped.size(), cv::INTER_LINEAR, cv::BORDER_REPLICATE);
cv::Mat mask = cv::Mat::zeros(rectOut.height, rectOut.width, img2Cropped.type());
fillConvexPoly(mask, tri2CroppedInt, cv::Scalar(1, 1, 1, 1), cv::LINE_AA, 0);
multiply(img2Cropped, mask, img2Cropped);
distMat(rectOut) = distMat(rectOut) + img2Cropped;
//END LOOP
return distMat; // return final image
i tried “BORDER_REPLICATE” and all types.
Hello Satya, I tried to subscribe, but I can not get any emails for download, Could you please help me to get this code? Thanks
how do you put the facial landmark points on the face in txt file mean the code i have determined points but cant put it in txt also pixels are 600*800 but i want to take img from user at run time and then transform it how can i proceed please reply fast what is tri.txt in code ???