In this article, we will learn deep learning based OCR and how to recognize text in images using an open-source tool called Tesseract and OpenCV. The method of extracting text from images is called Optical Character Recognition (OCR) or sometimes text recognition.
Tesseract was developed as a proprietary software by Hewlett Packard Labs. In 2005, it was open-sourced by HP in collaboration with the University of Nevada, Las Vegas. Since 2006 it has been actively developed by Google and many open-source contributors.
Tesseract acquired maturity with version 3.x when it started supporting many image formats and gradually added many scripts (languages). Tesseract 3.x is based on traditional computer vision algorithms. In the past few years, Deep Learning based methods have surpassed traditional machine learning techniques by a huge margin in terms of accuracy in many areas of Computer Vision. Handwriting recognition is one of the prominent examples. So, it was just a matter of time before Tesseract too had a Deep Learning based recognition engine.
In version 4, Tesseract has implemented a Long Short Term Memory (LSTM) based recognition engine. LSTM is a kind of Recurrent Neural Network (RNN).
Version 4 of Tesseract also has the legacy OCR engine of Tesseract 3, but the LSTM engine is the default, and we use it exclusively in this post.
Tesseract library is shipped with a handy command line tool called tesseract. We can use this tool to perform OCR on images; the output is stored in a text file. If we want to integrate Tesseract in our C++ or Python code, we will use Tesseract’s API. The usage is covered in Section 2, but let us first start with installation instructions.
1. How to Install Tesseract on Ubuntu and macOS
We will install:
- Tesseract library (libtesseract)
- Command line Tesseract tool (tesseract-ocr)
- Python wrapper for tesseract (pytesseract)
Later in the tutorial, we will discuss how to install language and script files for languages other than English.
1.1. Install Tesseract 4.0 on Ubuntu 18.04
Tesseract 4 is included with Ubuntu 18.04, so we will install it directly using Ubuntu package manager.
sudo apt install tesseract-ocr
sudo apt install libtesseract-dev
sudo pip install pytesseract
1.2. Install Tesseract 4.0 on Ubuntu 14.04, 16.04, 17.04, 17.10
Due to certain dependencies, only Tesseract 3 is available from official release channels for Ubuntu versions older than 18.04.
Luckily Ubuntu PPA – alex-p/tesseract-ocr maintains Tesseract 4 for Ubuntu versions 14.04, 16.04, 17.04, 17.10. We add this PPA to our Ubuntu machine and install Tesseract. If you have a Ubuntu version other than these, you must compile Tesseract from the source.
sudo add-apt-repository ppa:alex-p/tesseract-ocr
sudo apt-get update
sudo apt install tesseract-ocr
sudo apt install libtesseract-dev
sudo pip install pytesseract
1.3. Install Tesseract 4.0 on macOS
We will use Homebrew to install Tesseract on Homebrew. By default, Homebrew installs Tesseract 3, but we can nudge it to install the latest version from the Tesseract git repo using the following command.
# If you have tesseract 3 installed, unlink first by uncommenting the line below
# brew unlink tesseract
brew install tesseract --HEAD
pip install pytesseract
1.4. Checking Tesseract Version
To check if everything went right in the previous steps, try the following on the command line
tesseract --version
And you will see the output similar to
leptonica-1.76.0
libjpeg 9c : libpng 1.6.34 : libtiff 4.0.9 : zlib 1.2.8
Found AVX2
Found AVX
Found SSE
2. Tesseract Basic Usage
As mentioned earlier, we can use the command line utility or the Tesseract API to integrate it into our C++ and Python applications. In the fundamental usage, we specify the following
1. Input filename: We use image.jpg in the examples below.
2. OCR language: The language in our basic examples is set to English (eng). On the command line and pytesseract, it is specified using the -l option.
3. OCR Engine Mode (oem): Tesseract 4 has two OCR engines — 1) Legacy Tesseract engine 2) LSTM engine. There are four modes of operation chosen using the --oem option.
  0    Legacy engine only.
  1    Neural nets LSTM engine only.
  2    Legacy + LSTM engines.
  3    Default, based on what is available.
4. Page Segmentation Mode (psm): PSM can be very useful when you have additional information about the structure of the text. We will cover some of these modes in a follow-up tutorial. In this tutorial, we will stick to psm = 3 (i.e. PSM_AUTO). Note: When the PSM is not specified, it defaults to 3 in the command line and python versions but to 6 in the C++ API. If you are not getting the same results using the command line version and the C++ API, explicitly set the PSM.
2.1. Command Line Usage
The examples below show how to perform OCR using Tesseract command line tool. The language is chosen to be English and the OCR engine mode is set to 1 ( i.e. LSTM only ).
# Output to terminal
tesseract image.jpg stdout -l eng --oem 1 --psm 3
# Output to output.txt
tesseract image.jpg output -l eng --oem 1 --psm 3
2.2. Using pytesseract
In Python, we use the pytesseract module. It is a wrapper around the command line tool with the command line options specified using the config argument. The basic usage requires us first to read the image using OpenCV and pass the image to image_to_string method of the pytesseract class along with the language (eng).
import cv2
import sys
import pytesseract

if __name__ == '__main__':

  if len(sys.argv) < 2:
    print('Usage: python ocr_simple.py image.jpg')
    sys.exit(1)

  # Read image path from command line
  imPath = sys.argv[1]

  # Uncomment the line below to provide path to tesseract manually
  # pytesseract.pytesseract.tesseract_cmd = '/usr/bin/tesseract'

  # Define config parameters.
  # '-l eng'  for using the English language
  # '--oem 1' sets the OCR Engine Mode to LSTM only.
  config = ('-l eng --oem 1 --psm 3')

  # Read image from disk
  im = cv2.imread(imPath, cv2.IMREAD_COLOR)

  # Run tesseract OCR on image
  text = pytesseract.image_to_string(im, config=config)

  # Print recognized text
  print(text)
2.3. Using the C++ API
In the C++ version, we first need to include tesseract/baseapi.h and leptonica/allheaders.h. We then create a pointer to an instance of the TessBaseAPI class. We initialize the language to English (eng) and the OCR engine to tesseract::OEM_LSTM_ONLY ( this is equivalent to the command line option --oem 1) . Finally, we use OpenCV to read in the image, and pass this image to the OCR engine using its SetImage method. The output text is read out using GetUTF8Text().
#include <string>
#include <tesseract/baseapi.h>
#include <leptonica/allheaders.h>
#include <opencv2/opencv.hpp>

using namespace std;
using namespace cv;

int main(int argc, char* argv[])
{
    string outText;
    string imPath = argv[1];

    // Create Tesseract object
    tesseract::TessBaseAPI *ocr = new tesseract::TessBaseAPI();

     // Initialize OCR engine to use English (eng) and The LSTM OCR engine.
     ocr->Init(NULL, "eng", tesseract::OEM_LSTM_ONLY);

    // Set Page segmentation mode to PSM_AUTO (3)
    ocr->SetPageSegMode(tesseract::PSM_AUTO);

    // Open input image using OpenCV
    Mat im = cv::imread(imPath, IMREAD_COLOR);

    // Set image data
    ocr->SetImage(im.data, im.cols, im.rows, 3, im.step);

    // Run Tesseract OCR on image
    outText = string(ocr->GetUTF8Text());

    // print recognized text
    cout << outText << endl;

    // Destroy used object and release memory
    ocr->End();

    return EXIT_SUCCESS;
}
You can compile the C++ code by running the following command on the terminal,
g++ -O3 -std=c++11 ocr_simple.cpp `pkg-config --cflags --libs tesseract opencv`-o ocr_simple
Now you can use it by passing the path of an image
./ocr_simple image.jpg
2.4. Language Pack Error
You may encounter an error that says
Error opening data file tessdata/eng.traineddata

Please make sure the TESSDATA_PREFIX environment
variable is set to your "tessdata" directory.

Failed loading language 'eng' Tesseract couldn't
load any languages! Could not initialize tesseract.
It means the language pack (tessdata/eng.traineddata) is not in the right path. You can solve this in two ways.
Option 1 : Make sure the file is in the expected path ( e.g. on linux the path is /usr/share/tesseract-ocr/4.00/tessdata/eng.traineddata).Option 2 : Create a directory tessdata, download the eng.traineddata and save the file to tessdata/eng.traineddata. Then you can direct Tesseract to look for the language pack in this directory using
tesseract image.jpg stdout --tessdata-dir tessdata -l eng --oem 1 --psm 3
Similarly, you will need to change line 20 of the python code to
config = ('--tessdata-dir "tessdata" -l eng --oem 1 --psm 3')
and Line 18 of the C++ code to
ocr->Init(NULL, "eng", tesseract::OEM_LSTM_ONLY);
Also Read : Deep Learning Based Text Detection Using OpenCV
3. Use Cases
Tesseract is a general purpose OCR engine, but it works best when we have clean black text on solid white background in a standard font. It also works well when the text is approximately horizontal, and the text height is at least 20 pixels. If the text has a surrounding border, it may be detected as some random text.
For example, the results would be great if you scanned a book with a high-quality scanner. But if you took a passport with a complex guilloche pattern in the background, the text recognition may not work either. In such cases, there are several tricks that we need to employ to make reading such text possible. We will discuss those advanced tricks in our next post.
Let’s look at these relatively easy examples.
3.1 Documents (book pages, letters)
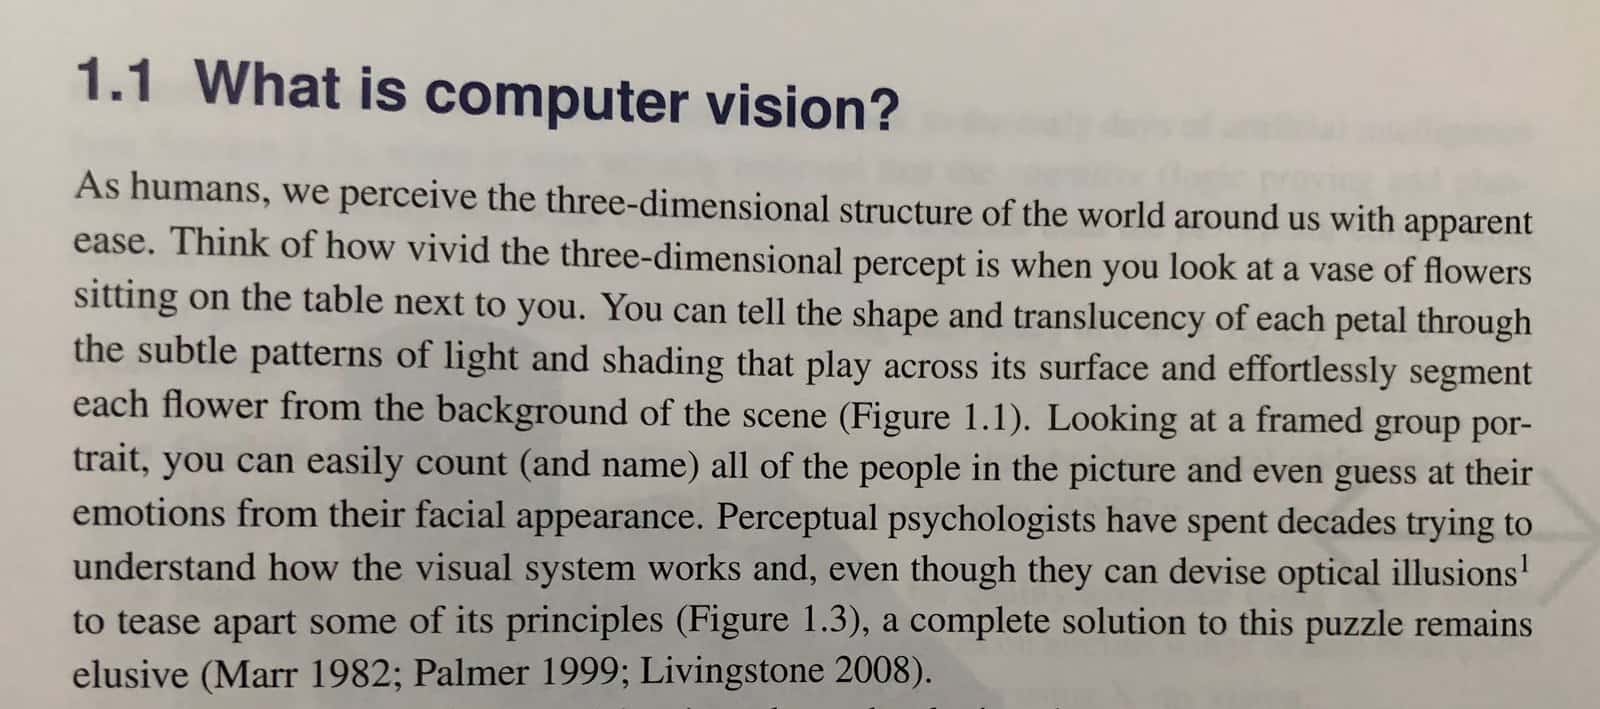
Let’s take an example of a photo of a book page.

When we process this image using tesseract, it produces the following output:
1.1 What is computer vision? As humans, we perceive the three-dimensional structure of the world around us with apparent
ease. Think of how vivid the three-dimensional percept is when you look at a vase of flowers
sitting on the table next to you. You can tell the shape and translucency of each petal through
the subtle patterns of light and Shading that play across its surface and effortlessly segment
each flower from the background of the scene (Figure 1.1). Looking at a framed group por-
trait, you can easily count (and name) all of the people in the picture and even guess at their
emotions from their facial appearance. Perceptual psychologists have spent decades trying to
understand how the visual system works and, even though they can devise optical illusions!
to tease apart some of its principles (Figure 1.3), a complete solution to this puzzle remains
elusive (Marr 1982; Palmer 1999; Livingstone 2008).
Even though there is a slight slant in the text, Tesseract does a reasonable job with very few mistakes.
3.2 Receipts
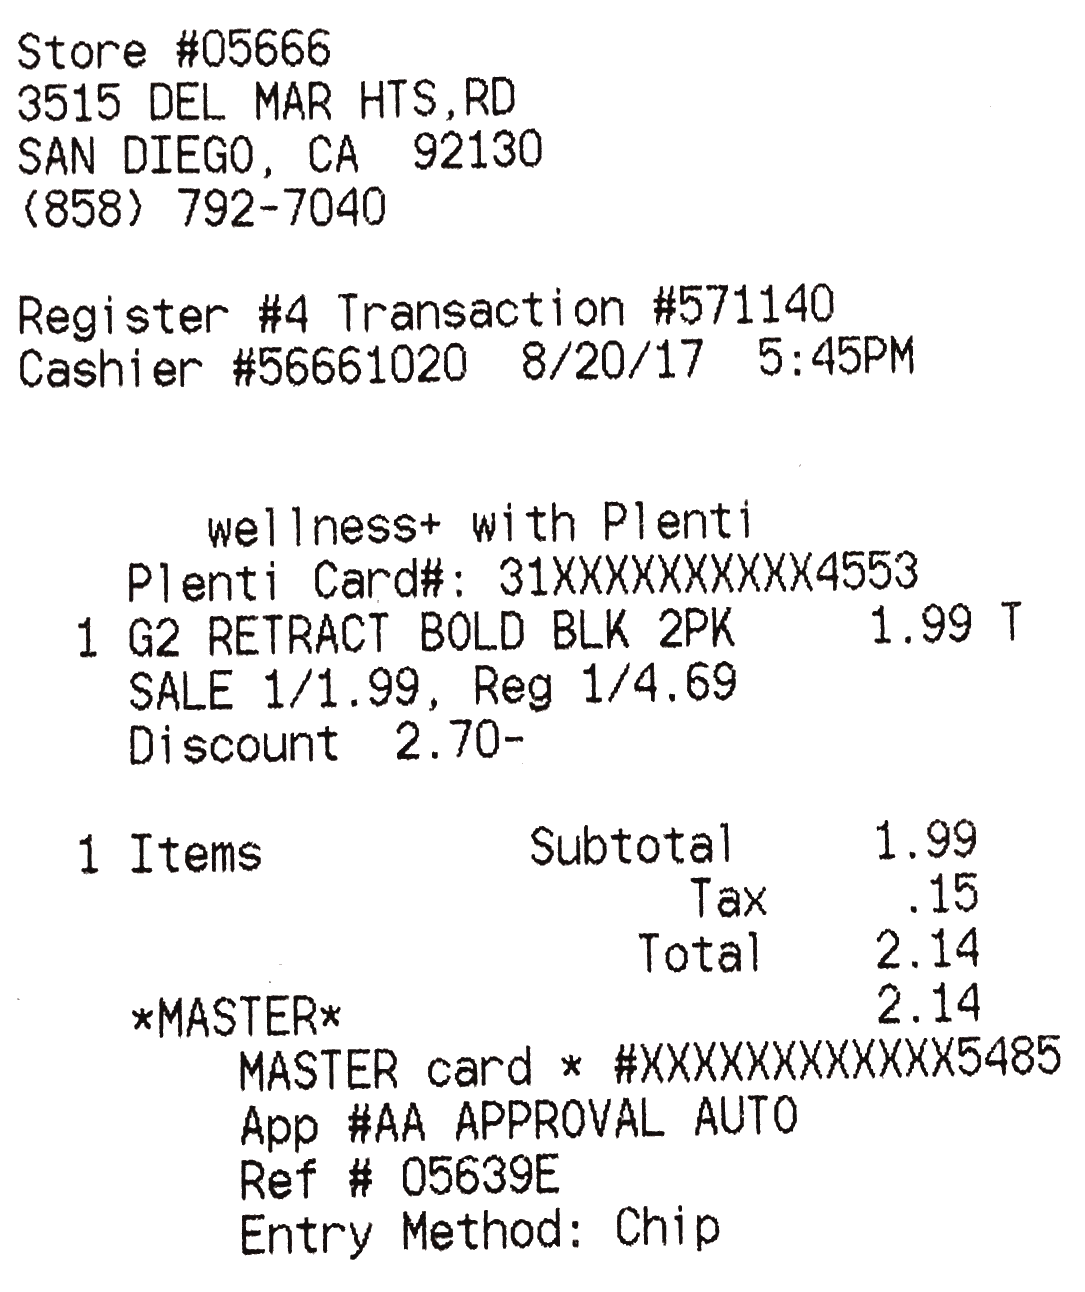
The text structure in book pages is very well defined i.e. words and sentences are equally spaced, and very less variation in font sizes which is not the case in bill receipts. A slightly difficult example is a receipt with a non-uniform text layout and multiple fonts. Let’s see how well tesseract performs on scanned receipts.

Store #056663515
DEL MAR HTS,RD
SAN DIEGO, CA 92130
(858) 792-7040Register #4 Transaction #571140
Cashier #56661020 8/20/17 5:45PMwellnesst+ with Plenti
Plenti Card#: 31XXXXXXXXXX4553
1 G2 RETRACT BOLD BLK 2PK 1.99 T
SALE 1/1.99, Reg 1/4.69
Discount 2.70-
1 Items Subtotal 1.99
Tax .15
Total 2.14
*xMASTER* 2.14
MASTER card * #XXXXXXXXXXXX548S
Apo #AA APPROVAL AUTO
Ref # 05639E
Entry Method: Chip
3.3 Street Signs
If you get lucky, you can also get this simple code to read simple street signs.

SKATEBOARDING
BICYCLE RIDING
ROLLER BLADING
SCOOTER RIDING
®
Note it mistakes the screw for a symbol.
Let’s look at a slightly more difficult example. You can see some background clutter, and the text is surrounded by a rectangle.

Tesseract does not do a very good job with dark boundaries and often assumes it to be text.
| THIS PROPERTY
} ISPROTECTEDBY ||
| VIDEO SURVEILLANCE
However, if we help Tesseract a bit by cropping out the text region, it gives perfect output.

THIS PROPERTY
IS PROTECTED BY
VIDEO SURVEILLANCE
The above example illustrates why we need text detection before text recognition. A text detection algorithm outputs a bounding box around text areas which can then be fed into a text recognition engine like Tesseract for high-quality output. We will cover this in a future post.


100K+ Learners
Join Free OpenCV Bootcamp3 Hours of Learning