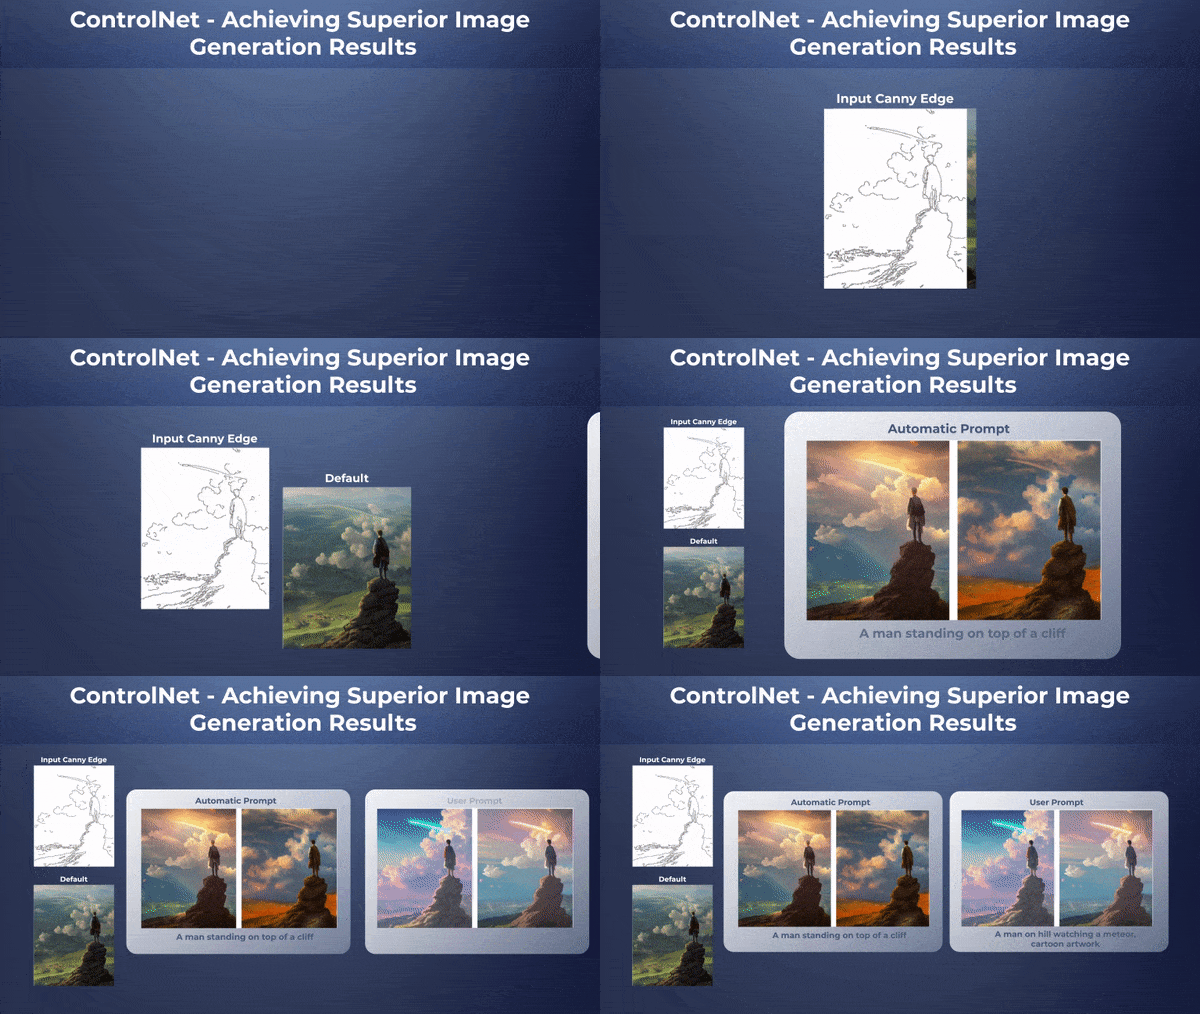
Controlnet – Stable Diffusion models and their variations are great for generating novel images. But most of the time, we do not have much control over the generated images. Img2Img lets us control the style a bit, but the pose and structure of objects may differ greatly in the final image. To mitigate this issue, we have a new Stable Diffusion based neural network for image generation, ControlNet.
ControlNet is a new way of conditioning input images and prompts for image generation. It allows us to control the final image generation through various techniques like pose, edge detection, depth maps, and many more.
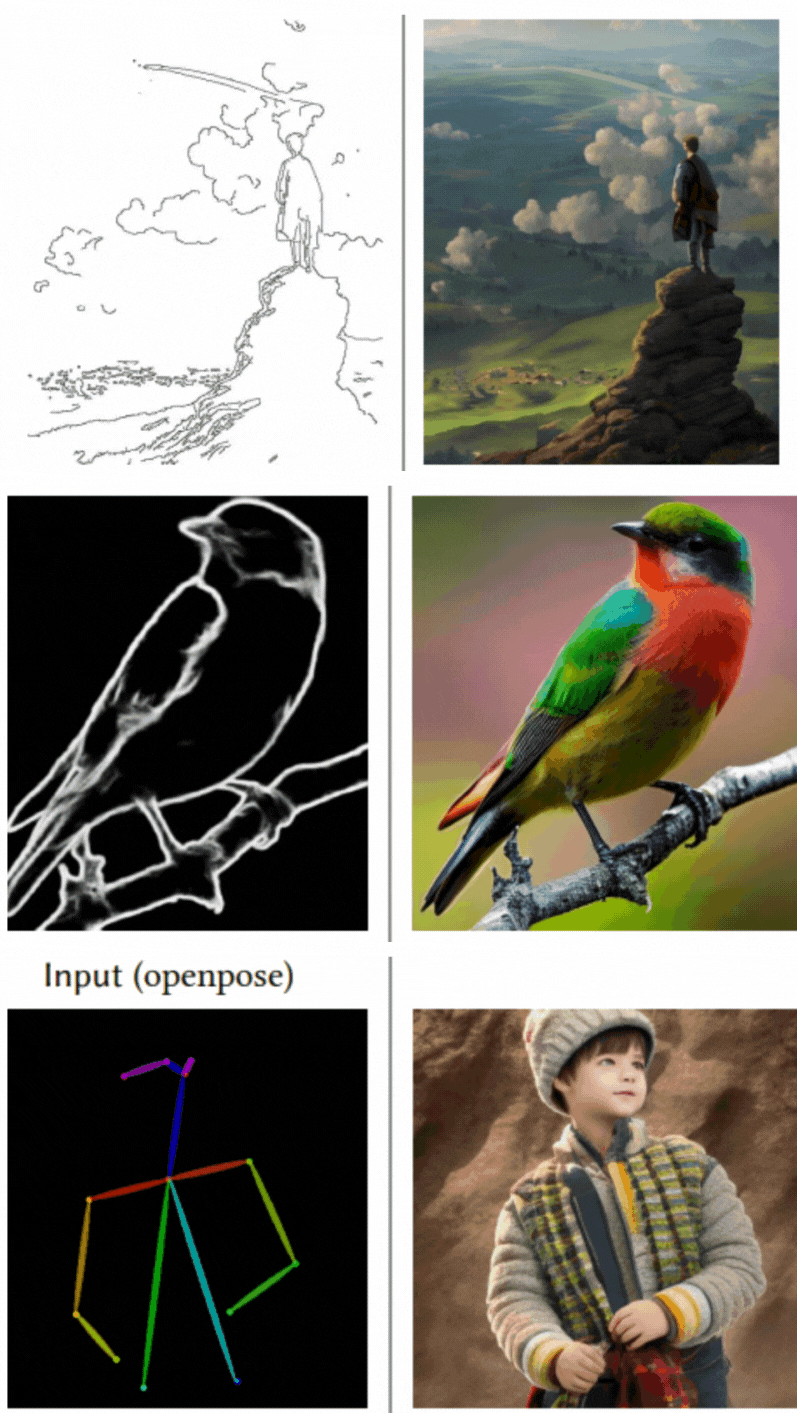
In this article, we will take a deep dive into the working of ControlNet, how it is trained, and what kinds of image-generation capabilities we can expect from it.
By the end of this article, you will be able to use ControlNet for your own experiments. In addition to this, you can easily take control of the image generation process and get the desired results faster.
- What is ControlNet?
- Why Do We Need ControlNet?
- How ControlNet Works?
- Training ControlNet
- Improved Training for ControlNet
- Different ControlNet Implementations and Experiments
- ControlNet Outputs
- Running ControlNet using Automatic1111 WebUI
- Conclusion
What is ControlNet?
ControlNet is a family of neural networks fine-tuned on Stable Diffusion that allows us to have more structural and artistic control over image generation. It can enhance the default Stable Diffusion models with task specific conditions.
It was introduced by Lvmin Zhang and Maneesh Agrawala in the paper – “Adding Conditional Control to Text-to-Image Diffusion Models.”
During training, ControlNet learns very specific features related to the tasks it is being fine-tuned on. These can range from generating images from canny images to more complicated ones, like generating images from normal maps.
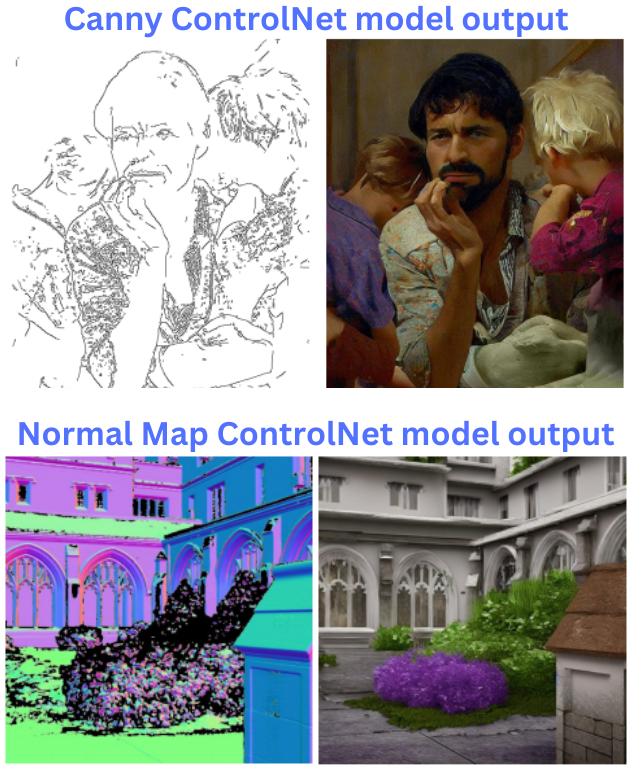
In a later section, we will discuss all available model variations. For now, let’s talk about why we need ControlNet.
Why Do We Need ControlNet?
The authors fine-tune ControlNet to generate images from prompts and specific image structures. As such, ControlNet has two conditionings. ControlNet models have been fine tuned to generate images from:
- Canny edge
- Hough line
- Scribble drawing
- HED edge
- Pose detections
- Segmentation maps
- Depth maps
- Cartoon line drawing
- Normal maps
This gives us extra control over the images that we generate. Imagine that we find an image where the pose of the person appeals to us. Now, we want to generate something different but with the same pose. It is difficult to achieve this with Vanilla Stable Diffusion and even with Img2Img. But ControlNet can help.
This is most helpful in situations where people know what shape and structure they would like but want to experiment by varying the color, the environment, or the texture of the objects.
For example, here is a sample from using the Canny Edge ControlNet model.
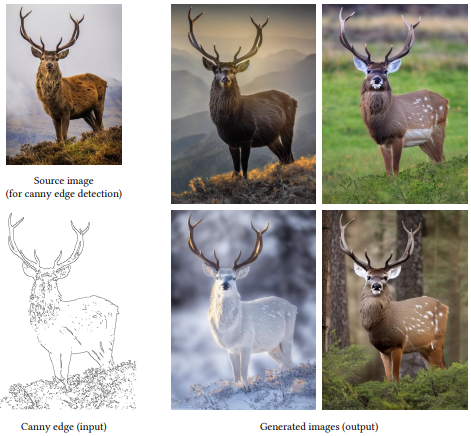
As you can see, only the pose of the deer remains the same in the final outputs while the environment, weather, and time of day keep on changing. This was not possible before with vanilla Stable Diffusion models along with the Img2Img method. However, ControlNet has made it much easier to control the artistic outcome of the image.
How ControlNet Works?
To understand why ControlNet works so well, we need to dive deeper into how it was built and trained.
We now understand that ControlNet offers control over our prompts by adding task-specific conditioning. In order for this to be effective, ControlNet was trained to control a large image diffusion model, which helped to learn task-specific conditioning from the prompt and an input image.
There are two major questions that arise here:
- Is there another diffusion model involved when we mention “control a large image diffusion model”?
- How do we achieve this (the training process)?
In brief:
- ControlNet first creates two copies of a large image diffusion model which has already been trained. One of these copies is trainable, and the other is non-trainable (weights are frozen).
- The trainable copy learns from task-specific datasets during training which gives us more control during inference.
Using the above approach, the authors trained several ControlNet models using different conditions. These include the Canny Edge model, the human pose model, and many others, which were mentioned earlier.
In the next section, we will go through the training process of ControlNet in vivid detail which will give us a better understanding of its working.
Training ControlNet
ControlNet is trained using a pre-trained Stable Diffusion model trained on billions of images.
We create two copies from the Stable Diffusion model; one is a locked copy with frozen weights and the other is a trainable copy with trainable weights.
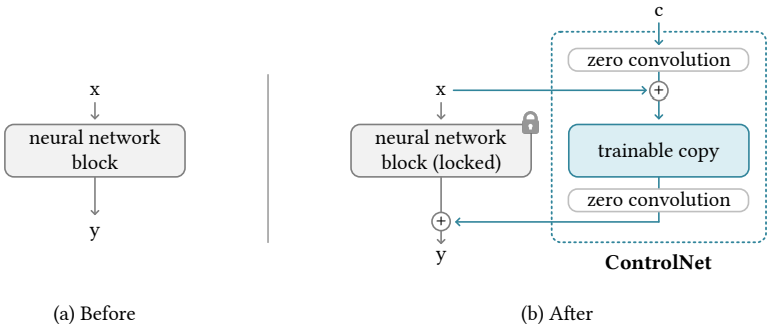
In the above figure, the Before image shows the vanilla Stable Diffusion model. And the After image shows the complete yet compact form of the entire ControlNet model.
The trainable copy of the model is trained with external conditions. The conditioning vector is c and this is what gives ControlNet the power to control the overall behavior of the neural network. Throughout the process of training the network, the parameters of the locked copy do not change.
Zero Convolution
As you may observe in the above image, we have a layer called zero convolution. This is a unique type of 1×1 convolutional layer. Initially, both the weights and biases of these layers are initialized with zeros. We can denote the zero convolution operation as Z(.;.).
The zero convolution layers help in stable training as the weights progressively grow from zeros to the optimized parameters.
Training Process
During the first training step, the parameters of the locked and trainable copies have values similar to those as if ControlNet does not exist. When applying ControlNet to neural blocks, before optimization, it does not influence any learned or deep features of its parameters. This preserves the learned features of the initial Stable Diffusion model, which has been pre-trained on billions of images.
Fine-tuning the trainable copy along with training of the zero convolution layers thus, results in a more stable training process. Also, the entire optimization process becomes as fast as fine-tuning compared to training the entire ControlNet from scratch.
The following image shows the complete ControlNet model along with the Stable Diffusion model The authors use Stable Diffusion 1.5 model.
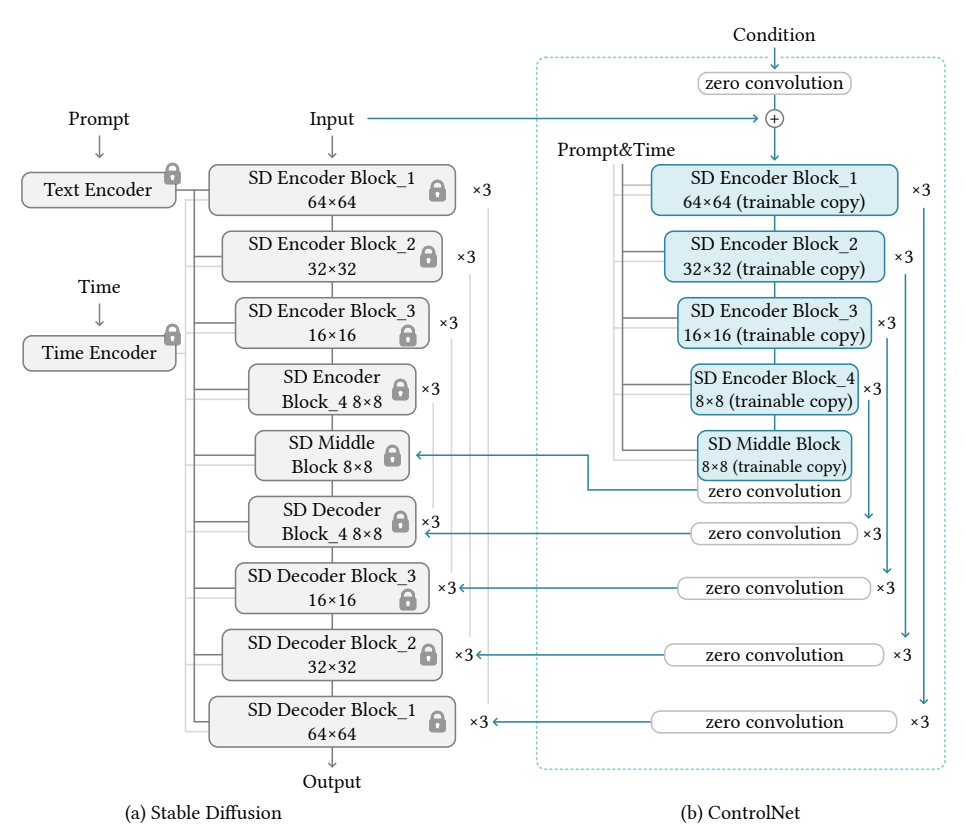
The blue blocks in the above image resemble the ControlNet model.
The Sudden Convergence Phenomenon of ControlNet
In the ControlNet paper, the authors make an important observation. During training, the model does not converge towards the desired output (in this case, the desired output image) gradually. Rather, it will keep generating somewhat random and out of context images for a few thousand iterations and then suddenly converge to the output that we want. The following image depicts this process very well.
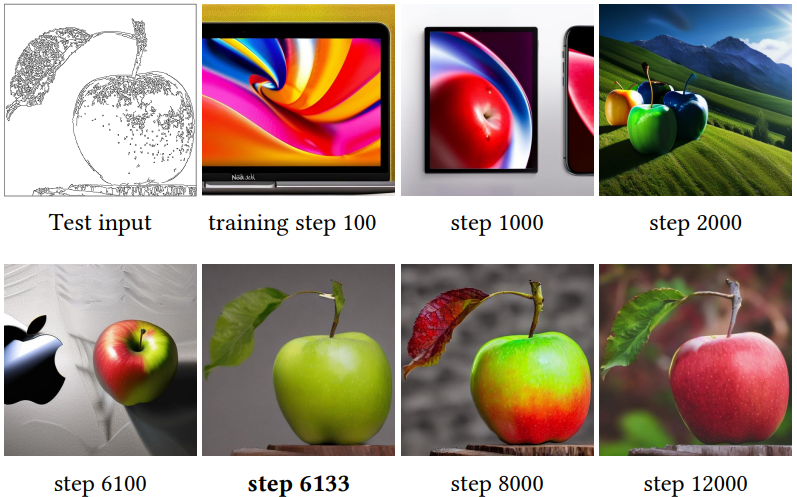
The authors call it the “sudden convergence phenomenon”. As shown in the above figure, the model fails to create an appropriate image of the apple from the Canny image for the first 6100 iterations. Then suddenly at 6133 iterations, it begins to generate the image of the apple conditioned exactly according to the Canny edge. Such convergence usually happens in less than 10000 iterations.
Improved Training for ControlNet
The authors have experimented and also shared tips for improved training. These include the following cases:
- With limited GPU memory on a laptop.
- With large-scale clusters, including powerful GPUs.
Small Scale Training
In small-scale training, we can consider two constraints:
- The amount of data available.
- The computation power.
For small scale training, even a laptop with 8 GB RTX 3070Ti is enough. However, initially, the connections between all the model layers are not the same.
During the initial training steps, partially breaking the connections between a ControlNet block and the Stable Diffusion model helps in faster convergence. Once the model starts to learn (showing an association between the condition and the outputs), we can again connect the links.
Large Scale Training
Here, large scale training refers to huge datasets, more training steps, and using GPU clusters for training.
The paper considers large-scale training using 8 NVIDIA A100 80 GB GPUs, a dataset with over a million images, and training for more than 50000 steps.
Using such a large dataset reduces the risk of overfitting. In this case, we can train the ControlNet first and then unlock the Stable Diffusion model to train it from end to end.
An approach like this works better when the model needs to learn a very specific dataset.
Different ControlNet Implementations and Experiments
There are various models of ControlNet according to the datasets and implementations. These include Canny Edge, Hough Line, Semantic Segmentation, and many more.
What’s interesting about these implementations is how we provide input and then condition the inputs, and get the outputs.
For example, in the case of using the Canny Edge ControlNet model, we do not actually give a Canny Edge image to the model.
Here are the steps on a high level:
- We will provide the model with an RGB image.
- An intermediate step will extract the Canny edges in the image.
- The final ControlNet model will give an output in a different style.
The following figure shows the steps for using the Canny ControlNet model.
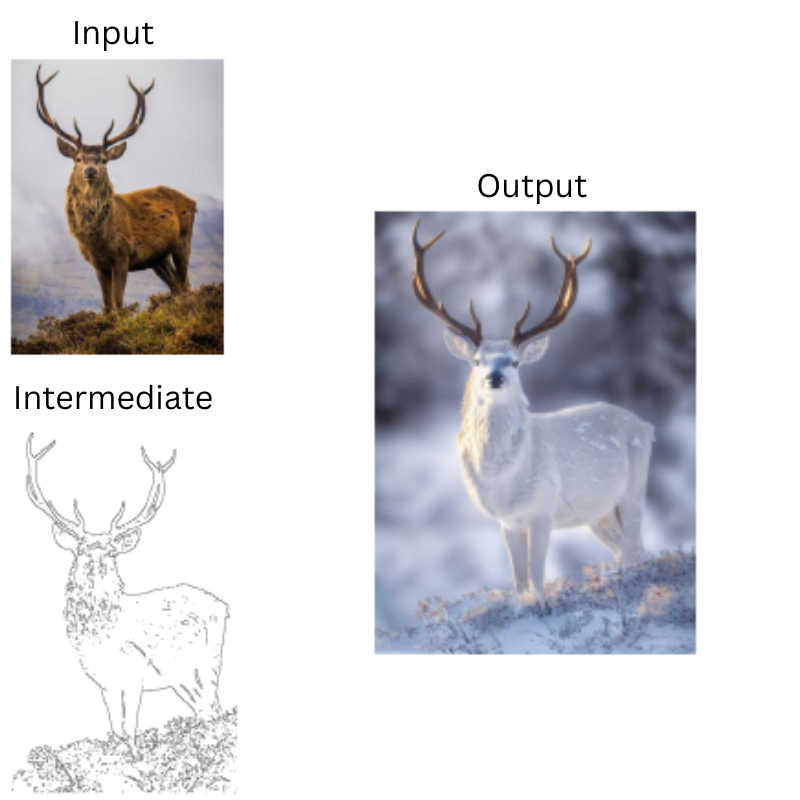
The most interesting part about all this is that we don’t actually give a prompt to get an output. ControlNet tries to guess an output from the intermediate image in case we do not provide a prompt.
For prompt experiments, ControlNet supports the following options:
- No user prompt
- A default prompt like “a professional, detailed, high-quality image”
- Automatic prompt using BLIP
- Finally, a user given prompt
To appreciate the efficacy of ControlNet, the following figure shows several examples of ControlNet generating images with different techniques without any prompts.
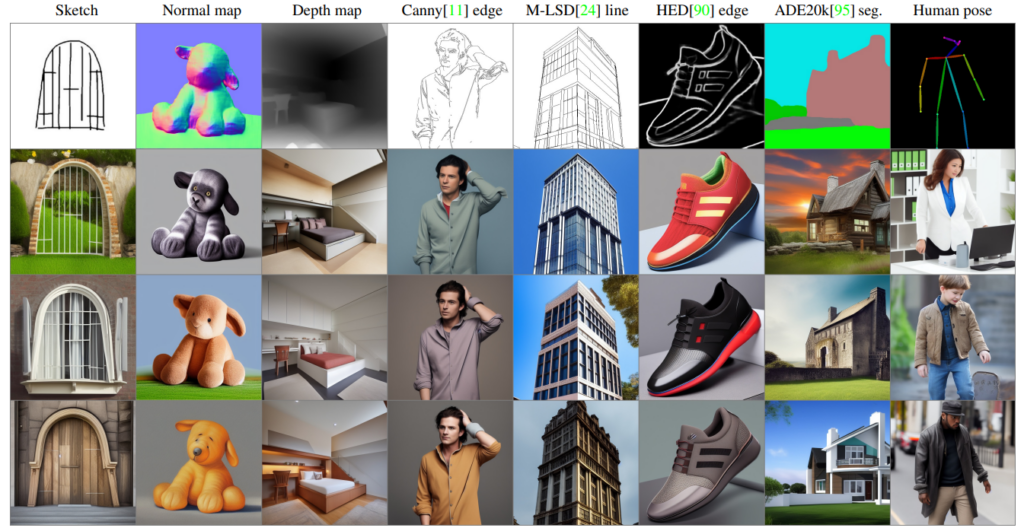
Some of the ControlNet models like the Depth ControlNet take 100s of GPU hours with millions of images to train. Fortunately, the authors have provided pretrained ControlNet models for most works that we can directly use.
Ablation Study Zero Convolution
The authors carried out several experiments with zero convolution and different initialization methods for the ControlNet architecture.
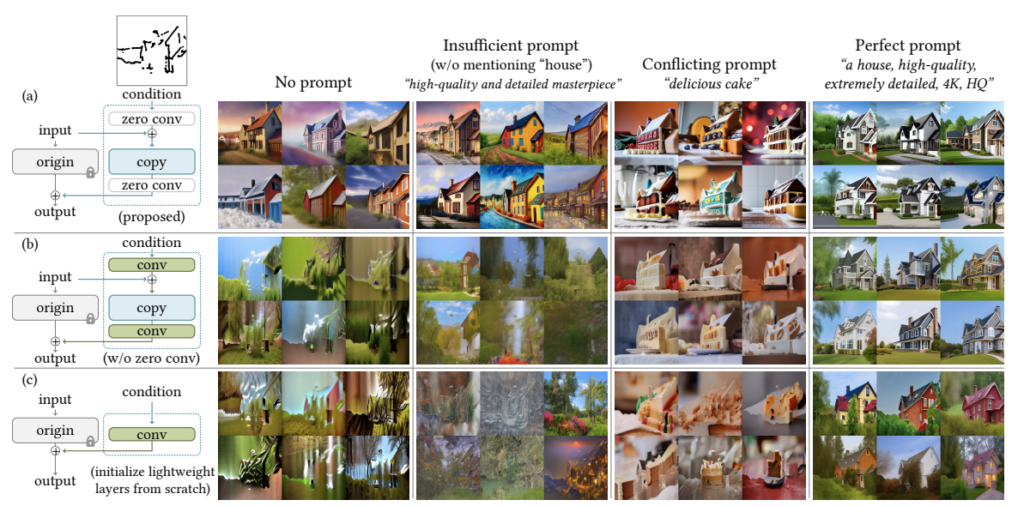
When the trainable block is initialized with lightweight layers, the model is not strong enough and fails to generate plausible images without prompts. Similarly, with a trainable copy but without zero convolution, the results are not good. However, with zero convolution, the model is able to generate images with and without prompt.
ControlNet Outputs
Here are some of the results from the ControlNet publication using different model implementations.
Canny Model

The above result shows that even without giving a prompt, the ControlNet canny model can produce excellent results.
Using the automatic prompt method improves the results to a good extent.
What’s more interesting is that once we have the Canny edge of a person, we can instruct the ControlNet model to generate an image of either a man or a woman. A similar thing occurs in the case of user prompts, where the model recreates the same image but swaps the man with a woman.
Here is another example of the Canny ControlNet model which it is able to change the background with ease.

Hough Lines

We can use ControlNet to produce impressive variations of different architectures and designs. Hough Lines tend to work best in this case.
In fact, ControlNet is able to switch the material (to wood) very convincingly compared to other Img2Img methods.
User Scribble

It is not always necessary to have perfect edge images as the intermediate steps for generating good images.
Even a simple scribble from the user is sufficient. ControlNet will fill and generate astonishingly beautiful images like the above simply from the scribbles. There is one important point to observe here, though. Providing a prompt, in this case, works much better than the default (no prompt) option.
HED Edge

HED Edge is another edge detection ControlNet model which produces great results.
Human Pose
For using Human Pose ControlNet models, we have two options.
- Human pose – Openpifpaf
- Human pose – Openpose

Openpifpaf outputs more key points for the hands and feet which is excellent for controlling hand and leg movements in the final outputs. This is evident from the above results.

When we have a rough idea of the pose of the person and want to have more artistic control over the environment in the final image, then Openpose works perfectly.
Segmentation Map
In situations where we require greater command over various objects within an image, the Segmentation Map ControlNet model proves to be the most effective.

The above figure displays various objects in the room, albeit in different settings each time. Additionally, the color scheme of the room and furniture tend to match quite well.
We can also use it on outdoor scenes for varying the time of day and surroundings. For example, take a look at the following image.

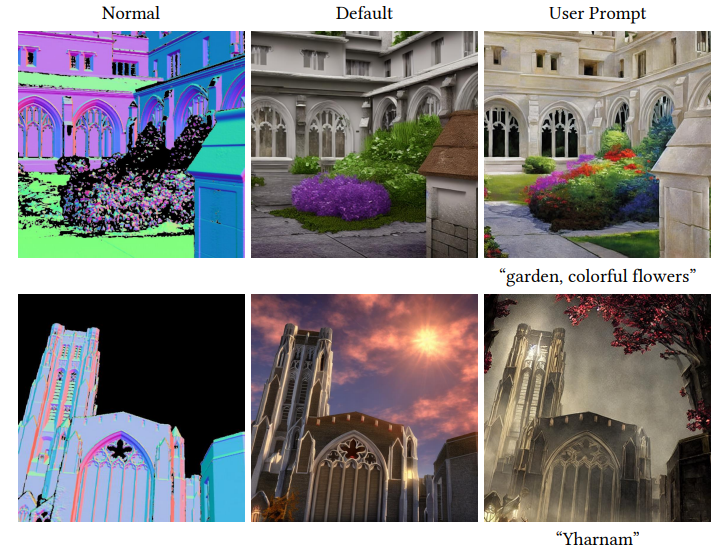
Normal Maps
In case you need to have more textures, lighting, and bumps taken into consideration, you can use the Normal Map ControlNet model.
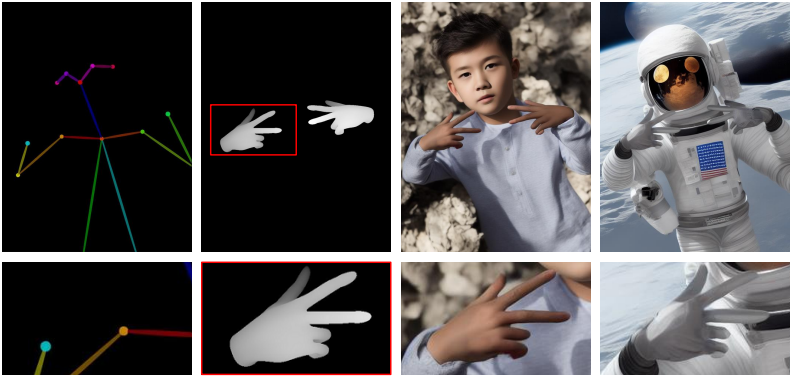
Composing Multiple ControlNets
With the latest update to the ControlNet model, now we can compose different ControlNet model conditions to generate a single output.
The following figure shows the use of depth and pose models simultaneously.
Running ControlNet using Automatic1111 WebUI
You can also run ControlNet using an extension with Automatic1111 WebUI.
After setting up the Automatic1111 WebUI, carry out the following steps to set up ControlNet.
- Go to the
extensionsdirectory inside thestable-diffusion-webuifolder. - Clone the
sd-webui-controlnetrepository inside this directory using the following command:
git clone https://github.com/Mikubill/sd-webui-controlnet.git
- Next, you need to download the ControlNet models inside
extensions/sd-webui-controlnet/models. All the models can be found in this Hugging Face Spaces Project.
After everything has been set up, opening the WebUI should the ControlNet tab.
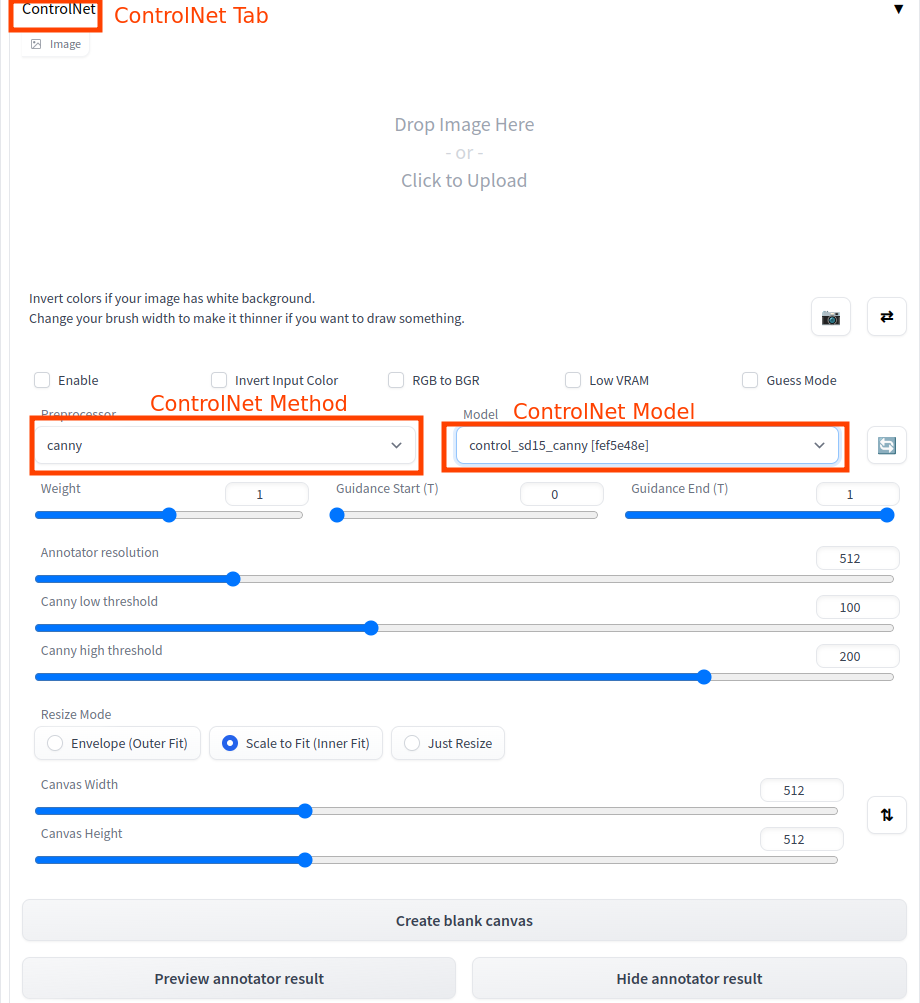
When using the ControlNet models in WebUI, make sure to use Stable Diffusion version 1.5 in the Stable Diffusion checkpoint tab. ControlNet models do not support Stable Diffusion 2.0 and further, as of writing this post.
Conclusion – Controlnet
With the evolution of image generation models, artists prefer more control over their images. While simple Img2Img2 techniques lack that ability, ControlNet offers a novel way to control the pose, texture, shapes, and textures in the generated images.
Models like ControlNet have a variety of use cases. Starting from controlling what an environment may look like at a different time of day, to changing the color of a building while keeping the architecture the same. It has a myriad of applications in digital painting, photography, and architecture.
What are you going to use ControlNet for? Let us know in the comments.




100K+ Learners
Join Free OpenCV Bootcamp3 Hours of Learning