Create a PyPi Package: This article is in continuation of our previous blog post, “Building An Automated Image Annotation Tool: PyOpenAnnotate”. In this blog post, we will go through details on PyPi packaging. Here, we will discuss how PyOpenAnnotate has been deployed as a pip installable package.
The following will be the learning objectives in this post.
- How to structure a python project for PyPi?
- What are the configurations associated with it?
- How to build and deploy a pip package?
- What is PyPi and PIP?
- What are the Requirements for PyPi Packaging?
- Package Type and Objective of the Project
- Project Layouts for PyPi Packaging
- Structuring A PIP Installable Project
- Python Build Backends
- Configuring PyOpenAnnotate for PyPi Packaging
- Build and Upload the Project
What is PyPi and PIP?
PyPi stands for Python Packaging Index. It is the official repository for python third-party software. Here, you can find pip installable packages distributed by python developers.
PIP is a package management system that installs and manages software packages from the PyPi repository.
Anyone across the globe can distribute their python packages through PyPi by following certain rules set according to PEP (Python Enhancement Proposals).
Fact: PYPi is pronounced as Pie-P-eye.
What are the Requirements for PyPi Packaging?
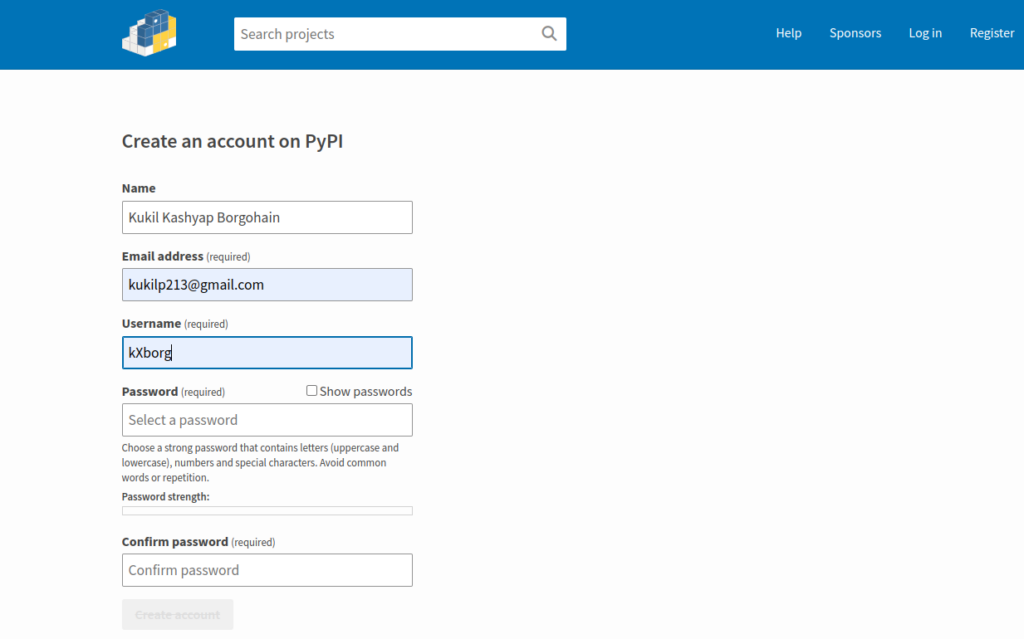
Uploading your package to PyPi requires a PyPi account. Register yourself in PyPi using the mail ID that is connected to your GitHub account.

The packages required for building a python project are,
- build
- twine
- Setuptools
Go ahead and install them using pip.
pip install build
pip install twine
pip install setuptools
Package Type and Objective of the Project – Create PyPi Package
There are two types of packages. The first one is where you can import modules from the package within a python script. Second, where you have an executable script that runs from the command line.
Example 1: Importing numpy within a script.
import numpy as np
Example 2: Using lblImg from the terminal to start the annotation program.
In our case, we are interested in the second type. We have a GUI (Graphics User Interface) based annotation tool. The objective is to run the software using commands in the command line.

Project Layouts for PyPi Packaging
The PyPi project files should be structured according to the PEP standard. Two types of layouts allowed by PyPi are src and flat layouts.
4.1 src Layout
In src-layout, the project contains a src (source) directory. All the distribution packages are placed in this directory. This layout is good for the automatic discovery of packages.
- root directory
- configuration files
- src
- package1
- modules
- subpackage1
- package1
4.2 flat Layout
Flat layout files are placed directly in the root directory. This structure is useful for REPL but can be error-prone. REPL (Read-Eval-Print-Loop) allows us to run code interactively with the project.
- root directory
- configuration files
- package1
- modules
- subpackage1
In our case, we will use src-layout, where packages are discovered automatically from the source directory.
Structuring A PIP Installable Project
In our previous blog post Building an Automated Image Annotation Tool: PyOpenAnnotate, we discussed the workflow and design aspects. Here, we will delve deeper into the organization of the code.
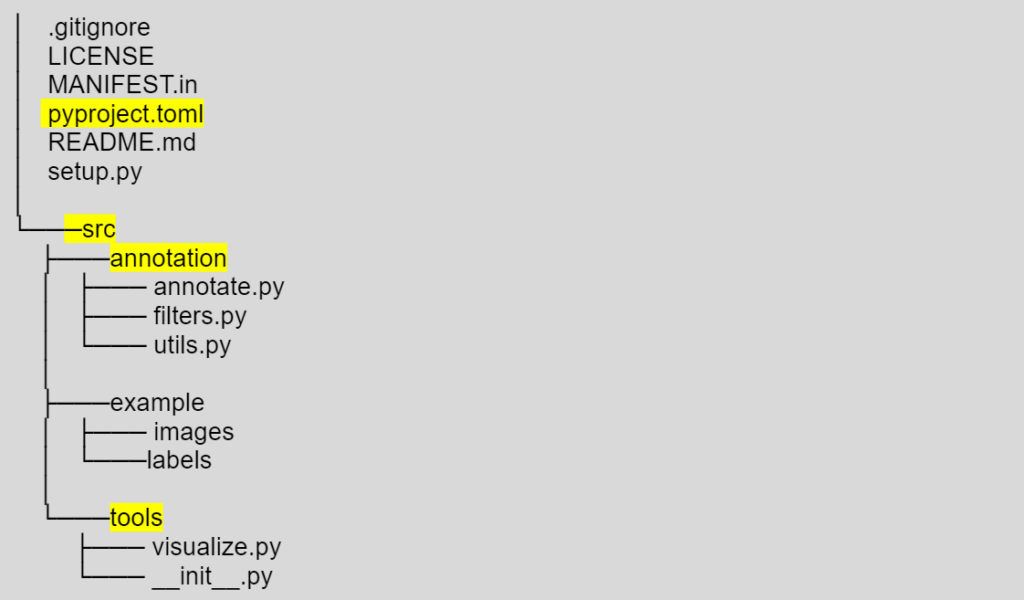
The collapsed project hierarchy of PyOpenAnnotate is as shown below.

As you can see, the src (source) directory has three packages, annotation, example, and tools. The annotation directory has three modules, annotate.py, fillters.py, and utils.py.
The tools directory has a module visualize.py. It is for visualizing annotations. We have to set annotations.py and visualize.py as executable scripts.
Apart from the source code, we have a few configuration files in the root directory. LICENSE, MANIFEST.in, pyproject.toml, and setup.py. Here, we are mainly concerned about the highlighted file, pyproject.toml and setup.py.
We will dive deeper into configurations in a bit but let’s first get a brief idea of different build backends.
Python Build Backends
| setuptools | poetry | flit | enscons | PDM | hatchling |
Python build backend provides necessary hooks for packaging a project. The hooks include build_wheel, build_sdist, build environment info, configuration settings, etc. You can check out the details in the build backend interface.
The default build backend is Setuptools which uses setup.py for configurations. Apart from Setuptools, you can also use Poetry and Flit backends. Each build system has its own advantages and disadvantages. In general, Poetry and Flit build backends are more geared toward pure python programming. On the other hand, Setuptools has better support for external dependencies.
Too many buzzwords? Don’t worry we will go through them one at a time.
Configuring PyOpenAnnotate for PyPi Packaging
PEP 518 introduces pyproject.toml as the standard configuration file. It replaces the previously used setup.py file. However, editable installs still require setup.py to be present in the root directory. In our case, the content of setup.py is as follows.
import setuptools
if __name__ == "__main__":
   setuptools.setup()
7.1 pyproject.toml
The most important particulars that pyproject.toml require are, [build-system] and [project]. Rest of the entries are optional or requirement specific. Let’s go through the details of the pyOpenAnnotate configurations.
[build-system]
requires = ["setuptools>=61.0.0", "wheel"]
build-backend = "setuptools.build_meta"
The entries are self explanatory. In the project settings, along with the basic details, we have also defined classifiers, keywords, and dependencies.
One important parameter is project versioning. You can see the version = “0.4.2” which is the version of PyOpenAnnotate at the time of writing. There is no specific rule for versioning the project. You may start with “0.0.1”. However, we cannot upload the same version twice into PyPi.
Classifiers include a predefined list of classifiers. As you can see, we are also defining required packages in the dependencies.
[project]
name = "pyOpenAnnotate"
version = "0.4.1"
description = "Single class automated annotation tool using OpenCV"
readme = "README.md"
authors = [{ name = "Kukil Kashyap Borgohain, LearnOpenCV",
email = "kukilp213@gmail.com" }]
license = { file = "LICENSE" }

classifiers = [
    "Development Status :: 3 - Alpha",
    "Operating System :: OS Independent",
    "License :: OSI Approved :: MIT License",
    "Programming Language :: Python :: 3",
]
keywords = ["Annotation",
	    "Automated Annotation",
	    "OpenCV Annotate",
	    "Image Annotation Tool",]

dependencies = [ "opencv-python", "natsort", ]

requires-python = ">=3.5"
Next is [project.urls]. Here, we will define the homepage link you can place in your GitHub repository.
Following [project.urls], we have [projects.scripts]. Here, we need to define the executable scripts. PyOpenAnnotate has been designed to annotate and display the annotations using the following commands.
- annotate
- showlbls
The execution method has to be defined as shown below. To run the annotation task, we need to call the main() function defined in the annotation module, which is in the annotation package.
Similarly, to run a visualization task, the main() function from the visualize module is called, which is in the tools package.
[project.urls]
Homepage = "https://github.com/bigvisionai/pyOpenAnnotate"

[project.scripts]
annotate = "annotation.annotate:main"
showlbls = "tools.visualize:main"
7.2 ReadMe.md
Going back to the [project] section, you will see the readme pointer below the short description. This is the long description of the project uploaded as a markdown file. Check out pyOpenAnnotate markdown file for reference. Drop a star if you like our work; it will encourage us to do better.
7.3 MENIFEST.in
This file is required in the source distribution layout. Setuptools will consider only the `src` directory while building the project. We may often want to include some extra files such as Docs, Examples etc. Here, MENIFEST.in file comes handy. We define relative (reference = root) paths of the extra files here.
Making It Pip Installable: Build and Upload the Project
With this structuring and configuration, we can install the package locally. Use the following command to install the package from the project’s root directory.
pip install .
You can also test it while also making live changes to the code. This is called an editable install. Add -e flag to perform the editable install.
pip install -e .
Once you are satisfied with the program, you can proceed to build the python package for distribution. Run the following command from the root directory to build the package.
python -m build
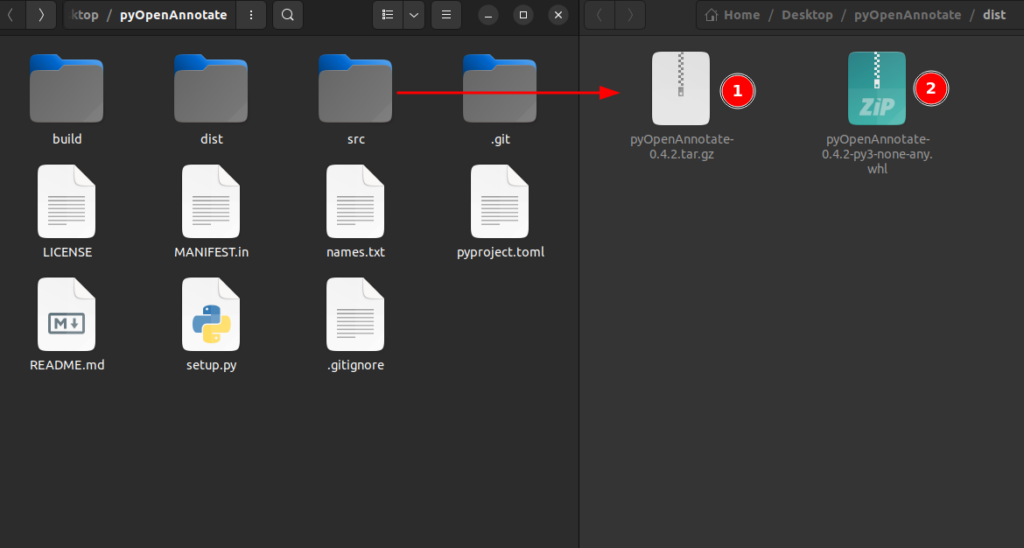
This will create a dist folder where the wheel distribution is built along with a zip file.

Finally, we need to upload these files to PyPi using Twine. Use the following command from the root directory. Enter the PyPi credentials to complete uploading the package.
twine upload dist/*
Again, note that with each upload, the project version must be changed. Uploading the same version twice is not permitted.
With editable install `pip install -e .`, rebuilding is not required while making changes to the code. However, if you change anything in the pyproject.toml file, the project should be rebuilt.
Conclusion
So that’s all about packaging pyOpenAnnotate as a pip installable package. We discussed the following points.
- Setting up a PyPi account.
- Structuring the project.
- Various build backends in PyPi packaging.
- Configuring the project.
- Building and deploying the package.
Hope you enjoyed the light read and it helped you understand the process. Go ahead and create your own pip packages for distribution. Send your queries and suggestions in the comment box below.
Must Read Articles
| Congratulations on making it this far. I appreciate your commitment to mastering Computer Vision. We have a few more articles that you might find interesting. 1. Roadmap to an Automated Image Annotation Tool Using OpenCV Python 2. Building An Automated Image Annotation Tool: PyOpenAnnotate 3. Contour Analysis using OpenCV |


