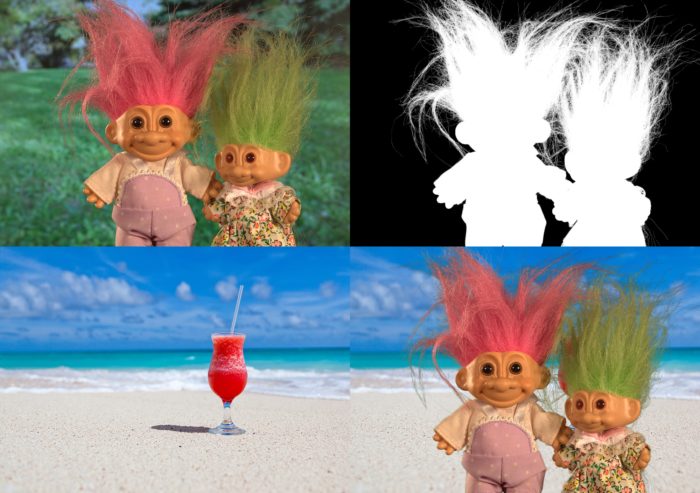
In this tutorial – Alpha blending using OpenCV, we will learn how to alpha blend two images and overlay a transparent PNG image over another image in OpenCV. We are sharing code in both C++ and Python.
What is Alpha Blending?
Alpha blending is the process of overlaying a foreground image with transparency over a background image. Transparency is often the fourth channel of an image ( e.g. in a transparent PNG), but it can also be a separate image. This transparency mask is often called the alpha mask or the alpha matte.
In the feature image at the top of this article, the foreground image is shown on the top left, the grayscale alpha mask is shown on the top right, the background image is shown on the bottom left, and the composite image obtained by blending the foreground image and the background image using an alpha mask is shown in the bottom right.
The math behind alpha blending is straightforward. At every pixel of the image, we need to combine the foreground image color (F) and the background image color (B) using the alpha mask (![]() ).
).
Note: The value of ![]() used in the equation is the pixel value in the alpha mask divided by 255. So, in the equation below,
used in the equation is the pixel value in the alpha mask divided by 255. So, in the equation below, ![]()
![]()
From the equation above, you can make the following observations.
- When
 , the output pixel color is the background.
 - When
 , the output pixel color is the foreground.
 - When
 , the output pixel color is a mix of the background and the foreground. For realistic blending, the boundary of the alpha mask usually has pixels between 0 and 1.
How to Implement Alpha Blending Using OpenCV (C++ /Python)?
Let us review an example in C++ and Python to see how to implement alpha blending using OpenCV. In a later section, we also show an efficient implementation of the C++ code.
Alpha Blending: C++
#include opencv2/opencv.hpp

using namespace cv;
using namespace std;

int main(int argc, char** argv)
{

    // Read the images
    Mat foreground = imread("puppets.png");
    Mat background = imread("ocean.png");
    Mat alpha = imread("puppets_alpha.png");

    // Convert Mat to float data type
    foreground.convertTo(foreground, CV_32FC3);
    background.convertTo(background, CV_32FC3);

    // Normalize the alpha mask to keep intensity between 0 and 1
    alpha.convertTo(alpha, CV_32FC3, 1.0/255); //

    // Storage for output image
    Mat ouImage = Mat::zeros(foreground.size(), foreground.type());

    // Multiply the foreground with the alpha matte
    multiply(alpha, foreground, foreground);

    // Multiply the background with ( 1 - alpha )
    multiply(Scalar::all(1.0)-alpha, background, background);

    // Add the masked foreground and background.
    add(foreground, background, ouImage);

    // Display image
    imshow("alpha blended image", ouImage/255);
    waitKey(0);

    return 0;
}
Alpha Blending: Python
import cv2

# Read the images
foreground = cv2.imread("puppets.png")
background = cv2.imread("ocean.png")
alpha = cv2.imread("puppets_alpha.png")

# Convert uint8 to float
foreground = foreground.astype(float)
background = background.astype(float)

# Normalize the alpha mask to keep intensity between 0 and 1
alpha = alpha.astype(float)/255

# Multiply the foreground with the alpha matte
foreground = cv2.multiply(alpha, foreground)

# Multiply the background with ( 1 - alpha )
background = cv2.multiply(1.0 - alpha, background)

# Add the masked foreground and background.
outImage = cv2.add(foreground, background)

# Display image
cv2.imshow("outImg", outImage/255)
cv2.waitKey(0)
Efficient Alpha Blending Using OpenCV (C++)
The above code is spotless but not as efficient as it can be. Note that we are making two passes over the foreground image — once while multiplying with alpha and once again while adding to the masked background. Similarly, we are making multiple passes over the background image.
For small (e.g. 250×250) and medium (e.g. 800×800) sized images, the above methods are fine, but if we are interested in efficiency, especially for large images (e.g. 2000×2000), we could manipulate the data directly to get much better performance. Below is the CPP code for the same.
void alphaBlend(Mat& foreground, Mat& background, Mat& alpha, Mat& outImage)
{
     // Find number of pixels.
     int numberOfPixels = foreground.rows * foreground.cols * foreground.channels();

     // Get floating point pointers to the data matrices
     float* fptr = reinterpret_cast<float*>(foreground.data);
     float* bptr = reinterpret_cast<float*>(background.data);
     float* aptr = reinterpret_cast<float*>(alpha.data);
     float* outImagePtr = reinterpret_cast<float*>(outImage.data);

     // Loop over all pixesl ONCE
     for(
       int i = 0;
       i < numberOfPixels;
       i++, outImagePtr++, fptr++, aptr++, bptr++
     )
     {
         *outImagePtr = (*fptr)*(*aptr) + (*bptr)*(1 - *aptr);
     }
}
Runtime Comparison
In the table below, we show the runtime comparison of the two methods on images of various sizes. The numbers are the average time taken over 3000 runs. As you can see for larger images, the efficient method that makes a single pass over the images takes less than half the time! It is not clear why the single-pass method is slightly worse for small images.
| Image Size | Using functions - multiply, add (in milliseconds) | Using direct access (in milliseconds) |
|---|---|---|
| 230 x 162 | 0.156 | 0.364 |
| 1000 x 704 | 7.856 | 7.102 |
| 2296 x 1617 | 54.014 | 39.985 |
| 4592 x 3234 | 355.502 | 161.34 |
Image Credits
1. The foreground image and its alpha matte was obtained from the alpha matting evaluation website
2. The background image is in the public domain. Here is the link.


