


AI Agents are usually API-bound workflows, designed to execute specific tasks with minimal human intervention. But when it comes to generic, open-ended automation, we’re still in the very early days. Imagine an AI agent that can handle any task, simply from a natural language instruction. Wouldn’t that be far more powerful?
In this blog post, we’ll walk through how to build a GUI-native, local VLM base AI agent from scratch using Moondream3 and Gemini.
What you’ll learn in this post:
- Explore the capabilities of the Moondream3 Preview model.
- Learn how to build an open-ended agent that understands and executes natural instructions.
- See the agent in action with real applications and use cases.
- Why Open Ended Local VLM Based AI Agent?
- System Configurations for Running Moondream3 VLM on Local
- Moondream3 Preview Vision Language Model
- AI Agent Building Pipeline
- Action Schema for Building AI Agent Code Explanation
- Main Agentic Workflow Script
- Results of VLM based AI Agent
- Conclusion: Building AI Agents using VLMs
Why Open Ended Local VLM Based AI Agent?
The objective is simple. We want an agent that can process natural language input. It should be open-ended, generic, and not rely on specific app based APIs.
Object detection models are efficient but they can perform detection only on pre-trained classes. Hence we need VLMs (Vision Language Models) having capability to understand scenes based on texts and images. Open-ended automation is possible through VLMs as they can perform zero shot grounding tasks.
1.1 Why Moondream3 VLM?
VLMs in general are heavy and resource intensive. If we reduce the parameters to make it light, they lose accuracy. On the other hand, We have been testing many light weight VLMs for detection and pointing – such as FastVLM from Apple, SmolVLM from Huggingface, InternVL, LiquidAi, Qwen2.5VL, Moondream2 and so on. None of these are accurate enough to locate objects on screen. With the recent release of Moondream3 Preview model however, we have high hopes. The author has claimed that it’s even superior to GTP 5 and Gemini.
So do you think it will be able to precisely locate GUI elements on screen? Continue reading to find out more.
System Configurations for Running Moondream3 VLM on Local
We are using Windows 11, Nvidia GTX 3060 12 GB GPU with 16GB RAM to run the pipeline. I have mentioned Windows 11 because it isn’t working with the Ubuntu instance on the same PC.
Other Ubuntu test setups used so far are as follows:
- Nvidia RTX 3080 Ti, 12 GB, 32 GB RAM
- Nvidia GTX 3060, 6GB
Moondream3 preview model with fp16 precision requires about 19GB vRAM. As you can see, my systems are way behind. However, the Windows instance is handling it well – by loading the remaining part on RAM.
Note: I am yet to find out how it is happening. If anyone knows, please comment. cc: Vikhyat Korrapati. We have tried doing the same using flag load_in_cpu flag, on 3080 Ti setup (Ubuntu); it faces tensor mismatch error.


Moondream3 Preview Vision Language Model
Moondream 3 (Preview) is a major step up from its earlier versions, shifting from small dense models into a more advanced design. It is a fine-grained sparse mixture-of-experts model with 64 experts, of which 8 are activated for each token.
It scales to 9B total parameters, but only 2B active at a time. On the vision side, it continues to rely on a SigLIP-based ViT encoder, but with improved multi-crop channel concatenation for handling high-resolution images more efficiently.
Moondream 3 also extends context length up to 32K tokens, compared to 4K tokens in v1 and v2. As per release notes, it has the potential to perform few-shot prompting and agentic workflows with tool-use. We will find out how it goes after stable release. Functionally, the preview release shows strong improvements in OCR, document understanding, structured output, visual reasoning, and grounding. Let’s go ahead and run the model on some example images as shown below.
3.1 Install and Import Dependencies for Moondream 3
The dependencies are very straightforward. We need Huggingface Hub, Transformers, Pytorch Cuda, and a few other dependent libraries shown in the code below. Additionally you can find the full set of dependencies added in the requirements.txt file in the downloaded code.
!pip install torch torchvision torchaudio accelerate huggingface_hub transformers pillow matplotlib
import torch
import time
from PIL import Image, ImageDraw
%matplotlib inline
import matplotlib.pyplot as plt
plt.rcParams['image.cmap'] = 'gray'
from transformers import AutoModelForCausalLM, AutoTokenizer
Note that it is a gated model, so you have to login to huggingface, accept license and authenticate using a generated token. Check out the blog post VLM on Jetson Nano where the authentication part is explained.
3.2 Load Moondream3 Model and Compile
We are loading the bfloat16 precision which comes by default. Quantized int8 and int4 models are not yet provided by the developers.
moondream = AutoModelForCausalLM.from_pretrained(
    "moondream/moondream3-preview",
    trust_remote_code=True,
    dtype=torch.bfloat16,
    device_map={"": "cuda"},
)
moondream.compile()
3.3 Check Parameters and Approx Model Size
Let’s verify parameters and approx size of the model in memory. We can see that it’s approximately 9B and occupies 17.26 GB.
num_params = sum(p.numel() for p in moondream.parameters())
print("Parameters:", num_params)

dtype = next(moondream.parameters()).dtype
bytes_per_param = {torch.float32: 4, torch.float16: 2, torch.bfloat16: 2}.get(dtype, 4)
size_gb = num_params * bytes_per_param / (1024**3)
print(f"Approx size in memory: {size_gb:.2f} GB")
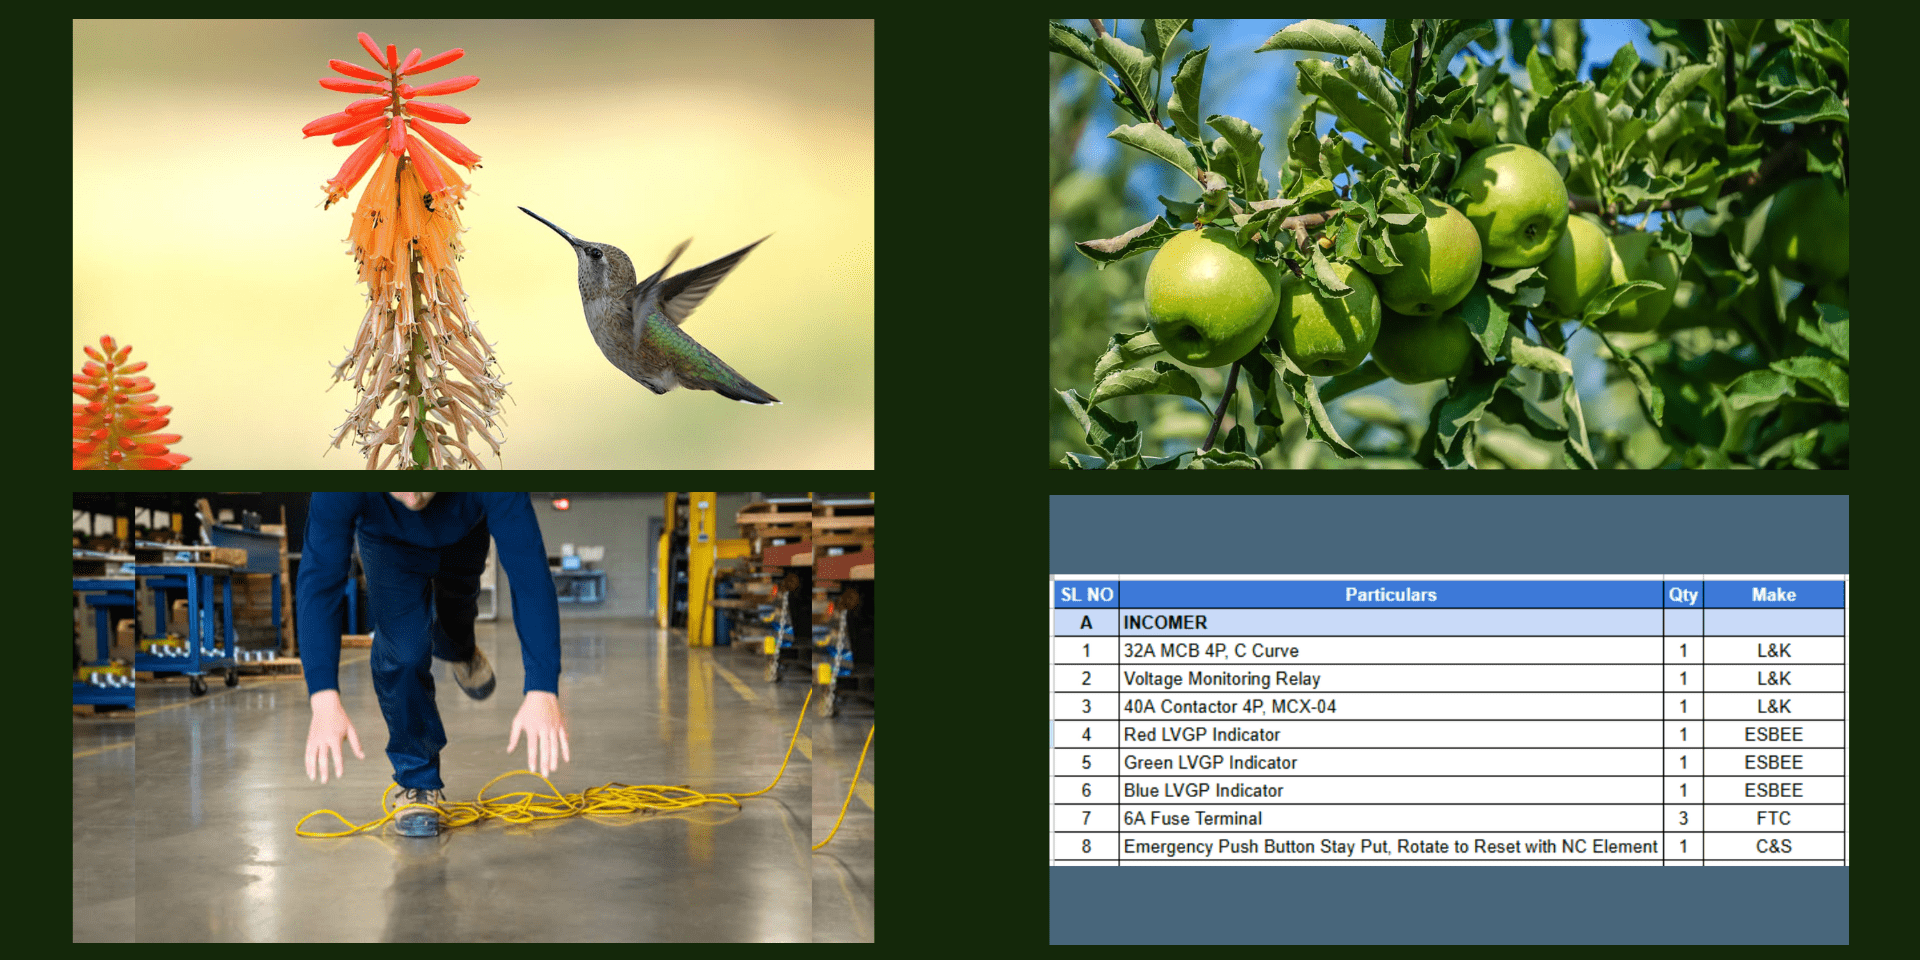
3.4 Load Images and Visualize
The model Moondream3 has more capability than just grounding. However, from the scope of the blog post, we will only focus on pointing objects. You can check out the tests on other tasks such as query, reasoning, ocr etc in the notebook enclosed within download code.
apple_img = Image.open("../../tasks/apples.png")
icon_image = Image.open("../../tasks/icons.png”)

# Display the image
plt.figure(figsize=(14,7))
plt.subplot(121); plt.imshow(apple_img); plt.title("Apples");
plt.axis('off');
plt.subplot(122); plt.imshow(icon_image); plt.title("Icons Apps"); plt.axis('off');
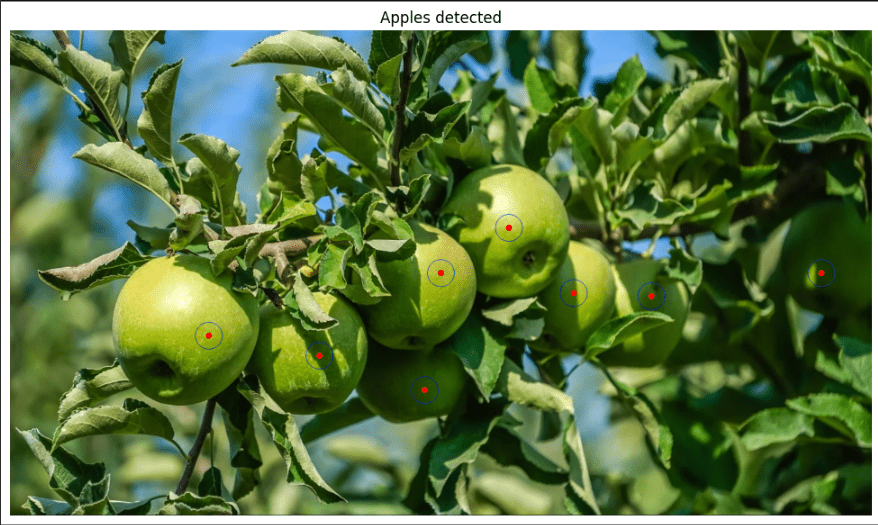
3.5 Point To Objects using Moondream3
In the following snippet of code, we are finding the coordinates of the apples in the input image. The P(x,y) points are annotated on the image for better visualization.
# Find points for specific objects
result = moondream.point(apple_img, "Apples in the image")

width = apple_img.width
height = apple_img.height
annotated_img = apple_img.copy()
draw = ImageDraw.Draw(annotated_img)
rad = 5

# Points are normalized coordinates (0-1)
for i, point in enumerate(result["points"]):
    abs_x = int(point['x'] * width)
    abs_y = int(point['y'] * height)
    print(f"Point {i+1}: x={abs_x}, y={abs_y}")
    draw.ellipse((abs_x - rad, abs_y - rad, abs_x + rad, abs_y + rad), outline="red", fill="red")
    draw.ellipse((abs_x - rad*5, abs_y - rad*5, abs_x + rad*5, abs_y + rad*5), outline="blue")

plt.figure(figsize=(14,7))
plt.imshow(annotated_img); plt.title("Apples detected");
plt.axis("off")
We will use the same call on the icon image but to find the Netflix icon this time.
# Find points for specific objects
result = moondream.point(icon_img, "Netflix icon in the image")
The pointing results are decent. We will be able to utilize this feature to locate GUI elements like buttons and icons in the application. Now, let’s go through the VLM agent building pipeline.
AI Agent Building Pipeline
Let’s assume that Moondream3 can precisely pin point elements. How do we use that information? Let’s try to understand via some example problem statements.
Input 1: “Hi, please keep an eye on the classification training notebook on the colab window, send results to Kukil Kashyap on WhatsApp once done, then shutdown the system”.
Input 2: “Hi, please search for top 3 posts on Vision Language Models on Edge devices. Prepare a summary and note down in the text editor, save the file, and send it to me on Telegram and GMail”.
In both cases, our brain is planning the events. Then we are using some applications, providing inputs through keyboard and mouse. On the basis of what appears on screen after the events, we decide what to do next. We are replicating the same process here as well.
Here, Gemini takes the lead on reasoning, planning, OCR, and code generation. On the other hand, Moondream3 shines in grounding tasks like object detection and pointing at elements. Together, they enable zero-shot action generation and execution through a set of custom action functions, bringing agentic automation directly to your desktop. We will discuss this in detail in a bit along with code. Now, let’s go ahead and take a look at Moondream3 Preview model.
Action Schema for Building AI Agent Code Explanation
The set of actions that we perform on a computer screen is more or less fixed. These are mostly mouse clicks (left click, double click, scroll, right click), key press, hold, move to (x,y), hotkey, etc. We have defined a helper script named actions.py. All the action schema is defined here.
Then we have the openAgent.py file which has the event planner and task execution pipeline. We are using Gemini 2.5 Flash for creating event instructions from user queries. It is also used for reading critical information on screen. The Moondream3 based point locator function is called whenever it needs to locate particular elements on screen.

5.1 PyAutoGUI Events for AI Agent
Let’s go through the predefined action functions that our computer performs generally. We are adding only a few necessary actions to keep the article less cluttered. The functions are pretty much self-explanatory. We are using PyAutoGUI to simulate the events.
def scroll(amount):
    pyautogui.scroll(amount)

def move_mouse(x, y, duration=0.2):
    pyautogui.moveTo(x, y, duration=duration)

def click(x=None, y=None, button="left"):
    pyautogui.click(x, y, button=button)

def double_click(x=None, y=None):
    pyautogui.doubleClick(x, y)

def right_click(x=None, y=None):
    pyautogui.rightClick(x, y)

def drag_and_drop(x1, y1, x2, y2, duration=0.5):
    pyautogui.moveTo(x1, y1)
    pyautogui.dragTo(x2, y2, duration=duration)

def press_key(key):
    pyautogui.press(key)

def hotkey(*keys):
    pyautogui.hotkey(*keys)

def type_text(text):
    pyautogui.typewrite(text, interval=0.05)

def clear_field():
    pyautogui.hotkey("ctrl", "a")
    pyautogui.press("backspace")
5.2 Process Handling and App Loading Events
def is_process_running(name):
    return any(name.lower() in p.name().lower() for p in psutil.process_iter())

def kill_process(name):
    for p in psutil.process_iter():
        if name.lower() in p.name().lower():
            p.terminate()
            return True
    return False

def sleep(seconds=None):
    if seconds is not None:
        time.sleep(seconds)
Next we have the launch_app() function. There are a few pre-defined app paths (we added them for testing). It will load the applications using the os.startfile() method. However, if it fails loading any applications, we have defined fallback methods to search and open the app from the screen. It is designed to handle app load processes on Mac, Linux, and Ubuntu.
Disclaimer: Not yet tested on Mac and Ubuntu. Note that delays have been added to allow applications to load.
predefined_paths = {
    "whatsapp": "whatsapp://",
    "chrome": "C:/Program Files/Google/Chrome/Application/chrome.exe",
    "edge": "C:/Program Files (x86)/Microsoft/Edge/Application/msedge.exe",
    "sublime text": "C:/Program Files/Sublime Text 3/sublime_text.exe"
}

def launch_app(path):
    resolved_path = predefined_paths.get(path.lower(), path)
    system = platform.system()

    try:
        if system == "Windows":
            os.startfile(resolved_path)
        elif system == "Darwin":  # macOS
            os.system(f"open -a '{resolved_path}'")
        elif system == "Linux":
            os.system(f"xdg-open '{resolved_path}'")
        else:
            raise Exception("Unsupported OS")

        print(f"✅ Launched {path} via predefined path")
        time.sleep(2)
        return True

    except Exception as e:
        print(f"❌ Could not launch {path} via predefined path: {e}")
        print(f"⚡ Attempting search fallback...")

        try:
            if system == "Windows":
                pyautogui.press("win")
                time.sleep(1)
                pyautogui.typewrite(path, interval=0.05)
                time.sleep(0.5)
                pyautogui.press("enter")

            elif system == "Darwin":  # macOS Spotlight
                pyautogui.hotkey("command", "space")
                time.sleep(1)
                pyautogui.typewrite(path, interval=0.05)
                time.sleep(0.5)
                pyautogui.press("enter")

            elif system == "Linux":  # Ubuntu GNOME/KDE (Super key opens Activities)
                pyautogui.press("win")
                time.sleep(1)
                pyautogui.typewrite(path, interval=0.05)
                time.sleep(0.5)
                pyautogui.press("enter")

            time.sleep(3)
            return True

        except Exception as ex:
            print(f"❌ Fallback failed for {path}: {ex}")
            return False
Main Agentic Workflow Script
This is the primary event generator and action handler file. As discussed before, the script contains the following functions.
- get_action_plan()
- execute_actions()
- read_text_from_image_gemini()
- locate_object_moondream()
Note: We will go through the major functions only as it is not possible to cover all aspects of a full blown agent within the scope of a single blog post. However, the downloaded file will contain full code.
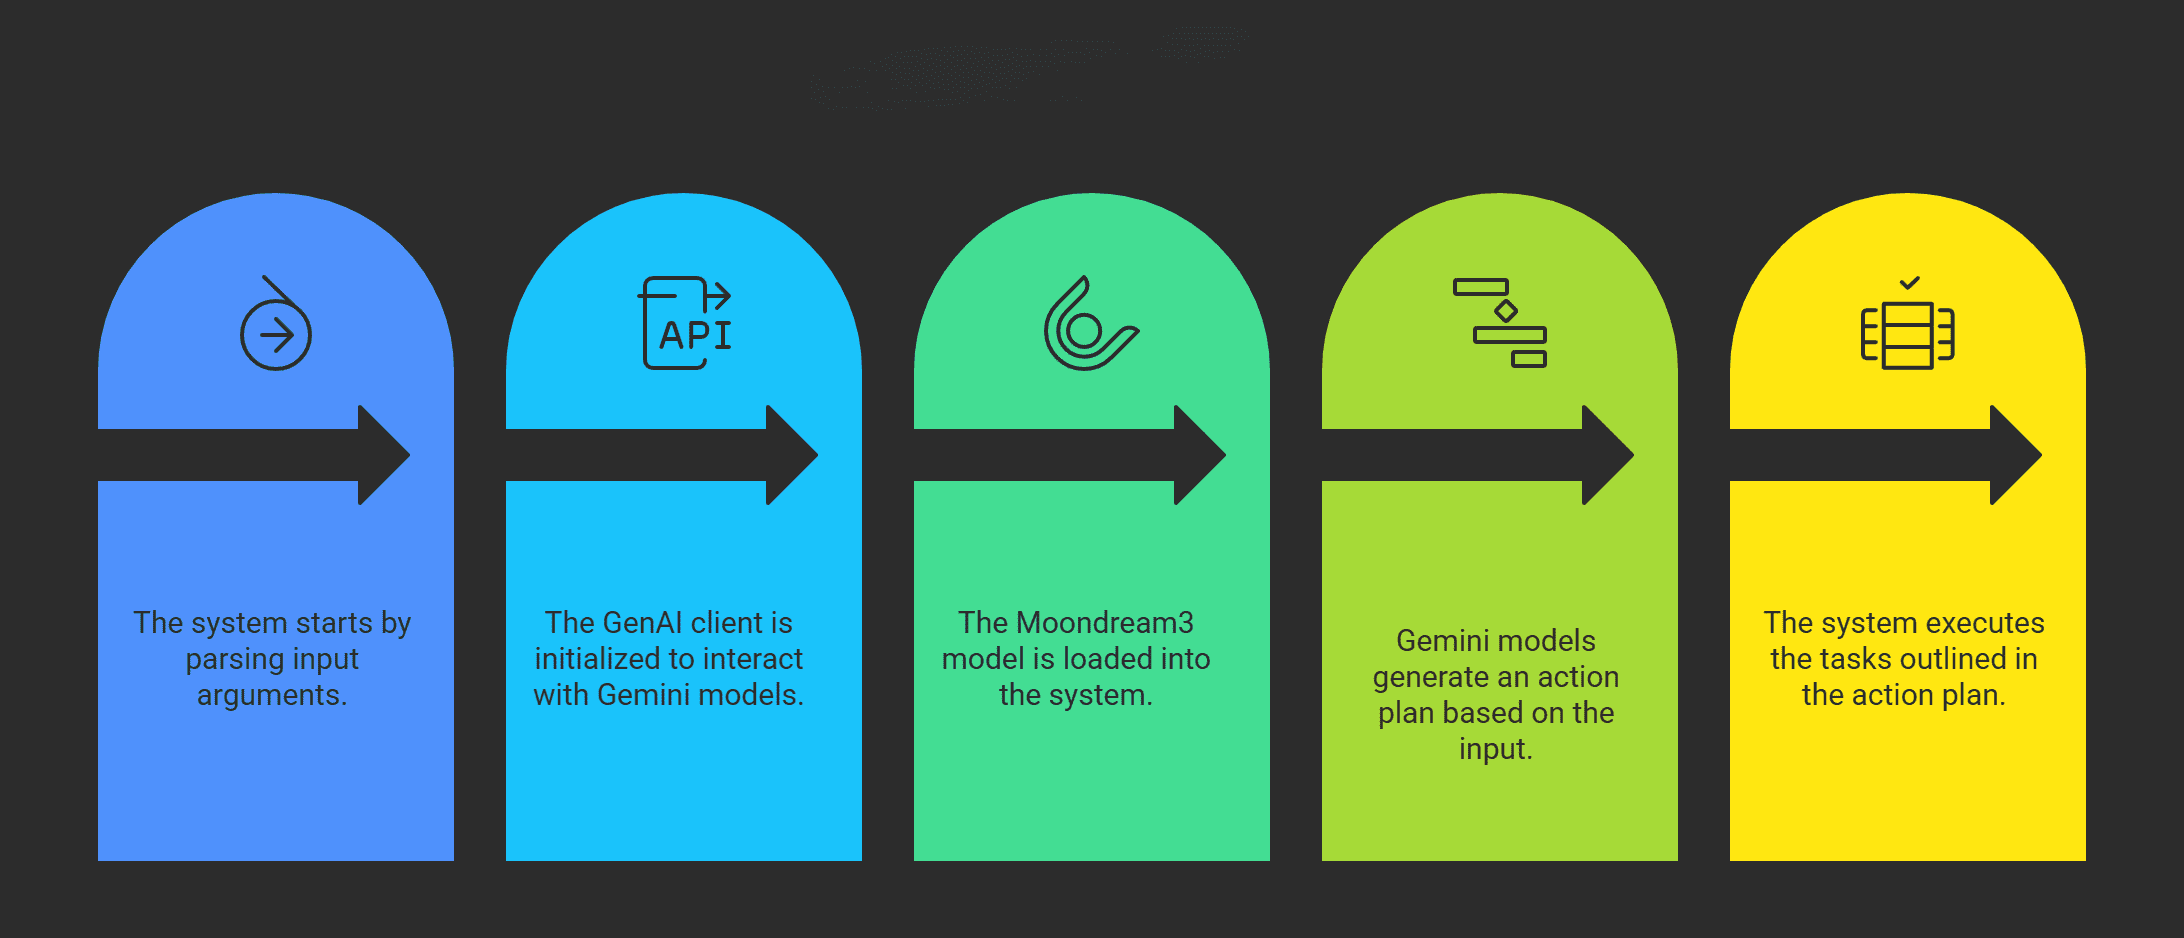
Let’s start with the main function to understand the workflow better. The prompt input is being done through the argument parser. Here, we are initialising the genai client for calling Gemini models, then loading Moondream3. We can see that the action plan is generated through Gemini, followed by executing tasks.
6.1 Main Function
if __name__ == "__main__":
    time.sleep(0.5)

    parser = argparse.ArgumentParser(description="Agentic Action Plan Executor")
    parser.add_argument(
        "--task",
        type=str,
        required=True,
        help="Task prompt in natural language, e.g., 'Summarize screen content and send report via WhatsApp'"
    )
    args = parser.parse_args()
    task_to_do = args.task

    # Setup Genai client for using Google Gemini Models
    client = genai.Client()

    # Load Moondream model
    model_name = "moondream/moondream3-preview"
    moondream = AutoModelForCausalLM.from_pretrained(
        model_name,
        trust_remote_code=True,
        dtype=torch.bfloat16,
        device_map={"": "cuda"}
    )
    moondream.compile()

    # Get action plan from Gemini
    print("📝 Generating action plan ...")
    action_pln = get_action_plan(client, task_to_do)
    print("📋 Action plan:", action_pln)

    # 5. Execute actions
    execute_actions(action_pln)
6.2 Get Action Plan Function for AI Agent Event Planner
This is the brain or master mind of the AI Agent. It orchestrates an action plan which contains events from the actions.py schema. It returns the methods in a json string which is parsed later in the execute_actions() method. For a natural input “Summarize screen content and send via WhatsApp”, the json plan looks like the output below.
[
  {"action": "read_text_from_image_gemini",
   "args": {"query": "Summarize the screen"}},
  {"action": "launch_app", "args": {"path": "whatsapp"}},
  {"action": "type_text", "args": {"text": "<OUTPUT_FROM_read_text_from_image_gemini>"}},
  {"action": "press_key", "args": {"key": "enter"}}
]
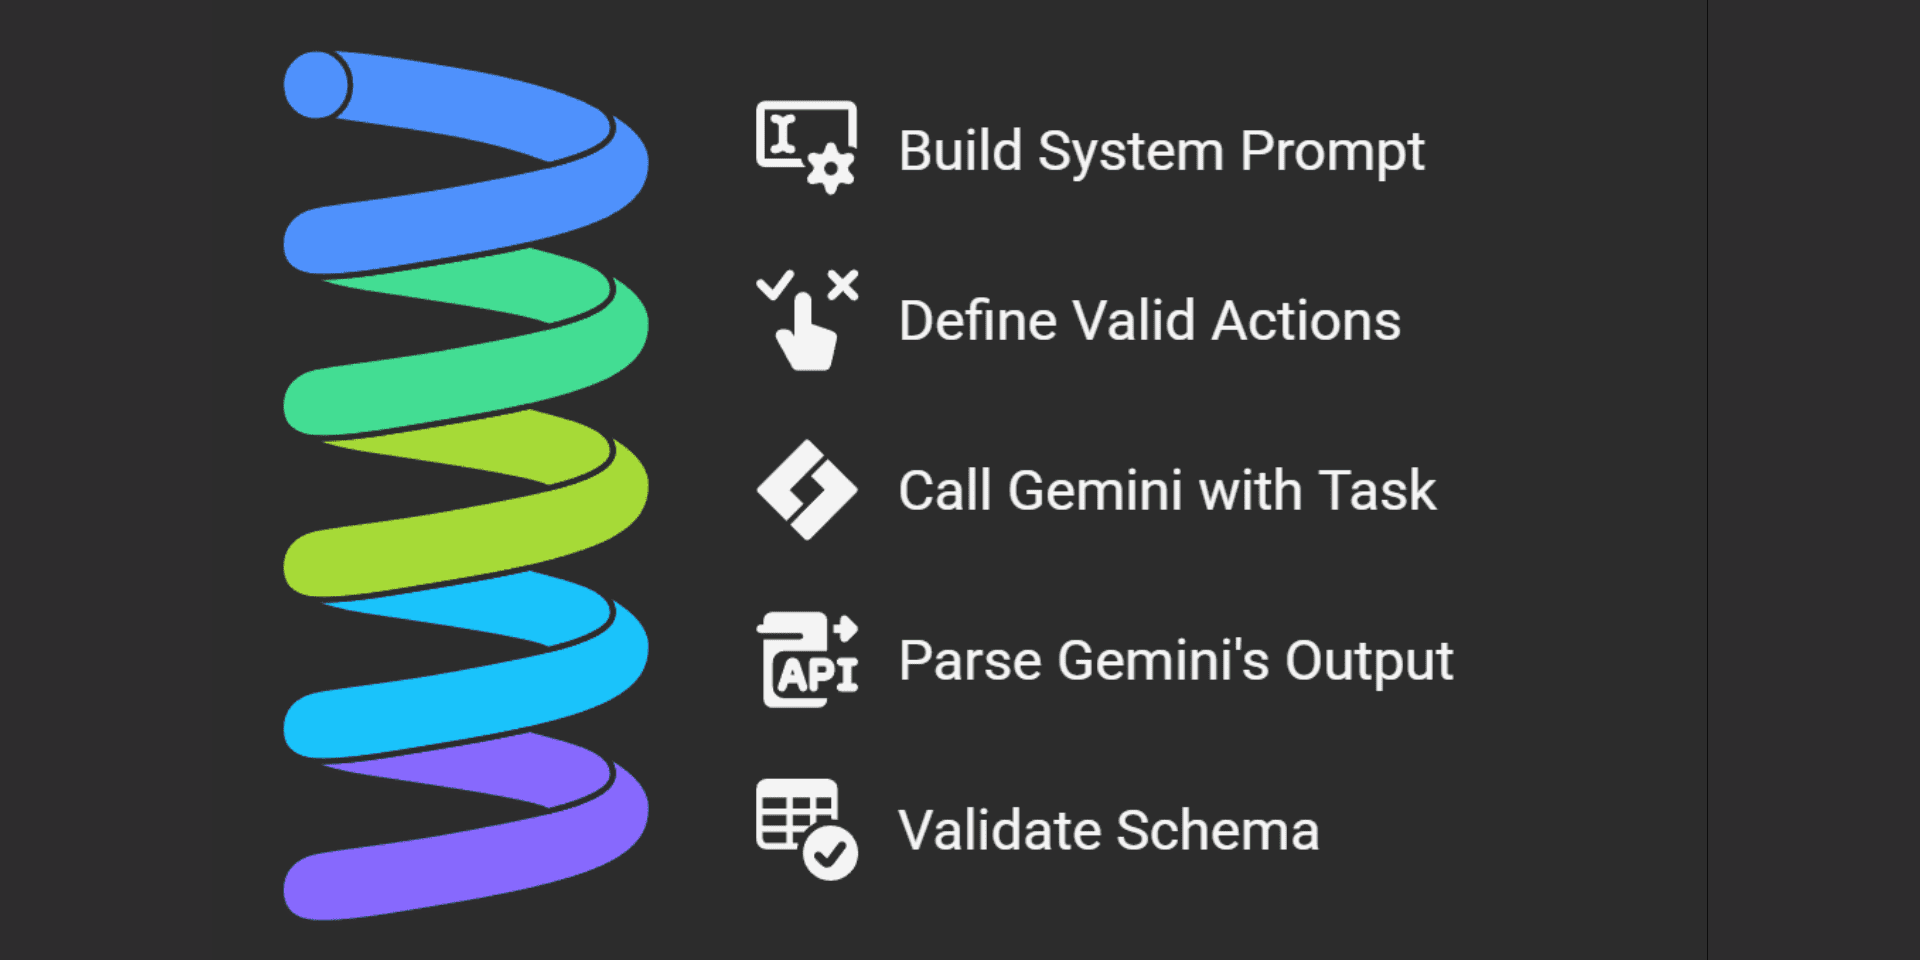
The effectiveness of the action plan depends on how well the system prompt has been designed. This is a zero shot task. As you can see below, we have created the prompt in natural language, mentioning all contingencies, and general steps to be followed. Gemini 2.5 Flash takes care of the rest.
def get_action_plan(client, prompt):
    # Here goes the system prompt
    system_promt = <>
    print('Generating Action Plan. Please wait ...')

    # Call Gemini
    response = client.models.generate_content(
        model="gemini-2.5-flash",
        contents=[{"role": "user", "parts": [{"text": system_prompt}]}],
    )
    print('✅ Done.')

    # Access text properly
    try:
        raw_text = response.candidates[0].content.parts[0].text.strip()
        raw_text = re.sub(r"^```(?:json)?|```$", "", raw_text, flags=re.MULTILINE).strip()
        action_plan = json.loads(raw_text)

        # Validate schema
        for i, step in enumerate(action_plan):
            if "action" not in step or "args" not in step:
                print(f"⚠️ Step {i} missing required keys:", step)

        return action_plan

    except Exception as e:
        print("❌ Error generating action plan:", e)
        print("Response text:", raw_text[:500])
        return []
6.3 Designing System Prompt to Retrieve Agentic Action Plan from Gemini
system_prompt = f"""
    You are a gui-native agent planner. Convert the user's instruction into a JSON action plan.
    Use only the following action schema:
      - read_text_from_image_gemini(client, query)
      - locate_object_moondream(target_obj, model)
      - click(x=None, y=None, button="left")
      - double_click(x=None, y=None)
      - right_click(x=None, y=None)
      - move_mouse(x, y, duration=0.2)
      - press_key(key)
      - hotkey(*keys)
      - type_text(text)
      - clear_field()
      - launch_app(path)
      - sleep(seconds=None)
      - scroll(amount)

    Pre-defined paths (args) for launch_app action, windows specific:
      - "whatsapp" → will resolve to whatsapp://
      - "chrome"   → C:/Program Files/Google/Chrome/Application/chrome.exe
      - "edge"     → C:/Program Files (x86)/Microsoft/Edge/Application/msedge.exe
      - "sublime text" → "C:/Program Files/Sublime Text 3/sublime_text.exe"

    Apps other than predefined paths are to be searched onscreen or searched from start menu.
    Sleep time is in seconds. Always start by capturing screen, analysing what's on it, then move on to the next actions.
    Add 2s delay after opening the application. For WhatsApp or Chrome or Telegram or other chat apps, once the app is open, start typing the user name directly. Press down arrow, enter, then type message.

    IMPORTANT: Any information retrieved from 'read_text_from_image_gemini' should be referenced in subsequent actions using the placeholder <OUTPUT_FROM_read_text_from_image_gemini>. Do NOT write fixed summaries. This placeholder will be replaced at runtime with the actual output.

    Each action must be a JSON object with keys:
      - "action": action name
      - "args": dictionary of arguments for that action

    Only output JSON array of actions. Do not include explanations or extra text.

    Instruction:
    {prompt}
    """
6.4 The Execute Actions Method in AI Agent
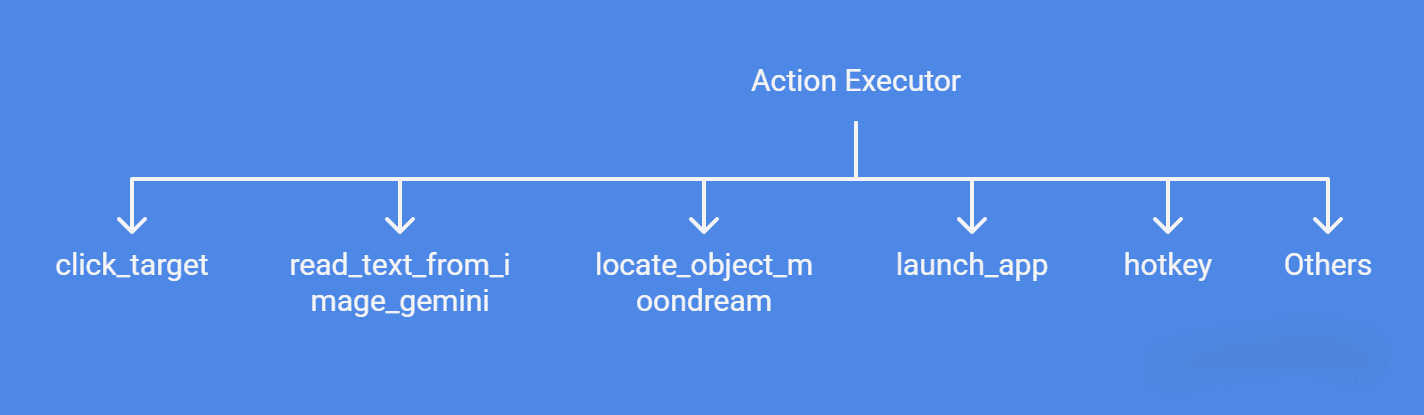
As the name suggests, this is the executor which iterates through an action plan and actually moves mouse, types, clicks etc. It also saves outputs so future steps can use the result. It dispatches each action to the right function as follows.
- click_target: uses Moondream to find object coordinates and clicks it.
- read_text_from_image_gemini: screenshot OCR with Gemini.
- locate_object_moondream: object detection.
- launch_app: open predefined apps.
- hotkey: simulate key combinations.
Others: mapped to pyautogui or actions.py.
6.5 Function to Read Text from Screen Using Gemini 2.5 Flash
This is the vision + reasoning function of the AI agent. Moondream3 is not good enough for reading small texts. Neither it can generate answers, or perform reasoning as good as Gemini. Before using this method, set up the Gemini API key in Google AI studio. It provides free quotas. The tasks performed by the function are as follows.
- Captures the screen using PIL.
- Converts screenshot into bytes.
- Calls Gemini 2.5 Flash with the query + screenshot.
- Returns extracted/processed text.
def read_text_from_image_gemini(client, query):
    screen_capture = ImageGrab.grab()
    # Convert to bytes
    img_bytes_io = io.BytesIO()
    screen_capture.save(img_bytes_io, format="PNG")
    img_bytes = img_bytes_io.getvalue()

    # Progress bar in a separate thread
    stop_flag = {"running": True}
    def progress_task():
        with tqdm(total=0, bar_format="⏳ Waiting for Gemini 2.5 Flash...") as pbar:
            while stop_flag["running"]:
                time.sleep(0.1)

    thread = threading.Thread(target=progress_task, daemon=True)
    thread.start()

    # Send request
    try:
        response = client.models.generate_content(
            model="gemini-2.5-flash",
            contents=[
                {
                    "role": "user",
                    "parts": [
                        {"text": query},
                        {"inline_data": {"mime_type": "image/png", "data": img_bytes}},
                    ],
                }
            ],
        )
    finally:
        stop_flag["running"] = False
        thread.join()

    return response.text
6.6 Function to Locate Elements On Screen Using Moondream3
This is the agent’s object grounding ability – say find “the WhatsApp icon” or “Send button.” The function captures the current screen using PIL. Then asks Moondream3 to locate the described object. The normalized coordinates are converted to absolute screen pixel values. These coordinates are passed into the click function by the planner.
def locate_object_moondream(target_obj, model):
    """
    Locate an object with Moondream and return the first detected point.
    """
    # Capture current screen
    screen_capture = ImageGrab.grab()  # PIL image
    height, width = screen_capture.height, screen_capture.width
    screen_capture.save("screen.png")

    # Ask Moondream to locate the target object
    response = model.point(screen_capture, target_obj)
    print("Model response:", response)

    try:
        points = response.get("points", [])
        if not points:
            raise ValueError("No points returned")

        # Pick the first point
        point = points[0]

        abs_x = int(point['x'] * width)
        abs_y = int(point['y'] * height)

        return {"x": abs_x, "y": abs_y}

    except Exception as e:
        print("Could not parse response. Got:", response, "Error:", e)
        return None
Results of VLM based AI Agent
Let’s take a look at the following video demonstrating our AI agent in action.
Input prompt: “check if the classification training is complete, and prepare a report with statistics, within 200 words, and send to Kukil Kashyap Borgohain on WhatsApp, and send the same report to Saved Message profile on Telegram”
Conclusion on Building AI Agents using VLM
The agent we built is designed to be generic, meaning you can ideally ask it to do anything on your desktop – from reading text off the screen to launching apps and sending messages. However, as with most early experiments, the system prompt we’ve designed isn’t fully robust yet. Sometimes Gemini generates perfectly structured plans, other times it struggles with edge cases or misses context. This is part of the iterative process, and we plan to keep refining until we achieve more reliable, repeatable behavior across a wide variety of tasks.
We’re also experimenting with Microsoft’s GUI-Actor project, which promises more native GUI grounding, but at the moment it suffers from stability and compatibility issues (especially on Windows). That’s why we haven’t covered it in detail here – though we see potential and will revisit it once it’s production-ready.
The broader takeaway is that GUI-native agents are becoming real: models that can not only understand text but also see, interpret, and act directly on our screens. Today, they’re still fragile prototypes, but the future points toward agents that can work seamlessly across applications, automate workflows, and act as true digital co-pilots.This project is just a step in that direction, and we’ll continue sharing updates as we test, break, and improve the system. If you’re interested in building along, stay tuned – the next phase will be about making the agent more predictable, extensible, and safe for everyday use.