As beginners in OpenCV, it is a daunting task to read beautiful yet complicated projects and codes. But fear not! In this post, we will guide you through a fun project which uses very basic Computer Vision and Image Processing techniques which I learned in the first two modules of Computer Vision for Faces. The Hangman Project is a very simple yet engaging game with different results every single time!
Rules of the game
So how does it work? Let’s go over the rules.
- You are greeted to a screen which has the hangman’s noose and boxes on the screen.
- The number of boxes and the spacing between them
indicate letters in each word and the number of words, respectively. - Pick a random letter and plug it in and the game starts.
- If your guess is right, phew! you are safe.
- If not, the man’s head appears.
- You continue and after your second mistake, you feel discouraged that you won’t be able to save him. Well, worry not, this is where you start getting clues after each mistake.
- After each mistake, the man’s head, body, hands and legs start to appear and you race to solve the clues and win a life in 6 correct tries!
Creating the Hangman Game

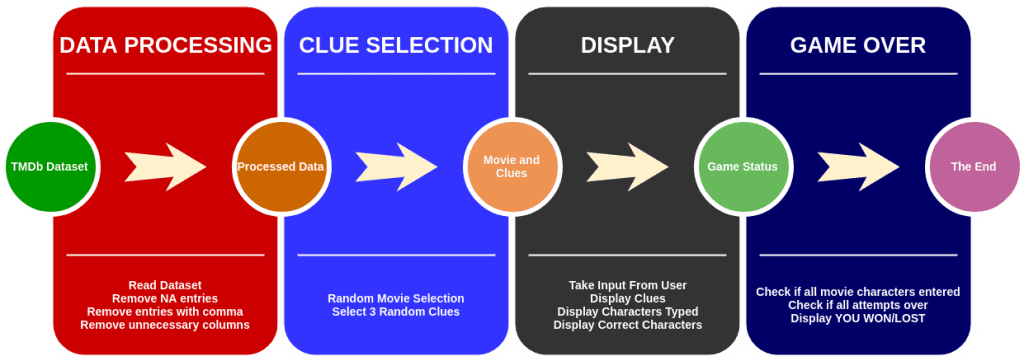
The basic flowchart of the entire game is shown above. Let’s look into each of these steps one by one.
Data Processing
We won’t go into the depth of the data processing step in this post. To make sure that the game doesn’t run out of new movies and clues any time soon, we are going to go for TMDb dataset (The Movie Database). The data processing steps comprise of removing missing values, keeping only the required columns/features – release year, cast, director, movie keywords, and the tagline. We also remove any entries containing the character ‘,‘ as that cause some hurdles in further data splitting steps. Finally, to reduce the size of the dataset, we only keep movies with titles having not more than 20 characters and tagline length not more than 30.
The final dataset contains 1767 movies and 6 features for each movie.
The pre-processed dataset and the code for this post can be downloaded using the link below.
Movie and Clues Selection
Now that we have the processed dataset, we will use it in our further steps. We will first detail the functions to carry out the particular steps and then at the end, how they will be used.
But before that, let’s import the modules we will need.
import cv2
import numpy as np
import sys
First, let’s load the dataset from the CSV file and store it in dictionary format.
def read_from_csv(csv_f):
    with open(csv_f,'r') as f:
        movie_data = {}
        for line in f.readlines():
            line_split = line.strip().split(",")
            year = line_split[-1].split("|")
            keywords = line_split[-2].split("|")
            tagline = line_split[-3].split("|")
            director = line_split[-4].split("|")
            cast = line_split[-5].split("|")
            movie = line_split[0].upper()
            movie_data[movie] = [year,keywords,tagline,director,cast]
    return movie_data
Notice that we are using the following dictionary format for storing the movie and the movie details.
movie_title:[year,list of keywords, tagline, director, list of cast]
Next, we will get a random movie from the list of movies and get the information for that movie (year, keywords, tagline, director and cast).
def get_movie_info(movies_data):
    movies_list = list(movies_data.keys())
    movie = np.random.choice(movies_list,1)[0].upper()
    movie_info = movies_data[movie]
    return movie,movie_info
We will use another function select_hints to select any 3 random hints. If keywords or cast are present as the hints, we will randomly select one element from them.
def select_hints(movie_info):
    # We will randomly select 3 types of
    # hints to display
    hints_index = list(np.random.choice(5,3,replace=False))
    hints = []
    hints_labels = ["Release Year","Keyword","Tagline","Director","Cast"]
    labels = []
    for hint_index in hints_index:
        hint = np.random.choice(movie_info[hint_index],1)[0].upper()
        hints.append(hint)
        labels.append(hints_labels[hint_index].upper())
    return hints,labels
Programming Display
As in the previous section, we will only describe the functions here and we will see their usage in the end of the post.
Load Hangman Canvas
First, we will read the hangman template which is shown below as well.

def get_canvas(canvas_file):
    img = cv2.imread(canvas_file,1)
    return img
Get Character Dimensions
Next, here comes a tricky part. We want to display blank boxes so that the user knows the length of the movie title. We will make it more interesting and general by taking into account the width and height of a character. We won’t use the dimensions directly as the box will then give an idea about the character (think I versus M). We will instead use the maximum height and width among all the characters in that title. We will use the function get_char_coords to calculate the coordinates of these boxes.
def get_char_coords(movie):
    x_coord = 100
    y_coord = 400

    char_ws = []
    char_hs = []

    for i in movie:
        char_width, char_height = cv2.getTextSize(i,
                cv2.FONT_HERSHEY_SIMPLEX,1,2)[0]
        char_ws.append(char_width)
        char_hs.append(char_height)

    max_char_h = max(char_hs)
    max_char_w = max(char_ws)

    char_rects = []

    for i in range(len(char_ws)):
        rect_coord = [(x_coord,y_coord-max_char_h),
                (x_coord+max_char_w,y_coord)]
        char_rects.append(rect_coord)
        x_coord = x_coord + max_char_w

    return char_rects
Draw Blank Boxes
Once we have these coordinates, we will use them to draw the boxes.
def draw_blank_rects(movie,char_rects,img):

    for i in range(len(char_rects)):
        top_left, bottom_right = char_rects[i]
        if not movie[i].isalpha() or
                ord(movie[i]) < 65 or
                ord(movie[i]) > 122 or
                (ord(movie[i]) > 90 and
                ord(movie[i]) < 97):
            cv2.putText(img,movie[i],(top_left[0],
                    bottom_right[1]),
                    cv2.FONT_HERSHEY_SIMPLEX,
                    1,(0,0,255),2)
            continue
        cv2.rectangle(img,top_left,
                bottom_right,
                (0,0,255),thickness=1,
                lineType = cv2.LINE_8)

    return img
Display Hint
Let’s go over other functions that we will need starting off with the function to display the hints. The hint to be displayed will depend on the number of incorrect attempts. If there is no incorrect attempt, we won’t display any hint. In case of one incorrect attempt, we will display the first hint. Similarly, for less than 4 incorrect attempts, we will display the second hint and finally, for less than 7 incorrect attempts, we will display the third hint.
def draw_hint(img,hints,labels,incorrect_attempts):
    x,y = 20,30
    if incorrect_attempts == 0:
        return img
    elif incorrect_attempts <= 1:
        index = 0
    elif incorrect_attempts <= 3:
        index = 1
    elif incorrect_attempts <= 6:
        index = 2
    cv2.putText(img,"HINT: {}".format(labels[index]),(x,y),
            cv2.FONT_HERSHEY_SIMPLEX,0.6,
            (255,0,255),1)
    cv2.putText(img,"{}".format(hints[index]),(x,y+30),
            cv2.FONT_HERSHEY_SIMPLEX,0.6,
            (255,0,255),1)
    return img
Display correct or incorrect attempt
Let’s also write functions to display if the guessed letter was present in the movie title or not.
def draw_wrong(img,incorrect_attempts):
    cv2.putText(img,"WRONG {}/6".format(incorrect_attempts+1),(380,40),
            cv2.FONT_HERSHEY_SIMPLEX,1,
            (0,0,255),2)
    return img

def draw_right(img):
    cv2.putText(img,"RIGHT",(380,40),
            cv2.FONT_HERSHEY_SIMPLEX,0.7,
            (0,255,0),2)
    return img
Display game won or lost
Similarly, we will also write functions to display if a game was won or lost.
def draw_lost(img):
    cv2.putText(img,"YOU LOST",(380,40),
            cv2.FONT_HERSHEY_SIMPLEX,0.7,
            (0,0,255),2)
    return img

def draw_won(img):
    cv2.putText(img,"YOU WON",(380,40),
            cv2.FONT_HERSHEY_SIMPLEX,0.7,
            (0,255,0),2)
    return img
Display invalid move and character reuse
Now, there are two more cases we have to consider. What if an invalid character was entered? This can be a number or a non-alphanumeric character. And second, what if the user enters a character that has already been entered before?
def draw_invalid(img):
    cv2.putText(img,"INVALID INPUT",(300,40),
            cv2.FONT_HERSHEY_SIMPLEX,0.7,
            (0,0,255),2)
    return img

def draw_reuse(img):
    cv2.putText(img,"ALREADY USED",(300,40),
            cv2.FONT_HERSHEY_SIMPLEX,0.7,
            (0,0,255),2)
    return img
Display used characters
Now, to make it easier for the user to know what characters have already been used, we will display them as well.
We will make one more addition here. We will display the valid character entered in red so that the user can see what character they entered.
def draw_used_chars(img,chars_entered,letter):
    cv2.putText(img,"Letters used:",(300,80),
            cv2.FONT_HERSHEY_SIMPLEX,0.5,
            (0,0,0),1)
    y = 120
    x = 350
    count = 0
    for i in chars_entered:
        if count == 10:
           x += 50
           y = 120
        if i==letter:
           cv2.putText(img,i,(x,y),
                cv2.FONT_HERSHEY_SIMPLEX,0.5,
                (0,0,255),1)
        else:
           cv2.putText(img,i,(x,y),
                cv2.FONT_HERSHEY_SIMPLEX,0.5,
                (0,0,0),1)
        y += 20
        count += 1
    return img
Display Hangman body
Next comes the turn to write functions to draw different body parts of the hangman – face, back, left and right arms, left and right legs. What body part will be drawn depends on the number of incorrect attempts.
def draw_hangman(img,num_tries):
    if num_tries==1:
        return draw_circle(img)
    elif num_tries==2:
        return draw_back(img)
    elif num_tries==3:
        return draw_left_hand(img)
    elif num_tries==4:
        return draw_right_hand(img)
    elif num_tries==5:
        return draw_left_leg(img)
    elif num_tries==6:
        return draw_right_leg(img)
    else:
        return img

def draw_circle(img):
    cv2.circle(img,(190,160),40,(0,0,0),thickness=2,
            lineType=cv2.LINE_AA)
    return img

def draw_back(img):
    cv2.line(img,(190,200),(190,320),
            (0,0,0),thickness=2,
            lineType=cv2.LINE_AA)
    return img

def draw_left_hand(img):
    cv2.line(img,(190,240),(130,200),
            (0,0,0),thickness=2,
            lineType=cv2.LINE_AA)
    return img

def draw_right_hand(img):
    cv2.line(img,(190,240),(250,200),
            (0,0,0),thickness=2,
            lineType=cv2.LINE_AA)
    return img

def draw_left_leg(img):
    cv2.line(img,(190,320),(130,360),
            (0,0,0),thickness=2,
            lineType=cv2.LINE_AA)
    return img

def draw_right_leg(img):
    cv2.line(img,(190,320),(250,360),
            (0,0,0),thickness=2,
            lineType=cv2.LINE_AA)
    return img
Display character occurrences
We also want to display all the occurrences of the letter entered in the movie title (if it is present in the movie title).
def displayLetter(img,letter,movie,char_rects):
    for i in range(len(movie)):
        if movie[i]==letter:
            top_left, bottom_right = char_rects[i]
            cv2.putText(img, movie[i],
                    (top_left[0],bottom_right[1]),
                    cv2.FONT_HERSHEY_SIMPLEX,
                    1,(255,0,0),2)
    return img
Reveal movie title
Finally, we want to reveal the correct movie title once the game ends.
def revealMovie(movie,img,char_rects):
    #img = cv2.imread(canvas_file,1)
    for i in range(len(movie)):
        top_left, bottom_right = char_rects[i]
        cv2.putText(img,movie[i],(top_left[0],bottom_right[1]),
                cv2.FONT_HERSHEY_SIMPLEX,
                1,(0,255,0),2)
    return img
Programming the game
Now that we have covered all the functions, let’s see how we are going to use them in our game.
We will start off with reading the data from the CSV file and getting a random movie.
import cv2
import numpy as np
from utils import *

movie_csv = "movies-list-short.csv"
canvas = "blank-canvas.png"

movies_data = read_from_csv(movie_csv)

movie, movie_info = get_movie_info(movies_data)
We will also select the 3 random hints as discussed before.
hints,labels = select_hints(movie_info)
Now, let’s start off with the blank Hangman canvas and zero incorrect attempts.
char_rects = get_char_coords(movie)

img = draw_blank_rects(movie,char_rects,img)

cv2.namedWindow("Hangman", cv2.WND_PROP_FULLSCREEN)
cv2.setWindowProperty("Hangman",cv2.WND_PROP_FULLSCREEN,cv2.WINDOW_FULLSCREEN)

cv2.imshow("Hangman",img)

chars_entered = []

incorrect_attempts = 0

img_copy = img.copy()
Next, we will code the section for taking input from user and displaying the letters entered. We will also need to display if the attempt is correct or wrong or if it is invalid or already used. The loop will break if the user runs out of tries.
We achieve the above by doing the following.
- Create a copy of the current image. This is to make sure that we don’t end up overwriting words like – WRONG, CORRECT, etc. or the hints.
- Next, based on the number of incorrect attempts, we will display the hint on the image.
- If the user has used up all his lives, we will display YOU LOST and the loop will break.
- If the user managed to guess all the characters of the movie, we will display YOU WON and break the loop.
- To check if the character entered by the user is valid or not, we will check if the character lies between a-z or A-Z. If the move is invalid, we will display the corresponding message – INVALID MOVE and the game will continue.
- The valid character entered by the user will be checked to see if it has already been used before, in which case the corresponding message will be displayed and the game will continue.
- Note that in the last 2 steps, the number of incorrect attempts made is not changed.
- If the character entered is a new one, we will first append it to the list of the characters used and then check if it is present in the movie title, in which case we will display CORRECT and display all occurrences of the character in the movie.
- If the character was not found in the movie title, we will display WRONG and increment the number of incorrect attempts.
- Finally, once the game is won or lost, we will reveal the correct movie title.
while 1:
    img = img_copy.copy()
    img = draw_hint(img,hints,labels,incorrect_attempts)
    if incorrect_attempts >= 6:
        img = draw_lost(img)
        break
    elif check_all_chars_found(movie, chars_entered):
        img = draw_won(img)
        break
    else:
        letter = cv2.waitKey(0) & 0xFF
        if letter < 65 or letter > 122 or (letter > 90 and letter < 97):
            img = draw_invalid(img)
            cv2.imshow("Hangman",img)
            continue
        else:
            letter = chr(letter).upper()
        if letter in chars_entered:
            img = draw_reuse(img)
            img = draw_used_chars(img,chars_entered,letter)
            cv2.imshow("Hangman",img)
            continue
        else:
            chars_entered.append(letter)
            if letter in movie:
                img = draw_right(img)
                img = displayLetter(img,letter,movie,char_rects)
                img_copy = displayLetter(img_copy,letter,movie,
                        char_rects)
            else:
                img = draw_wrong(img,incorrect_attempts)
                incorrect_attempts += 1
    img = draw_used_chars(img,chars_entered,letter)
    img = draw_hangman(img,incorrect_attempts)
    img_copy = draw_used_chars(img_copy,chars_entered,letter)
    img_copy = draw_hangman(img_copy,incorrect_attempts)
    cv2.imshow("Hangman",img)

img = revealMovie(movie,img,char_rects)
cv2.imshow("Hangman",img)
cv2.waitKey(0)

cv2.destroyAllWindows()
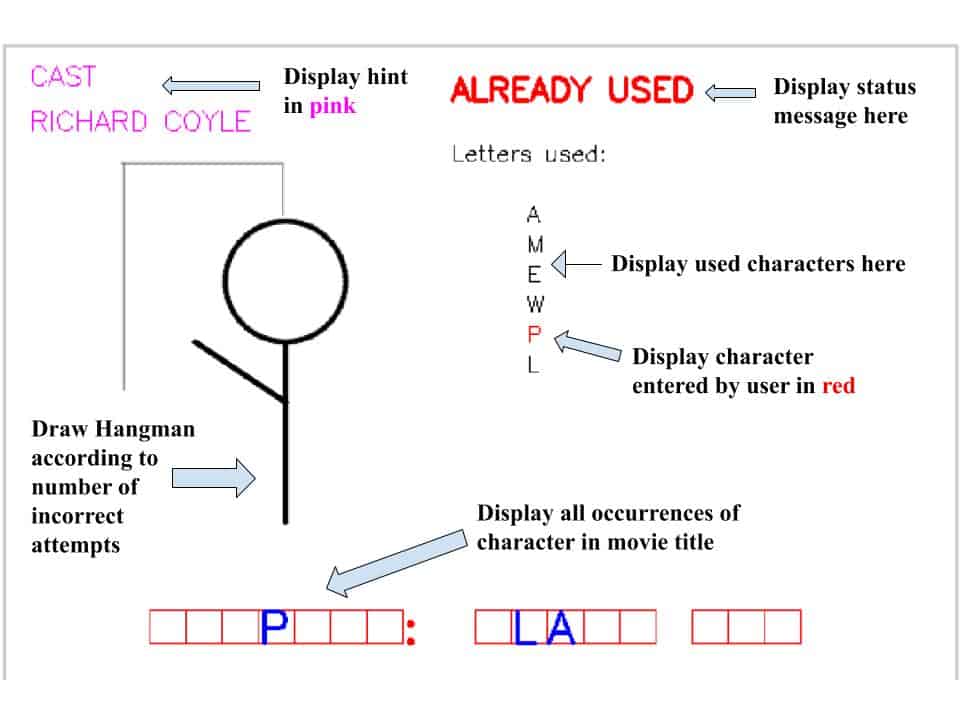
Let’s quickly summarise the different parts of the Hangman game with the help of the image shown below.

Phew! That’s it. I really hope you enjoyed the post and make sure to try out the game! Do keep in mind that this entire exhaustive project has been made with ONLY the basics of OpenCV and if I can do this, so can you!


