YOLOv7 Pose was introduced in the YOLOv7 repository a few days after the initial release in July ‘22. It is a single-stage, multi-person pose estimation model. YOLOv7 pose is unique, as it deviates from the conventional 2-stage pose estimation algorithms. With the reduced complexity in single-stage models, we can expect them to be faster and more efficient.
| The objective of the post is to answer the following questions. 1. What is YOLOv7 Pose? 2. What is MediaPipe Pose? 3. How is YOLOv7 Pose different from MediaPipe? 4. How YOLOv7 Pose compares to MediaPipe? |
- Deep Learning Based Human Pose Estimation
- Real Time Human Pose Estimation
- What’s New in YOLOv7 Pose?
- What is MediaPipe Pose?
- YOLOv7 vs MediaPipe Pose Features
- YOLOv7 Pose Code
- YOLOv7 vs MediaPipe Comparison on CPU
- YOLOv7 GPU Inference
YOLO Master Post – Every Model Explained
Don’t miss out on this comprehensive resource, Mastering All Yolo Models for a richer, more informed perspective on the YOLO series.
Deep Learning Based Human Pose Estimation
Deep Learning based pose estimation algorithms have come a long way since the first release of DeepPose by Google in 2014. These algorithms usually work in two stages.
- Person detection
- Keypoint Localization
Based on which stage comes first, they can be categorized into the Top-down and Bottom-up approaches.
Top-Down Approach
In this method, the person is detected first then the landmarks are localized for each person. More the number of persons, the more the computational complexity. These approaches are scale invariant. They perform well on popular benchmarks in terms of accuracy. However, due to the complexity of these models, achieving real-time inference is computationally expensive.
Bottom-Up Approach
In this approach, it finds identity-free landmarks (keypoints) of all the persons in an image at once, followed by grouping them into individual persons. A probabilistic map called heatmap is used by these approaches to estimate the probability of every pixel containing a particular landmark (keypoint). With the help of Non-Maximum Suppression, the best landmark is filtered. These are less complex compared to Top-down methods but at the cost of reduced accuracy.
Real Time Human Pose Estimation
Depending on the device [CPU/GPU/TPU etc.] the performance of different frameworks varies. There are many 2-stage pose estimation models that perform well in benchmark tests. Alpha Pose, OpenPose, Deep Pose, to name a few. However, due to the relative complexity of 2-stage models, obtaining real-time performance is computationally expensive. These models run fast on GPUs but not so much on CPUs.
In terms of efficiency and accuracy, MediaPipe is a well-balanced framework for pose estimation. It generates real-time detection on CPUs. With this in mind, we tested YOLOv7 Pose to see how it fares against MediaPipe.
What’s New in YOLOv7 Pose?
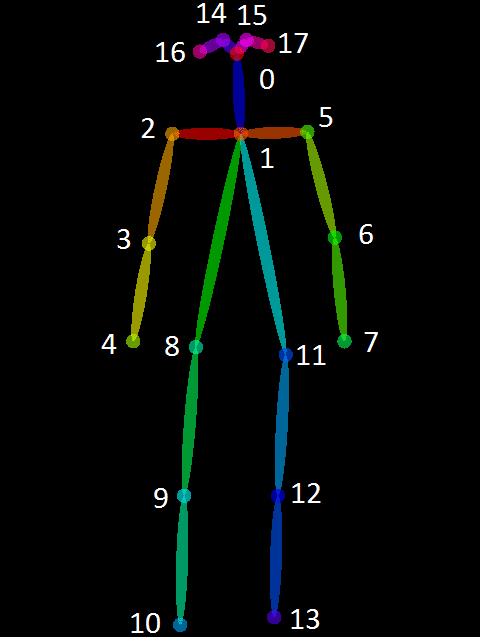
Unlike conventional Pose Estimation algorithms, YOLOv7 pose is a single-stage multi-person keypoint detector. It is similar to the bottom-up approach but heatmap free. It is an extension of the one-shot pose detector – YOLO-Pose. It has the best of both Top-down and Bottom-up approaches. YOLOv7 Pose is trained on the COCO dataset which has 17 landmark topologies. It is implemented in PyTorch making the code super easy to customize as per your need. The pre-trained keypoint detection model is yolov7-w6-pose.pth.

What is MediaPipe Pose?
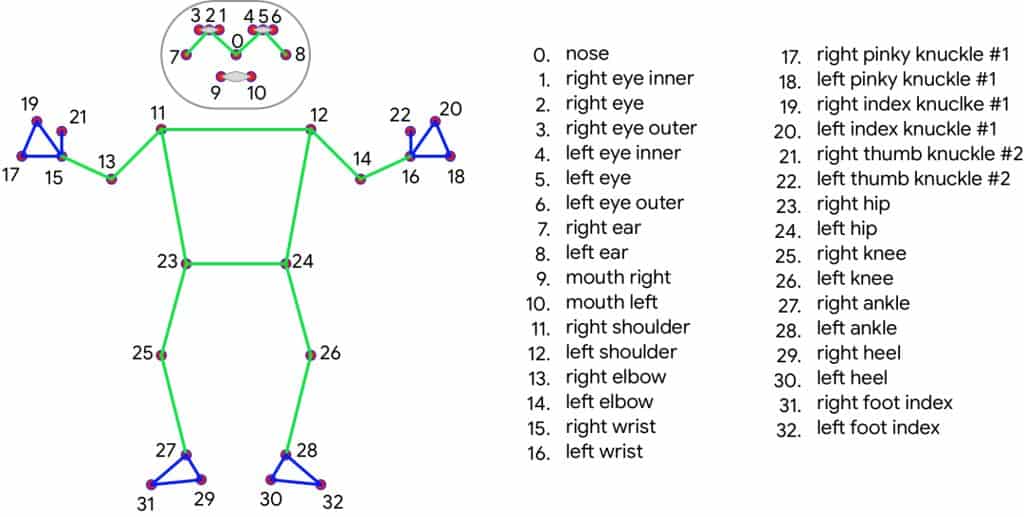
MediaPipe Pose is a single-person pose estimation framework. It uses BlazePose 33 landmark topology. BlazePose is a superset of COCO keypoints, Blaze Palm, and Blaze Face topology. It works in two stages – detection and tracking. As detection is not performed in each frame, MediaPipe is able to perform inference faster. There are three models in MediaPipe for pose estimation.
- BlazePose GHUM Heavy
- BlazePose GHUM Full
- BlazePose GHUM Lite
These models are flagged as complexity 0, 1, and 2 respectively.
MediaPipe pose solution is also integrated with segmentation which can be switched just by passing a flag. Check out this article on MediaPipe Pose for more insight.

YOLOv7 vs MediaPipe Pose Features
| Features | YOLOv7 Pose | MediaPipe Pose |
| Topology | 17 Keypoints COCO | 33 Keypoints COCO + Blaze Palm + Blaze Face |
| Workflow | Detection runs for all frames | Detection runs once followed by tracker until occlusion occurs |
| GPU support | Support for both CPU and GPU | Only CPU |
| Segmentation | Segmentation not integrated to pose directly | Segmentation integrated |
| Number of persons | Multi-person | Single person |
YOLOv7 is a multi-person detection framework. MediaPipe can not beat YOLOv7 in this category, hence we will not analyze them any further. The following video shows YOLOv7 estimating multi-person posture on GPU vs MediaPipe.
YOLOv7 Pose Code Explanation
YOLOv7 Pose uses a utility function letterbox to resize the image before inference. We observed that there is no mapping of resized outputs to the original input. This means, if you pass a video of resolution 1080×1080 for inference, the output video will have a resolution of 960×960. You don’t get the landmarks mapped to the original image. Hence, we carried out some modifications in the code for the sake of our experiment.
- Clone the YOLOv7 repository and put
yolov7-pose.pyin the root directory. - Replace
yolov7/utils/plots.pywith our version ofplots.py.
These experiment files are available in the Experiments directory. For installation, you can check out the articles YOLOv7 Pose and Human Pose Estimation using MediaPipe.
Apart from usual imports, we need the following utility functions.
- letterbox: letterbox resizing scales the image by maintaining the aspect ratio, but any areas which are not taken are filled with the background color.
- non_max_suppression_kpt: As the name suggests, this function performs non-maximum suppression on inference results.
- output_to_keypoint: Returns batch_id, class_id, x, y, w, h, conf.
- plot_skeleton_kpts: Landmark points and connection pair rendering.
Function to Detect and Plot Landmarks
The following function is pretty much self-explanatory with the inline comments. At first, the image is converted to a 4D Tensor [1, h, w, c] and loaded to the computation device for forward passing. Here, 1 is the batch size. The function pose_video returns the annotated image along with the forward pass FPS.
def pose_video(frame):
    mapped_img = frame.copy()
    # Letterbox resizing.
    img = letterbox(frame, input_size, stride=64, auto=True)[0]
    print(img.shape)
    img_ = img.copy()
    # Convert the array to 4D.
    img = transforms.ToTensor()(img)
    # Convert the array to Tensor.
    img = torch.tensor(np.array([img.numpy()]))
    # Load the image into the computation device.
    img = img.to(device)

    # Gradients are stored during training, not required while inference.
    with torch.no_grad():
        t1 = time.time()
        output, _ = model(img)
        t2 = time.time()
        fps = 1/(t2 - t1)
        output = non_max_suppression_kpt(output,
                                         0.25,    # Conf. Threshold.
                                         0.65,    # IoU Threshold.
                                         nc=1,   # Number of classes.
                                         nkpt=17, # Number of keypoints.
                                         kpt_label=True)

        output = output_to_keypoint(output)

    # Change format [b, c, h, w] to [h, w, c] for displaying the image.
    nimg = img[0].permute(1, 2, 0) * 255
    nimg = nimg.cpu().numpy().astype(np.uint8)
    nimg = cv2.cvtColor(nimg, cv2.COLOR_RGB2BGR)

    for idx in range(output.shape[0]):
        plot_skeleton_kpts(nimg, output[idx, 7:].T, 3)

    return nimg, fps
YOLOv7 vs MediaPipe Comparison on CPU
| YOLOV7 | MediaPipe |
| Model: yolov7-w6-pose.pth Device: GPU Input Size: 960p letterbox | Model: BlazePose GHUM Full Device: CPU Input Size: 256x256p |
While the primary objective of both YOLOv7 and MediaPipe remains the same, they are not alike in terms of implementation. Let’s take some examples to test out the frameworks. We will compare the accuracy and the FPS on the following grounds.
- Default model input size
- Fixed model input size for real-time inference
- YOLOv7 vs MediaPipe on Low light condition
- YOLOv7 vs MediaPipe Handling Occlusion
- YOLOv7 vs MediaPipe on Far Away Person
- YOLOv7 vs MediaPipe on Skydiving
- YOLOv7 vs MediaPipe Detecting Dance Posture
- YOLOv7 vs MediaPipe on Yoga Posture Detection
| TEST SETUP: Ryzen 5 4th Gen Laptop CPU, NVIDIA GTX 1650 4GB Notebook GPU Note: The recorded FPS is the average FPS of the forward pass excluding pre-processing and post-processing time. |
1. Comparing YOLOv7 and MediaPipe on Default Input Settings
YOLOv7 by default has 960p images in the letterbox format. It maintains the aspect ratio of the original image by maintaining the minimum width or height of 960p. On the other hand, MediaPipe uses two BlazePose models for detection and tracking. The detection model accepts 128×128 input and the tracking model takes 256×256.
Let’s see the results that we get with out-of-the-box code. Clearly, MediaPipe is the winner in this case.
- YOLOv7: 0.82 fps
- MediaPipe: 29.2 fps
2. Fixed Input Size for Real-Time Inference
To balance out the competition, we modified the code for YOLOv7 to forward pass images resized to 256×256. The results are as follows. This is also continued for the rest of the CPU experiments.
- YOLOv7: 8.1 fps
- MediaPipe: 29.2 fps
3. YOLOv7 vs MediaPipe on Low Light Condition
Example 1: The following results show YOLOv7 and MediaPipe handling low light, occlusion, and far away persons. YOLOv7 is observed to be performing a little better than MediaPipe in terms of accuracy.
- YOLOv7: 8.3
- MediaPipe: 29.2
Example 2: Contrary to the example above, MediaPipe confers slightly better results in terms of accuracy in the following example.
- YOLOv7: 8.23
- MediaPipe: 29
4. YOLOv7 vs MediaPipe Handling Occlusion
With YOLOv7, posture prediction works decently even when certain body parts are being occluded. The occluded leg of the person is predicted well by YOLOv7. MediaPipe however, thinks it’s a centaur. The FPS does not vary much as compared to low-light experiments.
- YOLOv7: 8.0
- MediaPipe: 30.0
5. YOLOv7 vs MediaPipe on Far Away Person
Let’s compare how both models react to a person on small scale. We can see that YOLOv7 failed to detect the person at all frames. MediaPipe detected the person on a significantly small scale. It could be due to the pose estimation techniques used by the frameworks. MediaPipe tracks the person once detection is confirmed. On the other hand, YOLOv7 performs detection on each frame.
- YOLOv7: 8.2
- MediaPipe: 31.1
6. YOLOv7 vs MediaPipe on Skydiving
In the following skydiving video, MediaPipe detects the person better with various orientations. It can be also seen that when the person is farther, MediaPipe detects better than YOLOv7. It can be also a good example of scale.
- YOLOv7: 8.24
- MediaPipe: 29.05
7. YOLOv7 vs MediaPipe Detecting Dance Posture
Both frameworks are able to detect the person. However, YOLOv7 is doing better pose estimation. With fast movements, MediaPipe seems to be unable to track well enough. The FPS difference is similar to the above examples.
- YOLOv7: 7.99
- MediaPipe: 29.46
8. YOLOv7 vs MediaPipe on Yoga Posture Detection
In the following YOGA posture detection experiment, the YOLOv7 pose is showing jittery detections. Using a low-resolution input size might not be the best idea to go with YOLOv7. We should not forget that YOLOv7 is trained on 960p letterbox images.
- YOLOv7: 8.20
- MediaPipe: 29.06
YOLOv7 Inference on GPU
We know that this isn’t a fair comparison but that’s all we have for MediaPipe now. Hopefully, GPU support for MediaPipe Python solutions will roll out soon. However, we want to see how the best of both frameworks fare against each other using a few examples. We will compare some difficult poses with MediaPipe and YOLOv7 itself on low vs high-resolution inputs.
| YOLOV7 | MediaPipe |
| Input Size: 960 (letterbox) Model: yolov7-w6-pose.pth Device: GPU | Input Size: 256×256 Model: BlazePose GHUM Full Device: CPU |
1. YOLOv7 vs MediaPipe on Difficult Postures
In the following video, we can see that YOLOv7 is performing comparatively better than MediaPipe. Switching to default resolution does improve the results. Moreover, in terms of inference speed, YOLOv7 is more than 2x faster.
- YOLOv7: 83.39
- MediaPipe: 29.0
2. Analyzing the Effect of Increased Input Size
Let’s check out the previous 256p inference results with default 960p GPU results. This is the previous sky diving example where YOLOv7 performed poorly on input size 256×256. The result on the right is after changing the input size to default 960p.
| 256p | 960p |
In the previous low-resolution input experiment YOLOv7 could not detect the person even once. After increasing the input resolution to 960p, the result improves significantly. This is however not as good as MediaPipe.
Similarly, with the Yoga posture detection experiment, the result improves. Detection in the 960p version is definitely better than the jittery output of 256p.
Swimming is a difficult activity for pose estimation models to track. The person gets occluded repeatedly. The following example shows swimming posture detection by YOLOv7 in different resolutions.
Observations
- MediaPipe is observed to be producing good results on low-resolution inputs compared to YOLOv7.
- It is faster than YOLOv7 on CPU inference.
- MediaPipe is also comparatively good at detecting far-away objects (persons in our case). However, when it comes to occlusion, YOLOv7 wins.
- While MediaPipe is limited to single-person, YOLOv7 can detect multiple people simultaneously.
- YOLOv7 is also better at estimating fast movements, given that the input size is high resolution.
- Moreover, YOLOv7 can harness the power of GPU, which makes it way faster than MediaPipe.
References
- Introduction to MediaPipe
- Building a Poor Body Posture Detection and Alert System using MediaPipe
- Multi-Person Pose Estimation in OpenCV using OpenPose
- Pose Detection comparison: wrnchAI vs OpenPose
- Skydiving video


100K+ Learners
Join Free OpenCV Bootcamp3 Hours of Learning