Wouldn’t it be cool if you could expose your OpenCV python code as a web service ? Got 10 minutes ? Let’s get started!
I have created a video that walks you through the process. The information in this post is pretty much the same as provided in the video.
Let’s lay down the goals of this tutorial first
- We will create a Web API that allows a user to call your OpenCV code.
- We will build a simple example in under 10 minutes.
- All you will need is a web browser, so it will work on all platforms.
- This project will be free! — free as in beer, and free as in speech. We will register for a free account, and use an open source framework.
- We will start with a very basic example where the user passes an input image url to the backend. The backend reads the images and returns it’s width and height.
We are going to use the following tools
- PythonAnywhere.com for hosting our app for free. PythonAnywhere is more than just a hosting platform. It is a full blown IDE for writing python code. It provides you access to a code editor with syntax highlighting, a unix terminal, access to log files — all through the web browser. Of course you can transfer your existing code easily from github, or code in vi if you want. It also comes with OpenCV installed!
- web2py is a “free open source full-stack framework for rapid development of fast, scalable, secure and portable database-driven web-based applications. Written and programmable in Python.” We will install web2py on PythonAnywhere with just a few clicks. Even though we will use web2py in this tutorial, you can easily use Django on PythonAnywhere.
Register for PythonAnywhere and install web2py
- Register for PythonAnywhere.com by clicking here . The beginner’s account is free, and sufficient to get started. Remember your username. We will refer to it several times in this article.
- Once you have registered and are logged in, go to the Web tab, and Add a new web app. See screenshot below

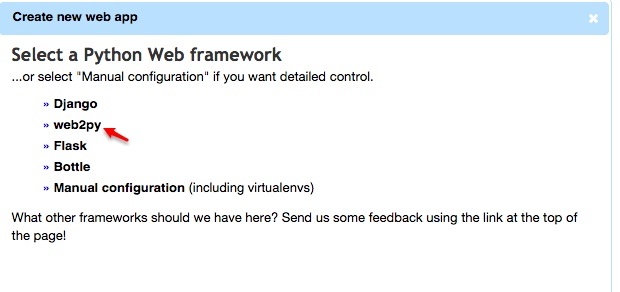
- Select web2py as your python framework.
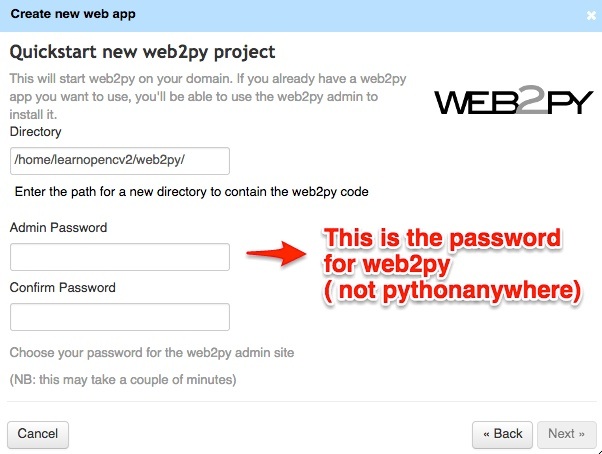
- Select an admin password for web2py. Note that this is a web2py admin password, and it is different from your PythonAnywhere.com password. Of course you may choose to have the same strong password for both. You can leave the default directory for web2py installation as is.
This completes the registration on PythonAnywhere and web2py installation. Next we will create a new web app on web2py
Create a new web app on web2py
- Open a new tab, and go to web2py admin interface located at
https://username.pythonanywhere.com/admin/default/index
( Change username to your username ) and use your web2py password to sign in. Add a new application by providing an appname. [ See the screenshot below ]. Remember this appname. We will refer to it several times in this article.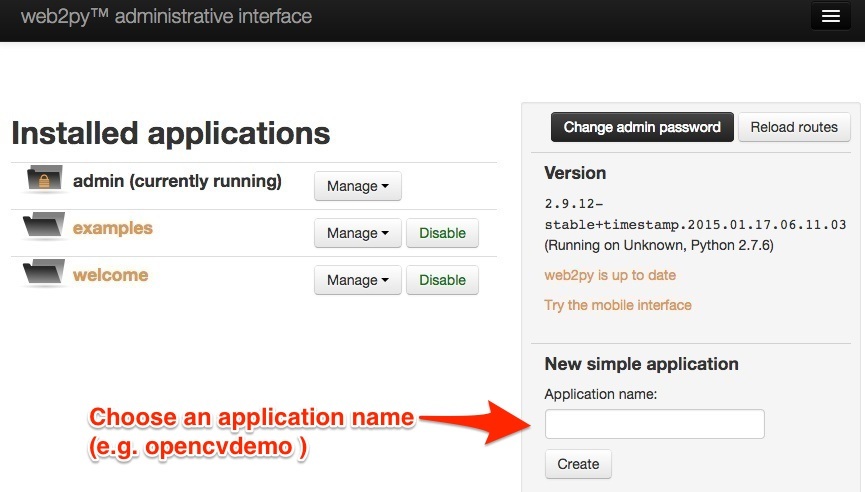
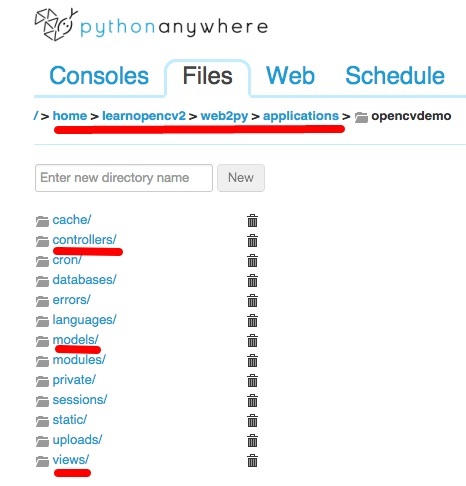
- Check installation : If everything went right, you should see your application folder under the Files tab on PythonAnywhere when you go down the directory structure home/username/web2py/appname

Add OpenCV code to web2py application
web2py encourages the use of a Model-View-Controller (MVC) framework for building web apps. Roughly speaking a model contains all the data and rules of the application, the controller contains the code for manipulating the data, and the view shows some state of the underlying data. In a simple web application, the database serves as the model, the code that manipulates the database ( say based on user action ) is the controller, and the html page that faces the user is the view. In web2py the models, views, and controllers are neatly arranged in separate directories. See the image below.
In this tutorial, we will create a very simple web service. The web service will take in an image url as input and return the width and height of the image. As a first baby step we will make no changes to the model or the view. We will add just a few lines of code to the default controller (default.py) which is located at
home/username/web2py/applications/appname/controllers/default.py
( Change username and appname according to what you had selected ).
Add the following lines of code to default.py.
import cv2
import numpy as np
import urllib2
import json

def image_dimensions():
    # Masquerade as Mozilla because some web servers may not like python bots.
    hdr = {‘User-Agent': 'Mozilla/5.0'}
    # Set up the request
    req = urllib2.Request(request.vars.url, headers=hdr)
    try:
        # Obtain the content of the url
        con = urllib2.urlopen( req )
        # Read the content and convert it into an numpy array
        im_array = np.asarray(bytearray(con.read()), dtype=np.uint8)
        # Convert the numpy array into an image.
        im =  cv2.imdecode(im_array, cv2.IMREAD_GRAYSCALE)
        # Get the width and heigh of the image.
        height, width = im.shape
        # Wrap up the width and height in an object and return the encoded JSON.
        return json.dumps({"width" : width, "height" : height})

    except urllib2.HTTPError, e:
        return e.fp.read()
You can read the comments in the code to understand how it works. Note that the function image_dimensions does not have any input arguments. This is because the framework implicitly passes the arguments using request.vars. In line 10, the parameter url is being accessed using request.vars.url.
That’s it! You now have a web service that uses OpenCV in the backend.
Testing your OpenCV web service
Let’s test the web service using curl.
curl -F url=http://example.com/image.jpg http://username.pythonanywhere.com/appname/default/image_dimensions
Note: The free version of PythonAnywhere has certain restrictions on the urls you can download. Any image from known safe sites like wikipedia, flickr etc. should work.
Here is a working example,
curl -F url=http://upload.wikimedia.org/wikipedia/commons/4/4d/Ball_python_lucy.JPG http://learnopencv3.pythonanywhere.com/opencvtests/default/image_dimensions
An alternative way to access this service is using url parameters. Click on the link below.
Part 2 coming soon
In Part 2 of this tutorial we will learn how to upload a photo, do some processing using OpenCV in the backend, and return a url of the processed output image.
If you want to be updated about more such tutorials, please sign up for our newsletter using the top bar!





100K+ Learners
Join Free OpenCV Bootcamp3 Hours of Learning