Object Detection is predominantly a vision task where we train a vision model, like YOLO, to predict the location of the object along with its class. But still it depends on the pre-trained classes, right? But what if we could talk to the model about images? What if you could just upload that photo and ask, “What brand are the sneakers the person on the left is wearing?” This is no longer science fiction. This is the era of Vision Language Models (VLMs). These are powerful AI models that are fluent in both the language of pixels (vision) and the language of words (text), creating a bridge between seeing and understanding. They are fundamentally changing the landscape of what’s possible in computer vision, especially in the realm of Object Detection with VLMs.
In this article, we will explore:
- What Vision Language Models are and why they are such a big deal.
- A deep dive into a new state-of-the-art model, Qwen2.5-VL, and what makes it special.
- The different layers of visual understanding, from basic object detection to intricate relationship analysis.
- How to “talk” to these models by crafting the perfect prompts to get exactly what you need.
- A Download Code button, to get the code files with One Click!
Now, that’s exciting, right? So, grab a cup of coffee, and let’s dive in!
Introduction to Qwen 2.5 VL
So, we’ve established that Vision Language Models are the bridge between seeing and understanding. But like any technology, there are many different models out there, each with its own strengths. For our journey today, we’re going to focus on a particularly impressive one: Qwen2.5-VL.
Think of Qwen2.5-VL as the new star player on the team. Developed by the Qwen Team at Alibaba Group, it’s an open-source model that has made some serious waves. Why? Because it achieves performance that’s right up there with some of the biggest closed-source names in the industry, like GPT-4o. This is huge for developers and researchers because it means we have access to top-tier technology without being locked behind a proprietary wall.
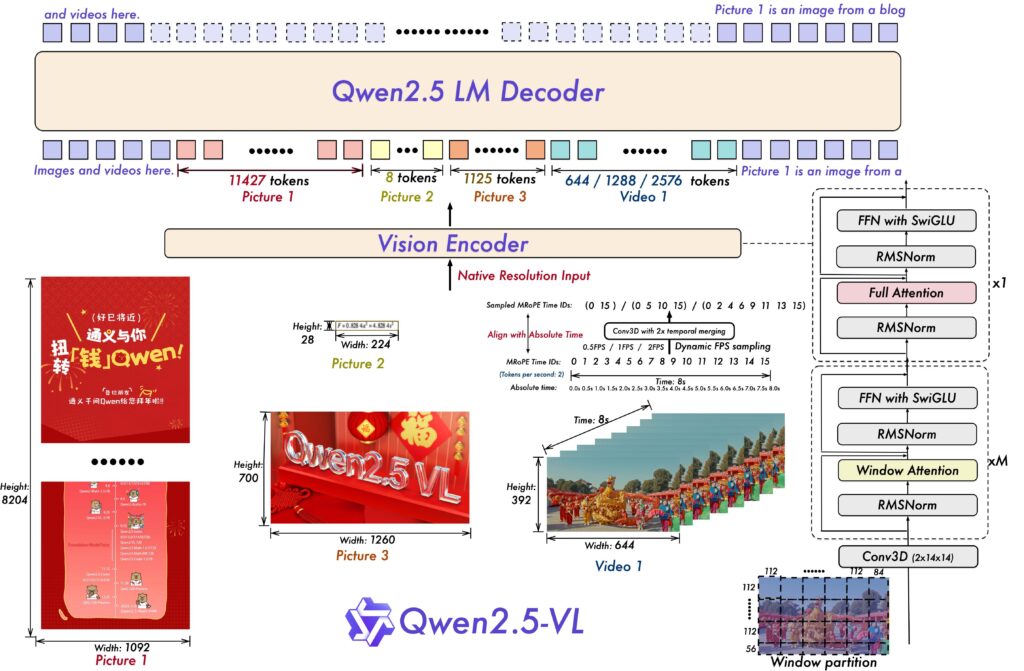
But what makes Qwen2.5-VL so good, especially for the tasks we care about? It’s not just one thing; it’s a combination of smart design and incredible training.
- It Sees in High-Definition (Without Squinting): A lot of older models need to resize images to a fixed, standard size before they can analyze them. This is like trying to fit a panoramic photo into a tiny square frame; you lose a lot of detail. Qwen2.5-VL is different. It was designed to handle images at their native, original resolution. This means all the fine-grained details, whether it’s the text on a distant sign or the texture of a fabric, are preserved.
- It’s a Master of Spatial Awareness: This is the big one for us. Qwen2.5-VL doesn’t just “see” an object; it knows exactly where it is. Instead of using vague relative positions, it thinks in precise coordinates (like a pixel-perfect GPS for images). This is the secret sauce behind its amazing ability to perform Keypoint Detection with VLMs and pinpoint exact locations.
- It’s Not Just an Image-Reader, It’s a Document-Parser: This model’s abilities go way beyond typical photos. It can parse complex documents, think PDFs filled with tables, charts, handwritten notes, and even chemical formulas. It was trained on a massive, custom-built dataset that taught it to understand the structure of a document, not just the text within it.
- It Understands Time, Not Just Space: The “VL” in its name also stands for Video Language, and its ability to comprehend video is rooted in a key architectural improvement. Think of older models watching a video like reading a book by page number (frame 1, frame 2, frame 3…). They know the order of events, but they don’t know if the action is happening in fast-motion or slow-motion. Qwen2.5-VL is different. It uses an enhanced positioning system called Multimodal Rotary Position Embedding (MRoPE), and the innovation lies in how it handles the temporal dimension. Instead of just using frame numbers, it aligns its internal “temporal ID” with absolute timestamps.
At its core, Qwen2.5-VL’s power comes from being trained on an enormous 4.1 trillion tokens of diverse data. This isn’t just a random dump of images and text from the internet. The data was meticulously curated to include everything from simple image captions to complex agent interactions, like how a person uses a computer. This rich, varied diet is what gives the model its deep, nuanced Object Understanding with VLMs.
For our purposes, this means we have a tool that is perfectly primed for visual analysis. It has the foundational skills to not only detect objects but to understand our instructions about them with incredible precision.
Object Detection and Visual (Spatial) Understanding in VLMs
When we talk about Object Detection with VLMs, we’re actually talking about a whole spectrum of capabilities. It’s not just one skill; it’s a ladder of understanding, with each rung representing a deeper level of insight. A powerful model like Qwen2.5-VL can operate at all these levels.
Let’s think of it like the career of a detective. You start as a rookie learning to spot the obvious clues, then become an investigator who can piece together specific evidence, and finally, you become a master sleuth who can understand the entire story behind the scene.
Level 1: The Rookie Detective – Zero-Shot Object Detection
This is the foundational skill. At this level, the model acts like a rookie detective scanning a crime scene for all the standard items of interest. You can give it a broad instruction, and it will identify and label all the objects it can find from a general category.
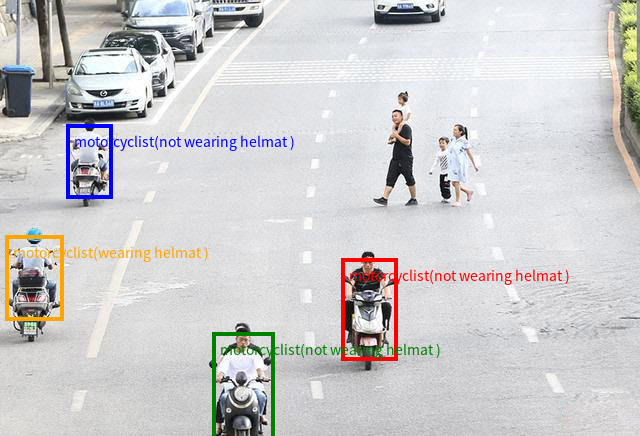
The Prompt: “Detect all motorcyclists in the image and return their locations in the form of coordinates. The format of output should be like {“bbox_2d”: [x1, y1, x2, y2], “label”: “motorcyclist”, “sub_label”: “wearing helmat” # or “not wearing helmat”}.”
You give it an image of a busy highway, and it diligently draws boxes around every vehicle it sees, labeling them ‘motorcyclist (wearing helmet)’, or ‘not wearing helmet’.
This is what we call “zero-shot” object detection. The term “zero-shot” just means the model can perform this task without any special prior training on that specific image. It’s using its vast general knowledge to identify objects on the fly. This is incredibly powerful because you don’t need to prepare a custom dataset or fine-tune a model for every new type of object you want to find. It’s a versatile, all-purpose tool for general Object Detection with VLMs.
Level 2: The Seasoned Investigator – Precise Visual Grounding and Object Counting
This is where things get much more interesting. A seasoned investigator doesn’t just list all the evidence; they follow specific leads. This is exactly what Visual Grounding with VLMs is all about. It’s the ability to link a specific piece of text, a description, to a precise location in an image.
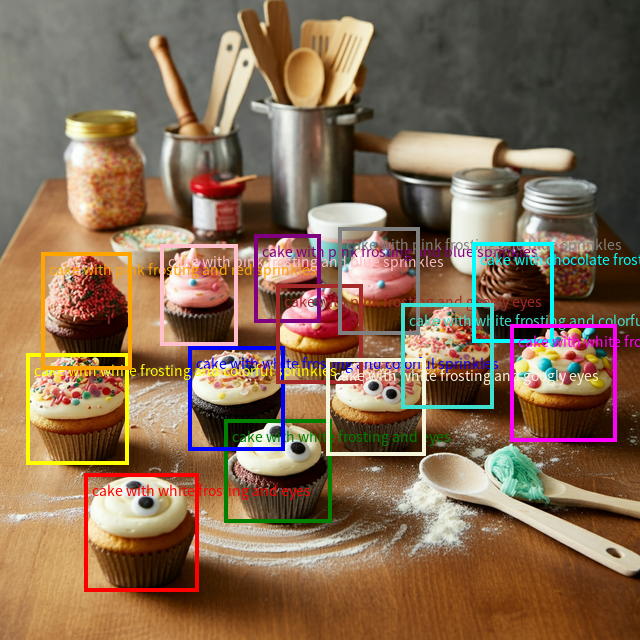
The Prompt: “Locate every cake and describe its features, output the bbox coordinates in JSON format.”
Here, you’re not only asking for all the cupcakes. You’re asking for descriptions based on its features. The model now has to go beyond simple recognition. It has to understand the concept of “choco-chips” and find the one cupcake that matches that description, ignoring all the others.
This capability is what allows you to have a real dialogue about an image. It’s the difference between saying “I see a car” and “I see the red car in the back that’s partially hidden by the tree.”
Going a Step Further: Keypoint Detection
Visual grounding can get even more granular. What if you don’t need a whole bounding box? What if you just need to pinpoint a specific feature? This is where Keypoint Detection with VLMs comes in.
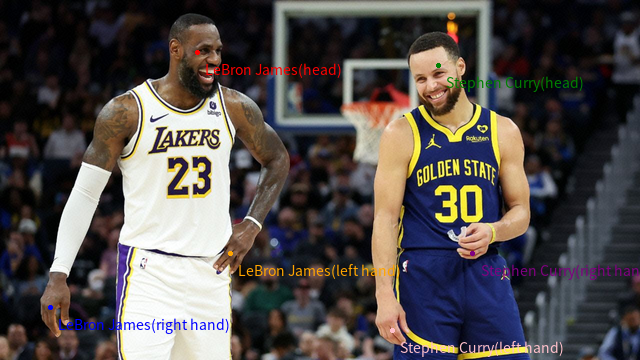
The Prompt: “Identify basketball players and detect key points such as their hands and heads.”
Instead of drawing a box around the entire player, the model can place a single dot on their head and each of their hands. Qwen2.5-VL is particularly good at this because it was trained to understand absolute coordinates, allowing for this kind of pixel-level precision. This is essential for applications in sports analytics, human-computer interaction, or even augmented reality.
Before we move: Our courses cover Vision Language Models(VLMs), Fundamentals of Computer Vision, and Deep Learning in depth. To get started, just click below on any of our free Bootcamps!
Level 3: The Master Sleuth – Understanding Relationships and Context
This is the pinnacle of Object Understanding with VLMs. At this level, the model isn’t just identifying or locating objects; it’s interpreting the scene. It’s making judgments based on the relationships and interactions between different elements.
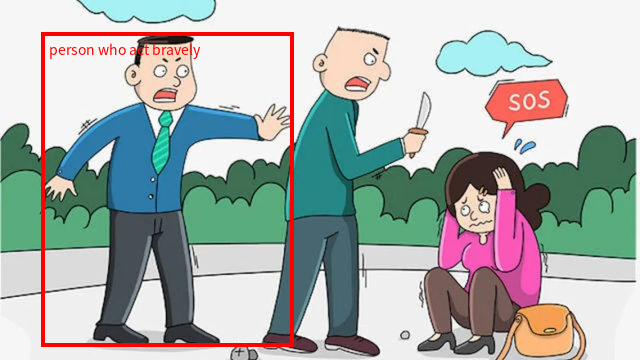
The Prompt: “Locate the person who act bravely, report the bbox coordinates in JSON format.”
Think about that for a second. There is no object class called “person who acts bravely.” “Bravely” is an abstract concept. To fulfill this request, the model has to:
- Identify the kids in the image.
- Identify the other people or objects they are interacting with (e.g., an elderly person, a dropped bag of groceries).
- Use its language-based reasoning to understand what constitutes a “bravely” action.
- Combine this visual evidence and contextual reasoning to correctly identify the child performing the helpful act.
This is where the true power of a VLM shines. The “vision” part sees the scene, and the “language” part provides the common-sense reasoning to interpret it. This opens the door to incredibly advanced applications, from creating automatic descriptions of complex scenes to building more intelligent robotic assistants.
As you can see, Qwen2.5-VL provides a full toolkit for visual analysis, from the broad strokes of object detection to the nuanced interpretation of complex human interactions.
Code Pipeline
Theory is fantastic, but seeing how these concepts translate into actual, running code is where the real learning happens. We’re now going to pull back the curtain and walk through the Python script that powers an interactive application for Object Detection with VLMs.
Think of this code as a digital assembly line. We’ll provide two raw materials: an image and a text prompt. At the end of the process, a beautifully annotated image and a structured text response will be generated. We will break down the entire process, piece by piece.
And don’t worry about trying to copy and paste everything as we go. All the Python scripts and implementation details we discuss are available for you to explore at your own pace.
Part 1: Setting the Stage – Loading the Model and Processor
Before our assembly line can start working, we need to set up our main machinery. This involves loading the Qwen2.5-VL model itself and a special helper called a “processor.”
from transformers import (
    AutoProcessor,
    Qwen2_5_VLForConditionalGeneration,
)
import supervision as sv

# --- Config ---
model_qwen_id = "Qwen/Qwen2.5-VL-3B-Instruct"

# Load the main model
model_qwen = Qwen2_5_VLForConditionalGeneration.from_pretrained(
    model_qwen_id, torch_dtype="auto", device_map="auto"
)

# Load the processor
min_pixels = 224 * 224
max_pixels = 1024 * 1024
processor_qwen = AutoProcessor.from_pretrained(
    "Qwen/Qwen2.5-VL-3B-Instruct", min_pixels=min_pixels, max_pixels=max_pixels
)
- The Model (
Qwen2_5_VLForConditionalGeneration): This is the brain of the operation. Thefrom_pretrainedfunction fetches the 3-billion parameter version of Qwen2.5-VL from the Hugging Face Hub. The argumentstorch_dtype="auto"anddevice_map="auto"are for efficiency, telling the library to use the best data format and automatically place the model on a GPU if one is available. - The Processor (AutoProcessor): If the model is the brain, the processor is the sensory system. Its job is to take our raw image and text and convert them into a format the model can understand. Notice the
min_pixelsandmax_pixelssettings. This is where we leverage Qwen’s native dynamic resolution. We’re telling the processor that it can handle images of various sizes within this range, avoiding the detail loss that comes with forced resizing.
Part 2: The Main Event – The Inference Function (detect_qwen)
This is the core of our assembly line, where the image and prompt are processed and sent to the model for analysis. We’ll look at this function step-by-step.
@GPU
def detect_qwen(image, prompt):
    # Step 1: Format the inputs
    messages = [
        {
            "role": "user",
            "content": [
                {"type": "image", "image": image},
                {"type": "text", "text": prompt},
            ],
        }
    ]

    # Step 2: Preprocess with the processor
    text = processor_qwen.apply_chat_template(messages, tokenize=False, add_generation_prompt=True)
    image_inputs, video_inputs = process_vision_info(messages)
    inputs = processor_qwen(
        text=[text],
        images=image_inputs,
        # ...
        return_tensors="pt",
    ).to(model_qwen.device)

    # Step 3: Run inference
    generated_ids = model_qwen.generate(**inputs, max_new_tokens=1024)

    # Step 4: Decode the output
    # ... (trimming and decoding logic)
    output_text = processor_qwen.batch_decode(
        generated_ids_trimmed,
        # ...
    )[0]

    # Step 5: Get processed dimensions for scaling
    input_height = inputs["image_grid_thw"][0][1] * 14
    input_width = inputs["image_grid_thw"][0][2] * 14

    # Step 6: Create the annotated image
    annotated_image = create_annotated_image(image, output_text, input_height, input_width)

    return annotated_image, output_text, # ...
- Step 1: Format the Inputs: We package our image and prompt into a messages list. This structured format is exactly how the model expects to receive multimodal (image + text) data. It’s clean and mimics a conversational turn.
- Step 2: Preprocess: Here, the processor earns its keep. It takes the messages list and performs several crucial actions: it applies a chat template to the text, processes the image into a grid of patches, and bundles everything into tensors, the numerical format that models work with.
- Step 3: Run Inference: This is the moment of magic.
model_qwen.generate(**inputs)sends the prepared data to the model. The model “looks” at the image tensor, “reads” the text tensor, and generates a sequence of output tokens that represent its answer. - Step 4: Decode the Output: The model’s raw output is a sequence of token IDs. The processor.batch_decode function translates these numbers back into human-readable text, giving us the JSON string we asked for in our prompt.
- Step 5: Get Processed Dimensions: This is a subtle but critical step for accurate visualization. The model doesn’t see the image in pixels; it sees it as a grid of 14×14 pixel patches. This line retrieves the dimensions of that grid (
inputs['image_grid_thw']) and multiplies by 14 to get the total dimensions of the image as the model saw it. We need these dimensions to correctly scale the bounding box coordinates later. - Step 6: Annotate: Finally, we pass everything to our visualization function, which we’ll explore next.
Part 3: The Finishing Touch – Visualizing the Results (create_annotated_image)
The model gives us data; this function turns that data into insight. It parses the model’s JSON response and draws the bounding boxes and keypoints directly onto our original image.
def create_annotated_image(image, json_data, height, width):
    # Step 1: Parse the JSON response
    try:
        parsed_json_data = json_data.split("```json")[1].split("```")[0]
        bbox_data = json.loads(parsed_json_data)
    except Exception:
        return image # Return original image if parsing fails

    # Step 2: Handle both bounding boxes and keypoints using 'supervision'
    annotated_image = np.array(image.convert("RGB"))

    # For Bounding Boxes
    detections = sv.Detections.from_vlm(
        vlm=sv.VLM.QWEN_2_5_VL,
        result=json_data,
        resolution_wh=(width, height), # Use the model's processed dimensions
    )
    bounding_box_annotator = sv.BoxAnnotator()
    label_annotator = sv.LabelAnnotator()

    annotated_image = bounding_box_annotator.annotate(scene=annotated_image, detections=detections)
    annotated_image = label_annotator.annotate(scene=annotated_image, detections=detections)

    # For Keypoints
    # ... (code to extract and annotate points) ...

    return Image.fromarray(annotated_image)
- Step 1: Parse the JSON: The model often wraps its JSON output in markdown-style code blocks (
json ...). This code first cleans that up and then usesjson.loadsto convert the text into a usable Python list of objects. The try-except block is good practice to prevent the app from crashing if the model returns a non-JSON response. - Step 2: Visualize with supervision: Manually drawing boxes and labels can be tedious. The supervision library is a fantastic toolkit that massively simplifies this.
sv.Detections.from_vlm(...): This is the star of the show. The library has built-in support for parsing the output of Qwen2.5-VL! We just pass it the raw JSON response (result) and the dimensions the model used (resolution_wh). It automatically handles the coordinate scaling and creates a Detections object.sv.BoxAnnotator and sv.LabelAnnotator: These are helpers that take the Detections object and, with a single line of code, draw the boxes and labels onto our image.
This pipeline is a beautiful example of modern machine learning engineering. We use a powerful foundation model, guide it with a clear prompt, and then leverage high-level libraries like supervision to quickly build a robust and useful application around it. This entire workflow perfectly demonstrates the practical side of Object Understanding with VLMs.
Inference
We’ve explored the theory, dissected the code, and compared the philosophies of our two models. Now, it’s curtain time. This is where we step into the director’s chair, give our models their prompts, and see how they perform on a live stage. The following examples showcase the incredible versatility of these VLMs, moving seamlessly between different types of visual understanding based on nothing more than the words we use.
We have created a Gradio interface for you to interact with the model and experiment with different images.
# --- Gradio Interface ---
with gr.Blocks(theme=gr.themes.Soft(), css=css_hide_share) as demo:
    gr.Markdown("# Object Detection & Understanding: Qwen vs. Gemma")
    # ...
    with gr.Row():
        with gr.Column(scale=2): # Input column
            image_input = gr.Image(...)
            prompt_input_model_1 = gr.Textbox(...)
            prompt_input_model_2 = gr.Textbox(...)
            generate_btn = gr.Button(...)

        with gr.Column(scale=1): # Qwen output column
            output_image_model_1 = gr.Image(...)
            output_textbox_model_1 = gr.Textbox(...)
            output_time_model_1 = gr.Markdown()

    gr.Markdown("### Examples")
    example_prompts = [ ... ] # Pre-filled examples for easy testing
    gr.Examples( ... )

    generate_btn.click(fn=detect, ...)
Before we dive in, a friendly heads-up: these models are compelling, and that power requires some serious hardware. To run these examples smoothly on your machine, you’ll need a capable GPU with a good amount of vRAM (>16GB). While it’s possible to run them on a CPU, the experience will be significantly slower.
All the codes are provided; you can download and play with them at any time.
Now, let’s see the results.
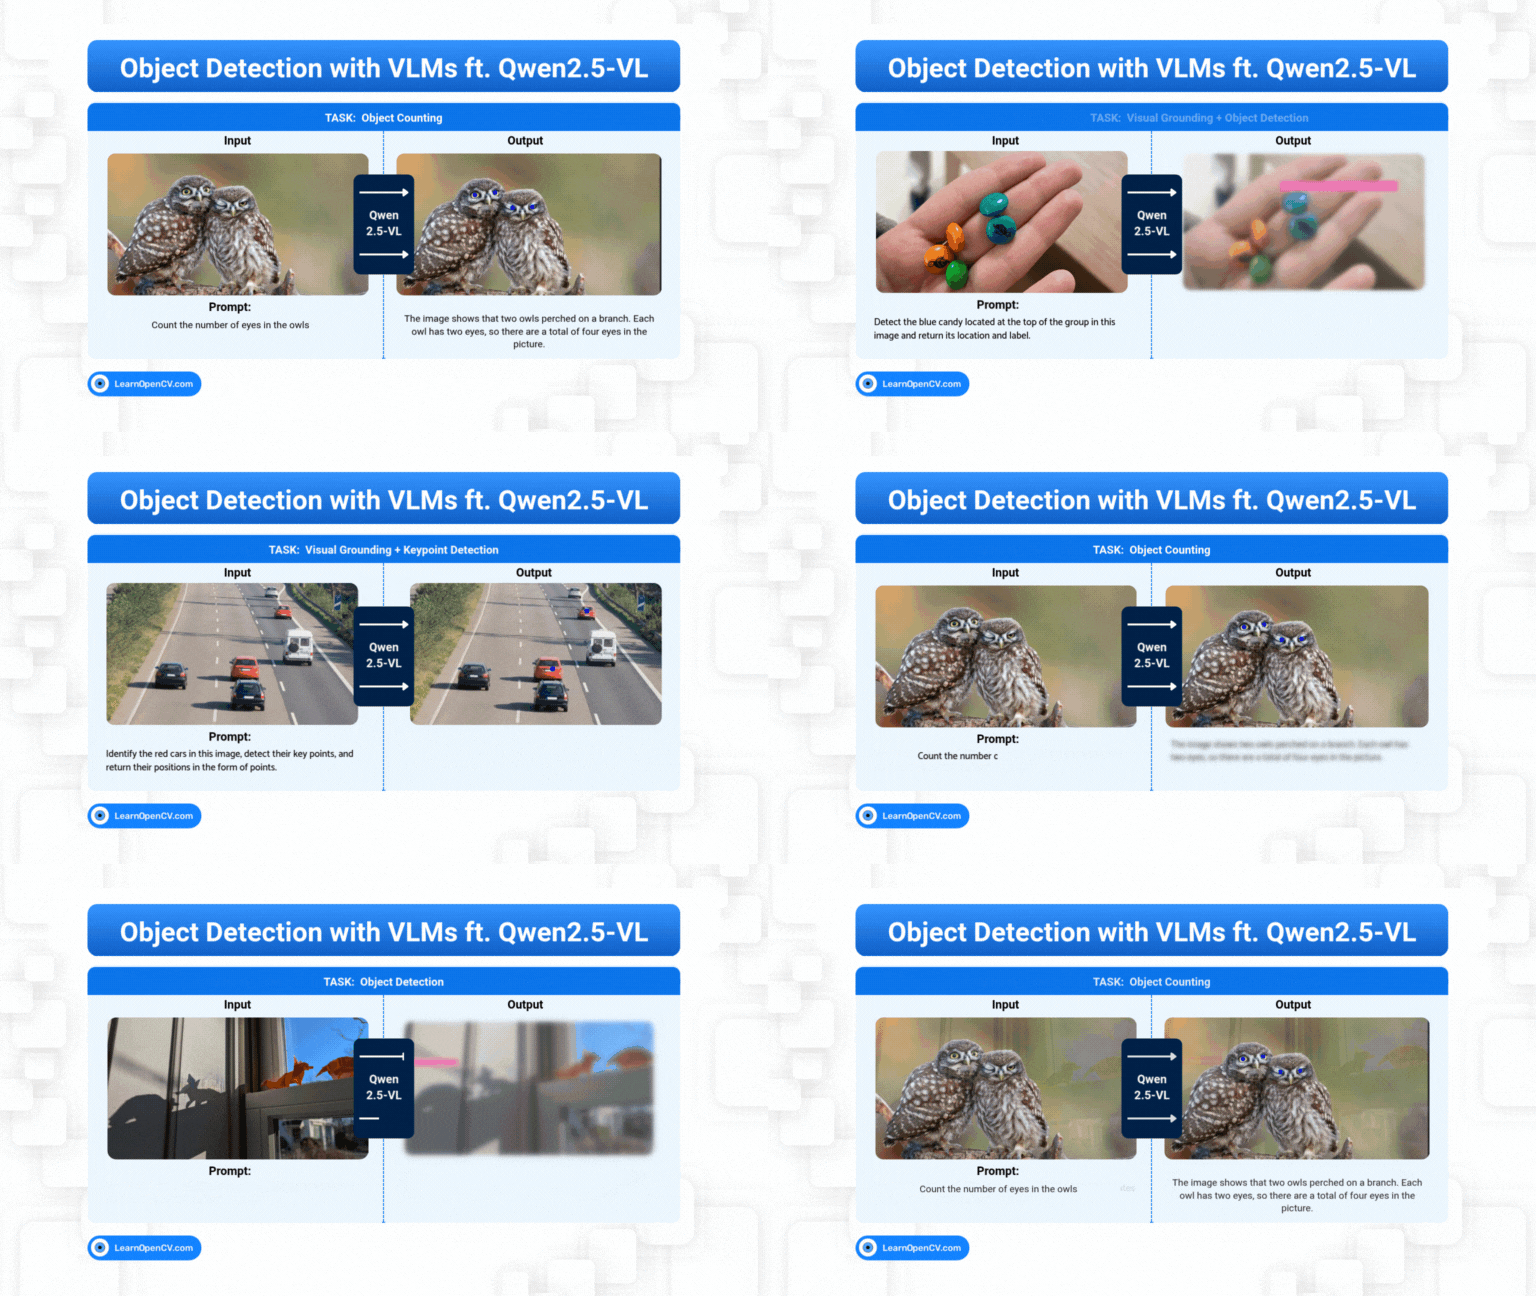
Use Case 1: The Art of Specificity – Visual Grounding
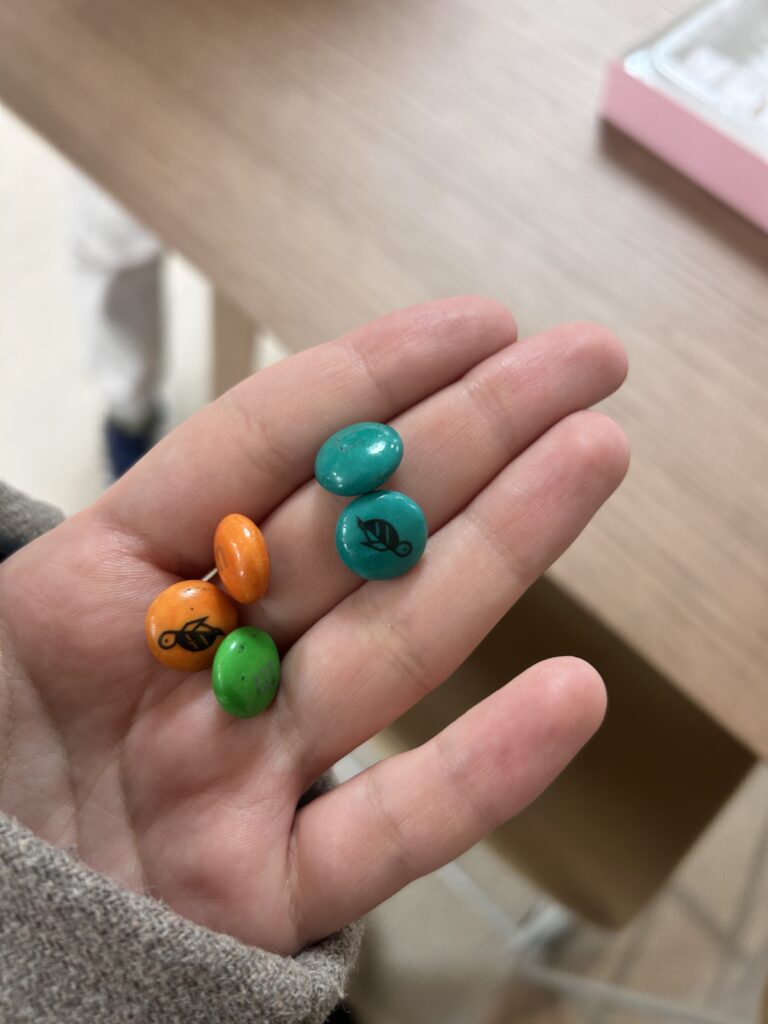
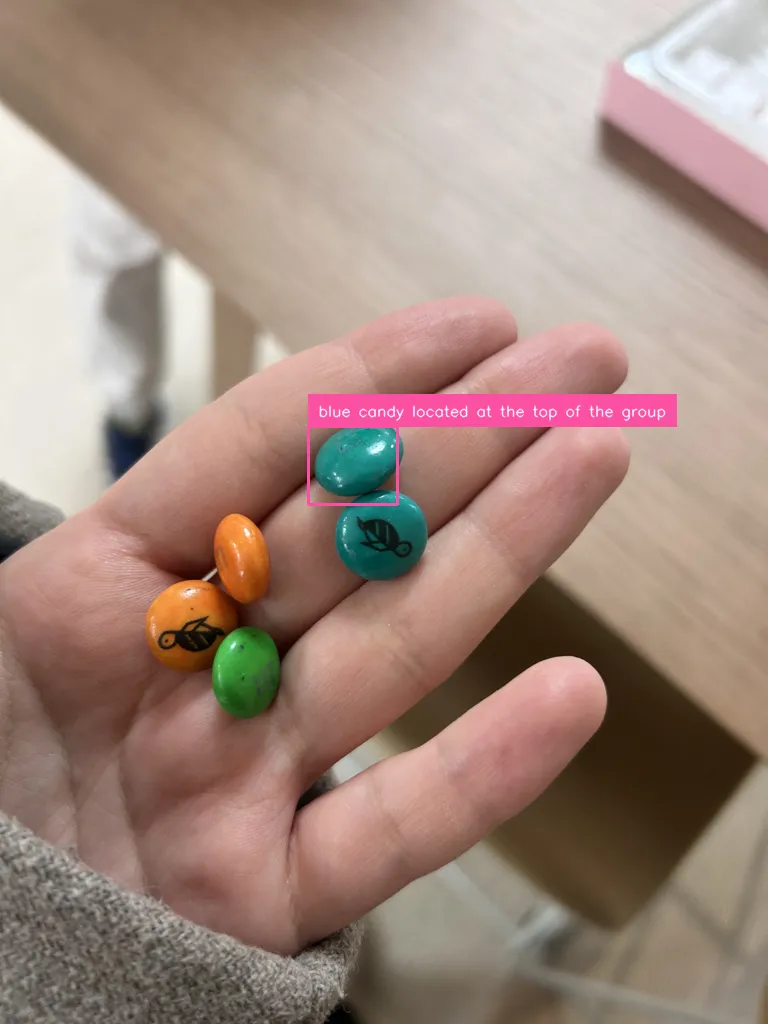
Here, we don’t want the model to find all the candies. We want it to find one specific candy based on a description of its color and location.
- Task: Visual Grounding + Object Detection
- Prompt: Detect the blue candy located at the top of the group in this image and return its location and label.
The Result: This is a beautiful demonstration of precise Visual Grounding with VLMs. The model correctly interprets every part of our request. It understands the concept of “blue,” filters for that attribute, and then uses spatial reasoning to identify which of the blue candies is “at the top of the group.” It successfully ignores all the other candies and draws a single, accurate bounding box. This is the model acting like a seasoned investigator following a very specific lead.
Use Case 2: Pinpoint Precision – Keypoint Detection
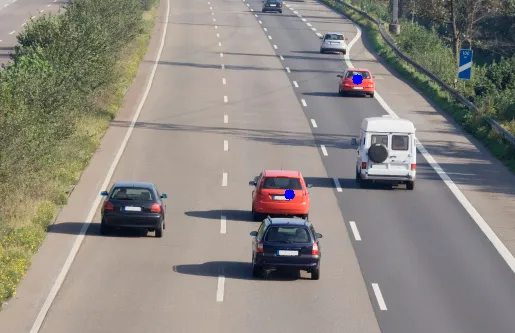
Let’s ask for an even more granular level of detail. Instead of a box around the whole object, we want the model to identify specific points of interest.

- Task: Visual Grounding + Keypoint Detection
- Prompt: Identify the red cars in this image, detect their key points, and return their positions in the form of points.
The Result: The model shifts its behavior from drawing boxes to placing precise dots on the red cars. This showcases its ability to perform Keypoint Detection with VLMs, moving from a paintbrush to a fine-tipped pen. It’s no longer just saying “the object is here”; it’s saying “this specific feature of the object is exactly here.” This capability is powered by the model’s understanding of coordinate systems and is essential for more advanced applications in analytics, robotics, or augmented reality.
Use Case 3: The Leap to Reasoning – Object Counting
This use case is fascinating because it tests the “language” part of the Vision Language Model more than its pure detection skills.

- Task: Object Counting
- Prompt: Count the number of eyes in the owls
The Result:
The image shows two owls perched on a branch. Each owl has two eyes, so there are a total of four eyes in the picture.
Look closely at this response. It’s not a JSON list or a set of coordinates. It’s a natural language sentence that demonstrates a multi-step reasoning process. The model:
- Identified that there are two owls.
- Accessed its world knowledge that owls have two eyes each.
- Performed the calculation (2 owls * 2 eyes/owl).
- Formulated a complete, helpful sentence.
This is a profound leap beyond just seeing pixels. This is genuine Object Understanding with VLMs.

Use Case 4: Detecting the Intangible – A Test of True Understanding
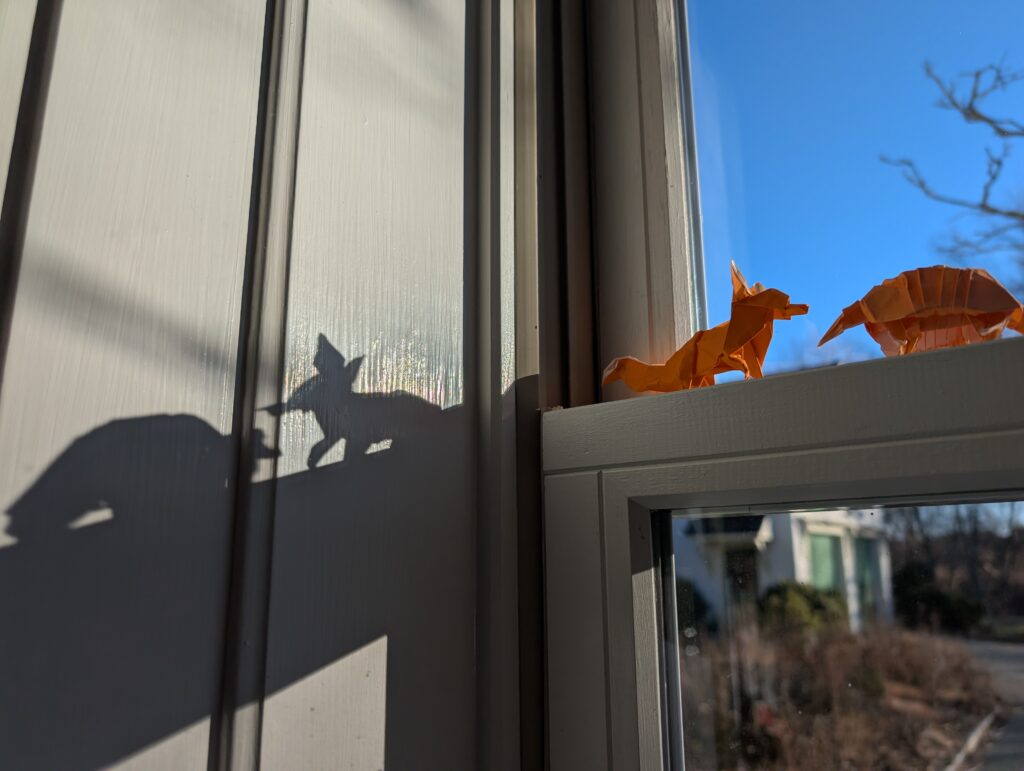
This final use case is perhaps the most impressive. It asks the model to detect something that isn’t a physical object at all, but rather a phenomenon created by an object. This is a profound test of its reasoning capabilities.
- Task: Object Detection
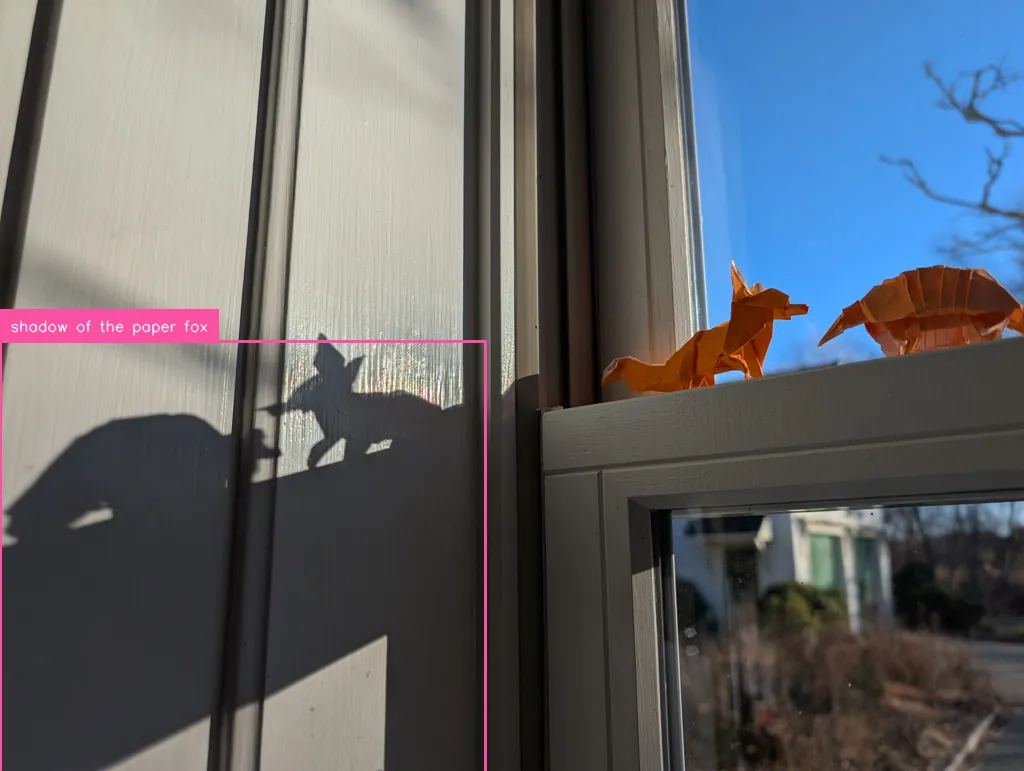
- Prompt: Locate the shadow of the paper fox, report the bbox coordinates in JSON format.
The Result: This prompt is a masterpiece of a challenge. A “shadow” has no color or texture of its own; its existence is defined purely by its relationship to the “paper fox” and the lighting in the scene. A traditional object detector would fail completely. A VLM, however, can succeed.
The model first has to understand the concept of a “paper fox,” locate it, and then reason about how light would interact with it to create a shadow on the surface below. It must then isolate that specific area of darkness and draw a bounding box around it, ignoring the fox itself. This demonstrates that we have moved far beyond just finding objects. We are now engaging in true Object Understanding with VLMs, asking the model to find not just what is in the image, but also the abstract effects and relationships between the elements.
PS: Also, we are experimenting with Gemma3 as well, we have given that comparison app script in the Download Code folder, play with it. Maybe we will publish a comparison article in the near future. Stay tuned!
Quick Recap
We’ve covered a lot of ground, from the foundational concepts of visual understanding to a head-to-head comparison of two AI titans. It’s been quite a journey! Before we conclude, let’s quickly recap the main takeaways to lock in what we’ve learned.
Here are the key things to remember:
- Vision Language Models (VLMs) Enable a Dialogue with Images: The core idea of Object Detection with VLMs is to move beyond simple classifiers and have a conversation. We can now ask nuanced questions in natural language and get intelligent, context-aware answers about what an image contains.
- Understanding Happens in Layers: Visual understanding is a spectrum. We’ve seen how models can perform Zero-Shot Object Detection (finding general objects), Precise Visual Grounding (locating specific objects by description), and even Relationship Understanding (interpreting the story within a scene).
- Modern Tools Make Implementation Easier: We don’t have to build everything from scratch. The journey from a raw model to a functional application is massively accelerated by powerful libraries. The Hugging Face transformers library gives us easy access to Qwen2.5-VL, while supervision provides a high-level API to parse model outputs and visualize results, saving us from writing complex boilerplate code.
- You Are the Director via Prompting: The power to unlock these capabilities is in your hands. A well-crafted prompt, containing a clear task, specific object details, and a desired output format (like JSON), is the universal key to guiding any VLM to give you the results you need.
Conclusion
Remember that feeling of frustration, trying to find those specific sneakers from a photo? We started there, with a simple, relatable problem that highlights the gap between how humans see and how traditional computers “see.” Throughout this article, we’ve explored the solution: a new generation of AI that is closing that gap with astonishing speed. With a model like Qwen2.5-VL, we can now simply ask about the sneakers. We can ask for their location, their key features, or even what makes them stand out in the scene.
This isn’t just a gimmick; it’s a profound shift. For developers, engineers, and creators, this technology unlocks a new world of possibilities. Imagine e-commerce sites where you can visually search with conversational language, assistive technologies that can describe a complex environment to the visually impaired, or creative tools that can automatically catalog and tag assets based on nuanced descriptions. The ability of Qwen2.5-VL to understand native resolutions, parse complex documents, and respond with structured, precise coordinates makes it an incredibly practical and powerful tool for building these real-world applications today.
References
Qwen2.5 VL Blog by Qwen Team
Object Detection and Visual Grounding with Qwen 2.5 by Pyimagesearch
The Code is inspired by a Gradio Space by the HF Team



100K+ Learners
Join Free OpenCV Bootcamp3 Hours of Learning