


Recently, the interest in fine-tuning Stable Diffusion models has surged among AI enthusiasts and professionals, driven by the need to incorporate these models into specific requirements. This article walks you through various aspects of fine-tuning a diffusion model on a flat-UI image dataset, providing a comprehensive guide for theoretical insights and practical implementation.
This resource is ideal for AI professionals working on image-generation diffusion models and AI enthusiasts looking to get hands-on experience without feeling left out on the programming front.
This article covers techniques like DreamBooth and LoRA and detailed scripts to understand the flow of fine-tuning pipelines. It equips readers with the knowledge and tools to customize diffusion models effectively for specialized applications.
- Dataset Preparation
- Dreambooth
- LoRA
- Various Fine-Tuning Tools
- Configuration File
- Fine-tuning
- Inferencing Results
- Improvements
- Generated UI images
- Key Takeaways
- Conclusion
- References
Dataset Preparation
Finding a good UI dataset was very challenging for a couple of reasons:
- Availability issue.
- Inconsistent Prompts are given.
- Some datasets contain images of individual icons only instead of complete UI.
For the above reasons, we created our huggingface UI dataset. This dataset consists of 20 rows( initially experimented with 10 rows) and two columns (“image” and “text”). We obtained images from dribble.com, which provides exquisite and modern flat UI designs with more than 1000 samples available.
We generated prompts for UI images by calling Google’s Gemini 2.0 Flash Experimental API.
If you want to go through the script to prepare this dataset, we recommend downloading the code by clicking the link below.

You can find this huggingface dataset here to perform your customization and training.
To load this dataset, you might use huggingface’s load_dataset function. This function makes working with various formats, such as parquet, CSV, JSON, and TXT, easier. This method is recommended because the dataset provided is in parquet format, which is advantageous if you use Arrow tools.
Dreambooth
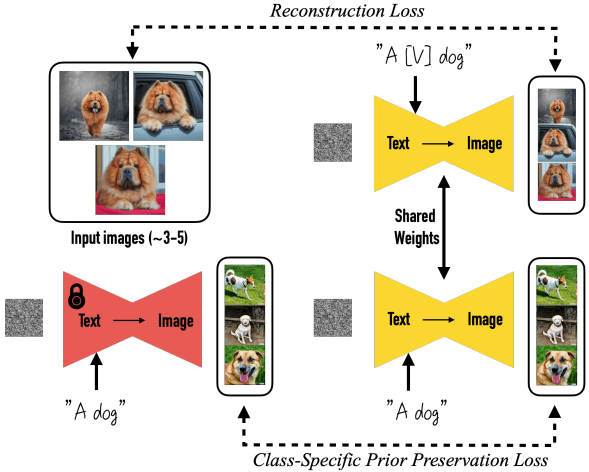
Let us briefly look at the DreamBooth fine-tuning technique and how it is used.
DreamBooth helps personalize image generation with just a few training images(~3 to 5). Associating a unique identifier with the subject allows for precise and consistent outputs without losing the model’s ability to create diverse images.
DreamBooth addresses the drifting issue commonly observed in diffusion models, where fine-tuning can lead to overfitting and compromise the model’s pre-existing knowledge. The authors identified this problem and introduced a class-specific prior preservation loss that encourages diversity and counters image/language drift.
Sometimes, people struggle to provide unique identifiers linked to a specific object in their prompt. To address this issue, the paper’s authors found that short sequences work very well, typically consisting of two or three characters. You can find an example of how the unique identifiers are provided in the image below:
The above image shows that the unique identifier is just a single character, ‘V,’ enclosed in square brackets. This makes it a unique character for textual models to understand.
In our discussions of fine-tuning techniques, we have addressed a brief introduction to DreamBooth. It is time to examine another widely recognized technique: LoRA (Low-Rank Adaptation). This method is typically employed when adapting the model to a specific style, such as an artistic or fantasy style.
To get a more comprehensive view of the Dreambooth fine-tuning technique, visit our blog on Dreambooth using diffusers.
LoRA
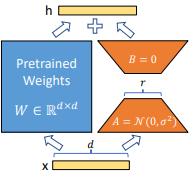
LoRA (Low-Rank Adaptation) is an efficient fine-tuning technique for adapting large models like Stable Diffusion to a new set of data instances. Instead of updating all model parameters, LoRA introduces small trainable matrices into specific layers, such as attention or feedforward layers, while keeping the base model weights frozen.
This approach significantly reduces the number of trainable parameters, making fine-tuning faster and less resource-intensive. LoRA modules can be reused or combined for different tasks or styles.
While adapting the model using LoRA, you must define a hyperparameter called ‘rank,’ denoted by ‘r’ in the above image.
The higher the R-value, the closer you will get to completely fine-tuning the model.
Generally, an R-value of 4 can produce comparable results, with one having a much higher R-value. A higher R-value also leads to more computational costs and higher fine-tuning time.
Results with different R-values can be seen in the below image, provided in the original paper of LoRA:
Various Fine-Tuning Tools
Tools like SimpleTuner from Bghira, Sd-Scripts from Kohya-ss, OneTrainer from Nerogar, and Diffusers from Huggingface are extensively used for implementing Stable-Diffusion 3.5 LoRA fine-tuning or any diffusion model in general.
Let’s briefly overview the diffusers module as we use it.
Diffusers is an open-source library by Huggingface that provides a well-documented framework for working with diffusion models like Stable Diffusion. It includes extensive scripts for fine-tuning Lora and Dreambooth, which can be directly called using the accelerator library(in the next section). The Diffusers library simplifies configuration management, making it beginner-friendly yet powerful enough for advanced tasks.
Huggingface’s strong community support and continuous updates make Diffusers a go-to choice for many developers and researchers.


Configuration File
We must define several arguments for Lora fine-tuning a diffusion model to guide our model toward generating better sample quality and prompt adherence than the pre-trained models. Some of these arguments are not mandatory and take a default value without impacting the model’s performance.
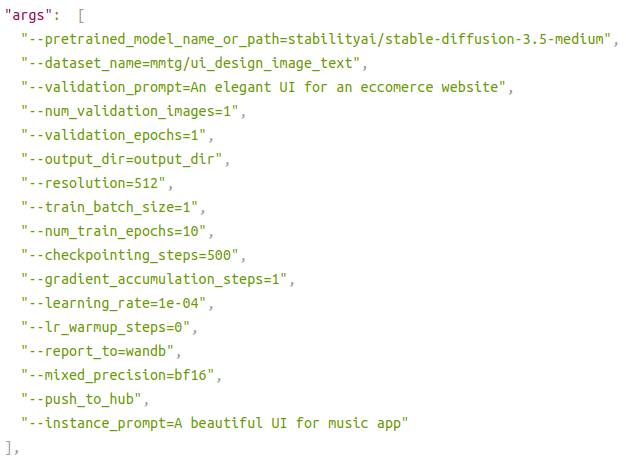
Let us now look at what a configuration file containing mandatory arguments looks like:
accelerate launch train_dreambooth_lora_sd3.py
--pretrained_model_name_or_path="stabilityai/stable-diffusion-3.5-medium"
--dataset_name="bhomik7/flat-UI-dataset-small"
--validation_prompt="""Create a modern user interface design for a mobile
application that focuses on fitness tracking. The layout should include a vibrant
dashboard displaying key metrics such as steps taken, calories burned, and
workout summaries. Incorporate interactive elements like buttons for starting
workouts, viewing progress, and accessing nutrition information. Use a color
palette that conveys energy and motivation, with clear typography and intuitive navigation."""
--num_validation_images=5
--validation_epochs=1
--output_dir="sd_3_5m_dreambooth_lora_ft_FULL_RES"
--train_text_encoder
--rank=4
--resolution=1024
--train_batch_size=1
--num_train_epochs=20
--checkpointing_steps=500
--gradient_accumulation_steps=4
--learning_rate=1e-04
--lr_warmup_steps=10000
--report_to="wandb"
--mixed_precision="bf16"
--push_to_hub
--instance_prompt="A beautiful <TOK> UI for music app"
--caption_column='text'
The image above shows that the file starts with the word ‘accelerate. ‘ But what does ‘accelerate’ mean?
The official huggingface Accelerate documentation states
“It is a library that enables the same pytorch code to run across any distributed configuration by adding just four lines of code! In short, training and inference at scale are simple, efficient, and adaptable.”
For a better understanding, refer to the image comparison below, which shows how Accelerate can be implemented with very few lines of code:
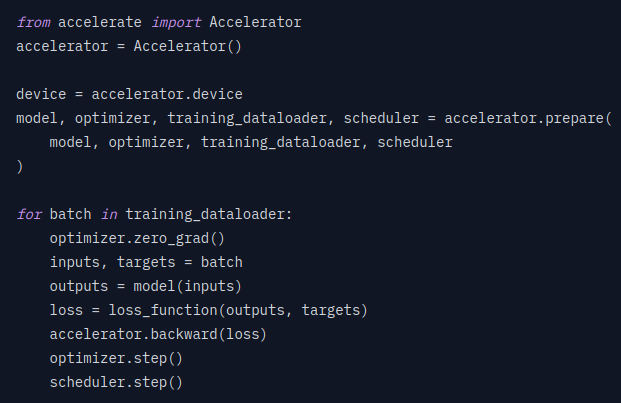
Such is the simplicity of Accelerate Library!!
Coming back to our configuration file, let us dissect each argument provided in the image step-by-step:
| Argument | Data Type | Default Value | Description |
| pre_trained_model_name_or_path | String Required: True | None | Path to pretrained model or model identifier from huggingface. |
| dataset_name | String | None | Number of images generated during validation using ‘—-validation_prompt’. |
| validation_prompt | String | None | Prompt used for validation. |
| num_validation_images | Integer | 4 | After ”–validation_epochs,” run a validation step. |
| validation_epochs | Integer | 1 | After ”–validation_epochs” run a validation step. |
| output_dir | String | sd-model-finetuned-Lora | Output directory where checkpoints and predictions will be written. |
| train_text_encoder | If present in the config file, then set to true | NA | Whether to train the text encoder (CLIP text encoders only). If set, text encoder should be float32 precision. |
| rank | Integer | 4 | Dimension of LoRA update matrices. |
| resolution | Integer | 512 | The resolution for input images in the train/validation dataset will be resized to this resolution. |
| train_batch_size | Integer | 4 | Batch Size for the training dataloader. |
| num_train_epochs | Integer | 1 | Number of epochs. |
| checkpointing_steps | Integer | 500 | Save the checkpoints of the training state after every ‘–checkpointing_steps’ update. These checkpoints can be used as final checkpoints in case they are better than the last and are also suitable for resuming training using `–resume_from_checkpoint.` |
| gradient_accumulation_steps | Integer | 1 | Number of update steps to accumulate before performing a backward/update pass. |
| learning_rate | Float | 1e-4 | The initial learning rate (after the potential warmup period). |
| lr_warmup_steps | Integer | 500 | Number of steps for the warmup in the lr scheduler. |
| report_to | String | Tensorboard | The integration to report the results and logs. Supported platforms are tensorboard (default), wandb, and comet_ml. Use “all” to report to all integrations. |
| mixed_precision | String | None | Whether to use mixed precision. Choose between ‘fp16’ or ‘bf16’. |
| push_to_hub | If present, push the model to the huggingface hub | NA | NA |
| instance_prompt | String Required: True | None | The prompt with an identifier specifying the instance, e.g., ‘photo of a TOK dog,’ ‘in the style of TOK’. |
| caption_column | String | None | The column of the dataset containing the instance prompt for each image. |
These are crucial arguments you’ll need to pass to produce good-quality images.
Apart from these, you might encounter a few other arguments during fine-tuning. For Example: ‘max_image_seq_len,’ ‘use_dynamic_shifting,’ ‘use_exponential_sigmas,’ ‘max_shift,’ ‘use_beta_sigmas,’ ‘invert_sigmas,’ and ‘base_shift.’ To know more about these arguments, visit the official repository of the diffusers module.
Fine-tuning
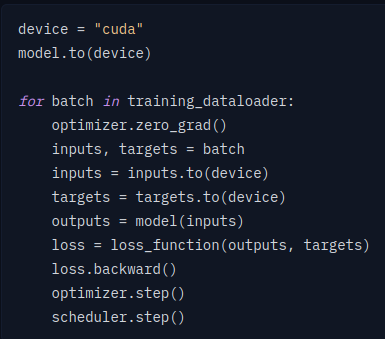
Here comes the interesting part, in which you will get a general idea of how to fine-tune a diffusion model using the diffusers module and how to use a configuration file and accelerate module, which we have already encountered in the previous section.
All experiments are performed on an Nvidia A6000 GPU on the vast.ai cloud platform.
Before moving further, it is essential to understand the memory requirements for fine-tuning the stable diffusion 3.5 medium model.
- Before Generating Validation Images: 19.6GB out of 49GB, 182W power consumption
- During the Generation of Validation Images: 26.4GB out of 49GB, 298W power consumption
Let’s begin by installing the dependencies:
git clone https://github.com/huggingface/diffusers , pip install -e .

pip install datasets

pip install wandb (if you are using weights and biases for model tracking)

pip install -r requirements_sd3.txt
After this, you must log in to your huggingface account and the tracking board you use; in our case, we will proceed with wandb only.
As all the dependencies are installed, along with logging into huggingface and wandb, we can proceed with initializing the accelerate config.
The Accelerate configuration allows you to default to all the parameters instead of manually defining them, but you can also do the opposite. Here, we will use the default configuration for Accelerate.
accelerate config default
After getting everything done, we will run the configuration script(explained in the previous section) and wait for the model weights to get downloaded before the training starts.
Once the training begins, you will notice that the progress bar says ‘x’ steps, but we have provided the number of epochs in the configuration. So, what is the difference between steps and epochs, and how do you calculate steps when epochs are given?
Step: A step is one optimization update. Multiple steps are executed within a single epoch.
Epoch: One complete pass through the entire training dataset.
For Example,
Samples: 20,000 images
Batch Size: 100
1 epoch = 200 (20000/100) steps
But in the configuration setting, we have passed an argument called gradient_accumulation_steps, which means how many steps the model should perform backpropagation after. Hence, to calculate an adequate number of steps in this situation, we will proceed in the following manner:
Effective steps = (Number of Samples/batch_size)/gradient_accumulation
We have gone through the basic details of fine-tuning a stable diffusion model and the essential arguments that must be passed to the configuration file.
It’s time to look at the validation results in various argument settings.
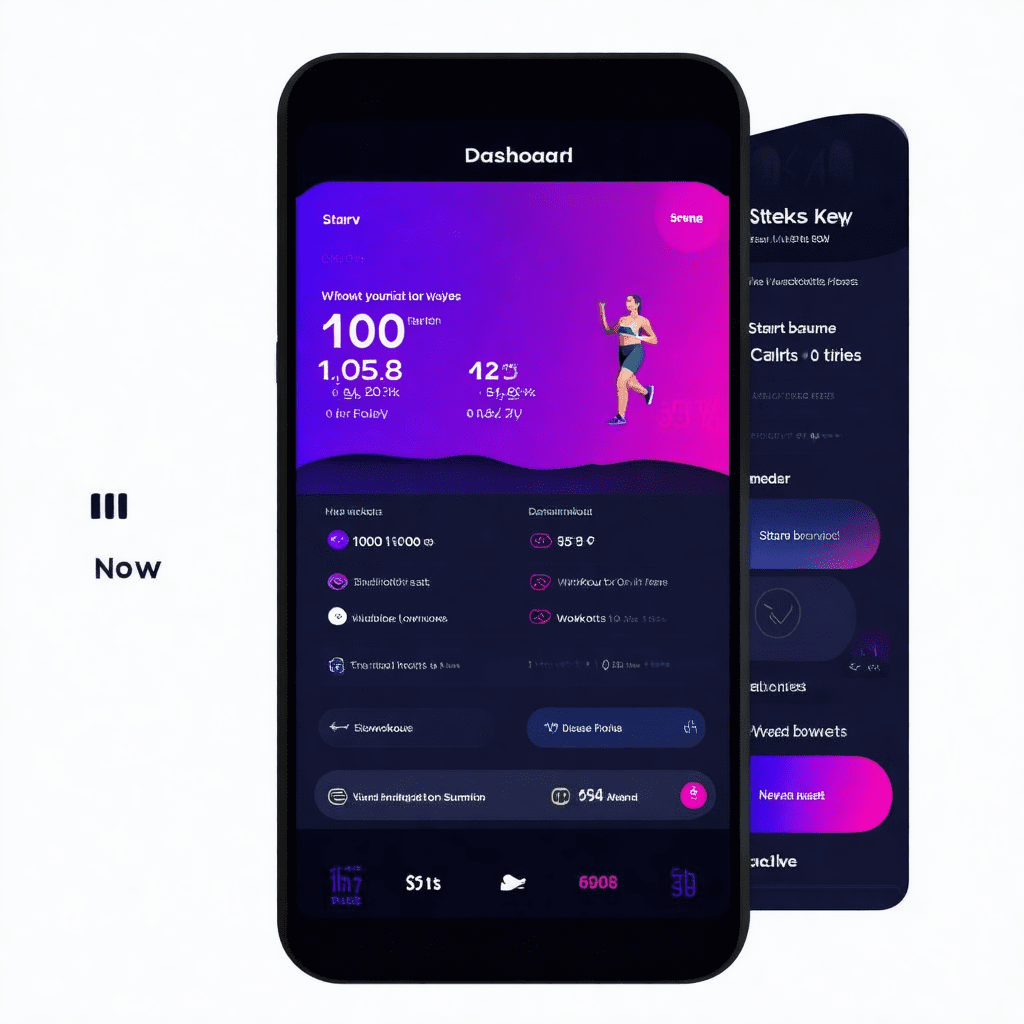
Inferencing Results
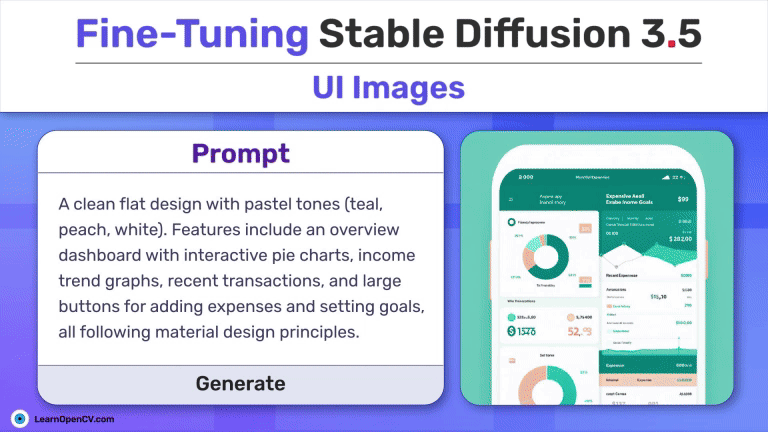
Below are some results of the initial iteration of Lora’s fine-tuned stable diffusion 3.5 medium model on the UI image dataset prepared by collecting images from dribble.com and converted into a huggingface dataset.
The dataset used in this iteration is available on huggingface and contains 1000 rows. However, due to poor results, a new dataset was created using images from dribble and prompts generated by Gemini 2.0 flash experimental.
Configuration file:–
Inference Memory Requirement: 22.5GB is utilized out of 49GB on an A6000 GPU.
Inference Parameters:
Prompt = ‘A vibrant and energetic music app UI inspired by music festivals. The design incorporates bright colors, playful icons, and dynamic animations. The playback screen features a glowing soundwave visualizer in the background and festival-themed illustrations like stages, lights, and crowds. The playlist view is colorful and engaging, with icons representing different genres and moods.’
image = pipeline(prompt = prompt,
                 guidance_scale = 10,
                 num_inference_steps = 50,
                 height = 1024,
                 width = 1024,
                negative_prompt="bad text, gibberish text, distorted image, distorted figure, distorted text",
                generator=torch.manual_seed(2957138076)).images[0]
Inference Result:

Two major faults can be seen in the inference image above:
- The image is blurry, even though the resolution provided is (1024,1024)
- Inconsistent UI- Improper icons, buttons, and search bar
Further iterations were made to mitigate these two issues using a configuration file different from that used before for fine-tuning. We’ll talk about these amendments in the next section.
Improvements
Script to create your huggingface dataset (just like we did for better results in our final iteration) and then push it to the huggingface hub is provided here in the article so that you can go and checkout and customize it as per your requirements.
The New Dataset contains only 20 rows.
Configuration file:
accelerate launch train_dreambooth_lora_sd3.py
--pretrained_model_name_or_path="stabilityai/stable-diffusion-3.5-medium"
--dataset_name="bhomik7/flat-UI-dataset-extended"
--validation_prompt="""Create a modern user interface design for a mobile application
that focuses on fitness tracking. The layout should include a vibrant dashboard
displaying key metrics such as steps taken, calories burned, and workout summaries.
Incorporate interactive elements like buttons for starting workouts, viewing progress,
and accessing nutrition information. Use a color palette that conveys energy and
motivation, with clear typography and intuitive navigation."""
--num_validation_images=5
--validation_epochs=1
--output_dir="sd_3_5m_dreambooth_lora_ft_HIGH_CONFIG"
--train_text_encoder
--rank=4
--resolution=1024
--train_batch_size=1
--num_train_epochs=20
--checkpointing_steps=500
--gradient_accumulation_steps=4
--learning_rate=1e-04
--lr_warmup_steps=10000
--report_to="wandb"
--mixed_precision="bf16"
--push_to_hub
--instance_prompt="A beautiful <TOK> UI for music app"
--caption_column='text'
Changes Implemented:
- Validation Prompt made better for better validation images
- –train_text_encoder argument passed to make the text encoders understand the prompts better
- num_train_epochs reduced to 20 only to make the model overfit on the limited dataset of 20 images.
- Gradient_accumulation_steps increased to 4 so that training can be done in fewer steps.
- lr_warmup_steps: so that instability and divergence can be prevented.
- The instance prompt is better if the unique identifier is inside angle brackets.
- The caption_column argument is provided so the model doesn’t take the instance prompt as the prompt for every image in our dataset.
Inference Parameters: The guidance Scale is increased slightly to improve the text in the image.
Prompt = “A vibrant and energetic music app UI inspired by music festivals. The design incorporates bright colors, playful icons, and dynamic animations. The playback screen features a glowing soundwave visualizer in the background and festival-themed illustrations like stages, lights, and crowds. The playlist view is colorful and engaging, with icons representing different genres and moods.”
image = pipeline(prompt = prompt,
                 guidance_scale = 10,
                 num_inference_steps = 50,
                 height = 1024,
                 width = 1024,
                negative_prompt="bad text, gibberish text, distorted image, distorted figure, distorted text",
                generator=torch.manual_seed(2957138076)).images[0]
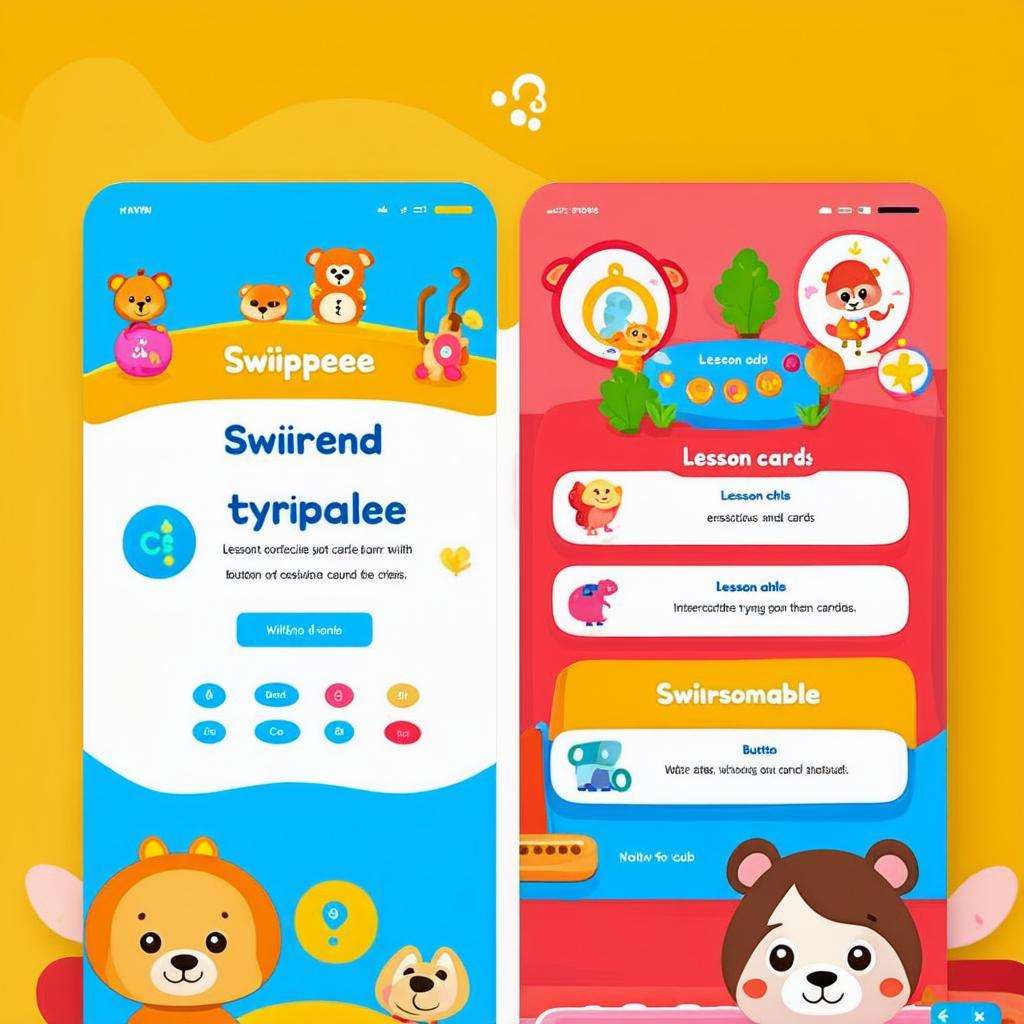
Inference Result

The quality has improved when comparing the above image with the one generated after the first iteration. There is no blurriness, and icon generation is consistent. There is also an appropriate UI layout, such as the search bar or music tabs.
Final iteration generated image—>
Although the text might not be apparent for the validation image, Lora’s fine-tuning has adapted to the style of flat UI images quite well, and the text discrepancies can be solved when defining the parameters during inference, like ‘prompt guidance.’
Generated UI images


Key Takeaways
- Dataset Creation: A custom UI dataset was built using Dribbble images and prompts from Google’s Gemini 2.0 API for better fine-tuning.
- Techniques: DreamBooth ensures personalized outputs, while LoRA enables efficient style transfer with resource-light fine-tuning.
- Tools: Huggingface’s Diffusers library simplifies fine-tuning with configurable parameters like batch size, learning rate, and resolution.
- Improvements: Refinements addressed blurry images and inconsistent UI through better prompts, fewer epochs, and optimized training steps.
- Results: The model produced high-quality UI designs for apps, achieving clarity, consistency, and style accuracy.
Conclusion
The article provides a comprehensive overview of fine-tuning Stable Diffusion 3.5, highlighting the importance of dataset preparation, configuration settings, and iterative improvements for generating high-quality, consistent images in specific styles or domain improvements for generating high-quality, consistent images in specific styles or domains.
References
Thanks to Adam Lucek for explaining the Lora fine-tuning script and arguments on his YouTube channel.
Stability AI lora finetuning tutorial


100K+ Learners
Join Free OpenCV Bootcamp3 Hours of Learning