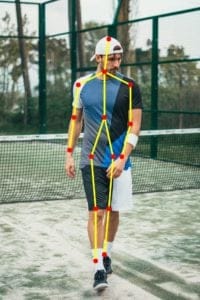
In this tutorial, Deep Learning based Human Pose Estimation using OpenCV. We will explain in detail how to use a pre-trained Caffe model that won the COCO keypoints challenge in 2016 in your own application. We will briefly go over the architecture to get an idea of what is going on under the hood.
1. Pose Estimation (a.k.a Keypoint Detection)
Pose Estimation is a general problem in Computer Vision where we detect the position and orientation of an object. This usually means detecting keypoint locations that describe the object.
For example, in the problem of face pose estimation (a.k.a facial landmark detection), we detect landmarks on a human face. We have written extensively on the topic. Please see our articles on ( Facial Landmark Detection using OpenCV and Facial Landmark Detection using Dlib )
A related problem is Head Pose Estimation where we use the facial landmarks to obtain the 3D orientation of a human head with respect to the camera.
In this article, we will focus on human pose estimation, where it is required to detect and localize the major parts/joints of the body ( e.g. shoulders, ankle, knee, wrist etc. ).
Remember the scene where Tony stark wears the Iron Man suit using gestures?
If such a suit is ever built, it would require human pose estimation!
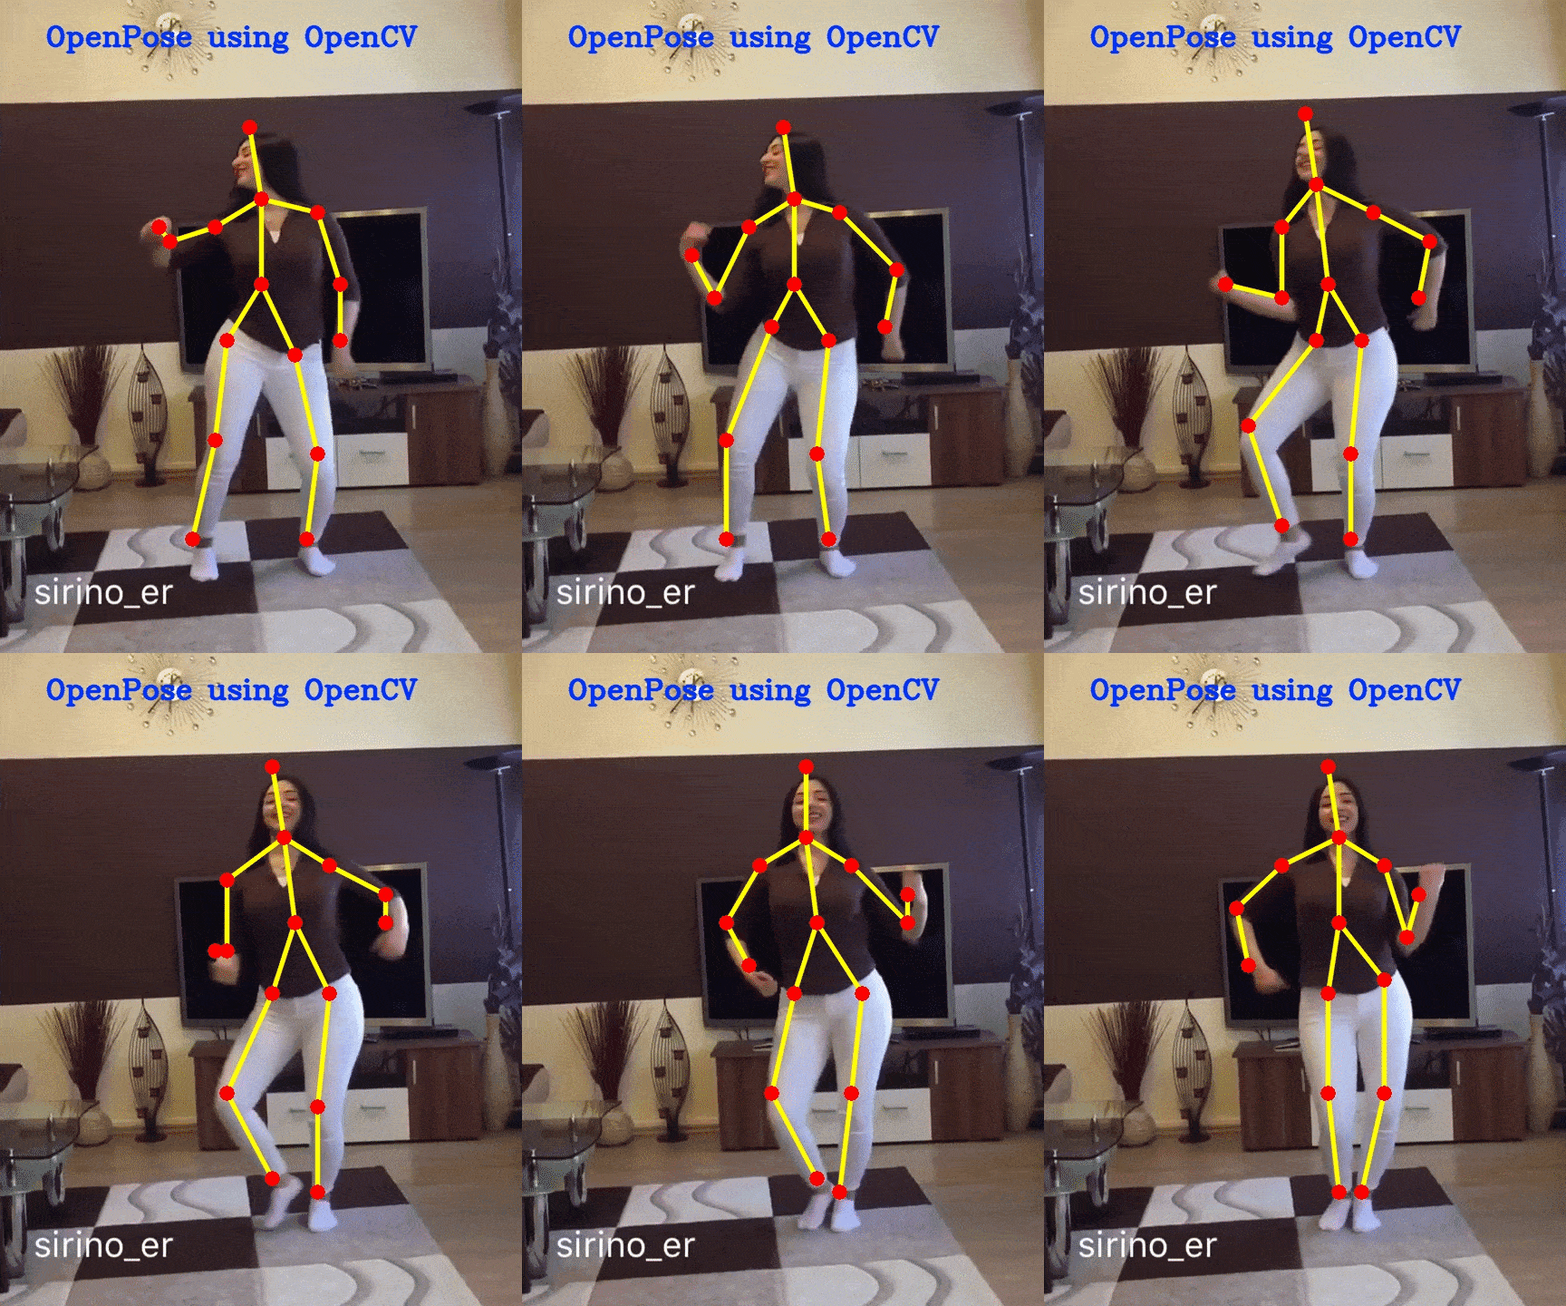
For the purpose of this article, though, we will tone down our ambition a tiny bit and solve a simpler problem of detecting keypoints on the body. A typical output of a pose detector looks as shown below :

1.1. Keypoint Detection Datasets
Until recently, there was little progress in pose estimation because of the lack of high-quality datasets. Such is the enthusiasm in AI these days that people believe every problem is just a good dataset away from being demolished. Some challenging datasets have been released in the last few years which have made it easier for researchers to attack the problem with all their intellectual might.
Some of the datasets are :
If we missed an important dataset, please mention in the comments and we will be happy to include in this list!
2. Multi-Person Pose Estimation model
The model used in this tutorial is based on a paper titled Multi-Person Pose Estimation by the Perceptual Computing Lab at Carnegie Mellon University. The authors of the paper train a very deep Neural Networks for this task. Let’s briefly go over the architecture before we explain how to use the pre-trained model.
2.1. Architecture Overview
The model takes as input a color image of size w × h and produces, as output, the 2D locations of keypoints for each person in the image. The detection takes place in three stages :
- Stage 0: The first 10 layers of the VGGNet are used to create feature maps for the input image.
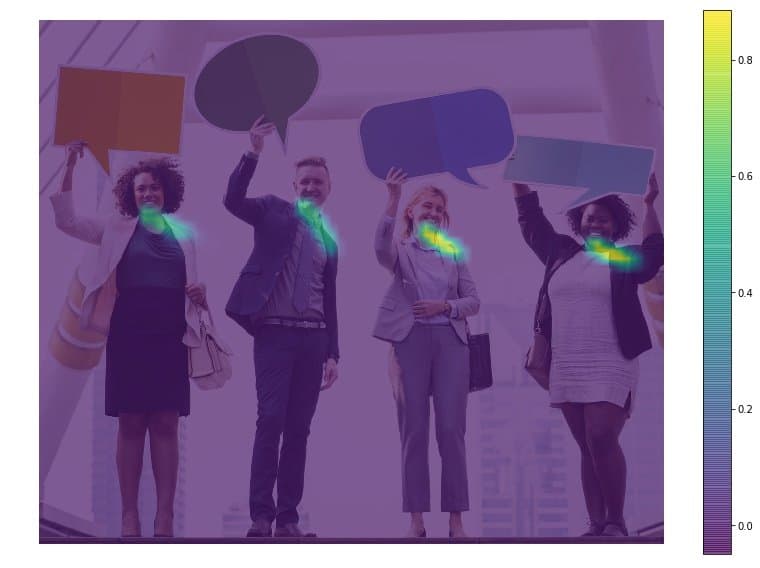
- Stage 1: A 2-branch multi-stage CNN is used where the first branch predicts a set of 2D confidence maps (S) of body part locations ( e.g. elbow, knee etc.). Given below are confidence maps and Affinity maps for the keypoint – Left Shoulder.
The second branch predicts a set of 2D vector fields (L) of part affinities, which encode the degree of association between parts. In the figure below part affinity between the Neck and Left shoulder is shown.
Stage 2: The confidence and affinity maps are parsed by greedy inference to produce the 2D keypoints for all people in the image.
This architecture won the COCO keypoints challenge in 2016.
2.2 Pre-trained models for Human Pose Estimation
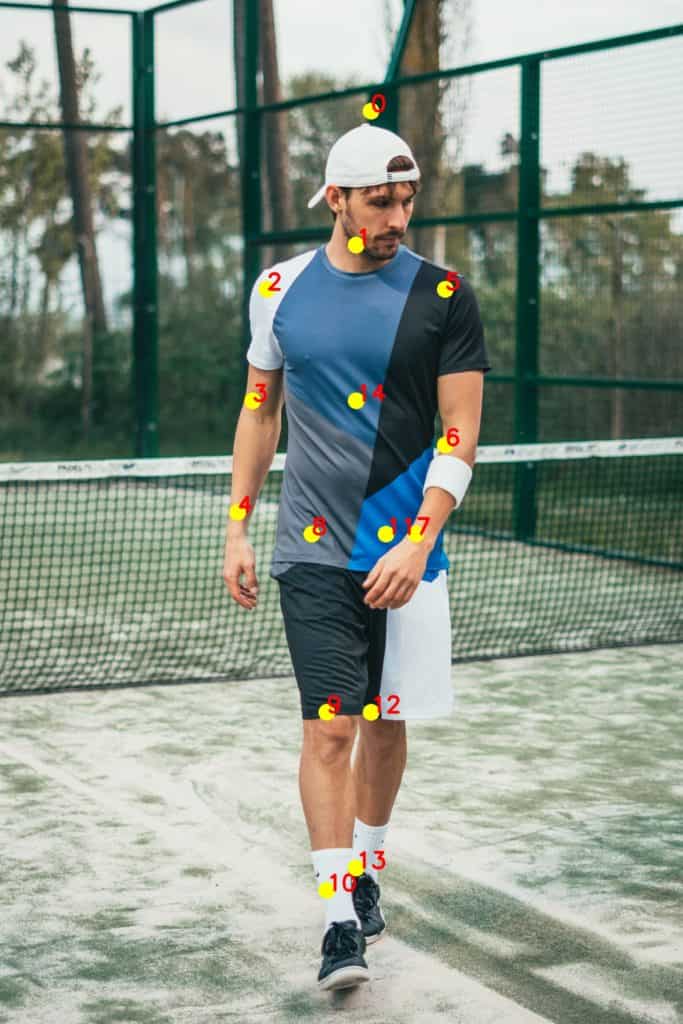
The authors of the paper have shared two models – one is trained on the Multi-Person Dataset ( MPII ) and the other is trained on the COCO dataset. The COCO model produces 18 points, while the MPII model outputs 15 points. The outputs plotted on a person is shown in the image below.
COCO Output Format Nose – 0, Neck – 1, Right Shoulder – 2, Right Elbow – 3, Right Wrist – 4, Left Shoulder – 5, Left Elbow – 6, Left Wrist – 7, Right Hip – 8, Right Knee – 9, Right Ankle – 10, Left Hip – 11, Left Knee – 12, LAnkle – 13, Right Eye – 14, Left Eye – 15, Right Ear – 16, Left Ear – 17, Background – 18 MPII Output Format Head – 0, Neck – 1, Right Shoulder – 2, Right Elbow – 3, Right Wrist – 4, Left Shoulder – 5, Left Elbow – 6, Left Wrist – 7, Right Hip – 8, Right Knee – 9, Right Ankle – 10, Left Hip – 11, Left Knee – 12, Left Ankle – 13, Chest – 14, Background – 15
You can download the model weight files using the scripts provided at this location.
3. Code for Human Pose Estimation in OpenCV
In this section, we will see how to load the trained models in OpenCV and check the outputs. We will discuss code for only single person pose estimation to keep things simple. As we saw in the previous section that the output consists of confidence maps and affinity maps. These outputs can be used to find the pose for every person in a frame if multiple people are present. We will cover the multiple-person case in a future post.
First, download the code and model files from below. There are separate files for Image and Video inputs. Please go through the README file if you encounter any difficulty in running the code.
3.1. Step 1 : Download Model Weights
Use the getModels.sh file provided with the code to download all the model weights to the respective folders. Note that the configuration proto files are already present in the folders.
From the command line, execute the following from the downloaded folder.
sudo chmod a+x getModels.sh
./getModels.sh
Check the folders to ensure that the model binaries (.caffemodel files ) have been downloaded. If you are not able to run the above script, then you can download the model by clicking here for the MPII model and here for COCO model.
3.2 Step 2: Load Network
We are using models trained on Caffe Deep Learning Framework. Caffe models have 2 files –
- .prototxt file which specifies the architecture of the neural network – how the different layers are arranged etc.
- .caffemodel file which stores the weights of the trained model
We will use these two files to load the network into memory.
C++
// Specify the paths for the 2 files
string protoFile = "pose/mpi/pose_deploy_linevec_faster_4_stages.prototxt";
string weightsFile = "pose/mpi/pose_iter_160000.caffemodel";
// Read the network into Memory
Net net = readNetFromCaffe(protoFile, weightsFile);
Python
# Specify the paths for the 2 files
protoFile = "pose/mpi/pose_deploy_linevec_faster_4_stages.prototxt"
weightsFile = "pose/mpi/pose_iter_160000.caffemodel"
# Read the network into Memory
net = cv2.dnn.readNetFromCaffe(protoFile, weightsFile)
3.3. Step 3: Read Image and Prepare Input to the Network
The input frame that we read using OpenCV should be converted to a input blob ( like Caffe ) so that it can be fed to the network. This is done using the blobFromImage function which converts the image from OpenCV format to Caffe blob format. The parameters are to be provided in the blobFromImage function. First we normalize the pixel values to be in (0,1). Then we specify the dimensions of the image. Next, the Mean value to be subtracted, which is (0,0,0). There is no need to swap the R and B channels since both OpenCV and Caffe use BGR format.
C++
//
Mat frame = imread("single.jpg");
// Specify the input image dimensions
int inWidth = 368;
int inHeight = 368;
// Prepare the frame to be fed to the network
Mat inpBlob = blobFromImage(frame, 1.0 / 255, Size(inWidth, inHeight), Scalar(0, 0, 0), false, false);
// Set the prepared object as the input blob of the network
net.setInput(inpBlob);
Python
# Read image
frame = cv2.imread("single.jpg")
# Specify the input image dimensions
inWidth = 368
inHeight = 368
# Prepare the frame to be fed to the network
inpBlob = cv2.dnn.blobFromImage(frame, 1.0 / 255, (inWidth, inHeight), (0, 0, 0), swapRB=False, crop=False)
# Set the prepared object as the input blob of the network
net.setInput(inpBlob)
3.4. Step 4: Make Predictions and Parse Keypoints
Once the image is passed to the model, the predictions can be made using a single line of code. The forward method for the DNN class in OpenCV makes a forward pass through the network which is just another way of saying it is making a prediction.
C++
Mat output = net.forward()
Python
output = net.forward()
The output is a 4D matrix :
- The first dimension being the image ID ( in case you pass more than one image to the network ).
- The second dimension indicates the index of a keypoint. The model produces Confidence Maps and Part Affinity maps which are all concatenated. For COCO model it consists of 57 parts – 18 keypoint confidence Maps + 1 background + 19*2 Part Affinity Maps. Similarly, for MPI, it produces 44 points. We will be using only the first few points which correspond to Keypoints.
- The third dimension is the height of the output map.
- The fourth dimension is the width of the output map.
We check whether each keypoint is present in the image or not. We get the location of the keypoint by finding the maxima of the confidence map of that keypoint. We also use a threshold to reduce false detections.
Once the keypoints are detected, we just plot them on the image.
C++
int H = output.size[2];
int W = output.size[3];
// find the position of the body parts
vector<Point> points(nPoints);
for (int n=0; n < nPoints; n++)
{
// Probability map of corresponding body's part.
Mat probMap(H, W, CV_32F, output.ptr(0,n));
Point2f p(-1,-1);
Point maxLoc;
double prob;
minMaxLoc(probMap, 0, &prob, 0, &maxLoc);
if (prob > thresh)
{
p = maxLoc;
p.x *= (float)frameWidth / W ;
p.y *= (float)frameHeight / H ;
circle(frameCopy, cv::Point((int)p.x, (int)p.y), 8, Scalar(0,255,255), -1);
cv::putText(frameCopy, cv::format("%d", n), cv::Point((int)p.x, (int)p.y), cv::FONT_HERSHEY_COMPLEX, 1, cv::Scalar(0, 0, 255), 2);
}
points[n] = p;
}
Python
H = out.shape[2]
W = out.shape[3]
# Empty list to store the detected keypoints
points = []
for i in range(len()):
# confidence map of corresponding body's part.
probMap = output[0, i, :, :]
# Find global maxima of the probMap.
minVal, prob, minLoc, point = cv2.minMaxLoc(probMap)
# Scale the point to fit on the original image
x = (frameWidth * point[0]) / W
y = (frameHeight * point[1]) / H
if prob > threshold :
cv2.circle(frame, (int(x), int(y)), 15, (0, 255, 255), thickness=-1, lineType=cv.FILLED)
cv2.putText(frame, "{}".format(i), (int(x), int(y)), cv2.FONT_HERSHEY_SIMPLEX, 1.4, (0, 0, 255), 3, lineType=cv2.LINE_AA)
# Add the point to the list if the probability is greater than the threshold
points.append((int(x), int(y)))
else :
points.append(None)
cv2.imshow("Output-Keypoints",frame)
cv2.waitKey(0)
cv2.destroyAllWindows()
3.5. Step 5: Draw Skeleton
Since we know the indices of the points before-hand, we can draw the skeleton when we have the keypoints by just joining the pairs. This is done using the code given below.
C++
for (int n = 0; n < nPairs; n++)
{
// lookup 2 connected body/hand parts
Point2f partA = points[POSE_PAIRS[n][0]];
Point2f partB = points[POSE_PAIRS[n][1]];
if (partA.x<=0 || partA.y<=0 || partB.x<=0 || partB.y<=0)
continue;
line(frame, partA, partB, Scalar(0,255,255), 8);
circle(frame, partA, 8, Scalar(0,0,255), -1);
circle(frame, partB, 8, Scalar(0,0,255), -1);
}
Python
for pair in POSE_PAIRS:
partA = pair[0]
partB = pair[1]
if points[partA] and points[partB]:
cv2.line(frameCopy, points[partA], points[partB], (0, 255, 0), 3)
Do checkout the Video demo using the video version of the code. We found that COCO model is 1.5 times slower than the MPI model. This is expected as we are using a stripped down version having 4 stages.
If you have ideas of some cool applications using these methods, do mention them in the comments!
Subscribe & Download Code
If you liked this article and would like to download code (C++ and Python) and example images used in this post, please click here. Alternately, sign up to receive a free Computer Vision Resource Guide. In our newsletter, we share OpenCV tutorials and examples written in C++/Python, and Computer Vision and Machine Learning algorithms and news.References and Further Reading
Original Youtube Video Link used in the Sample Video
OpenPose
Pose Detection paper
Realtime multi-person Pose Estimation
OpenCV DNN Module
Loading Caffe models in OpenCV
Satay,
Another really interesting blog. Any tips for those of us who might run this under Windows? This looks to be aimed at the Linux world.
Thanks,
Doug
Thanks, Doug. If you have get OpenCV installed with opencv_contrib on Windows, it should run without a problem.
Thank you for your interesting tutorial, after running “forward” function in C++ (Visual Studio 2017, OpenCV 3.4.0 and Windows X64)
Mat output = net.forward();
I get unhandled exception, and following error:
OpenCV Error: Assertion failed (output_slice.isContinuous() && output_slice.size == curr_output.size) in fuseLayers, file C:buildmaster_winpack-build-win64-vc15opencvmodulesdnnsrcdnn.cpp, line 1430
some users on the net said it only works with OpenCV 3.4.1, so I wondered is it because of OpenCV version?
Could you please let me know what version of OpenCV is used to test the code?
Thank you.
sir i have been subscribed you but i did’t get the code please tell me where is the code please share me the link
You can get the code here https://github.com/spmallick/learnopencv/tree/master/OpenPose
Hi Satya,
Thanks for sharing. Do you have any speed benchmarks for both models ? frame/sec for resolution
for a resolution of 368×368,
i7 and SSD – It takes 0.7 sec for MPI model and ~1 sec for COCO model.
i7 and HDD – it takes 1.6 sec for MPI and 2.3 sec for COCO
i5 and HDD – it takes ~6 sec for MPI
@disqus_dqpsKEIOsm:disqus : But we should be able to send multiple frames at the same time ?
Yes that can be done. Will check that out see how much we can optimize since 99% of the time is taken by the forward pass itself.
Hi Satya,
Thanks for the quick response, I do have 3.4.1 OpenCV and Contrib built and installed. Obviously the shell script is not too useful as wget doesn’t exist in OpenCV. Found using CMake-Gui was need as I have multiple version of CUDA installed.
Looks like all is well. As a point of reference on my system there is a bit ober 1sec difference between the two models per frame.
Thanks,
Doug
Hi Doug, You can use the links given in Step 3.1 to download the models. Did you check how much time it takes per frame with/without GPU?
Hi Vikas,
Got everything running yesterday so that was good. I did not have to to try comparing with and without GPU. Seeing the times you obtained on a 1080Ti I am curious now what my K5100M will do.
Sweet!
So cool! I tried to speed this up by decreasing inWidth and inHeight to 168,168. It was much faster, but the results were so-so. It looks like there is a trade-off between speed and accuracy. https://uploads.disquscdn.com/images/db6ede79c555d28fa43ad855ca5fd71538735c2844835da0b9d24e747a6234da.gif
Thanks for sharing Stephen! We will try to come up with some optimizations so that it can be used in a nice application.
I have created my own optimization to remove jitter in pose estimation: https://stackoverflow.com/questions/52450681/how-can-i-remove-jitter-in-pose-estimation/52450682#52450682 https://uploads.disquscdn.com/images/f92fecd25d2f6cb1a2fc374ea0ab67ff11038a2a561778979f66c4ec452f46c4.gif
Very cool!
hi sathya, i have one doubt how to get accuracy value for this caffe model
This is awesome Stephen!
Thank you. In good conditions* the model does not get turned around. Swapping the body parts is not necessary when using optimized source video. The source I used for this video was only 550px square @ 60fps. Juggling is hard to film :/
* Good conditions: The face is well lit (eyes, nose, mouth, and chin are visible) and the face size is at least 100px square.
Thanks, Stephen. This looks awesome!
Does it take 16 seconds / frame ? If so, which processor are you using? Did you compile OpenCV with OpenCL / CUDA ?
Thanks
Satya
Yeah, my computer (Pentium T4500 with 4gb RAM) is older. I am running OpenCV 4.0.0-pre. I did NOT compile it with OpenCL/CUDA or the opencv_contrib module.
Thanks for sharing Stephen,Can you tell me how to compile OpenCV with OpenCL / CUDA ? Give me some links available? I am use C++,I’m a beginner,thank you so much
OpenCV does not have good support for NVIDIA GPUs. You can use the original Caffe( given in References ) or Keras ( https://github.com/michalfaber/keras_Realtime_Multi-Person_Pose_Estimation ) implementation if you want.
https://uploads.disquscdn.com/images/f8913090dc827d850f87ff716892669888eeecb4aab133c6dbdaf920cc229d88.jpg Dear Sir,
I tried it in both picture and video but i was getting bad result…Can you help out please or do u have GitHub for your file?
Waiting to read from you https://uploads.disquscdn.com/images/a3e7d4d6cb1d08f8e553564101c1e49df11fe402370b55a309c87d7c4278c50b.png https://uploads.disquscdn.com/images/048504d9a0ecc142c6f1c3c1a3368c0af778b229f10b68b5ab577d4365927f4c.png https://uploads.disquscdn.com/images/f515fff1dd30e5b2c2e206f872ba6ef764fccddc41c520ba45fb60f0c8a95e0e.jpg
Have you downloaded the correct model file? – Please check whether pose/coco/ or pose/mpi/ have the required models.
What change did you make to getModels.sh?
Please give some more information on what you have done till now , which opencv version and which MODE you have used?
I got the same results, I did not make any changes to getModels.sh, I am using opencv 4.0.0 -pre, I don’t know what you mean by MODE
I ran the code and the results are correct. If you can elaborate what you have done, I might be able to help.
Thanks for the reply , I got it working, the picture size was the problem
hi stephan, i need one help. i have created one project that is based on the human body measurement and also i need hip, chest, waist to get accurate of the human. please help..
I don’t understand your question, but this might help you out: https://en.wikipedia.org/wiki/Waist%E2%80%93hip_ratio
Thanks for reply Stephan. My question is how to calculate measurement in detected keypoints? Example: My hip size is 32inche. I just pass my image in this code I get detected keypoints right. here i attached my output image.
https://uploads.disquscdn.com/images/8032f7af582874e5b2debaef305a119c3f8c42662852b8f278fad4328cbf7f58.jpg
Here i attached basic measurement of men. i want this all measurement can i calculate this all parts measurement in detected images https://uploads.disquscdn.com/images/7ed5991bae64df5ffd0c1ed08671e5eb5d51fd4b6e7300fc8960f0f58e4df536.jpg
Hi Nantha,
You cannot get all these measurements just using this model. You can use the points for reference, but you have to use a very accurate segmentation algorithm for finding the contour of the person.
Say for hip, you measure the distance between the x coordinates of the end points of the segmented body. The y coordinates will come from the points 8 and 11. Similarly you can use the keypoints as reference for finding the distance between different points. But you will have to segment out the body first.
can you tell me with model use to get all those measurement?
because i research already so many of them are using this model.
You can use this model, but along with that you have to use some other technique such as segmentation
if i am using image segmentation can i calculate measurement
You should be able to.
thanks for you response.
Hello Sir, I want to create a face aligner in 3D co-ordinates and frontal face alignment in 3D. How should I proceed? If a face is tilted towards left, right or any other direction the output should be frontal face and that to in 3D can you please suggest my method for this.
thanks in Advance
This might be helpful to you.
Thank you for your prompt response Sir. But, I have gone through that link. The code only provides 3D landmark of an image but its not actually aligning.
Dear Satya or Vikas,
Thank you for this ‘whetting the appetite’ introduction to gestures.
My question is – suppose we want to analyse hand and finger gestures. That is recognize movement from the palm or dorsum (other side of the hand), fist and finger gestures – whether on the palm side or dorsum side, Can this current tutorial handle/estimate hand and finger gestures or where does one get a database of hand and finger gestures.
Thank you,
Anthony of Sydney.
There is another model to do hand landmark detection. We are planning to have another post on that. In case it’s urgent, You can download the prototxt file from here and weights file from here.
You can use the same code to get the hand landmarks, just by changing the model file names. Comment out the draw skeleton part. It will give you all the points on the fingers.
Thank you for your reply, it is appreciated. My other question is related to speed of processing the images and the speed of displaying the skeleton/stick figures regardless of using the whole body (this tutorial) or hands (my question).
In the above tutorial we see the moving picture of the dancer (top of the page) it appears that the skeleton/stick figure is moving in real time. Is it possible to get real-time displays of skeletons/stick figures?
In other words, when you start the camera ‘rolling’ from time = t, when will I see in real time a person with skeleton/stick figure superimposed. If I wanted to do this on a Raspberry Pi, would I need the latest model 3?
Thank you
Anthony of Sydney
You are right about the speed. It is not real-time. The model is very large, thus it takes a lot of time to process the image. Moreover, as far as I know, OpenCV does not allow using GPU for DNN module yet. o, raspberry pi is a BIG NO for now.
You can instead use Tensorflow version of OpenPose with MobileNet version of Model, given here. This should run in near real-time even on raspberry-Pi.
Dear Vikas,
Thank you again for the reply. I also thank you for a future inclusion of a hand pose landmark tutorial described above.
I go back (sorry) to my PC to attempt the exercise. I have Tensorflow, and I presume that I can load a PC version of OpenPose.
Can the tutorial “Deep Learning based Human Pose Estimation using OpenCV” (this one) be conducted with Tensorflow and OpenPose and is there any necessary modifications to the code needed to be done. Given that near time processing and display can be done on an RPi, I presume that it may be faster with a PC.
Thank you,
Anthony of Sydney
You cannot use this code on Tensorflow even with modifications. You should refer to the github repo i gave above and follow the instructions given there to run the code. https://github.com/ildoonet/tf-pose-estimation
Thanks Vikas! I took a look and it appears to be pretty much rooted into a Linux environment. I did not see a Windows port, which I would like to try, as I have TensorFlow-GPU running in Windows. That conclusion was reached by downloading a zip and running python setup.py install and it hangs. Has anyone successfully installed this under Windows that you know of? I do not think I will get any time to try as my plate is already overflowing! If someone gets this running under Windows please post here as I would love to know the secret.
Thanks!
Dear Vikas
Thank you. I’m learning.
Anthony of Sydney
Dear Satya,
Awesome! Thanks for sharing a much easier version of OpenPose.
May I ask you 2 things ?
I did compile my OpenCV 3.4.1 with Cuda. But when I run the openposeimage or openposevideo it always starts with Initializing OpenCL Runtime.
How can I change that to CUDA ?
Second, do you have any blog such as : skin color, male/female, age, mood (happy, sad, anger, etc) ?
Thank you once again!!!
You need OpenCL to access Cuda.
Hey Douglas, thanks for the reply.
I thought they were totally different optimization tools.
So, this frame rate that I am getting 2 frames per sec, is the best I can get in a I7, nVidia 1080 GTX Ti ? Sorry for the silly questions, I am new on GPU computing.
We are still not clear on this. The discussion on this OpenCV issue says that DNN module supports GPU only through Halide Backend. Not through CUDA.
Will update when we get a clear picture on the issue of “whether OpenCV DNN Modules use CUDA or not”.
Thanks Vikas. One piece I can add is the last time I compiled 3.4.1 it went looking for the cuDNN library for Cuda 9.1. However, when I run OpenposeVideo and look at it with ProcExp, I see that it loads the Cuda Runtime, but I do not see cuDNN.
Thanks Doug, Might be helpful for someone. I don’t have a Windows system with a GPU to check 🙁
Thank you Douglas and Vikas! Although I didn’t understand half of what you guys said, I will study hard to catch up!
So if I got this straight, so far the issue seems to be in OpenCV DNN handling or not CUDA.
That seems slow. On my laptop, i7 and a K5100M, which is not as powerful as your 1080, I am averaging about 2.4 seconds per frame. Vikas has some better numbers using a 1080Ti he might be better at answering this.
I want to show my sincere gratitude to your work on this page, I have definitely learnt a lot from you. I am sure you have helped many novices to start their great ideas and hopefully change the world. Thanks and continue the great content!
Thanks for the kind words.
hi guys thanks for the awesome tutorial! i’m trying to understand what’s going on here is this model doing detection and tracking of a person? in the video it looks as if it knows it’s a single person that it has previously identified. can you clear this up pls? thanks again
There is no tracking going on. Each frame is handled independent of the other.
@disqus_dqpsKEIOsm:disqus, thank you so much for this guide into the fascinating world of computer vision! I’d like to share my thoughts of how to apply such body estimation algorithm.
You’re correct that there was some delay in solutions due no large datasets. I think that is why current approaches are too computationally consuming. Using OpenPose’s pose estimation network (MPI, 4 stages) I can achieve about 900ms per 368×368 frame (Intel® Core™ i5-4460 CPU @ 3.20GHz × 4). Even with acceleration backend ( https://github.com/opencv/opencv/wiki/Intel%27s-Deep-Learning-Inference-Engine-backend ) it takes no less than 550ms (the same CPU). One way is make it faster – do not process a whole image but crop a body using some person detector. This way resolution less than 368×368 can give more accurate results. There are a lot of lightweight SSD-based detectors for now. However most of them bound a body and could miss raised hands, in example.
Despite an efficiency we can already use it offline (means not in real-time). In example, create a 2D skeleton animation. I’ve been trying to do an example ( https://github.com/dkurt/animator or https://github.com/dkurt/animator/tree/raw_anim ) but I just had no time to finish it =) Please find images attached (just a random image without any personal preferences to any of football teams). I hope it could be a good start for someone interested in after reading your tutorial.
https://uploads.disquscdn.com/images/08d6d1b67824a586f0ca189a7d93d987802bf9bb6c1ce47785a1bfda2e5ab09e.png https://uploads.disquscdn.com/images/3cc0b6b66ae78bc28d2809f28be78f42d48b82c6080260e98e79686ca6bd5abd.png https://uploads.disquscdn.com/images/15728f0bbdecfb695b107bbfb5ad4f70ef1dc1870c6db3bb3ab637039c98af35.png
Thanks again and good luck!
Dmitry, OpenCV team member, Intel Corp.
Glad to hear from you @dmitrykurtaev. Does it not support cuda enabled GPUs? I had a hard time finding whether it does or not. I saw this issue which kind of says cuda is not supported yet.
Thanks for the Ideas.. This article would not have been possible, if not for you! Keep up the good work in OpenCV. Cheers!
@disqus_dqpsKEIOsm:disqus, May I ask you to test the latest state of 3.4 branch? There was a great PR which has been tested on Nvidia GPU. I’d be very nice if you could measure an efficiency of OpenPose model on it (enable DNN_TARGET_OPENCL target).
Hi, when I try net.setPreferableTarget(1), I get
[ WARN:0] DNN: OpenCL target is not supported with current OpenCL device (tested with Intel GPUs only), switching to CPU.
Anything I am doing wrong?
Hi! Try to set an environment variable OPENCV_DNN_OPENCL_ALLOW_ALL_DEVICES to 1 (see dnn.cpp).
Thanks, really appreciate the reply!
I still get the following messages:
OpenCV(ocl4dnn): consider to specify kernel configuration cache directory via OPENCV_OCL4DNN_CONFIG_PATH parameter.
OpenCL program build log: dnn/dummy
Status -11: CL_BUILD_PROGRAM_FAILURE
-cl-no-subgroup-ifp
Error in processing command line: Don’t understand command line argument “-cl-no-subgroup-ifp”!
I am a Python deep learning guy, don’t use C++ or OpenCV a lot, so I really don’t have much clue what all this means.
But having said that, I have some interesting numbers:
With OPENCV_DNN_OPENCL_ALLOW_ALL_DEVICES=1:
Body keypoints forward pass: 0.76s (Coco)
Face keypoints forward pass: 0.66s
Without specifying the environment variable:
Body keypoints forward pass: 2.53s (Coco)
Face keypoints forward pass: 1.92s
So about a ~3x speed up. Is this along expected lines?
For a Pytorch version of OpenPose (from one Git repo – tensorboy), the speedup is like 2000x, but it’s super slow on CPU and just 0.025s (Coco) on CUDA GPU. The OpeCV dnn forward pass in comparison is pretty fast on CPU (just 1.5 to 2x the above numbers: 2.53 and 1.92).
Thanks for reading the long comment. Would appreciate any response.
My main question would be, is there any way OpenCV DNN could be as fast as 0.025s on CUDA GPUs?
Thanks!
“is there any way OpenCV DNN could be as fast as 0.025s on CUDA GPUs”
I think the short answer would be NO.
Hi @dmitrykurtaev:disqus I tried it ( with 3.4.1 as well as 4.0.0-pre )
net.setPreferableTarget(DNN_TARGET_OPENCL) and
export OPENCV_DNN_OPENCL_ALLOW_ALL_DEVICES=1
Got similar performance as @chandrachudbasavaraj:disqus mentioned.
Thanks a lot
I am having the following error
TypeError: blobFromImage() takes at most 5 arguments (6 given)
I appreciate if you advice How to solve it
Thanks
I think you are using OpenCV 3.3.0. This article requires OpenCV 3.4.1 and above.
You can check the difference between function arguments for 3.3.0 and 3.4.1 here and here
I am really thankful
I t worked as expected.
Hi,
For opencv version 3.4.0, I get an error in line “output = net.forward()”
(-215) output_slice.isContinuous() && output_slice.size == curr_output.size in function cv::dnn::experimental_dnn_v3::Net::Impl::fuseLayers
It works only for OpenCV version 3.4.1 and above
Ok, I updated OpenCV, it works now.. Thanks for answer
How I can detect poses for multiple persons? If I have more than one then it ouputs “broken” pose where each person is used.
It does output multi-person pose. But, the code needs to be modified to get them. I have mentioned this in the blog already
“We will cover the multiple-person case in a future post”
I cant find this article, maybe its not written?
Do I need give seperate regions for multiple pose detection?
Updated demo would be really appreciated . Thank You
You can use their original code if you want to do multi-person detection.
Refer
1.Installation
2.C++
3.Python
This worked great. Thinking of the possible applications for this. Thank you for an interesting example. https://uploads.disquscdn.com/images/f5925573507b14eccfcda154ba1d00faaf5069321af0e9dcbef1008c8081f0b9.gif
Thanks for sharing Vlad
H = out.shape[2]
W = out.shape[3] what does it mean
The output is a 4D matrix :
The first dimension being the image ID ( in case you pass more than one image to the network ).
The second dimension indicates the index of a keypoint. The model produces Confidence Maps and Part Affinity maps which are all concatenated. For COCO model it consists of 57 parts – 18 keypoint confidence Maps + 1 background + 19*2 Part Affinity Maps. Similarly, for MPI, it produces 44 points. We will be using only the first few points which correspond to Keypoints.
The third dimension is the height of the output map.
The fourth dimension is the width of the output map.
sir one thing is confusing to me sir how does it konw about the point can we train our model on different pose
Hi Vikas / Satya,
I am getting the following error when I run the following command:
python OpenPoseVideo.py.
[ INFO:0] Initialize OpenCL runtime…
OpenCV Error: Assertion failed (output_slice.isContinuous() && output_slice.size == curr_output.size) in cv::dnn::experimental_dnn_v3::Net::Impl::fuseLayers, file C:projectsopencv-pythonopencvmodulesdnnsrcdnn.cpp, line 1430
Traceback (most recent call last):
File “OpenPoseVideo.py”, line 47, in
output = net.forward()
cv2.error: C:projectsopencv-pythonopencvmodulesdnnsrcdnn.cpp:1430: error: (-215) output_slice.isContinuous() && output_slice.size == curr_out
put.size in function cv::dnn::experimental_dnn_v3::Net::Impl::fuseLayers
My Python version:
‘3.6.4 |Anaconda, Inc.| (default, Jan 16 2018, 10:22:32) [MSC v.1900 64 bit (AMD64)]’
My OpenCV version:
‘3.4.0’
What am I doing wrong…?
Thanks!
Sachin
Please update to 3.4.1
Upgrading opencv worked. Thanks!
I am seeing speeds of 5 secs / frame for the pose model, and 7 secs / frame for the hand model. What kind of machine do I need to run this at near real time (10-20 fps)?
This is what I am using:
https://ark.intel.com/products/75459/Intel-Core-i5-4200U-Processor-3M-Cache-up-to-2_60-GHz
Thanks for your help!
Sachin
You can try the tensorflow version
Thanks! I got the tf version to work. It works a lot faster. ~1 fps. All I need now is a GPU :=)
I see that there is only a tf pose model. Do you know if there is a mobile net hand model also somewhere?
Thanks once again!
Sachin
This is so helpful! thanks a lot for the post. Can you please make a post on multi-person pose detection also?
can someone help with multi-person pose detection
You can use their original code if you want to do multi-person detection.
Refer
Installation
C++
Python
For taking measurement, you need a reference object in the image ( like a credit card ) at the same depth as the person. You can ask the person to hold the credit card on the palm or forehead so that it is easily detectable. Then you can find the distance between the points in pixels and convert to inches taking the credit card dimensions as reference. This is assuming that you know the credit card dimensions
how to get actual measurement of this key points?
You can use the values in the variable points for the pixelwise location of the points
thanks for you reply sir.how to detect side pose in image because need to calculate chest and waist of human body?
hello anybody there??
We have already replied twice to your comments. Please check below.
when running the getmodels.sh code in ubuntu, i got the following error:
./getModels.sh: line 7: syntax error near unexpected token `newline’
./getModels.sh: line 7: `’
Is there a more straightforward way to run this if I am using a PC?
Yes, you can look into the script
https://github.com/spmallick/learnopencv/blob/master/OpenPose/getModels.sh
Download the models from the link and manually copy the files to the right directories.
Hi
First off all, nice tutorial, pretty complete and interactive.
on the other hand, I would like to ask some questions:
1.-¿can I use this on windows 7?
2.-¿How can I compile my projects directly on visual studio?
You can use the code on Win7.
Hello Satya/Vikas and Team, Thank you for making very simple.
I would like to know step by step from first step (images) to last step(pose on the image/video).
I want to build the same thing with my custom images. how to create heat maps, how to join the key points.. and other steps…
Please help me in this.
Everything is given in detail in the code. Please download the code from here https://github.com/spmallick/learnopencv/tree/master/OpenPose
I tried with same code.
I would like to know, how to create the below files on my own data
pose_deploy_linevec.prototxt and pose_iter_440000.caffemodel
*Gnaneswar Rao Mantri*
*Board: +91 8885500056*
Very excellent post & blog!
Thanks, Rob.
Hello!
Can I run this program without installing the framework Caffe?
Thank you! 🙂
Yes! Only OpenCV 3.4.1 is required.
Thanks!
But it seems I cannot download the code :/
I subscribed, but anytime I try to download it, it asks me to subscribe again.
Would you mind sharing it by email?
[email protected]
I like your posts!!!! I would like to learn about Hand-Keypoints
Detection in Openpose like this post. Your
explanation is very effective for me.
You can use the getModels.sh file to download the hand model. In the code you can change the model file names and use the same code for hand keypoints detection, with very small modifications!
Yes, I am trying now. But I cannot get accurately results for hand. Do I need to train for hand? How can I do that training for hand? https://uploads.disquscdn.com/images/cacfd9cd4530b92605d9d99bbe91db86217f9fda15cdab3b44164c1036edab3a.jpg
I will shortly release a hand pose detection tutorial. Stay tuned!
Oh!!! Thank you very much Mr.Gupta. I am looking forward.
Hello,
How about hand pose estimation. I am waiting for hand pose like this.
I can run the code but the result are not correct for both COCO and MPI. Dont know where it went wrong, can anyone help me to figure out? Thanks. https://uploads.disquscdn.com/images/e668eb38a59e4b1e0cb6d89810f3d0efaf2a1185b9a5909ed8f702afb07ac862.jpg https://uploads.disquscdn.com/images/ad5531b2ab79724d84beffc1be17947282a9cab5c4d9be044696818a52a3b643.jpg
Thanks for your sharing. This web is useful.
After run the program, I am wondering how to train a model to detect other objects, for example the hand. If you may provide another tutorial on that, it would be much better. Thanks.
You can use the getModels.sh file to download the hand model. In the code you can change the model file names and use the same code for hand keypoints detection, with very small modifications!
Regarding training, it should be done using other frameworks like Tensorflow / Caffe etc. OpenCV is to be used for inference or test time only.
Sir, I have changed all the ‘pose’ to ‘hand’ in the .sh file, and I have tried to load the url into my web browser. However, they gave me 404 not found. I am not should whether the website is still available to not. Do you have any ideas?
You don’t need to change anything in the .sh file. You should make changes in the python notebook file.
The model is there at the link. You can use this link for downloading the model and this link for the prototxt file.
Now, in the code, specify the paths to the hand model and prototxt file, along with other necessary changes and run the code.
make these changes
protoFile = “hand/pose_deploy.prototxt”
weightsFile = “hand/pose_iter_102000.caffemodel”
nPoints = 22
POSE_PAIRS = [ [0,1],[1,2],[2,3],[3,4],[0,5],[5,6],[6,7],[7,8],[0,9],[9,10],[10,11],[11,12],[0,13],[13,14],[14,15],[15,16],[0,17],[17,18],[18,19],[19,20] ]
Sir, I am working on hand detection as part of my final year project for my undergraduate degree. It is really important to me. However, the model doesn’t work as well as I expect. I have more questions to ask to improve performance. May I send you emails to ask more questions?
Plz help :
Can’t open “pose/mpi/pose_iter_160000.caffemodel” in function ‘cv::dnn::ReadProtoFromBinaryFile’
CV2 version 3.4.2 – Python
Thanks in advance
Please use the script getModels.sh to download the model first. If that does not work, look inside the script to find a link to the model that you can download.
Can you check if the files are present in the folder pose/mpi?
i try to run this (Deep Learning based Human Pose Estimation using OpenCV ( C++ / Python )code in command prompt but i get this image. Please tell me why the key-points not appear in the image.
Please help me any one!!
Dear Expertee in Pose Estimation, please im requring your assistance bcos i do not know where it get wrong after following the due process of what the above article and code said and in the Readme File i change what the readed said and im using python but the out come in both single picture and video are very very bad,
please i need any body to help me out
thanks for reading my comments https://uploads.disquscdn.com/images/f515fff1dd30e5b2c2e206f872ba6ef764fccddc41c520ba45fb60f0c8a95e0e.jpg https://uploads.disquscdn.com/images/f8913090dc827d850f87ff716892669888eeecb4aab133c6dbdaf920cc229d88.jpg
And to produce this ugly pose is
time taken by network : 17.194
Total time taken : 17.506
I checked the code just now and I can confirm that I’m getting the correct output. If you can elaborate on what you have done till now, I may be able to help better.
hi vikas, how to get accuracy of this model
What accuracy are you talking about? The accuracy is best measured in terms of precision and Recall. Check this page
Please tell me, how to get accuracy of this model?
Somehow MPI misses my image’s Right elbow https://uploads.disquscdn.com/images/9ca4b3228ed0e00924fe22cdf4f97ff12cbec4964775739fb0bae03739609093.jpg
Somehow my run with Mode = MPI misses picture’s right elbow https://uploads.disquscdn.com/images/a7148ce3a9d40dc0af54e787fe51157b2c7d1a32e613647f2493692b467f5482.jpg
Can i use this project to detector fall human for aging
I did not understand your question. Please elaborate?
My project is about detecting human fall over(especially old people) so I want to adapt your code for my project but i’m not sure where should I change or adjust . Can u give a little suggestion?
Nice Project!. You dont need the skeleton for doing this. Once you get the points from Step 3.4, You can check for certain points like neck, shoulders etc. If the y coordinates of most of them look same, then that means that probably the person has fallen.
Hi this is awesome and great. I want to know that when draw skeleton according to the human pose estimation can i cover that human with solid color? if it is yes how can i do it?
Are you talking about image segmentation? We have a post on that – https://learnopencv.com/deep-learning-based-object-detection-and-instance-segmentation-using-mask-r-cnn-in-opencv-python-c/
When I tried using the code, the output video was really slow, is there any way that I can make the output video faster?
@spmallick:disqus @disqus_dqpsKEIOsm:disqus Thanks for the great tutorial. I was wondering how these coordinates are measured.I already have pose coordinates. Suppose I want to know if a person is looking down. In this case I wanted to write a condition around neck,eyes,ears co-ordinates. Is there is a reference line against which these coordinates are measured? Sorry if my question does not make any sense.
@spmallick:disqus @disqus_dqpsKEIOsm:disqus Thanks for the great tutorial. is there a way to get the actions performed in the video using the pose estimated coordinates? I am using those coordinates to detect actions like sitting,standing. But it is not that accurate. Is there a better way to do it? Thank you
can’t i use this for open cv version 3.1.0?
No, it works only for OpenCV > 3.4